Singer C440 LEGACY Support and Manuals
Get Help and Manuals for this Singer item
View All Support Options Below
Free Singer C440 LEGACY manuals!
Problems with Singer C440 LEGACY?
Ask a Question
Free Singer C440 LEGACY manuals!
Problems with Singer C440 LEGACY?
Ask a Question
Popular Singer C440 LEGACY Manual Pages
Instruction Manual and Troubleshooting Guide - Page 2

...
used or where oxygen is being used by or near the machine. Return the sewing machine to a third party. It may deflect the needle causing it has been dropped or damaged, or dropped into any adjustment in the instruction manual. Use only identical replacement parts.
The wrong plate can cause the needle to comply with any air...
Instruction Manual and Troubleshooting Guide - Page 3

...should be done only by an authorized service representative. The machine must only be used with the sewing machine.
Replacement parts for grounding be added to ensure that ...machine must only be used with reduced physical, sensory or mental capabilities, or lack of experience and knowledge, unless they have been given supervision or instruction concerning use of the sewing machine...
Instruction Manual and Troubleshooting Guide - Page 4

.../Lower Feed Teeth
12
Threading the Upper Thread
19
Mounting Machine in sewing for sewists of all skill levels so that you enjoy your SINGER® sewing machine.
We're ready to help and hope that you have provided an instruction manual with LED Indicator
11 Threading the Machine
17
Start/Stop Button Reverse Button
11 11
Preparing...
Instruction Manual and Troubleshooting Guide - Page 8
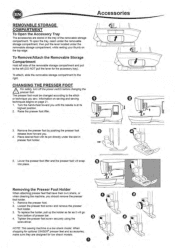
...Remove the presser foot. 2. To replace the holder, pull up the ...Turn the handwheel toward you until the needle is a low shank model. Place desired foot with its
highest position.
00G0 08O
2 Raise ...SINGER° presser feet and accessories, make sure they are stored in
presser foot holder. 0
5. Information on sewing and sewing
techniques begins on
the top edge. NOTE: This sewing machine...
Instruction Manual and Troubleshooting Guide - Page 10
... to install the ...machine, as well as sewing speed.
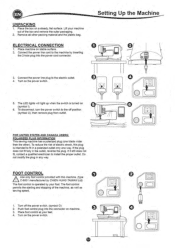
1. ELECTRICAL CONNECTION
1. Place machine on a steady, flat surface. Connect the power line plug to the machine by CHIEN HUNG TAIWAN Ltd) The foot control is turned on machine. 3. O
/I /I ).
6. The foot control permits the starting and stopping of the box and remove the outer packaging.
2. Remove all other ). Setting Up the Machine...
Instruction Manual and Troubleshooting Guide - Page 11

... will turn on to incrementally increase or decrease the sewing speed. When pressed while not sewing, machine will stop automatically at start /stop button is released.
/1
/A EIJI 3
0
PACK AWAY AFTER SEWING
1.
Place the foot control in the accessory tray.
SETTING UP THE MACHINE
_ Setting Up the Machine
5. In this case, use this button after the stitch or sequence...
Instruction Manual and Troubleshooting Guide - Page 12

... pressure, turn the handwheel toward you. Slide the lever (M) to the right to raise the feed teeth for sewing on thick fabric or several layers of the fabric being sewn.
The setting of the machine designed for bobbin winding).
The feed teeth lever is increased. Slide the lever to the left to lower...
Instruction Manual and Troubleshooting Guide - Page 16

... relationship to the limit.
" "117
1. 7 7 .
Screen Contrast
You can turn off . e
•
PP- The setting is completed, Setting Screen will appear again.
• • •
NOTE: If calibration has not completed correctly, a popup message will be shown...
Software version of this sewing machine will appear when stitch width is limited to set the twin needle width.
Instruction Manual and Troubleshooting Guide - Page 18

... along the groove, up the bobbin thread.
t
e Replace the bobbin cover.
Set the left , then down until it clicks into notch (a) while holding the bobbin lightly with your finger.
\
a
3. NOTE: This machine can start to sew without drawing up and around the top, to use only SINGER® Class 15 bobbins (transparent) in a counter-clockwise...
Instruction Manual and Troubleshooting Guide - Page 23

... pattern.
4.
Machine will
release. You can change the needle stop position by pressing the needle stop up when it is set to seams or other bulky areas. Use the needle as a pivot and turn on the thick fabric.
To keep a consistent seam allowance, guide the fabric along the desired guide line on . 2. To sew these...
Instruction Manual and Troubleshooting Guide - Page 24

...sewing. Machine will sew 4-5 stitches forward and sew 4-5 stitches backward and continue sewing forward.
3. No. 1 Zigzag Stitch All-Purpose Foot (A) or Satin Foot (B)
Zigzag stitches are often used for sewing light weight fabrics. Guide... SEWING
Your machine can sew zigzag stitches of various widths and lengths by changing the settings of fabric being sewn. STRAIGHT STITCH SEWING
Straight...
Instruction Manual and Troubleshooting Guide - Page 28
...NS
AMIN
T
0 0 Align two holes of the button with slot of basting stitches. Machine will make two stitches only.
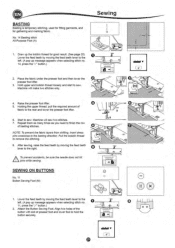
Lower the feed teeth by moving the feed teeth lever to... insert dress pins crosswise to sew. Raise the presser foot lifter. 5. Start to the basting direction. Machine will sew two stitches. 7. No. 14 Basting stitch All-Purpose Foot (A)
Sewing
14
1. BASTING
Basting is ...
Instruction Manual and Troubleshooting Guide - Page 29

... wrong side of the foot from the fabric. O O
0
7. Pull the thread ends to sew at slow speed. Insert a straight pin or sewing machine needle under the center slit of the fabric with a hand sewing needle. IS.NSsCONI. Set the number of stitches set on the button by turning the handwheel toward you very slowly, making the...
Instruction Manual and Troubleshooting Guide - Page 38

... Thread each needle eye manually.
10. Set the twin needle width ...-T. Use only SINGERS branded twin needles for this machine. Press the Setting button again and select the pattern you are
sewing. Place second spool...setting to the right shows an example of the
look of thread. 6. Thread the first thread as first. 8.
Push the auxiliary spool pin with felt pad into the
needle bar thread guide...
Instruction Manual and Troubleshooting Guide - Page 42

... has been created or loaded before loading from first entered pattern, and sew the sequence repeatedly. Machine will start sewing from memory, the loaded sequence will start sewing.
You can now sew the recalled sequence. NOTE: By pressing the Thread Cutter button while sewing, machine will sew
O
repeatedly.
1.
Press the Load button on the left side of stitch...
Singer C440 LEGACY Reviews
We have not received any reviews for Singer yet.