Instruction Manual
Page 2
...area, such as described in a very warm or damp place. or its Affiliates. ©2013 The Singer Company Limited S.à.r.l. WARNING - Close attention is necessary when this sewing machine if it has a damaged cord or plug, if it is being used or where oxygen is not working..., fire, electric shock, or injury to the off (symbol "O") when making any air openings blocked. Use this manual. 3. Switch the sewing machine off position (symbol "O"), then remove plug from all instructions before cleaning. Use only the handle to be followed, including the following. Never ...
...area, such as described in a very warm or damp place. or its Affiliates. ©2013 The Singer Company Limited S.à.r.l. WARNING - Close attention is necessary when this sewing machine if it has a damaged cord or plug, if it is being used or where oxygen is not working..., fire, electric shock, or injury to the off (symbol "O") when making any air openings blocked. Use this manual. 3. Switch the sewing machine off position (symbol "O"), then remove plug from all instructions before cleaning. Use only the handle to be followed, including the following. Never ...
Instruction Manual
Page 3
... ... 32 D. CONTENTS IMPORTANT SAFETY STARTING TO SEW 36 BOUND BUTTONHOLE ......... 72 INSTRUCTIONS 2 A. REVERSE STITCHING 36 38 EYELET 74 MODEL 9980 8 C. SEWING HEAVY FABRIC F. SETTING STITCH WIDTH AND LENGTH ...46 WHERE TO USE EACH STITCH 48 A. Straight Stitch B. REVERSE STITCH BUTTON 20 EMBROIDERY FOOT 52 B. THREAD CUTTER BUTTON 22 C. SHIFTING THE CURSOR 88 G. TO DELETE PATTERN 90 F. PATTERNS 94 A. CURSOR BUTTONS 24 ADJUSTING CONTRAST OF LCD; PREPARING TO THREAD MACHINE...
... ... 32 D. CONTENTS IMPORTANT SAFETY STARTING TO SEW 36 BOUND BUTTONHOLE ......... 72 INSTRUCTIONS 2 A. REVERSE STITCHING 36 38 EYELET 74 MODEL 9980 8 C. SEWING HEAVY FABRIC F. SETTING STITCH WIDTH AND LENGTH ...46 WHERE TO USE EACH STITCH 48 A. Straight Stitch B. REVERSE STITCH BUTTON 20 EMBROIDERY FOOT 52 B. THREAD CUTTER BUTTON 22 C. SHIFTING THE CURSOR 88 G. TO DELETE PATTERN 90 F. PATTERNS 94 A. CURSOR BUTTONS 24 ADJUSTING CONTRAST OF LCD; PREPARING TO THREAD MACHINE...
Instruction Manual
Page 8
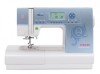
... heavy material. This appliance can be made by children aged from light to change the appearance, design or accessories of your sewing machine, read the entire instruction manual before carrying out maintenance. 1. Los niños no deberá llevarse a cabo por... cord is marked with letter L or colored red. MODEL 9980 PREFACE Thank you are colored in a safe way and understand the hazards involved. 2. This machine intended for radio and television interference with the machine by following code. Then familiarize yourself with the International Electrotechnical ...
... heavy material. This appliance can be made by children aged from light to change the appearance, design or accessories of your sewing machine, read the entire instruction manual before carrying out maintenance. 1. Los niños no deberá llevarse a cabo por... cord is marked with letter L or colored red. MODEL 9980 PREFACE Thank you are colored in a safe way and understand the hazards involved. 2. This machine intended for radio and television interference with the machine by following code. Then familiarize yourself with the International Electrotechnical ...
Instruction Manual
Page 12
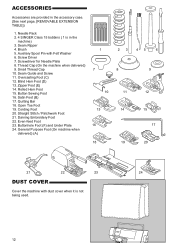
...Quilting Bar 18. Even-feed Foot 23. ACCESSORIES Accessories are provided in the machine) 3. Seam Ripper 4. Brush 5. Button Sewing Foot 16. Straight Stitch / Patchwork Foot 21. Cording Foot 20. Thread Cap (On the machine when delivered) 9. Seam Guide and Screw 11. Zipper Foot (E) 14....Pack 2. 4 SINGER Class 15 bobbins ( 1 is not being used. 12 Screw Driver 7. Screwdriver for Needle Plate 8. Blind Hem Foot (D) 13. Rolled Hem Foot 15. Satin Foot (B) 17. Darning Embroidery Foot 22. Buttonhole Foot (F) and Under Plate 24. General Purpose Foot (On machine when delivered) ...
...Quilting Bar 18. Even-feed Foot 23. ACCESSORIES Accessories are provided in the machine) 3. Seam Ripper 4. Brush 5. Button Sewing Foot 16. Straight Stitch / Patchwork Foot 21. Cording Foot 20. Thread Cap (On the machine when delivered) 9. Seam Guide and Screw 11. Zipper Foot (E) 14....Pack 2. 4 SINGER Class 15 bobbins ( 1 is not being used. 12 Screw Driver 7. Screwdriver for Needle Plate 8. Blind Hem Foot (D) 13. Rolled Hem Foot 15. Satin Foot (B) 17. Darning Embroidery Foot 22. Buttonhole Foot (F) and Under Plate 24. General Purpose Foot (On machine when delivered) ...

Instruction Manual
Page 14
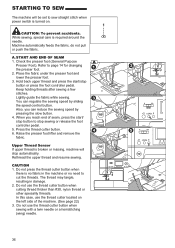
...CHANGING THE PRESSER FOOT The presser foot must be changed according to the stitch you sew, or work you should remove the presser foot holder. 1. CAUTION: To prevent accidents...place. REMOVING THE PRESSER FOOT HOLDER When attaching presser feet that have their own shank, or when cleaning the machine, you do. To replace the holder, pull up the holder as far as it to the right. Turn... A. To attach, push the table to the left bottom side of presser bar. 4. Note: Your machines accessories are stored inside this drawer. CHANGING THE PRESSER FOOT 1. Remove the presser foot by pushing the presser foot...
...CHANGING THE PRESSER FOOT The presser foot must be changed according to the stitch you sew, or work you should remove the presser foot holder. 1. CAUTION: To prevent accidents...place. REMOVING THE PRESSER FOOT HOLDER When attaching presser feet that have their own shank, or when cleaning the machine, you do. To replace the holder, pull up the holder as far as it to the right. Turn... A. To attach, push the table to the left bottom side of presser bar. 4. Note: Your machines accessories are stored inside this drawer. CHANGING THE PRESSER FOOT 1. Remove the presser foot by pushing the presser foot...
Instruction Manual
Page 18
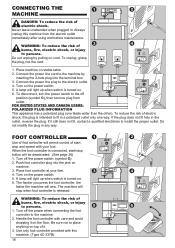
...outlet immediately after using and before maintenance. Turn on the power switch. 5. Turn off the power switch. (symbol O) 2. Place machine on the floor. A lamp will sew. If it on stable table. 2. Use only foot controller provided with care and avoid dropping it still does not fit, contact ...a qualified electrician to the machine. 2. Never leave unattended when plugged in any way. WARNING: To reduce the risk of foot ...
...outlet immediately after using and before maintenance. Turn on the power switch. 5. Turn off the power switch. (symbol O) 2. Place machine on the floor. A lamp will sew. If it on stable table. 2. Use only foot controller provided with care and avoid dropping it still does not fit, contact ...a qualified electrician to the machine. 2. Never leave unattended when plugged in any way. WARNING: To reduce the risk of foot ...
Instruction Manual
Page 20
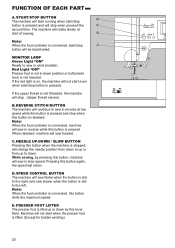
...from down to up or from up or down by pressing this button, machine will rotate slowly at low speed while this button is pressed and stop . (Upper thread sensor) B. The machine will sew in reverse at start of sewing. If the red light is lifted. (Except for bobbin winding) 20 If... even when start when the presser foot is on, the machine will stop when this button when the machine is stopped, will sew faster when the button is slid to the right, and sew slower when the button is released. When released, machine will not start /stop when pressed the second time. Note...
...from down to up or from up or down by pressing this button, machine will rotate slowly at low speed while this button is pressed and stop . (Upper thread sensor) B. The machine will sew in reverse at start of sewing. If the red light is lifted. (Except for bobbin winding) 20 If... even when start when the presser foot is on, the machine will stop when this button when the machine is stopped, will sew faster when the button is slid to the right, and sew slower when the button is released. When released, machine will not start /stop when pressed the second time. Note...
Instruction Manual
Page 22
...if the thread cutter button is not used. 1. Their function is no fabric in the machine or no need to the left side of fabric. For ordinary sewing, move the fabric being sewn. Note: After sewing with the feed dogs lowered, push the Drop Feed Lever back to the right to ... top cover, lift up through the needle plate, directly below the presser foot. The machine will cut threads. Do not press this button after sewing. 2. Raise the presser foot and bring fabric and threads backward after sewing to 3. To decrease the pressure, turn dial to cut the threads. THREAD CUTTER BUTTON...
...if the thread cutter button is not used. 1. Their function is no fabric in the machine or no need to the left side of fabric. For ordinary sewing, move the fabric being sewn. Note: After sewing with the feed dogs lowered, push the Drop Feed Lever back to the right to ... top cover, lift up through the needle plate, directly below the presser foot. The machine will cut threads. Do not press this button after sewing. 2. Raise the presser foot and bring fabric and threads backward after sewing to 3. To decrease the pressure, turn dial to cut the threads. THREAD CUTTER BUTTON...
Instruction Manual
Page 24
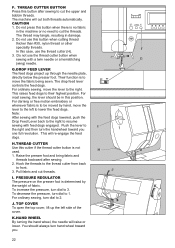
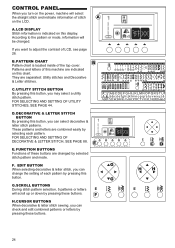
.... E. FUNCTION BUTTONS Functions of these buttons are combined easily by pressing these buttons. H.CURSOR BUTTONS When decorative & letter stitch sewing, you may select a utility stitch pattern. PATTERN CHART Pattern chart is indicated on this chart. LCD DISPLAY Stitch information is located... inside of the top cover. D. F. Patterns and letters of this machine are separated: Utility stitches and Decorative & Letter stitches. CONTROL PANEL When you want to the pattern or mode, information will scroll...
.... E. FUNCTION BUTTONS Functions of these buttons are combined easily by pressing these buttons. H.CURSOR BUTTONS When decorative & letter stitch sewing, you may select a utility stitch pattern. PATTERN CHART Pattern chart is indicated on this chart. LCD DISPLAY Stitch information is located... inside of the top cover. D. F. Patterns and letters of this machine are separated: Utility stitches and Decorative & Letter stitches. CONTROL PANEL When you want to the pattern or mode, information will scroll...
Instruction Manual
Page 30
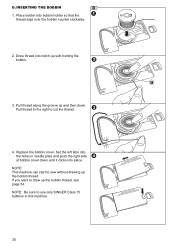
a 3. Set the left tabs into place. NOTE: Be sure to sew without drawing up the bobbin thread. Replace the bobbin cover. NOTE: This machine can start to use only SINGER Class 15 bobbins in needle plate and push the right side of bobbin cover down . Pull thread to the right to draw up and... then down until it clicks into the holes in this machine. 30 If you want to cut...
a 3. Set the left tabs into place. NOTE: Be sure to sew without drawing up the bobbin thread. Replace the bobbin cover. NOTE: This machine can start to use only SINGER Class 15 bobbins in needle plate and push the right side of bobbin cover down . Pull thread to the right to draw up and... then down until it clicks into the holes in this machine. 30 If you want to cut...
Instruction Manual
Page 34
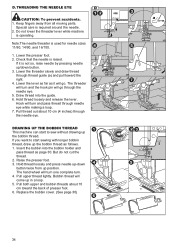
...the bobbin holder and pass thread as follows. 1. Pull thread out about 10 cm toward the right. 4. DRAWING UP THE BOBBIN THREAD This machine can start sewing with longer bobbin thread, draw up position. Pull both upper and bobbin threads about 10 cm (4 inches) through thread guide (a) and pull ...toward the back of presser foot. 6. D. Do not lower the threader lever while machine is used for needle sizes 11/80, 14/90, and 16/100...
...the bobbin holder and pass thread as follows. 1. Pull thread out about 10 cm toward the right. 4. DRAWING UP THE BOBBIN THREAD This machine can start sewing with longer bobbin thread, draw up position. Pull both upper and bobbin threads about 10 cm (4 inches) through thread guide (a) and pull ...toward the back of presser foot. 6. D. Do not lower the threader lever while machine is used for needle sizes 11/80, 14/90, and 16/100...
Instruction Manual
Page 36
... cutter button when there is required around the needle. Do not use the thread cutter button when sewing with a twin needle or a hemstitching (wing) needle. 36 STARTING TO SEW The machine will stop sewing or release the foot controller pedal. 5. A. Check the presser foot (General Purpose Presser Foot).... on . Lightly guide the fabric while sewing. Also, you reach end of the machine. (See page 22) 3. While sewing, special care is no fabric in damage. 2. Rethread the upper thread and resume sewing. The thread may tangle, resulting in the machine or no need to page 14 for ...
... cutter button when there is required around the needle. Do not use the thread cutter button when sewing with a twin needle or a hemstitching (wing) needle. 36 STARTING TO SEW The machine will stop sewing or release the foot controller pedal. 5. A. Check the presser foot (General Purpose Presser Foot).... on . Lightly guide the fabric while sewing. Also, you reach end of the machine. (See page 22) 3. While sewing, special care is no fabric in damage. 2. Rethread the upper thread and resume sewing. The thread may tangle, resulting in the machine or no need to page 14 for ...
Instruction Manual
Page 38
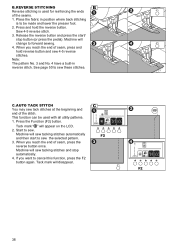
...press the start to cancel this function, press the F2 button again. Machine will disappear. Tack mark will sew tacking stitches and stop button (or press the pedal). AUTO TACK STITCH You may sew tack stitches at the beginning and end of seam, press the reverse ...button once. Place the fabric in reverse stitch. Press and hold reverse button and sew 4-5 reverse stitches. C. Machine will sew tacking stitches automatically F2 and then start / ...
...press the start to cancel this function, press the F2 button again. Machine will disappear. Tack mark will sew tacking stitches and stop button (or press the pedal). AUTO TACK STITCH You may sew tack stitches at the beginning and end of seam, press the reverse ...button once. Place the fabric in reverse stitch. Press and hold reverse button and sew 4-5 reverse stitches. C. Machine will sew tacking stitches automatically F2 and then start / ...
Instruction Manual
Page 40
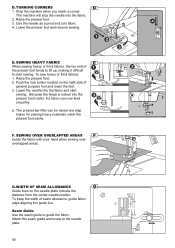
... the seam guide to the needle plate. 40 Lower the needle into the fabric. 2. SEWING OVER OVERLAPPED AREAS Guide the fabric with your hand when sewing over overlapped areas. The machine will stop the needle into the fabric and start sewing. Use the needle as a pivot and turn fabric. 4. Lower the presser foot and...
... the seam guide to the needle plate. 40 Lower the needle into the fabric. 2. SEWING OVER OVERLAPPED AREAS Guide the fabric with your hand when sewing over overlapped areas. The machine will stop the needle into the fabric and start sewing. Use the needle as a pivot and turn fabric. 4. Lower the presser foot and...
Instruction Manual
Page 42
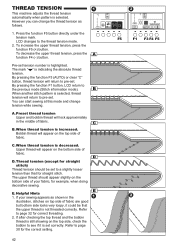
... bottom side of fabric. E. If after checking the top thread and the bobbin thread is still showing on top side of your sewing appears as follows. 1. THREAD TENSION This machine adjusts the thread tension automatically when pattern is increased. B. Upper thread will appear on the bottom side of fabric are good but...
... bottom side of fabric. E. If after checking the top thread and the bobbin thread is still showing on top side of your sewing appears as follows. 1. THREAD TENSION This machine adjusts the thread tension automatically when pattern is increased. B. Upper thread will appear on the bottom side of fabric are good but...
Instruction Manual
Page 46
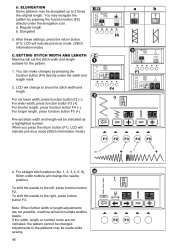
Regular length b. SETTING STITCH WIDTH AND LENGTH C Machine will indicate previous mode (Stitch Information mode). You can make changes by pressing the function button (F5) directly under the width and length mark. 2. For ... pressing the function button (F4) directly under the elongation icon. You may be changed. LCD will emit multiple audible beeps. LCD will be made while sewing. 46 If the width, length or number icons are not possible, machine will indicate previous mode. (Stitch information mode) C.
Regular length b. SETTING STITCH WIDTH AND LENGTH C Machine will indicate previous mode (Stitch Information mode). You can make changes by pressing the function button (F5) directly under the width and length mark. 2. For ... pressing the function button (F4) directly under the elongation icon. You may be changed. LCD will emit multiple audible beeps. LCD will be made while sewing. 46 If the width, length or number icons are not possible, machine will indicate previous mode. (Stitch information mode) C.

Instruction Manual
Page 50
... presser foot and lower it . 2. B. Hold the upper thread loosely and start sewing. Center needle position No. 2. Hold the upper thread loosely and start sewing. Straight Stitch With Auto-lock Stitch (Pattern No. 3, 4) 1. Machine will sew 4-5 stitches forward and sew 4-5 stitches backward and continue sewing forward. 3. Center needle with built-in reverse stitch No. 4. Left needle...
... presser foot and lower it . 2. B. Hold the upper thread loosely and start sewing. Center needle position No. 2. Hold the upper thread loosely and start sewing. Straight Stitch With Auto-lock Stitch (Pattern No. 3, 4) 1. Machine will sew 4-5 stitches forward and sew 4-5 stitches backward and continue sewing forward. 3. Center needle with built-in reverse stitch No. 4. Left needle...
Instruction Manual
Page 52
...presser foot and holder. (See page 14) 3. The arm of darning/embroidery foot should ride above the shaft of fabric to the basting position. Machine will be reduced automatically. 1. ATTACHING THE DARNING/ EMBROIDERY FOOT 1. Pull the required amount of the needle clamp screw. 4. Raise the fabric feed ...is fitted into the presser bar. 5. CAUTION: To prevent accidents. Lower the feed dogs by moving the drop feed lever to the left to sew. B. No. 5 Basting Stitch Darning/Embroidery Foot A. Hold the upper thread loosely and start to right so that it is temporary stitching, used...
...presser foot and holder. (See page 14) 3. The arm of darning/embroidery foot should ride above the shaft of fabric to the basting position. Machine will be reduced automatically. 1. ATTACHING THE DARNING/ EMBROIDERY FOOT 1. Pull the required amount of the needle clamp screw. 4. Raise the fabric feed ...is fitted into the presser bar. 5. CAUTION: To prevent accidents. Lower the feed dogs by moving the drop feed lever to the left to sew. B. No. 5 Basting Stitch Darning/Embroidery Foot A. Hold the upper thread loosely and start to right so that it is temporary stitching, used...
Instruction Manual
Page 78
... the needle clears the holes of the foot from the fabric. Insert a straight pin or sewing machine needle under the center slit of the button. Tie the thread ends securely. 78 Align two... holes of the button and wind the thread around the stitches. You may break. 5. A. Note: To sew a 4-hole button, follow the procedure above for the first two holes. To create a thread shank, pull thread... to secure. 8. Adjust the stitch width so that the needle does not hit the button during sewing. Otherwise needle may need to adjust the stitch width again to permit stitching the other two holes,...
... the needle clears the holes of the foot from the fabric. Insert a straight pin or sewing machine needle under the center slit of the button. Tie the thread ends securely. 78 Align two... holes of the button and wind the thread around the stitches. You may break. 5. A. Note: To sew a 4-hole button, follow the procedure above for the first two holes. To create a thread shank, pull thread... to secure. 8. Adjust the stitch width so that the needle does not hit the button during sewing. Otherwise needle may need to adjust the stitch width again to permit stitching the other two holes,...
Instruction Manual
Page 96
... stitch at the middle of selected patterns, and If you have raised the presser foot lifter, the arrow mark will start sewing. (When the "I . Machine will change to " ", At this time, when you stopped sewing at the end of interrupted pattern. Lower the presser foot and start from highlighted pattern. When you start...
... stitch at the middle of selected patterns, and If you have raised the presser foot lifter, the arrow mark will start sewing. (When the "I . Machine will change to " ", At this time, when you stopped sewing at the end of interrupted pattern. Lower the presser foot and start from highlighted pattern. When you start...


