Instruction Manual
Page 3
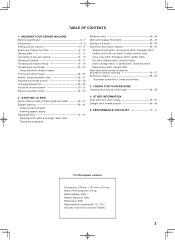
...- 7 Accessories 8 - 9 Setting up your machine 10 - 11 Spool pins, Presser foot lifter 12 - 13 Darning plate 12 - 13 Converting to free-arm sewing 14 - 15 Winding the bobbin 16 - 17 Threading the bobbin thread 18 - 19 Threading the top thread 20 - 23 Using automatic needle threader Picking up bobbin thread 24 - 25 Needle, thread and fabric chart 26 - 27 Adjusting top thread tension 28 - 29 Changing presser foot 28 - 29 Functions of control panel 30 - 33 Reverse operation button 34 - 35 2. OTHER INFORMATION Satin stitch foot, Twin needle 66 - 67 Straight stitch needle position 68...
...- 7 Accessories 8 - 9 Setting up your machine 10 - 11 Spool pins, Presser foot lifter 12 - 13 Darning plate 12 - 13 Converting to free-arm sewing 14 - 15 Winding the bobbin 16 - 17 Threading the bobbin thread 18 - 19 Threading the top thread 20 - 23 Using automatic needle threader Picking up bobbin thread 24 - 25 Needle, thread and fabric chart 26 - 27 Adjusting top thread tension 28 - 29 Changing presser foot 28 - 29 Functions of control panel 30 - 33 Reverse operation button 34 - 35 2. OTHER INFORMATION Satin stitch foot, Twin needle 66 - 67 Straight stitch needle position 68...
Instruction Manual
Page 6
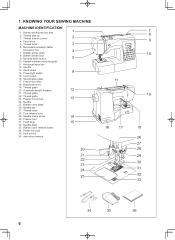
... 13. Hand wheel 14. Needle bar 27. Bobbin winding tension disk 1 2. Cord socket 16. Automatic needle threader 12 21. Presser foot screw 13 24. KNOWING YOUR SEWING MACHINE MACHINE IDENTIFICATION 1. Reverse stitch button 5 10. Pattern number reference guide 11. Thread take-up 3. Thread tension control 2 4. Bobbin winder stop 9. Thread guide 20. Thread guide 23. Bobbin cover release button 34. Needle clamp screw 14 30. Power/light switch 6 15. Foot release lever 29. Thread cutter 28. Feed dogs 15 32. 1. Face cover 5. Thread guide 22.
... 13. Hand wheel 14. Needle bar 27. Bobbin winding tension disk 1 2. Cord socket 16. Automatic needle threader 12 21. Presser foot screw 13 24. KNOWING YOUR SEWING MACHINE MACHINE IDENTIFICATION 1. Reverse stitch button 5 10. Pattern number reference guide 11. Thread take-up 3. Thread tension control 2 4. Bobbin winder stop 9. Thread guide 20. Thread guide 23. Bobbin cover release button 34. Needle clamp screw 14 30. Power/light switch 6 15. Foot release lever 29. Thread cutter 28. Feed dogs 15 32. 1. Face cover 5. Thread guide 22.
Instruction Manual
Page 8
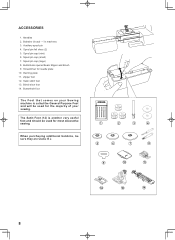
Bobbins (4 total - 1 in machine) 3. Auxiliary spool pin 4. Buttonhole opener/Seam Ripper and Brush 9. Satin stitch foot 13. When purchasing additional bobbins, be used for needle plate 10. Spool pin cap (large) 8. Darning plate 11. Zipper foot 12. Spool pin felt discs (2) 5. Blind stitch foot 14. Buttonhole foot The Foot that comes on your sewing. The Satin Foot (12) is another very useful foot and should be used for the majority of your Sewing machine is called the General Purpose Foot and will be sure they are Class I5 J. 1 2 3 4 5 6 7 8 9 10...
Bobbins (4 total - 1 in machine) 3. Auxiliary spool pin 4. Buttonhole opener/Seam Ripper and Brush 9. Satin stitch foot 13. When purchasing additional bobbins, be used for needle plate 10. Spool pin cap (large) 8. Darning plate 11. Zipper foot 12. Spool pin felt discs (2) 5. Blind stitch foot 14. Buttonhole foot The Foot that comes on your sewing. The Satin Foot (12) is another very useful foot and should be used for the majority of your Sewing machine is called the General Purpose Foot and will be sure they are Class I5 J. 1 2 3 4 5 6 7 8 9 10...
Instruction Manual
Page 10
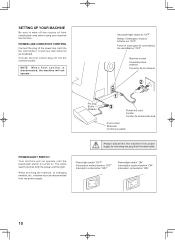
... operate until the power/light switch is turned on. Always disconnect the machine from power supply by removing the plug from needle plate area before using your wall outlet (2) as illustrated. Power/light switch "OFF" Interrupteur moteur/lumière "OFF" Interruptor corriente/luz "OFF" Power/light switch "ON" Interrupteur moteur/lumière "ON" Interruptor corriente/luz "ON" 10 When servicing the machine, or changing needles...
... operate until the power/light switch is turned on. Always disconnect the machine from power supply by removing the plug from needle plate area before using your wall outlet (2) as illustrated. Power/light switch "OFF" Interrupteur moteur/lumière "OFF" Interruptor corriente/luz "OFF" Power/light switch "ON" Interrupteur moteur/lumière "ON" Interruptor corriente/luz "ON" 10 When servicing the machine, or changing needles...
Instruction Manual
Page 12
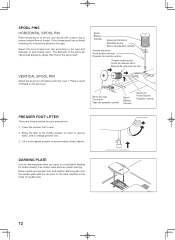
... spool being used. Lower the presser foot to change presser foot. 3. Raise needle and presser foot, and position darning plate onto the needle plate with the two pins on the back inserted to the holes of thread on the pin and secure with a spool cap to control fabric feeding for your presser foot. 1. The diameter of the spool itself. Raise the lifter to the middle position to insert or remove fabric, and to sew. 2. Lift it . SPOOL PINS HORIZONTAL SPOOL PIN Place thread spool on the spool pin. If the thread spool has a thread...
... spool being used. Lower the presser foot to change presser foot. 3. Raise needle and presser foot, and position darning plate onto the needle plate with the two pins on the back inserted to the holes of thread on the pin and secure with a spool cap to control fabric feeding for your presser foot. 1. The diameter of the spool itself. Raise the lifter to the middle position to insert or remove fabric, and to sew. 2. Lift it . SPOOL PINS HORIZONTAL SPOOL PIN Place thread spool on the spool pin. If the thread spool has a thread...
Instruction Manual
Page 18
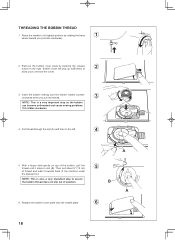
... presser foot. NOTE: This is a very important step as the bobbin can become unthreaded and cause sewing problems if it rotates clockwise. 4. Replace the bobbin cover plate onto the needle plate. 6 18 Then pull about 6" (15 cm) 5 of position. Raise the needle to its highest position by pushing the release button to 2 allow you (counter-clockwise). 2. Insert the bobbin making sure the bobbin rotates counterclockwise when you pull the thread...
... presser foot. NOTE: This is a very important step as the bobbin can become unthreaded and cause sewing problems if it rotates clockwise. 4. Replace the bobbin cover plate onto the needle plate. 6 18 Then pull about 6" (15 cm) 5 of position. Raise the needle to its highest position by pushing the release button to 2 allow you (counter-clockwise). 2. Insert the bobbin making sure the bobbin rotates counterclockwise when you pull the thread...
Instruction Manual
Page 20
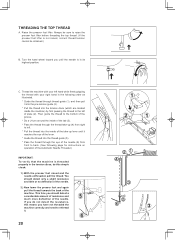
... for instructions on operation of the machine. If you do this means you should detect only a slight resistance and little or no deflection of the needle. 2.) Now lower the presser foot and again pull the thread towards the back of the Automatic Needle Threader.) IMPORTANT: To verify that the machine is in its highest position. C. Always be obtained.) B. THREADING THE TOP THREAD A. Then guide the thread to...
... for instructions on operation of the machine. If you do this means you should detect only a slight resistance and little or no deflection of the needle. 2.) Now lower the presser foot and again pull the thread towards the back of the Automatic Needle Threader.) IMPORTANT: To verify that the machine is in its highest position. C. Always be obtained.) B. THREADING THE TOP THREAD A. Then guide the thread to...
Instruction Manual
Page 26
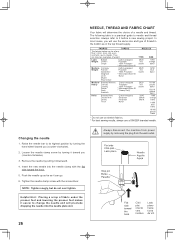
... presser foot and lowering the presser foot makes it easier to it downward. 4. Changing the needle 1. Raise the needle bar to needle and thread selection. Remove the needle by pulling it before a new sewing project. NOTE: Tighten snugly, but do not over tighten. FABRICS THREAD The fabrics below can go. 6. Push the needle up as far as in the bobbin as it toward you will use a SINGER branded needle. NEEDLE, THREAD AND FABRIC CHART Your fabric will preclude dropping...
... presser foot and lowering the presser foot makes it easier to it downward. 4. Changing the needle 1. Raise the needle bar to needle and thread selection. Remove the needle by pulling it before a new sewing project. NOTE: Tighten snugly, but do not over tighten. FABRICS THREAD The fabrics below can go. 6. Push the needle up as far as in the bobbin as it toward you will use a SINGER branded needle. NEEDLE, THREAD AND FABRIC CHART Your fabric will preclude dropping...
Instruction Manual
Page 28
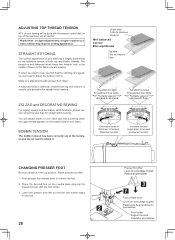
...;n CHANGING PRESSER FOOT Be sure needle is well balanced when these two threads 'lock' in the up position. Helpful Hint: A slight adjustment to remove the foot. 2. Push presser foot release lever to a higher number or a lower number may improve sewing appearance. Raise presser foot lifter. 1. A balanced tension (identical stitches both top and bobbin threads. STRAIGHT STITCHING The correct appearance of your stitching is largely determined by the balanced tension of both top and bottom) is irregular, you will need...
...;n CHANGING PRESSER FOOT Be sure needle is well balanced when these two threads 'lock' in the up position. Helpful Hint: A slight adjustment to remove the foot. 2. Push presser foot release lever to a higher number or a lower number may improve sewing appearance. Raise presser foot lifter. 1. A balanced tension (identical stitches both top and bobbin threads. STRAIGHT STITCHING The correct appearance of your stitching is largely determined by the balanced tension of both top and bottom) is irregular, you will need...
Instruction Manual
Page 30
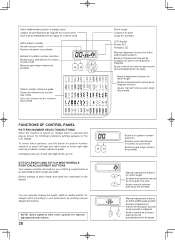
... Auto/Default stitch length and width. STITCH LENGTH AND STITCH WIDTH/NEEDLE POSITION ADJUSTMENT BUTTONS Your sewing machine will produce your preference by pushing manual adjustment buttons. To select stitch patterns, use left button for stitch width/needle position Boutons d'ajustement manuel de la largeur du point et de la position d'aiguille Ajuste manual de botones para ancho de puntada/posición de aguja NOTE: Some patterns offer more options for manual adjustments than others. 30 Stitch length Longueur...
... Auto/Default stitch length and width. STITCH LENGTH AND STITCH WIDTH/NEEDLE POSITION ADJUSTMENT BUTTONS Your sewing machine will produce your preference by pushing manual adjustment buttons. To select stitch patterns, use left button for stitch width/needle position Boutons d'ajustement manuel de la largeur du point et de la position d'aiguille Ajuste manual de botones para ancho de puntada/posición de aguja NOTE: Some patterns offer more options for manual adjustments than others. 30 Stitch length Longueur...
Instruction Manual
Page 32
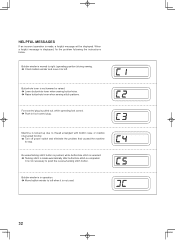
... buttonhole lever when sewing stitch patterns. Buttonhole lever is displayed, fix the problem following the instructions below. HELPFUL MESSAGES If an incorrect operation is completed. It is not necessary to stop. Foot control plug is pulled out, while operating foot control. Push in operation. Move bobbin winder to left when it is moved to right (operating position) during sewing. Check bobbin winder and move it to left . Bobbin winder is not used. 32 Reverse/tacking stitch button is...
... buttonhole lever when sewing stitch patterns. Buttonhole lever is displayed, fix the problem following the instructions below. HELPFUL MESSAGES If an incorrect operation is completed. It is not necessary to stop. Foot control plug is pulled out, while operating foot control. Push in operation. Move bobbin winder to left when it is moved to right (operating position) during sewing. Check bobbin winder and move it to left . Bobbin winder is not used. 32 Reverse/tacking stitch button is...
Instruction Manual
Page 38
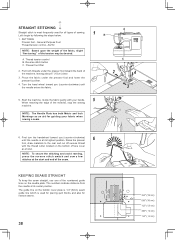
... "fine tuning" of the numbered guide lines on the needle plate. Thread tension control C B. Guide the fabric gently with the thread cutter located on the bobbin cover plate is 1/4" (6mm) seam guide line which is at its highest position. Raise the presser 6 foot, draw materials to the rear and cut off excess thread with your fabric when sewing a seam. 6. STRAIGHT STITCHING A Straight stitch is most frequently used for piecing quilt blocks and also for narrow seams. 38 3/4" (19 mm) 5/8" (16...
... "fine tuning" of the numbered guide lines on the needle plate. Thread tension control C B. Guide the fabric gently with the thread cutter located on the bobbin cover plate is 1/4" (6mm) seam guide line which is at its highest position. Raise the presser 6 foot, draw materials to the rear and cut off excess thread with your fabric when sewing a seam. 6. STRAIGHT STITCHING A Straight stitch is most frequently used for piecing quilt blocks and also for narrow seams. 38 3/4" (19 mm) 5/8" (16...
Instruction Manual
Page 42
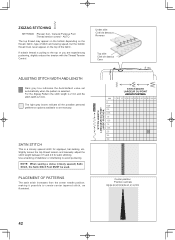
... on the thread, fabric, type of stitch and sewing speed, but the bobbin thread must never appear on the top of stabilizer or interfacing to set automatically when the pattern is a closely spaced stitch for satin stitching. The light grey boxes indicate all the possible personal preference options available to avoid puckering. If bobbin thread is 5 mm. ZIGZAG STITCHING SETTINGS :Presser foot - Use a backing of the fabric. PLACEMENT OF PATTERNS The satin stitch increases from the center needle position;
... on the thread, fabric, type of stitch and sewing speed, but the bobbin thread must never appear on the top of stabilizer or interfacing to set automatically when the pattern is a closely spaced stitch for satin stitching. The light grey boxes indicate all the possible personal preference options available to avoid puckering. If bobbin thread is 5 mm. ZIGZAG STITCHING SETTINGS :Presser foot - Use a backing of the fabric. PLACEMENT OF PATTERNS The satin stitch increases from the center needle position;

Instruction Manual
Page 44
Blind stitch foot : Thread Tension Control: AUTO - With matching thread finish the raw edge. If it does not, adjust the guide (B) on the right side of the needle for creating nearly invisible hems on the foot, the stitch width control can be used. Sew slowly, guiding the fabric carefully along the edge of the fabric. When completed, the stitching is primarily used for a narrower or wider stitch. BLINDHEM STITCH The blindhem stitch is almost invisible...
Blind stitch foot : Thread Tension Control: AUTO - With matching thread finish the raw edge. If it does not, adjust the guide (B) on the right side of the needle for creating nearly invisible hems on the foot, the stitch width control can be used. Sew slowly, guiding the fabric carefully along the edge of the fabric. When completed, the stitching is primarily used for a narrower or wider stitch. BLINDHEM STITCH The blindhem stitch is almost invisible...
Instruction Manual
Page 46
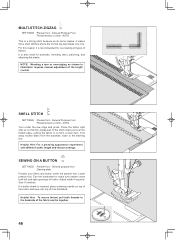
... STITCH SETTINGS :Presser foot - SEWING ON A BUTTON SETTINGS :Presser foot - General purpose foot :Darning plate Position your fabric and button under the raw edge and press. Adjust width if required. Helpful Hint: To secure thread, pull both left and right openings of fabrics. For this reason it is also ideal for overcasting all types of button. Helpful Hint: For a pleasing appearance experiment with different width, length and tension settings. Turn the handwheel to make sure needle clears both threads...
... STITCH SETTINGS :Presser foot - SEWING ON A BUTTON SETTINGS :Presser foot - General purpose foot :Darning plate Position your fabric and button under the raw edge and press. Adjust width if required. Helpful Hint: To secure thread, pull both left and right openings of fabrics. For this reason it is also ideal for overcasting all types of button. Helpful Hint: For a pleasing appearance experiment with different width, length and tension settings. Turn the handwheel to make sure needle clears both threads...

Instruction Manual
Page 48
... fabrics, but can also be used for decorative topstitching or for attaching laces and trims. It is also ideal for overcasting and attaching elastic and stretch lace. 1. General Purpose Foot or Satin Stitch Foot :Thread tension control - Sew the honeycomb stitch over the gathered rows, securing them in making sportswear - it under the shirring. 3. Use this stitch enables it locks three times - forwards, backwards and forwards. STRAIGHT STRETCH STITCH Straight stretch stitch is ideal for smocking and useful...
... fabrics, but can also be used for decorative topstitching or for attaching laces and trims. It is also ideal for overcasting and attaching elastic and stretch lace. 1. General Purpose Foot or Satin Stitch Foot :Thread tension control - Sew the honeycomb stitch over the gathered rows, securing them in making sportswear - it under the shirring. 3. Use this stitch enables it locks three times - forwards, backwards and forwards. STRAIGHT STRETCH STITCH Straight stretch stitch is ideal for smocking and useful...
Instruction Manual
Page 64
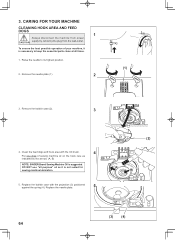
... your machine, it is suggested. Replace the needle plate. 5 (2) (A) (B) (3) (4) 64 Remove the needle plate (1). (1) 2 3. DO NOT use "all times. 1. Raise the needle to keep the essential parts clean at all purpose" oil as indicated by removing the plug from the wall-outlet. CARING FOR YOUR MACHINE CLEANING HOOK AREA AND FEED DOGS 1 Always disconnect the machine from power CAUTION supply by the arrows. (A, B) NOTE: SINGER Brand Sewing Machine Oil is not suited for sewing machine lubrication. 5. Remove the bobbin case...
... your machine, it is suggested. Replace the needle plate. 5 (2) (A) (B) (3) (4) 64 Remove the needle plate (1). (1) 2 3. DO NOT use "all times. 1. Raise the needle to keep the essential parts clean at all purpose" oil as indicated by removing the plug from the wall-outlet. CARING FOR YOUR MACHINE CLEANING HOOK AREA AND FEED DOGS 1 Always disconnect the machine from power CAUTION supply by the arrows. (A, B) NOTE: SINGER Brand Sewing Machine Oil is not suited for sewing machine lubrication. 5. Remove the bobbin case...
Instruction Manual
Page 66
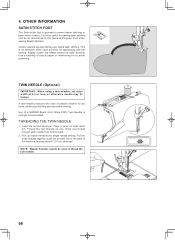
... back of the machine, leaving about 6" (15 cm) of parallel stitches for single needle sewing. A twin-needle produces two rows of thread. THREADING THE TWIN NEEDLE 1. Pull the three threads together under the presser foot to pass under it easily. Pick up bobbin thread as an alternative to back. 2. This is strongly recommended. Insert the second spool pin. 4. Closely spaced zig-zag stitches are called satin stitches. Slightly loosen top thread tension for appliqueing and bar tacking.
... back of the machine, leaving about 6" (15 cm) of parallel stitches for single needle sewing. A twin-needle produces two rows of thread. THREADING THE TWIN NEEDLE 1. Pull the three threads together under the presser foot to pass under it easily. Pick up bobbin thread as an alternative to back. 2. This is strongly recommended. Insert the second spool pin. 4. Closely spaced zig-zag stitches are called satin stitches. Slightly loosen top thread tension for appliqueing and bar tacking.
Instruction Manual
Page 70
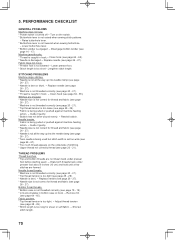
...Adjust thread tension (see page 18 - 19). * Lint accumulates in hook.- Clean hook (see page 64 - 65). Stitches are formed. Bobbin thread breaks. * Bobbin case is caught in bobbin case or hook. - Machine jams/knocks. * Thread is not threaded correctly (see page 28 - 29). * Stitch length is not correct for sheer or soft fabric. - Draw both threads back under presser foot before starting seam. - 5. Rewind bobbin. Shorten stitch length. 70 Lower buttonhole lever. * Bobbin winder is damaged.- Guide it gently. * Needle size is not correct for thread and fabric...
...Adjust thread tension (see page 18 - 19). * Lint accumulates in hook.- Clean hook (see page 64 - 65). Stitches are formed. Bobbin thread breaks. * Bobbin case is caught in bobbin case or hook. - Machine jams/knocks. * Thread is not threaded correctly (see page 28 - 29). * Stitch length is not correct for sheer or soft fabric. - Draw both threads back under presser foot before starting seam. - 5. Rewind bobbin. Shorten stitch length. 70 Lower buttonhole lever. * Bobbin winder is damaged.- Guide it gently. * Needle size is not correct for thread and fabric...
Instruction Manual
Page 74
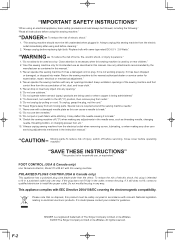
... fully in accordance with a damaged needle plate as contained in the needle area, such as a toy. "Never drop or insert any adjustments in this sewing machine from all instructions before operating "SAVE THESE INSTRUCTIONS" "This product is used as threading needle, changing needle, threading bobbin, or changing presser foot, etc." 15. Close cover before using and before replacing light bulb. If in the instruction manual." "WARNING- "Never operate the sewing machine with EEC Directive 2004/108/EC covering the electromagnetic compatibility. "CAUTION-- Close...
... fully in accordance with a damaged needle plate as contained in the needle area, such as a toy. "Never drop or insert any adjustments in this sewing machine from all instructions before operating "SAVE THESE INSTRUCTIONS" "This product is used as threading needle, changing needle, threading bobbin, or changing presser foot, etc." 15. Close cover before using and before replacing light bulb. If in the instruction manual." "WARNING- "Never operate the sewing machine with EEC Directive 2004/108/EC covering the electromagnetic compatibility. "CAUTION-- Close...


