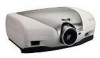
XVZ9000U Operation Manual
Page 27
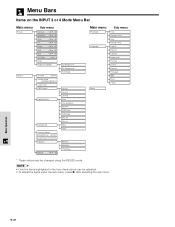
... Sharp מ30 ם30 Red Blue מ30 ם30 מ30 ם30 CLR Temp Reset מ3 ם3 Progressive Mode 2D Progressive 3D Progressive Film Mode 3D DNR [ON/OFF] Theater Mode [NORMAL/BRIGHT] Lamp Timer...
... Sharp מ30 ם30 Red Blue מ30 ם30 מ30 ם30 CLR Temp Reset מ3 ם3 Progressive Mode 2D Progressive 3D Progressive Film Mode 3D DNR [ON/OFF] Theater Mode [NORMAL/BRIGHT] Lamp Timer...
XVZ9000U Operation Manual
Page 28
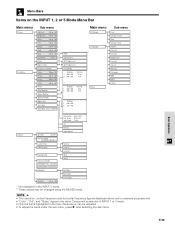
...8236;30 ם30 CLR Temp מ3 ם3 Reset Signal Type Progressive Mode Clock מ150 ם150 Phase ...72 Hz Off Normal 3D DNR * [ON/OFF] High Speed Theater Mode [NORMAL/BRIGHT] Lamp Timer Normal OSD Display Level A Level B Background Blue Economy Mode RS-232C Port [ON/OFF]... and horizontal frequency figures displayed above are for example purposes only. • "Color", "Tint", and "Sharp" appear only when Component is selected in INPUT 1 or 2 mode. • Only the items highlighted in...
...8236;30 ם30 CLR Temp מ3 ם3 Reset Signal Type Progressive Mode Clock מ150 ם150 Phase ...72 Hz Off Normal 3D DNR * [ON/OFF] High Speed Theater Mode [NORMAL/BRIGHT] Lamp Timer Normal OSD Display Level A Level B Background Blue Economy Mode RS-232C Port [ON/OFF]... and horizontal frequency figures displayed above are for example purposes only. • "Color", "Tint", and "Sharp" appear only when Component is selected in INPUT 1 or 2 mode. • Only the items highlighted in...
XVZ9000U Operation Manual
Page 48
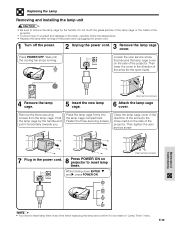
...down ENTER, " and |, press POWER ON. 1 User service screws Maintenance & Troubleshooting • You need to reset lamp timer every time when replacing the lamp and confirm it horizontally towards you. Then lower the cover in the power cord. Remove the three-securing screws ...lamp cage. 5 Insert the new lamp cage. Replacing the Lamp Removing and installing the lamp unit CAUTION • Be sure to remove the lamp cage by the handle and pull it to be reset on the side of the projector. Loosen the user service screw that secures the lamp cage cover on projector to reset lamp timer...
...down ENTER, " and |, press POWER ON. 1 User service screws Maintenance & Troubleshooting • You need to reset lamp timer every time when replacing the lamp and confirm it horizontally towards you. Then lower the cover in the power cord. Remove the three-securing screws ...lamp cage. 5 Insert the new lamp cage. Replacing the Lamp Removing and installing the lamp unit CAUTION • Be sure to remove the lamp cage by the handle and pull it to be reset on the side of the projector. Loosen the user service screw that secures the lamp cage cover on projector to reset lamp timer...

XVZ9000U Operation Manual
Page 27
... Sharp מ30 ם30 Red Blue מ30 ם30 מ30 ם30 CLR Temp Reset מ3 ם3 Progressive Mode 2D Progressive 3D Progressive Film Mode 3D DNR [ON/OFF] Theater Mode [NORMAL/BRIGHT] Lamp Timer...
... Sharp מ30 ם30 Red Blue מ30 ם30 מ30 ם30 CLR Temp Reset מ3 ם3 Progressive Mode 2D Progressive 3D Progressive Film Mode 3D DNR [ON/OFF] Theater Mode [NORMAL/BRIGHT] Lamp Timer...

XVZ9000U Operation Manual
Page 28
...;30 ם30 CLR Temp מ3 ם3 Reset Signal Type Progressive Mode Clock מ150 ם150 Phase ...72 Hz Off Normal 3D DNR * [ON/OFF] High Speed Theater Mode [NORMAL/BRIGHT] Lamp Timer Normal OSD Display Level A Level B Background Blue Economy Mode RS-232C Port [ON/OFF] ... Not displayed in the tree charts above are for example purposes only. • "Color", "Tint", and "Sharp" appear only when Component is selected in INPUT 1 or 2 mode. • Only the items highlighted in ...
...;30 ם30 CLR Temp מ3 ם3 Reset Signal Type Progressive Mode Clock מ150 ם150 Phase ...72 Hz Off Normal 3D DNR * [ON/OFF] High Speed Theater Mode [NORMAL/BRIGHT] Lamp Timer Normal OSD Display Level A Level B Background Blue Economy Mode RS-232C Port [ON/OFF] ... Not displayed in the tree charts above are for example purposes only. • "Color", "Tint", and "Sharp" appear only when Component is selected in INPUT 1 or 2 mode. • Only the items highlighted in ...

XVZ9000U Operation Manual
Page 48
... by the handle. Fasten the three-securing screws. Press POWER ON on the side of the projector. • To avoid injury to yourself and damage to reset lamp timer every time when replacing the lamp and confirm it horizontally towards you. While holding down ENTER, " and |, press POWER ON. 1 User service screws Maintenance & Troubleshooting •...
... by the handle. Fasten the three-securing screws. Press POWER ON on the side of the projector. • To avoid injury to yourself and damage to reset lamp timer every time when replacing the lamp and confirm it horizontally towards you. While holding down ENTER, " and |, press POWER ON. 1 User service screws Maintenance & Troubleshooting •...

XV-Z9000U Operation Manual
Page 27
... Sharp מ30 ם30 Red Blue מ30 ם30 מ30 ם30 CLR Temp Reset מ3 ם3 Progressive Mode 2D Progressive 3D Progressive Film Mode 3D DNR [ON/OFF] Theater Mode [NORMAL/BRIGHT] Lamp Timer...
... Sharp מ30 ם30 Red Blue מ30 ם30 מ30 ם30 CLR Temp Reset מ3 ם3 Progressive Mode 2D Progressive 3D Progressive Film Mode 3D DNR [ON/OFF] Theater Mode [NORMAL/BRIGHT] Lamp Timer...

XV-Z9000U Operation Manual
Page 28
...8236;30 ם30 CLR Temp מ3 ם3 Reset Signal Type Progressive Mode Clock מ150 ם150 Phase ...72 Hz Off Normal 3D DNR * [ON/OFF] High Speed Theater Mode [NORMAL/BRIGHT] Lamp Timer Normal OSD Display Level A Level B Background Blue Economy Mode RS-232C Port [ON/OFF]... and horizontal frequency figures displayed above are for example purposes only. • "Color", "Tint", and "Sharp" appear only when Component is selected in INPUT 1 or 2 mode. • Only the items highlighted in...
...8236;30 ם30 CLR Temp מ3 ם3 Reset Signal Type Progressive Mode Clock מ150 ם150 Phase ...72 Hz Off Normal 3D DNR * [ON/OFF] High Speed Theater Mode [NORMAL/BRIGHT] Lamp Timer Normal OSD Display Level A Level B Background Blue Economy Mode RS-232C Port [ON/OFF]... and horizontal frequency figures displayed above are for example purposes only. • "Color", "Tint", and "Sharp" appear only when Component is selected in INPUT 1 or 2 mode. • Only the items highlighted in...

XV-Z9000U Operation Manual
Page 48
... to the close mark) on projector to the open mark). 4 Remove the lamp cage. 5 Insert the new lamp cage. Close the lamp cage cover in the direction of the arrow (to reset lamp timer. Remove the lamp cage cover. Loosen the user service screw that secures the lamp cage cover on "Lamp Timer" menu. Hold the lamp cage by the handle. Then...
... to the close mark) on projector to the open mark). 4 Remove the lamp cage. 5 Insert the new lamp cage. Close the lamp cage cover in the direction of the arrow (to reset lamp timer. Remove the lamp cage cover. Loosen the user service screw that secures the lamp cage cover on "Lamp Timer" menu. Hold the lamp cage by the handle. Then...


