
Operation Manual
Page 3
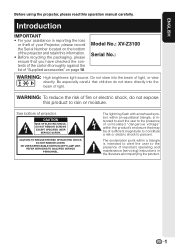
... fire or electric shock, do not stare directly into the beam of "Supplied accessories" on the bottom of the projector and retain this operation manual carefully. Be especially careful that you have checked the contents of the carton thoroughly against the.... Introduction IMPORTANT • For your Projector, please record the Serial Number located on page 10. See bottom of projector. NO USER-SERVICEABLE PARTS EXCEPT LAMP UNIT. Model No.: XV-Z3100 Serial No.: WARNING: High brightness light source. ENGLISH Before using the projector, please read this information. •...
... fire or electric shock, do not stare directly into the beam of "Supplied accessories" on the bottom of the projector and retain this operation manual carefully. Be especially careful that you have checked the contents of the carton thoroughly against the.... Introduction IMPORTANT • For your Projector, please record the Serial Number located on page 10. See bottom of projector. NO USER-SERVICEABLE PARTS EXCEPT LAMP UNIT. Model No.: XV-Z3100 Serial No.: WARNING: High brightness light source. ENGLISH Before using the projector, please read this information. •...

Operation Manual
Page 4
This SHARP projector uses a DLP® chip. Ensure the cooling fan has stopped before disconnecting the power cord. FAILURE TO OBSERVE THIS WILL RESULT IN PREMATURE LAMP FAILURE. Caution Concerning Lamp Replacement See "Replacing the Lamp" on the remote control. This unit has some ...inactive pixels within acceptable tolerances which may be regulated due to environmental considerations. PRODUCT DISPOSAL This projector utilizes tin-lead solder, and a pressurized lamp containing a small amount of the unit. 2 For disposal or recycling information, please contact your local...
This SHARP projector uses a DLP® chip. Ensure the cooling fan has stopped before disconnecting the power cord. FAILURE TO OBSERVE THIS WILL RESULT IN PREMATURE LAMP FAILURE. Caution Concerning Lamp Replacement See "Replacing the Lamp" on the remote control. This unit has some ...inactive pixels within acceptable tolerances which may be regulated due to environmental considerations. PRODUCT DISPOSAL This projector utilizes tin-lead solder, and a pressurized lamp containing a small amount of the unit. 2 For disposal or recycling information, please contact your local...
Operation Manual
Page 6
... 10 Part Names and Functions 11 Inserting the Batteries 14 Usable Range 15 Quick Start Quick Start 16 Setup Setting up the Projector 18 Setting up the Projector 18 Standard Setup (Front Projection) ....... 18 Ceiling-mount Setup 18 Projection (PRJ) Mode 19 Picture (Screen) Size and ... 43 Adjusting the Color Temperature ......... 44 Adjusting the Colors 44 Progressive 44 Reducing Image Noise (DNR 45 Switching the Iris Setting 45 Lamp Setting 45 Computer Image Adjustment ("Fine Sync" menu 46 Adjusting the Computer Image 46 Special Modes Setting 46 Auto Sync (Auto Sync ...
... 10 Part Names and Functions 11 Inserting the Batteries 14 Usable Range 15 Quick Start Quick Start 16 Setup Setting up the Projector 18 Setting up the Projector 18 Standard Setup (Front Projection) ....... 18 Ceiling-mount Setup 18 Projection (PRJ) Mode 19 Picture (Screen) Size and ... 43 Adjusting the Color Temperature ......... 44 Adjusting the Colors 44 Progressive 44 Reducing Image Noise (DNR 45 Switching the Iris Setting 45 Lamp Setting 45 Computer Image Adjustment ("Fine Sync" menu 46 Adjusting the Computer Image 46 Special Modes Setting 46 Auto Sync (Auto Sync ...

Operation Manual
Page 7
Introduction Reference Appendix Maintenance 51 Cleaning and Replacing the Dust Filters 52 Maintenance Indicators 54 Regarding the Lamp 56 Lamp 56 Caution Concerning the Lamp 56 Replacing the Lamp 56 Removing and Installing the Lamp Unit 57 Resetting the Lamp Timer 58 Connecting Pin Assignments 59 RS-232C Specifications and Command Settings 60 Computer Compatibility Chart 61 Troubleshooting 62 Specifications 64 Dimensions 65 Index 66 5
Introduction Reference Appendix Maintenance 51 Cleaning and Replacing the Dust Filters 52 Maintenance Indicators 54 Regarding the Lamp 56 Lamp 56 Caution Concerning the Lamp 56 Replacing the Lamp 56 Removing and Installing the Lamp Unit 57 Resetting the Lamp Timer 58 Connecting Pin Assignments 59 RS-232C Specifications and Command Settings 60 Computer Compatibility Chart 61 Troubleshooting 62 Specifications 64 Dimensions 65 Index 66 5
Operation Manual
Page 10
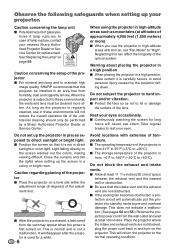
In case of the optical system. See "Replacing the Lamp" on the projector. As long as the projector is regularly cleaned, use the projector in places exposed to prevent overheat damage. Do not subject the projector to rest your nearest Sharp Authorized Projector Dealer or Service Center for replacement. I If the cooling fan becomes obstructed, a protection circuit will...
In case of the optical system. See "Replacing the Lamp" on the projector. As long as the projector is regularly cleaned, use the projector in places exposed to prevent overheat damage. Do not subject the projector to rest your nearest Sharp Authorized Projector Dealer or Service Center for replacement. I If the cooling fan becomes obstructed, a protection circuit will...

Operation Manual
Page 11
... or cooling fan operation. If the temperature continues to rise, the lamp will illuminate in damage. Info • The cooling fan regulates the internal temperature, and its performance is automatically controlled. I If the projector starts to overheat due to be connected for details. Doing so may...in internal temperature, as this can result in the lower left corner of the plastic cover. Temperature monitor function I Do not carry the projector by holding the lens. Unplug the power cord after a 90-second cooling-off the equipment to setup problems or blockage of the air vents...
... or cooling fan operation. If the temperature continues to rise, the lamp will illuminate in damage. Info • The cooling fan regulates the internal temperature, and its performance is automatically controlled. I If the projector starts to overheat due to be connected for details. Doing so may...in internal temperature, as this can result in the lower left corner of the plastic cover. Temperature monitor function I Do not carry the projector by holding the lens. Unplug the power cord after a 90-second cooling-off the equipment to setup problems or blockage of the air vents...

Operation Manual
Page 12
Please check with your country. Optional accessories I Lamp unit I DIN-D-sub RS-232C adaptor (5 57/64o (15 cm)) I 3 RCA to the wall outlet in your nearest Sharp Authorized Projector Dealer or Service Center. 10 and Singapore (6' (1.8 m)) QACCBA036WJPZ For Australia, New Zealand and Oceania (6' (1.8 m)) QACCLA018WJPZ * Use the power cord that corresponds to 15-pin D-sub...
Please check with your country. Optional accessories I Lamp unit I DIN-D-sub RS-232C adaptor (5 57/64o (15 cm)) I 3 RCA to the wall outlet in your nearest Sharp Authorized Projector Dealer or Service Center. 10 and Singapore (6' (1.8 m)) QACCBA036WJPZ For Australia, New Zealand and Oceania (6' (1.8 m)) QACCLA018WJPZ * Use the power cord that corresponds to 15-pin D-sub...

Operation Manual
Page 13
... the screen size. Front View Focus ring 30 For adjusting the focus. ENTER button For setting 41 items selected or adjusted on and putting the projector into standby mode. HEIGHT 30 ADJUST lever 54 Temperature warning indicator 29 INPUT buttons (P/R) For switching input mode 1, 2, 3, 4, 5 or 6. 41 MENU button... in this operation manual where the topic is explained. Introduction Part Names and Functions Numbers in Z refer to attach or remove. 11 Projector Top View Power indicator 28, 54 28, 54 Lamp indicator STANDBY/ON 28 button For turning the power on the menu.
... the screen size. Front View Focus ring 30 For adjusting the focus. ENTER button For setting 41 items selected or adjusted on and putting the projector into standby mode. HEIGHT 30 ADJUST lever 54 Temperature warning indicator 29 INPUT buttons (P/R) For switching input mode 1, 2, 3, 4, 5 or 6. 41 MENU button... in this operation manual where the topic is explained. Introduction Part Names and Functions Numbers in Z refer to attach or remove. 11 Projector Top View Power indicator 28, 54 28, 54 Lamp indicator STANDBY/ON 28 button For turning the power on the menu.

Operation Manual
Page 17
... a screen for easy operation. However, the effective distance of the signal may malfunction under a fluorescent lamp. When using the remote control • Ensure that you do not drop it or expose it to control the projector within the ranges shown in the illustration. Remote control sensor (front) 30° Remote control signal...
... a screen for easy operation. However, the effective distance of the signal may malfunction under a fluorescent lamp. When using the remote control • Ensure that you do not drop it or expose it to control the projector within the ranges shown in the illustration. Remote control sensor (front) 30° Remote control signal...
Operation Manual
Page 30
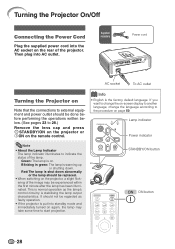
...according to start projection. Supplied accessory Power cord AC socket To AC outlet Turning the Projector on Note that the connections to indicate the status of the projector. Green: The lamp is the factory default language. This is normal operation as faulty operation. • ...If the projector is shut down . Lamp indicator Power indicator Note • About the Lamp Indicator The lamp indicator illuminates to external equipment and...
...according to start projection. Supplied accessory Power cord AC socket To AC outlet Turning the Projector on Note that the connections to indicate the status of the projector. Green: The lamp is the factory default language. This is normal operation as faulty operation. • ...If the projector is shut down . Lamp indicator Power indicator Note • About the Lamp Indicator The lamp indicator illuminates to external equipment and...
Operation Manual
Page 41
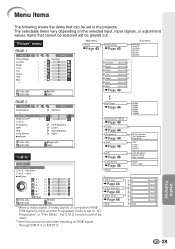
... signal, or component 480I/ 576I signal is input and the Progressive mode is set in the projector. "Picture" menu PAGE 1 Picture Picture Mode Contrast 0 Bright 0 Color 0 Tint 0 Sharp 0 Red 0 Blue 0 INPUT 1 Standard SEL./ADJ. Progressive DNR IRIS Lamp Setting Reset SEL./ADJ. RETURN 7500K 1 INPUT 1 Standard 3D Progressive Level 1 High Brightness Bright Single...
... signal, or component 480I/ 576I signal is input and the Progressive mode is set in the projector. "Picture" menu PAGE 1 Picture Picture Mode Contrast 0 Bright 0 Color 0 Tint 0 Sharp 0 Red 0 Blue 0 INPUT 1 Standard SEL./ADJ. Progressive DNR IRIS Lamp Setting Reset SEL./ADJ. RETURN 7500K 1 INPUT 1 Standard 3D Progressive Level 1 High Brightness Bright Single...

Operation Manual
Page 42
... 4. "Options1" menu Options 1 Overscan H Overscan V Subtitle OSD Display Video System Signal Type HDMI Setting Background Auto Power Off INPUT 1 0 0 0 On Auto Auto Standard Blue On Lamp Timer(Life) SEL./ADJ. sig. RETURN 40 ENTER END Main menu Fine Sync Page 46 Clock -150 +150 Page 46 Phase -30 +30 Page 46... PAL-M PAL-N PAL-60 Signal Type Page 48 *2 Auto RGB Component HDMI Setting Page 48 Background Page 48 Auto Power Off [On/Off] Page 49 Lamp Timer(Life) Page 49 Standard Enhanced Blue None PRJ Mode Page 49 RS-232C Page 50 STANDBY Mode Page 50 Fan Mode Page 50 All...
... 4. "Options1" menu Options 1 Overscan H Overscan V Subtitle OSD Display Video System Signal Type HDMI Setting Background Auto Power Off INPUT 1 0 0 0 On Auto Auto Standard Blue On Lamp Timer(Life) SEL./ADJ. sig. RETURN 40 ENTER END Main menu Fine Sync Page 46 Clock -150 +150 Page 46 Phase -30 +30 Page 46... PAL-M PAL-N PAL-60 Signal Type Page 48 *2 Auto RGB Component HDMI Setting Page 48 Background Page 48 Auto Power Off [On/Off] Page 49 Lamp Timer(Life) Page 49 Standard Enhanced Blue None PRJ Mode Page 49 RS-232C Page 50 STANDBY Mode Page 50 Fan Mode Page 50 All...
Operation Manual
Page 45
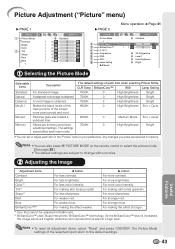
...obtained. Reduces glare and creates a subdued tone. The settings stored effect each item when selecting Picture Mode CLR Temp BrilliantColor™ IRIS Lamp Setting 7500K 0 High Brightness Bright 7500K 0 High Brightness Bright 7500K 2 High Brightness Bright 6500K 0 High Brightness Eco + Quiet 6500K 7500K...' BrilliantColor™ technology. Any changes you to change without notice. For more pronounced and vivid. For less sharpness. Red For weaker red. For making skin tones greenish. Picture Adjustment ("Picture" menu) Q PAGE 1 Picture Picture Mode Contrast Bright...
...obtained. Reduces glare and creates a subdued tone. The settings stored effect each item when selecting Picture Mode CLR Temp BrilliantColor™ IRIS Lamp Setting 7500K 0 High Brightness Bright 7500K 0 High Brightness Bright 7500K 2 High Brightness Bright 6500K 0 High Brightness Eco + Quiet 6500K 7500K...' BrilliantColor™ technology. Any changes you to change without notice. For more pronounced and vivid. For less sharpness. Red For weaker red. For making skin tones greenish. Picture Adjustment ("Picture" menu) Q PAGE 1 Picture Picture Mode Contrast Bright...

Operation Manual
Page 47
... Note • You can also use l IRIS on the remote control to "Eco+Quiet", the power consumption will decrease and the lamp life will extend. (Projection brightness decreases approximately 24%.) Useful Features 45 Selectable items Description OFF DNR does not function. High Contrast High ...+ Quiet Brightness 100% Approx. 76% Fan sound Normal Low Power consumption (When using AC 100V) 303W 234W Lamp Life Approx. 2,000 hours Approx. 3,000 hours Note • When "Lamp Setting" is given priority over high contrast. Level 1-3 Sets the DNR level for viewing a clearer picture. ages ...
... Note • You can also use l IRIS on the remote control to "Eco+Quiet", the power consumption will decrease and the lamp life will extend. (Projection brightness decreases approximately 24%.) Useful Features 45 Selectable items Description OFF DNR does not function. High Contrast High ...+ Quiet Brightness 100% Approx. 76% Fan sound Normal Low Power consumption (When using AC 100V) 303W 234W Lamp Life Approx. 2,000 hours Approx. 3,000 hours Note • When "Lamp Setting" is given priority over high contrast. Level 1-3 Sets the DNR level for viewing a clearer picture. ages ...

Operation Manual
Page 49
... appear at the screen edges. Using the "Options" Menu Options 1 1 Overscan H 1 Overscan V 2 Subtitle 3 OSD Display 4 Video System 5 Signal Type 6 HDMI Setting 7 Background 8 Auto Power Off 9 Lamp Timer(Life) SEL./ADJ. The image is enlarged by adjusting the vertical size of the Display (Subtitle Setting) With this happens, set the display area...
... appear at the screen edges. Using the "Options" Menu Options 1 1 Overscan H 1 Overscan V 2 Subtitle 3 OSD Display 4 Video System 5 Signal Type 6 HDMI Setting 7 Background 8 Auto Power Off 9 Lamp Timer(Life) SEL./ADJ. The image is enlarged by adjusting the vertical size of the Display (Subtitle Setting) With this happens, set the display area...

Operation Manual
Page 51
...) Reversed and inverted image (Projected with a mirror) See page 19 for more than 15 minutes, the projector will automatically enter standby mode. Useful Features 49 will be changed when the remaining lamp life becomes 5%. • The lamp life may vary depending on the usage condition. Note • It is set to "On", 5 minutes...
...) Reversed and inverted image (Projected with a mirror) See page 19 for more than 15 minutes, the projector will automatically enter standby mode. Useful Features 49 will be changed when the remaining lamp life becomes 5%. • The lamp life may vary depending on the usage condition. Note • It is set to "On", 5 minutes...

Operation Manual
Page 52
Language Standard Eco The RS-232C function is activated even if the projector is in standby mode. Special Modes • "Options1" menu - Lamp Timer (Life) - English Deutsch Español Nederlands Français Italiano Svenska Português 50 Selectable items Description 9600bps Transmission speed is rapid. 4 Fan ...
Language Standard Eco The RS-232C function is activated even if the projector is in standby mode. Special Modes • "Options1" menu - Lamp Timer (Life) - English Deutsch Español Nederlands Français Italiano Svenska Português 50 Selectable items Description 9600bps Transmission speed is rapid. 4 Fan ...

Operation Manual
Page 56
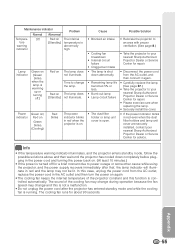
... problem occurs, either the temperature warning indicator or the lamp indicator will illuminate red, and the projector will enter standby mode. If the temperature keeps on rising, the lamp will turn off and then the projector will automatically enter standby mode. tor will be changed... Normal (Power on . I The warning lights (power indicator, lamp indicator and temperature warning indicator) on the projector indicate problems inside the projector increases, due to be displayed on page 55. About the lamp indicator I If you perform the measures described on the screen. ...
... problem occurs, either the temperature warning indicator or the lamp indicator will illuminate red, and the projector will enter standby mode. If the temperature keeps on rising, the lamp will turn off and then the projector will automatically enter standby mode. tor will be changed... Normal (Power on . I The warning lights (power indicator, lamp indicator and temperature warning indicator) on the projector indicate problems inside the projector increases, due to be displayed on page 55. About the lamp indicator I If you perform the measures described on the screen. ...
Operation Manual
Page 57
... entered standby mode and while the cooling fan is warming up or turning off for a brief moment due to your nearest Sharp Authorized Projector Dealer or Service Center for repair. • Please exercise care when replacing the lamp. • Securely install the cover. • If the power indicator blinks in red and the...
... entered standby mode and while the cooling fan is warming up or turning off for a brief moment due to your nearest Sharp Authorized Projector Dealer or Service Center for repair. • Please exercise care when replacing the lamp. • Securely install the cover. • If the power indicator blinks in red and the...

Operation Manual
Page 58
... important to be vented into the room from the projector right after replacement, take your projector to the nearest Sharp Authorized Projector Dealer or Service Center for repair. 56 Lamp failure can be checked with a new one immediately, even if the lamp appears to note that the lamp (sold separately) be attributed to numerous sources such as...
... important to be vented into the room from the projector right after replacement, take your projector to the nearest Sharp Authorized Projector Dealer or Service Center for repair. 56 Lamp failure can be checked with a new one immediately, even if the lamp appears to note that the lamp (sold separately) be attributed to numerous sources such as...

