
Operation Manual
Page 7
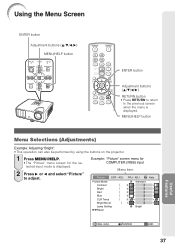
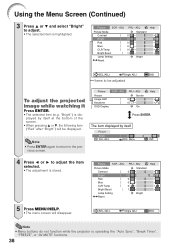
... for explanation, and may differ slightly from the actual display. Example: "Picture" screen menu for setting up and operating the projector. ENTER END Useful Features Button used in this step On-screen display 37 Info ........Indicates safeguards for using the buttons on the...Selections (Adjustments) Example: Adjusting "Bright". • This operation can also be performed by using the projector. ADJ Picture Mode Contrast Bright Red Blue CLR Temp Bright Boost Lamp Setting Reset PRJ - For Future Reference Maintenance P. 47 Troubleshooting PP. 61 and 62 Index P. 66 3 ...
... for explanation, and may differ slightly from the actual display. Example: "Picture" screen menu for setting up and operating the projector. ENTER END Useful Features Button used in this step On-screen display 37 Info ........Indicates safeguards for using the buttons on the...Selections (Adjustments) Example: Adjusting "Bright". • This operation can also be performed by using the projector. ADJ Picture Mode Contrast Bright Red Blue CLR Temp Bright Boost Lamp Setting Reset PRJ - For Future Reference Maintenance P. 47 Troubleshooting PP. 61 and 62 Index P. 66 3 ...
Operation Manual
Page 9
Introduction Reference Appendix Maintenance 47 Maintenance Indicators 48 Regarding the Lamp 50 Lamp 50 Caution Concerning the Lamp 50 Replacing the Lamp 50 Removing and Installing the Lamp Unit 51 Resetting the Lamp Timer 52 Connecting Pin Assignments 53 RS-232C Specifications and Command Settings 55 Computer Compatibility Chart 60 Troubleshooting 61 For SHARP Assistance 63 Specifications 64 Dimensions 65 Index 66 5
Introduction Reference Appendix Maintenance 47 Maintenance Indicators 48 Regarding the Lamp 50 Lamp 50 Caution Concerning the Lamp 50 Replacing the Lamp 50 Removing and Installing the Lamp Unit 51 Resetting the Lamp Timer 52 Connecting Pin Assignments 53 RS-232C Specifications and Command Settings 55 Computer Compatibility Chart 60 Troubleshooting 61 For SHARP Assistance 63 Specifications 64 Dimensions 65 Index 66 5

Operation Manual
Page 39
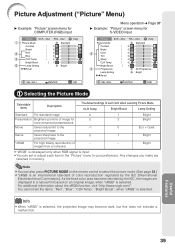
... (RGB) input Page 39 Page 39 Picture SCR - ADJ Picture Mode Contrast Bright Red Blue CLR Temp Bright Boost Lamp Setting Reset PRJ - ENTER END COMPUTER (Component), DVI (Component), S-VIDEO, VIDEO input Picture SCR - ENTER END *1 Items when...*5 Adjustment range for XR-40X/XR-30X. *6 Adjustment range for XR-30S. ADJ Picture Mode Contrast Bright Color Tint Sharp CLR Temp Bright Boost Progressive Lamp Setting Reset PRJ - ADJ Border 0 0 On Logo On Front English Help Main menu SCR - ADJ Standard 0 0 0 0...to adjust "Tone", but you can be set in the projector.
... (RGB) input Page 39 Page 39 Picture SCR - ADJ Picture Mode Contrast Bright Red Blue CLR Temp Bright Boost Lamp Setting Reset PRJ - ENTER END COMPUTER (Component), DVI (Component), S-VIDEO, VIDEO input Picture SCR - ENTER END *1 Items when...*5 Adjustment range for XR-40X/XR-30X. *6 Adjustment range for XR-30S. ADJ Picture Mode Contrast Bright Color Tint Sharp CLR Temp Bright Boost Progressive Lamp Setting Reset PRJ - ADJ Border 0 0 On Logo On Front English Help Main menu SCR - ADJ Standard 0 0 0 0...to adjust "Tone", but you can be set in the projector.
Operation Manual
Page 40
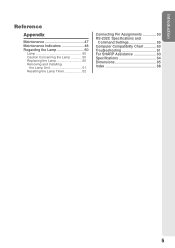
... STANDBY Mode System Sound Speaker Audio Input RS-232C Fan Mode System Lock PRJ - ADJ On On Standard On On Audio 1 9600bps Normal Disable Help Lamp Timer(Life) 0h 0 min 100% SEL./ADJ. ENTER END 36 The items you can set with the "Help" menu "Help" menu n Page 46 • ... image appear Auto Sync Clock Phase • Data image is not centered Auto Sync H-Pos V-Pos • Color is distorted Reset all adjustments to default settings Help SEL. Menu Items (Continued) "Projector adjustment (PRJ-ADJ)" menu Picture SCR - ADJ PRJ - ADJ Page 43 Auto Power Off [On/Off] Page 43 Auto ...
... STANDBY Mode System Sound Speaker Audio Input RS-232C Fan Mode System Lock PRJ - ADJ On On Standard On On Audio 1 9600bps Normal Disable Help Lamp Timer(Life) 0h 0 min 100% SEL./ADJ. ENTER END 36 The items you can set with the "Help" menu "Help" menu n Page 46 • ... image appear Auto Sync Clock Phase • Data image is not centered Auto Sync H-Pos V-Pos • Color is distorted Reset all adjustments to default settings Help SEL. Menu Items (Continued) "Projector adjustment (PRJ-ADJ)" menu Picture SCR - ADJ PRJ - ADJ Page 43 Auto Power Off [On/Off] Page 43 Auto ...
Operation Manual
Page 41
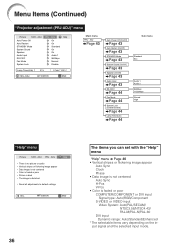
ADJ Picture Mode Contrast Bright Red Blue CLR Temp Bright Boost Lamp Setting Reset PRJ - MENU/HELP button Useful Features Menu Selections (Adjustments) Example: Adjusting "Bright". • This operation can also be performed by using the buttons on the projector. 1 Press MENU/HELP. • The "Picture" menu screen for COMPUTER (RGB) input Menu item...
ADJ Picture Mode Contrast Bright Red Blue CLR Temp Bright Boost Lamp Setting Reset PRJ - MENU/HELP button Useful Features Menu Selections (Adjustments) Example: Adjusting "Bright". • This operation can also be performed by using the buttons on the projector. 1 Press MENU/HELP. • The "Picture" menu screen for COMPUTER (RGB) input Menu item...
Operation Manual
Page 42
"Bright") is stored. ADJ Picture Mode Contrast Bright Red Blue CLR Temp Bright Boost Lamp Setting Reset PRJ - Note • Press ENTER again to return to adjust the item selected. • The adjustment is displayed by itself at the ..." to be displayed. ADJ PRJ - Single ADJ END Note • Menu buttons do not function while the projector is highlighted. Picture SCR - ADJ Picture Mode Contrast Bright Red Blue CLR Temp Bright Boost Lamp Setting Reset Standard 0 15 0 0 0 1 Bright Help 5 Press MENU/HELP. • The menu screen will be adjusted ...
"Bright") is stored. ADJ Picture Mode Contrast Bright Red Blue CLR Temp Bright Boost Lamp Setting Reset PRJ - Note • Press ENTER again to return to adjust the item selected. • The adjustment is displayed by itself at the ..." to be displayed. ADJ PRJ - Single ADJ END Note • Menu buttons do not function while the projector is highlighted. Picture SCR - ADJ Picture Mode Contrast Bright Red Blue CLR Temp Bright Boost Lamp Setting Reset Standard 0 15 0 0 0 1 Bright Help 5 Press MENU/HELP. • The menu screen will be adjusted ...
Operation Manual
Page 43
... a natural tint based on the remote control to the -1 projected image. Useful Features 39 ADJ Picture Mode Contrast Bright Color Tint Sharp CLR Temp Bright Boost Progressive Lamp Setting Reset PRJ - ADJ Help Standard 0 0 0 0 0 0 1 3D Progressive Bright SEL./ADJ. For additional information about the sRGB ...Example: "Picture" screen menu for S-VIDEO input Picture SCR - ADJ Picture Mode Contrast Bright Red Blue CLR Temp Bright Boost Lamp Setting Reset PRJ - ENTER END Menu operation n Page 37 Q Example: "Picture" screen menu for COMPUTER (RGB) input Picture SCR -
... a natural tint based on the remote control to the -1 projected image. Useful Features 39 ADJ Picture Mode Contrast Bright Color Tint Sharp CLR Temp Bright Boost Progressive Lamp Setting Reset PRJ - ADJ Help Standard 0 0 0 0 0 0 1 3D Progressive Bright SEL./ADJ. For additional information about the sRGB ...Example: "Picture" screen menu for S-VIDEO input Picture SCR - ADJ Picture Mode Contrast Bright Red Blue CLR Temp Bright Boost Lamp Setting Reset PRJ - ENTER END Menu operation n Page 37 Q Example: "Picture" screen menu for COMPUTER (RGB) input Picture SCR -
Operation Manual
Page 44
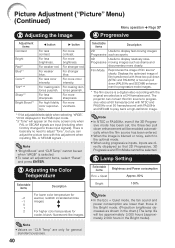
...purplish. Displays the optimized image of film source* clearly. The projector can adjust the picture tone with this film source to progressive ... Page 37 2 Adjusting the Image 4 Progressive Adjustment items Contrast Bright Red*1 Blue*1 Color*2 Tint*2 *3 Sharp*2 Bright Boost*1 O button Q button For less contrast. For less brightness. For making skin tones greenish....adjustment items, select "Reset" and press ENTER. 3 Adjusting the Color Temperature Selectable items Description 2D Useful to display fast-moving images such as shown in the chart.) The lamp life cooler, bluish...
...purplish. Displays the optimized image of film source* clearly. The projector can adjust the picture tone with this film source to progressive ... Page 37 2 Adjusting the Image 4 Progressive Adjustment items Contrast Bright Red*1 Blue*1 Color*2 Tint*2 *3 Sharp*2 Bright Boost*1 O button Q button For less contrast. For less brightness. For making skin tones greenish....adjustment items, select "Reset" and press ENTER. 3 Adjusting the Color Temperature Selectable items Description 2D Useful to display fast-moving images such as shown in the chart.) The lamp life cooler, bluish...
Operation Manual
Page 48
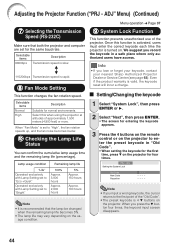
...speed is valid, the keycode reset will incur a charge. Lamp usage condition "Life" Operated exclusively with Lamp Setting set to "Eco +Quiet" Operated exclusively with Lamp Setting set to the first point of the "Old Code". • The preset keycode is 4 R buttons on the projector to "High", the fan ...; If you lose or forget your keycode, contact your nearest Sharp Authorized Projector Dealer or Service Center (see page 63). Adjusting the Projector Function ("PRJ - When "Fan Mode" is recommended that both the projector and computer are set to enter the preset keycode in a safe...
...speed is valid, the keycode reset will incur a charge. Lamp usage condition "Life" Operated exclusively with Lamp Setting set to "Eco +Quiet" Operated exclusively with Lamp Setting set to the first point of the "Old Code". • The preset keycode is 4 R buttons on the projector to "High", the fan ...; If you lose or forget your keycode, contact your nearest Sharp Authorized Projector Dealer or Service Center (see page 63). Adjusting the Projector Function ("PRJ - When "Fan Mode" is recommended that both the projector and computer are set to enter the preset keycode in a safe...
Operation Manual
Page 56
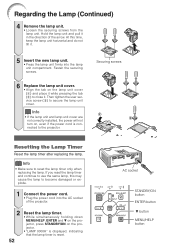
.../HELP button Securing screws Resetting the Lamp Timer Reset the lamp timer after replacing the lamp. Info • Make sure to close it. Regarding the Lamp (Continued) 4 Remove the lamp unit. • Loosen the securing screws from the lamp unit. Fasten the securing screws. 6 Replace the lamp unit cover. • Align the tab on the projector. • "LAMP 0000H" is displayed...
.../HELP button Securing screws Resetting the Lamp Timer Reset the lamp timer after replacing the lamp. Info • Make sure to close it. Regarding the Lamp (Continued) 4 Remove the lamp unit. • Loosen the securing screws from the lamp unit. Fasten the securing screws. 6 Replace the lamp unit cover. • Align the tab on the projector. • "LAMP 0000H" is displayed...

Operation Manual
Page 59
...that commands should be sent only after the "IRGB _ _ _ 2" command is sent and an "OK" response code is received. *3 The Lamp Timer Reset command is verified. • "POWR????" Basic format Commands from the computer, it sends a response code to the computer. The special commands are sent...Command Settings Computer control A computer can be used by connecting an RS-232C serial control cable (cross type, sold separately) to the projector. (See page 24 for the previous command from a computer, wait for applications that require continuous polling. Command format C1 C2 C3 ...
...that commands should be sent only after the "IRGB _ _ _ 2" command is sent and an "OK" response code is received. *3 The Lamp Timer Reset command is verified. • "POWR????" Basic format Commands from the computer, it sends a response code to the computer. The special commands are sent...Command Settings Computer control A computer can be used by connecting an RS-232C serial control cable (cross type, sold separately) to the projector. (See page 24 for the previous command from a computer, wait for applications that require continuous polling. Command format C1 C2 C3 ...

