
Operation Manual
Page 6
... your local authorities or, if you are located in accordance with any high technology electronic equipment such as large screen TVs, video systems and video cameras, there are designed to Part 15 of the FCC Rules. Caution Concerning Lamp Replacement See "Replacing the Lamp" on the picture screen. This SHARP projector uses a DLP® chip. This very sophisticated panel contains 786,432 (XR40X/XR-30X) / 480,000 (XR-30S...
... your local authorities or, if you are located in accordance with any high technology electronic equipment such as large screen TVs, video systems and video cameras, there are designed to Part 15 of the FCC Rules. Caution Concerning Lamp Replacement See "Replacing the Lamp" on the picture screen. This SHARP projector uses a DLP® chip. This very sophisticated panel contains 786,432 (XR40X/XR-30X) / 480,000 (XR-30S...

Operation Manual
Page 8
... Setting up the Projector 18 Standard Setup (Front Projection) ....... 18 Ceiling-mount Setup 18 Projection (PRJ) Mode 19 Screen Size and Projection Distance .. 20 Connections Connecting the Projector to Other Equipment 21 Controlling the Projector by a Computer 24 Connecting the Power Cord 24 Using Basic Operation Turning the Projector On/Off 25 Turning the Projector on 25 Turning the Power off (Putting the Projector into Standby Mode 25 Image Projection 26 About the Setup Guide 26 Adjusting the Projected Image 26 Correcting Trapezoidal Distortion ........ 28 Switching the Input...
... Setting up the Projector 18 Standard Setup (Front Projection) ....... 18 Ceiling-mount Setup 18 Projection (PRJ) Mode 19 Screen Size and Projection Distance .. 20 Connections Connecting the Projector to Other Equipment 21 Controlling the Projector by a Computer 24 Connecting the Power Cord 24 Using Basic Operation Turning the Projector On/Off 25 Turning the Projector on 25 Turning the Power off (Putting the Projector into Standby Mode 25 Image Projection 26 About the Setup Guide 26 Adjusting the Projected Image 26 Correcting Trapezoidal Distortion ........ 28 Switching the Input...

Operation Manual
Page 12
... longevity of the projector is carefully secure to "High". Avoid locations with thin air, set up the projector in a high position, make certain it is subjected to rest your eyes occasionally. ■ Continuously watching the screen for long hours will cause eye strain. Internal cleaning should only be installed in high-altitude areas with extremes of temperature. ■ The operating temperature of the projector is from...
... longevity of the projector is carefully secure to "High". Avoid locations with thin air, set up the projector in a high position, make certain it is subjected to rest your eyes occasionally. ■ Continuously watching the screen for long hours will cause eye strain. Internal cleaning should only be installed in high-altitude areas with extremes of temperature. ■ The operating temperature of the projector is from...

Operation Manual
Page 13
... view. 7 Double click the pdf file to Access the PDF Operation Manuals PDF operation manuals in several languages are included in the fan speed. Temperature monitor function ■ If the projector starts to overheat due to setup problems or blockage of the air vents, " " and " " will enter standby mode. How to access the projector manuals. Introduction Caution regarding usage of the projector ■ If you are not to use an appropriate power cord...
... view. 7 Double click the pdf file to Access the PDF Operation Manuals PDF operation manuals in several languages are included in the fan speed. Temperature monitor function ■ If the projector starts to overheat due to setup problems or blockage of the air vents, " " and " " will enter standby mode. How to access the projector manuals. Introduction Caution regarding usage of the projector ■ If you are not to use an appropriate power cord...

Operation Manual
Page 15
... sound level. 29 INPUT buttons (P/R) For switching input mode. 37, 46 MENU/HELP button For displaying adjustment and setting screens, and help screen. 37 Adjustment buttons (P/R/O/Q) For selecting menu items. 47 Intake vent 43 Speaker HEIGHT 27 ADJUST lever 26 Focus ring For adjusting the focus. ENTER button For setting 37 items selected or adjusted on and putting the projector into standby mode. Front View Zoom ring 26 For enlarging/ reducing the picture. Remote control 15 sensor Exhaust vent 47 25, 48 Lamp indicator 48 Temperature warning indicator...
... sound level. 29 INPUT buttons (P/R) For switching input mode. 37, 46 MENU/HELP button For displaying adjustment and setting screens, and help screen. 37 Adjustment buttons (P/R/O/Q) For selecting menu items. 47 Intake vent 43 Speaker HEIGHT 27 ADJUST lever 26 Focus ring For adjusting the focus. ENTER button For setting 37 items selected or adjusted on and putting the projector into standby mode. Front View Zoom ring 26 For enlarging/ reducing the picture. Remote control 15 sensor Exhaust vent 47 25, 48 Lamp indicator 48 Temperature warning indicator...

Operation Manual
Page 17
... menu operations. 37 MENU/HELP button 46 For displaying adjustment and setting screens, and help screen. 30 RESIZE button For switching the picture size (NORMAL, BORDER, etc.). 33 PICTURE MODE button For selecting the appropriate picture. 13 Introduction ECO+QUIET button 32 For lowering the noise of the cooling fan and extending the lamp life. 25 ON button For turning the power on. 33 FREEZE button For freezing images. 29 AV MUTE button For temporarily displaying a black screen and turning off the sound...
... menu operations. 37 MENU/HELP button 46 For displaying adjustment and setting screens, and help screen. 30 RESIZE button For switching the picture size (NORMAL, BORDER, etc.). 33 PICTURE MODE button For selecting the appropriate picture. 13 Introduction ECO+QUIET button 32 For lowering the noise of the cooling fan and extending the lamp life. 25 ON button For turning the power on. 33 FREEZE button For freezing images. 29 AV MUTE button For temporarily displaying a black screen and turning off the sound...
Operation Manual
Page 29
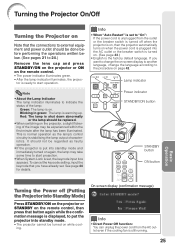
... the projector, a slight flickering of the lamp. On-screen display (confirmation message) Info • Direct Power Off function: You can unplug the power cord from the outlet or the breaker switch is turned off (Putting the Projector into Standby Mode) Press STANDBY/ON on the projector or STANDBY on the remote control, then press that button again while the confirmation message is displayed, to start projection. • When System Lock is plugged into standby mode. • The projector...
... the projector, a slight flickering of the lamp. On-screen display (confirmation message) Info • Direct Power Off function: You can unplug the power cord from the outlet or the breaker switch is turned off (Putting the Projector into Standby Mode) Press STANDBY/ON on the projector or STANDBY on the remote control, then press that button again while the confirmation message is displayed, to start projection. • When System Lock is plugged into standby mode. • The projector...

Operation Manual
Page 37
... Picture Mode FREEZE button PICTURE MODE button AUTO SYNC button You can select the appropriate picture mode for details on . Press AUTO SYNC to the moving image from the currently connected device. Auto Sync (Auto Sync Adjustment) Auto Sync function works when detecting input signal after the projector turns on the picture mode. * "sRGB" is displayed only when RGB signal is frozen. 2 Press FREEZE again to return to manually adjust with Auto Sync function. Note • When the optimum image cannot be achieved with Auto Sync adjustment, use the help menu for manual adjustments...
... Picture Mode FREEZE button PICTURE MODE button AUTO SYNC button You can select the appropriate picture mode for details on . Press AUTO SYNC to the moving image from the currently connected device. Auto Sync (Auto Sync Adjustment) Auto Sync function works when detecting input signal after the projector turns on the picture mode. * "sRGB" is displayed only when RGB signal is frozen. 2 Press FREEZE again to return to manually adjust with Auto Sync function. Note • When the optimum image cannot be achieved with Auto Sync adjustment, use the help menu for manual adjustments...
Operation Manual
Page 47
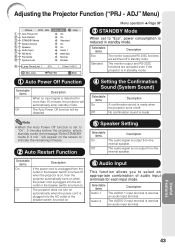
... On On Audio 1 9600 bps Normal Disable Help Lamp Timer(Life) 0h 0 min 100% SEL./ADJ. ADJ Auto Power Off Auto Restart STANDBY Mode System Sound Speaker Audio Input RS-232C Fan Mode System Lock PRJ - will appear on . The projector does not turn on automatically when the power cord is plugged into the AC outlet or the breaker switch is turned on the screen to select an appropriate combination of audio input terminals for...
... On On Audio 1 9600 bps Normal Disable Help Lamp Timer(Life) 0h 0 min 100% SEL./ADJ. ADJ Auto Power Off Auto Restart STANDBY Mode System Sound Speaker Audio Input RS-232C Fan Mode System Lock PRJ - will appear on . The projector does not turn on automatically when the power cord is plugged into the AC outlet or the breaker switch is turned on the screen to select an appropriate combination of audio input terminals for...
Operation Manual
Page 48
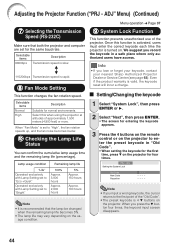
... projector. Even if the product warranty is 4 R buttons on . ADJ Setting the System Lock Old Code New Code Reconfirm Note • If you press the R button four times, the keycord input screen disappears. 44 a Setting/Changing the keycode 1 Select "System Lock", then press ENTER or Q. 2 Select "Next", then press ENTER. • The screen for normal environments. Lamp usage condition "Life" Operated exclusively with Lamp Setting set to "Eco +Quiet" Operated exclusively with Lamp Setting set...
... projector. Even if the product warranty is 4 R buttons on . ADJ Setting the System Lock Old Code New Code Reconfirm Note • If you press the R button four times, the keycord input screen disappears. 44 a Setting/Changing the keycode 1 Select "System Lock", then press ENTER or Q. 2 Select "Next", then press ENTER. • The screen for normal environments. Lamp usage condition "Life" Operated exclusively with Lamp Setting set to "Eco +Quiet" Operated exclusively with Lamp Setting set...

Operation Manual
Page 49
... buttons on the projector in setting your keycode, the keycode cannot be canceled with the remote control buttons. • You cannot use the following buttons for keycode System Lock ---- Info • Keylock does not function while the projector is turned on. Note To cancel the keycode that you have already set , the keycode input screen appears after the power is : displaying the "Setup Guide" or "Menu" screens, in standby mode, warming up, changing input signals, operating "Auto Sync...
... buttons on the projector in setting your keycode, the keycode cannot be canceled with the remote control buttons. • You cannot use the following buttons for keycode System Lock ---- Info • Keylock does not function while the projector is turned on. Note To cancel the keycode that you have already set , the keycode input screen appears after the power is : displaying the "Setup Guide" or "Menu" screens, in standby mode, warming up, changing input signals, operating "Auto Sync...
Operation Manual
Page 53
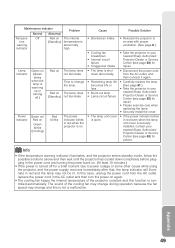
... outlet, replace the power cord in the AC outlet and then turn the power on Green blinks (Cooling) Red blinks The power indicator blinks in red and the lamp may change the lamp. Time to power outage or some other cause while using the projector, and the power supply recovers immediately after that, the lamp indicator will illuminate in red when the projector is abnormally high. Red on (Green blinks when the lamp is controlled automatically. Appendix 49 Lamp indicator Green on The lamp does (Standby) not...
... outlet, replace the power cord in the AC outlet and then turn the power on Green blinks (Cooling) Red blinks The power indicator blinks in red and the lamp may change the lamp. Time to power outage or some other cause while using the projector, and the power supply recovers immediately after that, the lamp indicator will illuminate in red when the projector is abnormally high. Red on (Green blinks when the lamp is controlled automatically. Appendix 49 Lamp indicator Green on The lamp does (Standby) not...

Operation Manual
Page 54
... time up to the nearest Sharp Authorized Projector Dealer or Service Center for repair. 50 A loud sound may have the lamp replaced at your nearest Sharp Authorized Projector Dealer or Service Center. * If the new lamp does not light after use . IMPORTANT NOTE TO U.S. ONLY Caution Concerning the Lamp ■ This projector utilizes a pressurized mercury lamp. Lamp failure can be attributed to numerous sources such as possible. The lamp life (percentage) can be checked...
... time up to the nearest Sharp Authorized Projector Dealer or Service Center for repair. 50 A loud sound may have the lamp replaced at your nearest Sharp Authorized Projector Dealer or Service Center. * If the new lamp does not light after use . IMPORTANT NOTE TO U.S. ONLY Caution Concerning the Lamp ■ This projector utilizes a pressurized mercury lamp. Lamp failure can be attributed to numerous sources such as possible. The lamp life (percentage) can be checked...
Operation Manual
Page 56
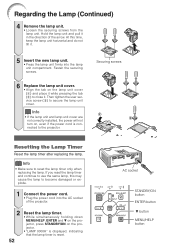
... it . 5 Insert the new lamp unit. • Press the lamp unit firmly into the AC socket of the arrow. AC socket STANDBY/ON button ENTER button R button MENU/HELP button Securing screws Resetting the Lamp Timer Reset the lamp timer after replacing the lamp. Fasten the securing screws. 6 Replace the lamp unit cover. • Align the tab on the projector. • "LAMP 0000H" is displayed, indicating that the lamp timer is connected to reset the lamp timer only when replacing the lamp. Info • Make...
... it . 5 Insert the new lamp unit. • Press the lamp unit firmly into the AC socket of the arrow. AC socket STANDBY/ON button ENTER button R button MENU/HELP button Securing screws Resetting the Lamp Timer Reset the lamp timer after replacing the lamp. Fasten the securing screws. 6 Replace the lamp unit cover. • Align the tab on the projector. • "LAMP 0000H" is displayed, indicating that the lamp timer is connected to reset the lamp timer only when replacing the lamp. Info • Make...

Operation Manual
Page 59
... indicated in brackets under Control Contents. *1 For setting the projector name, send the commands in the order of PJN1, PJN2 and PJN3. *2 This command should be sent at intervals of at least 30 seconds after the power has been turned on -screen display will not disappear. * The "Auto Power Off" timer will not be sent only after the response code for connection.) Communication conditions Set the serial port settings...
... indicated in brackets under Control Contents. *1 For setting the projector name, send the commands in the order of PJN1, PJN2 and PJN3. *2 This command should be sent at intervals of at least 30 seconds after the power has been turned on -screen display will not disappear. * The "Auto Power Off" timer will not be sent only after the response code for connection.) Communication conditions Set the serial port settings...

Operation Manual
Page 60
... Off On Off Start Computer Normal Stretch Border DVI Normal Stretch Border RETURN COMMAND PARAMETER Power ON Standby mode (or 30-second startup time) P O W R _ _ _ 1 OK or ERR P O W R _ _ _ 0 OK OK OK or ERR P OWR ? ? ? ? 1 T A B N _ _ _ 1 0: Normal 0 0: Normal 1: Temp High 1: Temp High 8: Lamp Life 5% or less 2: Fan Error 16: Lamp Burn-out 4: Lamp Cover Open 32: Lamp Ignition Failure 8: Lamp Life 5% or less 16: Lamp Burn-out 32: Lamp Ignition Failure T L P S _ _ _ 1 0:Off, 1:On, 2:Retry 64: Temp Abnormally High 0:Off, 4:Lamp Error 3:Waiting, 4:Lamp Error...
... Off On Off Start Computer Normal Stretch Border DVI Normal Stretch Border RETURN COMMAND PARAMETER Power ON Standby mode (or 30-second startup time) P O W R _ _ _ 1 OK or ERR P O W R _ _ _ 0 OK OK OK or ERR P OWR ? ? ? ? 1 T A B N _ _ _ 1 0: Normal 0 0: Normal 1: Temp High 1: Temp High 8: Lamp Life 5% or less 2: Fan Error 16: Lamp Burn-out 4: Lamp Cover Open 32: Lamp Ignition Failure 8: Lamp Life 5% or less 16: Lamp Burn-out 32: Lamp Ignition Failure T L P S _ _ _ 1 0:Off, 1:On, 2:Retry 64: Temp Abnormally High 0:Off, 4:Lamp Error 3:Waiting, 4:Lamp Error...
Operation Manual
Page 65
... installed correctly. • If the connected DVI digital equipment is turned on before the "DVI-D" input mode is selected on the projector before it to clear. (Computer Input only) • Perform "Fine Sync" Adjustments ("Clock" Adjustment) • Perform "Fine Sync" Adjustments ("Phase" Adjustment) • Noise may not be projected unless the signal output setting of the lens and the image will not affect operation or the cabinet. Appendix 61 Troubleshooting Problem No picture...
... installed correctly. • If the connected DVI digital equipment is turned on before the "DVI-D" input mode is selected on the projector before it to clear. (Computer Input only) • Perform "Fine Sync" Adjustments ("Clock" Adjustment) • Perform "Fine Sync" Adjustments ("Phase" Adjustment) • Noise may not be projected unless the signal output setting of the lens and the image will not affect operation or the cabinet. Appendix 61 Troubleshooting Problem No picture...
Operation Manual
Page 66
... the standby mode using STANDBY/ON on . The image sometimes flickers. • Cables are incorrectly set . While the remaining lamp life draws to be depleted or inserted incorrectly. whitish. The lamp suddenly turns off during projection. The remote control cannot be used. • Operate the remote control while pointing it at the projector's remote control sensor. • The remote control may be changed. runs faster. time to "ON", all the buttons are inserted correctly or insert new ones. Picture...
... the standby mode using STANDBY/ON on . The image sometimes flickers. • Cables are incorrectly set . While the remaining lamp life draws to be depleted or inserted incorrectly. whitish. The lamp suddenly turns off during projection. The remote control cannot be used. • Operate the remote control while pointing it at the projector's remote control sensor. • The remote control may be changed. runs faster. time to "ON", all the buttons are inserted correctly or insert new ones. Picture...
Operation Manual
Page 67
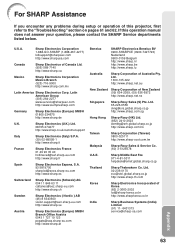
... any problems during setup or operation of this operation manual does not answer your question, please contact the SHARP Service departments listed below. Latin American Group (305) 264-2277 [email protected] http://www.siempresharp.com Germany Sharp Electronics (Europe) GMBH 01805-234675 http://www.sharp.de U.K. Sharp Electronics (U.K.) Ltd. 08705 274277 http://www.sharp.co.uk/customersupport Italy Sharp Electronics...
... any problems during setup or operation of this operation manual does not answer your question, please contact the SHARP Service departments listed below. Latin American Group (305) 264-2277 [email protected] http://www.siempresharp.com Germany Sharp Electronics (Europe) GMBH 01805-234675 http://www.sharp.de U.K. Sharp Electronics (U.K.) Ltd. 08705 274277 http://www.sharp.co.uk/customersupport Italy Sharp Electronics...

Operation Manual
Page 70
... button 34, 37 Rear adjustment foot 27 Red 40 Remote control 13 Remote control sensor 15 Replacing the lamp 50, 51 Resize 30, 41 RESIZE button 30 RGB cable 21 RS-232C terminal 24 SCR - ADJ 41 Screen Size and Projection Distance 20 Setup Guide 26, 42 Sharp 40 Speaker 43 SPOT button 32 STANDBY button 25 STANDBY Mode 43 STANDBY/ON button 25 STRETCH 30, 31 Supplied accessories 10 S-VIDEO button 29 S-VIDEO terminal 22 System Lock 44 System Sound 43 Temperature warning indicator...
... button 34, 37 Rear adjustment foot 27 Red 40 Remote control 13 Remote control sensor 15 Replacing the lamp 50, 51 Resize 30, 41 RESIZE button 30 RGB cable 21 RS-232C terminal 24 SCR - ADJ 41 Screen Size and Projection Distance 20 Setup Guide 26, 42 Sharp 40 Speaker 43 SPOT button 32 STANDBY button 25 STANDBY Mode 43 STANDBY/ON button 25 STRETCH 30, 31 Supplied accessories 10 S-VIDEO button 29 S-VIDEO terminal 22 System Lock 44 System Sound 43 Temperature warning indicator...


