PG-MB56X , PG-MB66X Operation Manual
Page 5
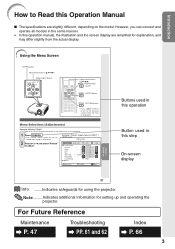
... • In this operation manual, the illustration and the screen display are slightly different, depending on the projector. 1 Press BMENU. • The "Picture" menu screen for the selected input mode is displayed. Introduction How to Read this Operation Manual I The ...safeguards for setting up and operating the projector. For Future Reference Maintenance P. 47 Troubleshooting PP. 61 and 62 Index P. 66 3 ADJ Picture Mode Contrast Bright Red Blue CLR Temp Bright Boost Lamp Setting Reset 0 0 0 0 7500K 1 Standard Bright Help SEL./ADJ. Example: "Picture" screen ...
... • In this operation manual, the illustration and the screen display are slightly different, depending on the projector. 1 Press BMENU. • The "Picture" menu screen for the selected input mode is displayed. Introduction How to Read this Operation Manual I The ...safeguards for setting up and operating the projector. For Future Reference Maintenance P. 47 Troubleshooting PP. 61 and 62 Index P. 66 3 ADJ Picture Mode Contrast Bright Red Blue CLR Temp Bright Boost Lamp Setting Reset 0 0 0 0 7500K 1 Standard Bright Help SEL./ADJ. Example: "Picture" screen ...
PG-MB56X , PG-MB66X Operation Manual
Page 6
... Power Cord 26 Using Basic Operation Turning the Projector On/Off 27 Turning the Projector on the Projector (Keylock Function 45 Troubleshooting with the Remote Control .... 34 Displaying and Setting the Break Timer 34 Auto Sync (Auto Sync Adjustment) ..... 34 Freezing a Moving Image 34 Selecting the Picture Mode 34 Menu Items 35 Using the Menu...
... Power Cord 26 Using Basic Operation Turning the Projector On/Off 27 Turning the Projector on the Projector (Keylock Function 45 Troubleshooting with the Remote Control .... 34 Displaying and Setting the Break Timer 34 Auto Sync (Auto Sync Adjustment) ..... 34 Freezing a Moving Image 34 Selecting the Picture Mode 34 Menu Items 35 Using the Menu...
PG-MB56X , PG-MB66X Operation Manual
Page 13
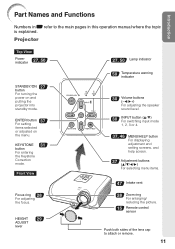
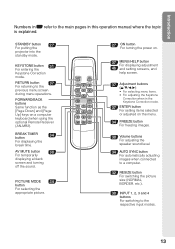
ENTER button 37 For setting items selected or adjusted on and putting the projector into standby mode. KEYSTONE 31 button For entering the Keystone Correction mode. Projector Top View Power indicator 27, 50 STANDBY/ON 27 button For turning the power on the menu. Front View Focus ...mode 1, 2, 3 or 4. 37, 46 MENU/HELP button For displaying adjustment and setting screens, and help screen. 37 Adjustment buttons (P/R/O/Q) For selecting menu items. 47 Intake vent 28 Zoom ring For enlarging/ reducing the picture. 15 Remote control sensor Push both sides of the lens cap to the main ...
ENTER button 37 For setting items selected or adjusted on and putting the projector into standby mode. KEYSTONE 31 button For entering the Keystone Correction mode. Projector Top View Power indicator 27, 50 STANDBY/ON 27 button For turning the power on the menu. Front View Focus ...mode 1, 2, 3 or 4. 37, 46 MENU/HELP button For displaying adjustment and setting screens, and help screen. 37 Adjustment buttons (P/R/O/Q) For selecting menu items. 47 Intake vent 28 Zoom ring For enlarging/ reducing the picture. 15 Remote control sensor Push both sides of the lens cap to the main ...
PG-MB56X , PG-MB66X Operation Manual
Page 15
... and setting screens, and help screen. 37 Adjustment buttons (P/R/O/Q) • For selecting menu items. • For adjusting the Keystone Correction when in this operation manual where the topic is explained. STANDBY button 27 For putting the projector into the standby mode. PICTURE MODE ...34 button For selecting the appropriate picture. 27 ON button For turning the power on a computer keyboard when using the optional ...
... and setting screens, and help screen. 37 Adjustment buttons (P/R/O/Q) • For selecting menu items. • For adjusting the Keystone Correction when in this operation manual where the topic is explained. STANDBY button 27 For putting the projector into the standby mode. PICTURE MODE ...34 button For selecting the appropriate picture. 27 ON button For turning the power on a computer keyboard when using the optional ...
PG-MB56X , PG-MB66X Operation Manual
Page 19
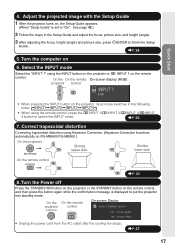
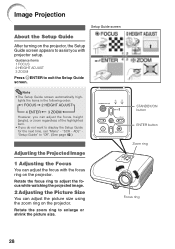
...automatically on the remote control. Adjust the projected image with the Setup Guide 1 After the projector turns on the remote control, and then press the button again while the confirmation message is set to switch the INPUT mode. _P. 30 7. On the On the remote On-screen display...4 button to "On". Turn the computer on the projector, input mode switches in the Setup Guide and adjust the focus, picture size, and height (angle). 3 After adjusting the focus, height (angle) and picture size, press TENTER to put the projector into standby mode. Turn the Power off Press the ...
...automatically on the remote control. Adjust the projected image with the Setup Guide 1 After the projector turns on the remote control, and then press the button again while the confirmation message is set to switch the INPUT mode. _P. 30 7. On the On the remote On-screen display...4 button to "On". Turn the computer on the projector, input mode switches in the Setup Guide and adjust the focus, picture size, and height (angle). 3 After adjusting the focus, height (angle) and picture size, press TENTER to put the projector into standby mode. Turn the Power off Press the ...
PG-MB56X , PG-MB66X Operation Manual
Page 20
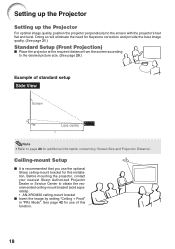
... • AN-XRCM30 ceiling-mount bracket I Invert the image by setting "Ceiling + Front" in "PRJ Mode". Before mounting the projector, contact your nearest Sharp Authorized Projector Dealer or Service Center to the screen with the projector's feet flat and level. Doing so will eliminate the need for Keystone... you use of standard setup Side View Screen H Lens center L Note • Refer to the desired picture size. (See page 20.) Example of this installation. Ceiling-mount Setup I Place the projector at the required distance from the screen according to page 20 for use the optional...
... • AN-XRCM30 ceiling-mount bracket I Invert the image by setting "Ceiling + Front" in "PRJ Mode". Before mounting the projector, contact your nearest Sharp Authorized Projector Dealer or Service Center to the screen with the projector's feet flat and level. Doing so will eliminate the need for Keystone... you use of standard setup Side View Screen H Lens center L Note • Refer to the desired picture size. (See page 20.) Example of this installation. Ceiling-mount Setup I Place the projector at the required distance from the screen according to page 20 for use the optional...
PG-MB56X , PG-MB66X Operation Manual
Page 21
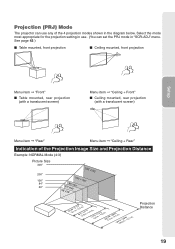
... shown in "SCR-ADJ" menu. Projection (PRJ) Mode The projector can use . (You can set the PRJ mode in the diagram below. Select the mode most appropriate for the projection setting in use any of the Projection Image Size and Projection Distance Example: NORMAL Mode (4:3) Picture Size 300" 200" 100" 84" 60" 240"´...
... shown in "SCR-ADJ" menu. Projection (PRJ) Mode The projector can use . (You can set the PRJ mode in the diagram below. Select the mode most appropriate for the projection setting in use any of the Projection Image Size and Projection Distance Example: NORMAL Mode (4:3) Picture Size 300" 200" 100" 84" 60" 240"´...
PG-MB56X , PG-MB66X Operation Manual
Page 22
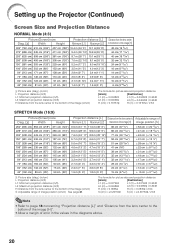
Setting up the Projector (Continued) Screen Size and Projection Distance NORMAL Mode (4:3) Picture (Screen) size Diag. [χ] Width Height Projection distance [L] Minimum [L1] Maximum [L2] 300Љ (762 cm) 610 cm (240Љ) 457 cm (180Љ...04029χ [Feet/inches] L1 (ft) = 0.03482χ / 0.3048 L2 (ft) = 0.04029χ / 0.3048 H (cm) = 0.16151χ H (in) = 0.16151χ / 2.54 STRETCH Mode (16:9) Picture (Screen) size Diag. [χ] Width Height Projection distance [L] Distance from the lens center to Adjustable range of Minimum [L1] Maximum [L2] the bottom of the...
Setting up the Projector (Continued) Screen Size and Projection Distance NORMAL Mode (4:3) Picture (Screen) size Diag. [χ] Width Height Projection distance [L] Minimum [L1] Maximum [L2] 300Љ (762 cm) 610 cm (240Љ) 457 cm (180Љ...04029χ [Feet/inches] L1 (ft) = 0.03482χ / 0.3048 L2 (ft) = 0.04029χ / 0.3048 H (cm) = 0.16151χ H (in) = 0.16151χ / 2.54 STRETCH Mode (16:9) Picture (Screen) size Diag. [χ] Width Height Projection distance [L] Distance from the lens center to Adjustable range of Minimum [L1] Maximum [L2] the bottom of the...
PG-MB56X , PG-MB66X Operation Manual
Page 30
... ring to adjust the focus while watching the projected image. 2 Adjusting the Picture Size You can adjust the focus, height (angle), or zoom regardless of the highlighted item. • If you with the focus ring on the projector. Note • The Setup Guide screen automatically high- Focus ring 28 "... After turning on the projector, the Setup Guide screen appears to assist you do not want to display the Setup Guide for the next time, set "Menu" - lights the items in the following order: 1 FOCUS 2 HEIGHT ADJUST 4 ENTER 3 ZOOM However, you can adjust the picture size using the zoom ...
... ring to adjust the focus while watching the projected image. 2 Adjusting the Picture Size You can adjust the focus, height (angle), or zoom regardless of the highlighted item. • If you with the focus ring on the projector. Note • The Setup Guide screen automatically high- Focus ring 28 "... After turning on the projector, the Setup Guide screen appears to assist you do not want to display the Setup Guide for the next time, set "Menu" - lights the items in the following order: 1 FOCUS 2 HEIGHT ADJUST 4 ENTER 3 ZOOM However, you can adjust the picture size using the zoom ...
PG-MB56X , PG-MB66X Operation Manual
Page 36
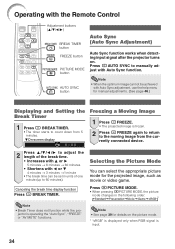
... button AUTO SYNC button Auto Sync (Auto Sync Adjustment) Auto Sync function works when detecting input signal after the projector turns on the picture mode. * "sRGB" is displayed only when RGB signal is operating the "Auto Sync", "FREEZE" or "AV MUTE" functions. ROn-...FAUTO SYNC to manually adjust with O or R 4 minutes s 3 minutes s1 minute • The break time can select the appropriate picture mode for manual adjustments. (See page 46.) Displaying and Setting the Break Timer 1 Press k BREAK TIMER. • The timer starts to count down from the currently connected device. 2 Press ...
... button AUTO SYNC button Auto Sync (Auto Sync Adjustment) Auto Sync function works when detecting input signal after the projector turns on the picture mode. * "sRGB" is displayed only when RGB signal is operating the "Auto Sync", "FREEZE" or "AV MUTE" functions. ROn-...FAUTO SYNC to manually adjust with O or R 4 minutes s 3 minutes s1 minute • The break time can select the appropriate picture mode for manual adjustments. (See page 46.) Displaying and Setting the Break Timer 1 Press k BREAK TIMER. • The timer starts to count down from the currently connected device. 2 Press ...
PG-MB56X , PG-MB66X Operation Manual
Page 37
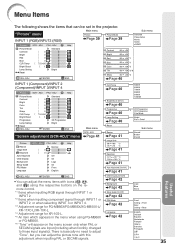
... INPUT 1 (RGB)/INPUT2 (RGB) Page 39 Page 39 Picture SCR - ADJ PRJ - ADJ Help Picture Mode Contrast Bright Color Tint Sharp CLR Temp Bright Boost Progressive Lamp Setting Reset SEL./ADJ. 0 0 0 0 0 7500K 1 Standard 3D Progressive Bright...projector. ENTER Help END Contrast -30 Bright -30 Red -30 Blue -30 Color -30 Tint -30 Sharp -30 Page 40 Sub menu Standard Presentation Movie Game sRGB*1 +30 +30 +30 *1 +30 *1 +30 *2 +30 *2*6 +30 *2 INPUT 1 (Component)/INPUT 2 (Component)/INPUT 3/INPUT 4 Picture SCR - Menu Items The following shows the items that can be set...
... INPUT 1 (RGB)/INPUT2 (RGB) Page 39 Page 39 Picture SCR - ADJ PRJ - ADJ Help Picture Mode Contrast Bright Color Tint Sharp CLR Temp Bright Boost Progressive Lamp Setting Reset SEL./ADJ. 0 0 0 0 0 7500K 1 Standard 3D Progressive Bright...projector. ENTER Help END Contrast -30 Bright -30 Red -30 Blue -30 Color -30 Tint -30 Sharp -30 Page 40 Sub menu Standard Presentation Movie Game sRGB*1 +30 +30 +30 *1 +30 *1 +30 *2 +30 *2*6 +30 *2 INPUT 1 (Component)/INPUT 2 (Component)/INPUT 3/INPUT 4 Picture SCR - Menu Items The following shows the items that can be set...
PG-MB56X , PG-MB66X Operation Manual
Page 38
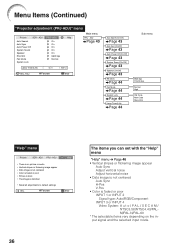
.../PAL-N/PAL-60 * The selectable items vary depending on the input signal and the selected input mode. 36 ENTER Help END The items you can set with the "Help" menu "Help" menu n Page 46 • Vertical stripes or flickering image appear Auto Sync Adjust vertical noise Adjust horizontal noise • Data... image is not centered Auto Sync H-Pos V-Pos • Color is distorted Reset all adjustments to default settings SEL. Menu Items (Continued) "Projector adjustment (PRJ-ADJ)" menu Picture SCR -
.../PAL-N/PAL-60 * The selectable items vary depending on the input signal and the selected input mode. 36 ENTER Help END The items you can set with the "Help" menu "Help" menu n Page 46 • Vertical stripes or flickering image appear Auto Sync Adjust vertical noise Adjust horizontal noise • Data... image is not centered Auto Sync H-Pos V-Pos • Color is distorted Reset all adjustments to default settings SEL. Menu Items (Continued) "Projector adjustment (PRJ-ADJ)" menu Picture SCR -
PG-MB56X , PG-MB66X Operation Manual
Page 39
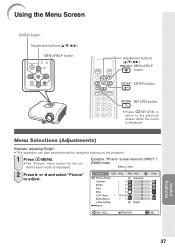
ADJ Picture Mode Contrast Bright Red Blue CLR Temp Bright Boost Lamp Setting Reset 0 0 0 0 7500K 1 Standard Bright Help SEL./ADJ. ADJ PRJ - ENTER END Useful Features 37 Using the Menu Screen ENTER button Adjustment buttons (P/R/O/Q) MENU/HELP... "Bright". • This operation can also be performed by using the buttons on the projector. 1 Press BMENU. • The "Picture" menu screen for INPUT 1 (RGB) mode Menu item 2 Press Q or O and select "Picture" to the previous screen when the menu is displayed. Example: "Picture" screen menu for the selected input mode is displayed...
ADJ Picture Mode Contrast Bright Red Blue CLR Temp Bright Boost Lamp Setting Reset 0 0 0 0 7500K 1 Standard Bright Help SEL./ADJ. ADJ PRJ - ENTER END Useful Features 37 Using the Menu Screen ENTER button Adjustment buttons (P/R/O/Q) MENU/HELP... "Bright". • This operation can also be performed by using the buttons on the projector. 1 Press BMENU. • The "Picture" menu screen for INPUT 1 (RGB) mode Menu item 2 Press Q or O and select "Picture" to the previous screen when the menu is displayed. Example: "Picture" screen menu for the selected input mode is displayed...
PG-MB56X , PG-MB66X Operation Manual
Page 40
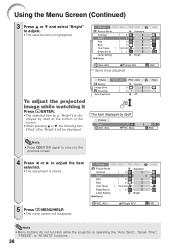
...ADJ PRJ - ADJ PRJ - Picture SCR - Picture SCR - ADJ Picture Mode Contrast Bright Red Blue CLR Temp Bright Boost Lamp Setting Reset 0 15 0 0 7500K 1 Standard Bright SEL./ADJ. Single ADJ Help END Note • Menu buttons do not function while the projector is stored. 5 Press BMENU/HELP...of the screen. • When pressing P or R, the following item ("Red" after "Bright") will disappear. ADJ Picture Mode Contrast Bright Red Blue CLR Temp Bright Boost Lamp Setting Reset 0 0 0 0 7500K 1 Standard Bright SEL./ADJ. ADJ PRJ - "Bright") is highlighted. Menu Help END...
...ADJ PRJ - ADJ PRJ - Picture SCR - Picture SCR - ADJ Picture Mode Contrast Bright Red Blue CLR Temp Bright Boost Lamp Setting Reset 0 15 0 0 7500K 1 Standard Bright SEL./ADJ. Single ADJ Help END Note • Menu buttons do not function while the projector is stored. 5 Press BMENU/HELP...of the screen. • When pressing P or R, the following item ("Red" after "Bright") will disappear. ADJ Picture Mode Contrast Bright Red Blue CLR Temp Bright Boost Lamp Setting Reset 0 0 0 0 7500K 1 Standard Bright SEL./ADJ. ADJ PRJ - "Bright") is highlighted. Menu Help END...
PG-MB56X , PG-MB66X Operation Manual
Page 41
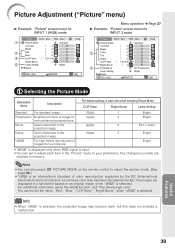
... by the IEC (International Electrotechnical Commission). ADJ Help Picture Mode Contrast Bright Color Tint Sharp CLR Temp Bright Boost Progressive Lamp Setting Reset SEL./ADJ. 0 0 0 0 0 7500K 1 Standard 3D Progressive Bright ENTER END 1 Selecting the Picture Mode Selectable items Description The default settings of image for INPUT 1 (RGB) mode Picture SCR - ENTER END Menu operation n Page 37...
... by the IEC (International Electrotechnical Commission). ADJ Help Picture Mode Contrast Bright Color Tint Sharp CLR Temp Bright Boost Progressive Lamp Setting Reset SEL./ADJ. 0 0 0 0 0 7500K 1 Standard 3D Progressive Bright ENTER END 1 Selecting the Picture Mode Selectable items Description The default settings of image for INPUT 1 (RGB) mode Picture SCR - ENTER END Menu operation n Page 37...

PG-MB56X , PG-MB66X Operation Manual
Page 42
For less color intensity. For less sharpness. For making skin tones purplish. Note • "Bright Boost" and "CLR Temp" cannot be approximately 3,000 hours (approximately 2,000 hours in the Bright mode). The projector can adjust the picture tone with this film source to ...fan sound and power consumption are directly displayed so that 2D Progressive, 3D Progressive and Film Mode cannot be selected. 5 Lamp Setting 3 Adjusting the Color Temperature Selectable items Description 5500K 6500K 7500K 8500K 9300K 10500K For lower color temperature for cooler, bluish, fluorescent-...
For less color intensity. For less sharpness. For making skin tones purplish. Note • "Bright Boost" and "CLR Temp" cannot be approximately 3,000 hours (approximately 2,000 hours in the Bright mode). The projector can adjust the picture tone with this film source to ...fan sound and power consumption are directly displayed so that 2D Progressive, 3D Progressive and Film Mode cannot be selected. 5 Lamp Setting 3 Adjusting the Color Temperature Selectable items Description 5500K 6500K 7500K 8500K 9300K 10500K For lower color temperature for cooler, bluish, fluorescent-...
PG-MB56X , PG-MB66X Operation Manual
Page 43
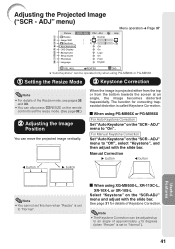
...-MB66X or PG-MB56X For Auto Keystone Correction Set "Auto Keystone" on the "SCR - a When using PG-MB66X or PG-MB56X 1 Setting the Resize Mode 3 Keystone Correction Note • For details of Keystone Correction. ADJ" menu) Picture SCR - ADJ PRJ - Manual Correction Q ...button O button O button Q button Useful Features Note • You cannot set this item when "Resize" is set to "On". ADJ 1 Resize 2 Image Shift 3 Keystone Auto Keystone 4 ...
...-MB66X or PG-MB56X For Auto Keystone Correction Set "Auto Keystone" on the "SCR - a When using PG-MB66X or PG-MB56X 1 Setting the Resize Mode 3 Keystone Correction Note • For details of Keystone Correction. ADJ" menu) Picture SCR - ADJ PRJ - Manual Correction Q ...button O button O button Q button Useful Features Note • You cannot set this item when "Resize" is set to "On". ADJ 1 Resize 2 Image Shift 3 Keystone Auto Keystone 4 ...
PG-MB56X , PG-MB66X Operation Manual
Page 44
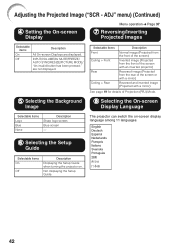
... MUTE/FREEZE/ AUTO SYNC/RESIZE/PICTURE MODE/ "An invalid button has been pressed." are displayed. Not displaying the Setup Guide. The projector can switch the on . Selectable...Blue None Description Sharp logo screen Blue screen - 6 Selecting the Setup Guide Selectable items On Off Description Displaying the Setup Guide when turning the projector on -screen ...display language among 11 languages. English Deutsch Español Nederlands Français Italiano Svenska Português 42 Adjusting the Projected Image ("SCR - ADJ" menu) (Continued) 4 Setting...
... MUTE/FREEZE/ AUTO SYNC/RESIZE/PICTURE MODE/ "An invalid button has been pressed." are displayed. Not displaying the Setup Guide. The projector can switch the on . Selectable...Blue None Description Sharp logo screen Blue screen - 6 Selecting the Setup Guide Selectable items On Off Description Displaying the Setup Guide when turning the projector on -screen ...display language among 11 languages. English Deutsch Español Nederlands Français Italiano Svenska Português 42 Adjusting the Projected Image ("SCR - ADJ" menu) (Continued) 4 Setting...

PG-MB56X , PG-MB66X Operation Manual
Page 45
...detected for and switches to the input mode in the order of INPUT 1 n INPUT 2 n INPUT 3 n INPUT 4 when you press INPUT (P/R) on the projector. • While "Auto Search" is set to "On", press C INPUT 1,C INPUT 2, D INPUT 3 or EINPUT 4 on , or when the INPUT button is not output from the internal speaker. ...pro- ADJ On On On On On 9600 bps Normal Menu operation n Page 37 Help Lamp Timer(Life) 0h 100% SEL./ADJ. ADJ" menu) Picture SCR - Adjusting the Projector Function ("PRJ - ADJ Auto Search Auto Sync Auto Power Off System Sound Speaker RS-232C Fan Mode System Lock PRJ -
...detected for and switches to the input mode in the order of INPUT 1 n INPUT 2 n INPUT 3 n INPUT 4 when you press INPUT (P/R) on the projector. • While "Auto Search" is set to "On", press C INPUT 1,C INPUT 2, D INPUT 3 or EINPUT 4 on , or when the INPUT button is not output from the internal speaker. ...pro- ADJ On On On On On 9600 bps Normal Menu operation n Page 37 Help Lamp Timer(Life) 0h 100% SEL./ADJ. ADJ" menu) Picture SCR - Adjusting the Projector Function ("PRJ - ADJ Auto Search Auto Sync Auto Power Off System Sound Speaker RS-232C Fan Mode System Lock PRJ -

PG-MB56X , PG-MB66X Operation Manual
Page 48
... horizontal noise.", then press hENTER. 6 Press O or Q to adjust. Picture SCR - ENTER END 46 Vertical stripes or flickering image appear Initiate "Auto Sync" Adjustments. sig. pending on Help menu, then press hENTER. pears" on the input signal or setting that you to default settings SEL. ADJ Vertical stripes or flickering image appear There...
... horizontal noise.", then press hENTER. 6 Press O or Q to adjust. Picture SCR - ENTER END 46 Vertical stripes or flickering image appear Initiate "Auto Sync" Adjustments. sig. pending on Help menu, then press hENTER. pears" on the input signal or setting that you to default settings SEL. ADJ Vertical stripes or flickering image appear There...


