
XR-55S | XR-55X Operation Manual
Page 5
...alert the user to your local authorities, the Electronics Industries Alliance: www.eiae.org, the lamp recycling organization www.lamprecycle.org, or Sharp at 1-800-BE-SHARP. See bottom of important operating and maintenance (servicing) instructions in the literature accompanying the product....PRODUCT DISPOSAL This product utilizes tin-lead solder, and lamp containing a small amount of the parts, service and labor warranty applicable to the presence of projector. CONSUMER PRODUCT SAFETY ACT To ensure that SHARP may be required to environmental considerations. The lightning &#...
...alert the user to your local authorities, the Electronics Industries Alliance: www.eiae.org, the lamp recycling organization www.lamprecycle.org, or Sharp at 1-800-BE-SHARP. See bottom of important operating and maintenance (servicing) instructions in the literature accompanying the product....PRODUCT DISPOSAL This product utilizes tin-lead solder, and lamp containing a small amount of the parts, service and labor warranty applicable to the presence of projector. CONSUMER PRODUCT SAFETY ACT To ensure that SHARP may be required to environmental considerations. The lightning &#...
XR-55S | XR-55X Operation Manual
Page 6
... inside of use . However, there is subject to radio communications. ONLY Declaration of conformity SHARP PROJECTOR, MODEL XR-55X/XR-50S This device complies with Part 15 of usage time. ONLY Caution Concerning Lamp Replacement ■ This projector utilizes a pressurized mercury lamp. The period of the following conditions: (1) This device may cause harmful interference to the...
... inside of use . However, there is subject to radio communications. ONLY Declaration of conformity SHARP PROJECTOR, MODEL XR-55X/XR-50S This device complies with Part 15 of usage time. ONLY Caution Concerning Lamp Replacement ■ This projector utilizes a pressurized mercury lamp. The period of the following conditions: (1) This device may cause harmful interference to the...
XR-55S | XR-55X Operation Manual
Page 9
... Default Settings 52 Checking the Lamp Life Status 52 Reference Appendix Maintenance 53 Maintenance Indicators 54 Regarding the Lamp 56 Lamp 56 Caution Concerning the Lamp 56 Replacing the Lamp 56 Removing and Installing the Lamp Unit 57 Resetting the Lamp Timer 58 Connecting Pin Assignments... 59 RS-232C Specifications and Commands 61 Computer Compatibility Chart 66 Troubleshooting 67 For SHARP Assistance...
... Default Settings 52 Checking the Lamp Life Status 52 Reference Appendix Maintenance 53 Maintenance Indicators 54 Regarding the Lamp 56 Lamp 56 Caution Concerning the Lamp 56 Replacing the Lamp 56 Removing and Installing the Lamp Unit 57 Resetting the Lamp Timer 58 Connecting Pin Assignments... 59 RS-232C Specifications and Commands 61 Computer Compatibility Chart 66 Troubleshooting 67 For SHARP Assistance...
XR-55S | XR-55X Operation Manual
Page 12
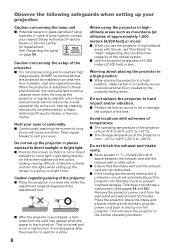
.... Caution concerning the setup of the unit. It will automatically put the projector into Standby mode to maintain high image quality, SHARP recommends that the intake vent and the exhaust vent are not blocked, plug the power cord back in and turn on the ... regular breaks to avoid personal injury caused by a Sharp Authorized Projector Dealer or Service Center. Caution regarding placing of the projector ■ Place the projector on a level site within the adjustment range (9 degrees) of glass particles if lamp ruptures. When using the projector in high- Caution concerning...
.... Caution concerning the setup of the unit. It will automatically put the projector into Standby mode to maintain high image quality, SHARP recommends that the intake vent and the exhaust vent are not blocked, plug the power cord back in and turn on the ... regular breaks to avoid personal injury caused by a Sharp Authorized Projector Dealer or Service Center. Caution regarding placing of the projector ■ Place the projector on a level site within the adjustment range (9 degrees) of glass particles if lamp ruptures. When using the projector in high- Caution concerning...

XR-55S | XR-55X Operation Manual
Page 13
..., make certain you unplug the power cord from the wall outlet, and disconnect any person obtaining a copy of the fonts accompanying this state continues, the lamp will turn off the equipment to be connected. ■ Please read the operation manuals of the plastic cover. Other connected equipment ■ When connecting a computer...
..., make certain you unplug the power cord from the wall outlet, and disconnect any person obtaining a copy of the fonts accompanying this state continues, the lamp will turn off the equipment to be connected. ■ Please read the operation manuals of the plastic cover. Other connected equipment ■ When connecting a computer...
XR-55S | XR-55X Operation Manual
Page 15
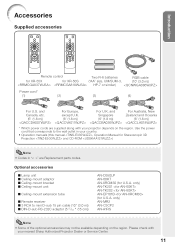
...Lamp unit ■ Ceiling-mount adaptor ■ Ceiling-mount bracket ■ Ceiling-mount unit ■ Ceiling-mount extension tube ■ Remote receiver ■ 3 RCA to the wall outlet in "< >" are supplied along with your country. • Operation manuals (this manual , Operation Manual for XR... cords are Replacement parts codes. Introduction Accessories Supplied accessories Remote control Two R-6 batteries RGB cable for XR-55X for Stereoscopic 3D Projection and CD-ROM ) Note • Codes in your nearest Sharp Authorized Projector Dealer or Service Center. 11
...Lamp unit ■ Ceiling-mount adaptor ■ Ceiling-mount bracket ■ Ceiling-mount unit ■ Ceiling-mount extension tube ■ Remote receiver ■ 3 RCA to the wall outlet in "< >" are supplied along with your country. • Operation manuals (this manual , Operation Manual for XR... cords are Replacement parts codes. Introduction Accessories Supplied accessories Remote control Two R-6 batteries RGB cable for XR-55X for Stereoscopic 3D Projection and CD-ROM ) Note • Codes in your nearest Sharp Authorized Projector Dealer or Service Center. 11
XR-55S | XR-55X Operation Manual
Page 16
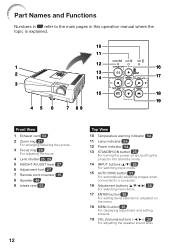
... 5 HEIGHT ADJUST lever 27 6 Adjustment foot 27 7 Remote control sensor 15 8 Speaker 49 9 Intake vent 53 12 Top View 10 Temperature warning indicator 54 11 Lamp indicator 54 12 Power indicator 54 13 STANDBY/ON button 25 For turning the power on and putting the projector into Standby mode. 14 INPUT...
... 5 HEIGHT ADJUST lever 27 6 Adjustment foot 27 7 Remote control sensor 15 8 Speaker 49 9 Intake vent 53 12 Top View 10 Temperature warning indicator 54 11 Lamp indicator 54 12 Power indicator 54 13 STANDBY/ON button 25 For turning the power on and putting the projector into Standby mode. 14 INPUT...
XR-55S | XR-55X Operation Manual
Page 18
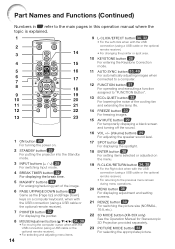
...For operating and executing a function assigned to "FUNCTION Button". 13 ECO+QUIET button 32 For lowering the noise of the cooling fan and extending the lamp life. 14 FREEZE button 33 For freezing images. 15 AV MUTE button 29 For temporarily displaying a black screen and turning off the sound. 16...button 38 For displaying adjustment and setting screens. 21 RESIZE button 30 For switching the picture size (NORMAL, 16:9, etc.). 22 3D MODE button (XR-55X only) See the Operation Manual for Stereoscopic 3D Projection provided separately. 23 PICTURE MODE button 33 For selecting the appropriate picture.
...For operating and executing a function assigned to "FUNCTION Button". 13 ECO+QUIET button 32 For lowering the noise of the cooling fan and extending the lamp life. 14 FREEZE button 33 For freezing images. 15 AV MUTE button 29 For temporarily displaying a black screen and turning off the sound. 16...button 38 For displaying adjustment and setting screens. 21 RESIZE button 30 For switching the picture size (NORMAL, 16:9, etc.). 22 3D MODE button (XR-55X only) See the Operation Manual for Stereoscopic 3D Projection provided separately. 23 PICTURE MODE button 33 For selecting the appropriate picture.
XR-55S | XR-55X Operation Manual
Page 19
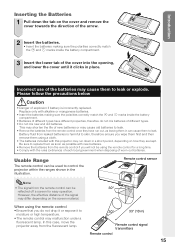
... The batteries included with the rules (ordinance) of each local government when disposing of new batteries or may malfunction under a fluorescent lamp. Please follow the precautions below Caution • Danger of the cover into the opening, and lower the cover until it to leak or ...shown in the illustration. In this projector may run out, as possible with new batteries. • Remove the batteries from the fluorescent lamp. 30° 33 n (10 m) Remote control signal transmitters Remote control 15 Introduction Inserting the Batteries 1 Pull down in a short period,...
... The batteries included with the rules (ordinance) of each local government when disposing of new batteries or may malfunction under a fluorescent lamp. Please follow the precautions below Caution • Danger of the cover into the opening, and lower the cover until it to leak or ...shown in the illustration. In this projector may run out, as possible with new batteries. • Remove the batteries from the fluorescent lamp. 30° 33 n (10 m) Remote control signal transmitters Remote control 15 Introduction Inserting the Batteries 1 Pull down in a short period,...
XR-55S | XR-55X Operation Manual
Page 29
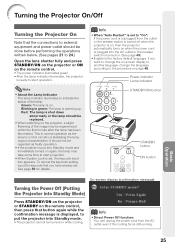
... is displayed, to put into Standby mode. • The projector cannot be turned on while cooling. Blinking in green: The lamp is stabilising the lamp output characteristics. To cancel the keycode setting, input the keycode that you want to change the on-screen display to another language...equipment and power outlet should be replaced. • When switching on the projector, a slight flickering of the lamp. Note • About the Lamp Indicator The lamp indicator illuminates to indicate the status of the image may take some time to start operation. See page 50 for details....
... is displayed, to put into Standby mode. • The projector cannot be turned on while cooling. Blinking in green: The lamp is stabilising the lamp output characteristics. To cancel the keycode setting, input the keycode that you want to change the on-screen display to another language...equipment and power outlet should be replaced. • When switching on the projector, a slight flickering of the lamp. Note • About the Lamp Indicator The lamp indicator illuminates to indicate the status of the image may take some time to start operation. See page 50 for details....
XR-55S | XR-55X Operation Manual
Page 36
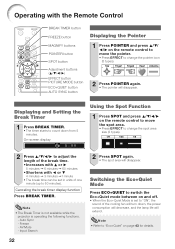
... will disappear. Displaying and Setting the Break Timer 1 Press BREAK TIMER. • The timer starts to count down , the power consumption will decrease, and the lamp life will extend. Canceling the break timer display function Press BREAK TIMER. Freeze - Note • Refer to "Eco+Quiet" on the remote control to move...
... will disappear. Displaying and Setting the Break Timer 1 Press BREAK TIMER. • The timer starts to count down , the power consumption will decrease, and the lamp life will extend. Canceling the break timer display function Press BREAK TIMER. Freeze - Note • Refer to "Eco+Quiet" on the remote control to move...
XR-55S | XR-55X Operation Manual
Page 41
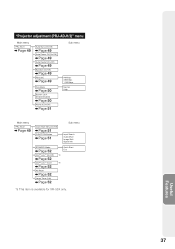
... Image Shift Signal Info STANDBY Mode Page 52 DLP® LinkTM [On/Off] Page 52 DLP® LinkTM Invert Page 52 All Reset Page 52 Lamp Timer (Life) Page 52 Quick Start Eco *9 *9 *9 This item is available for XR-55X only. 37 Useful Features
... Image Shift Signal Info STANDBY Mode Page 52 DLP® LinkTM [On/Off] Page 52 DLP® LinkTM Invert Page 52 All Reset Page 52 Lamp Timer (Life) Page 52 Quick Start Eco *9 *9 *9 This item is available for XR-55X only. 37 Useful Features

XR-55S | XR-55X Operation Manual
Page 43
... reduces the cooling fan noise and power consumption, thereby prolonging the operating life of the lamp. (See page 43.) Selects the language displayed on the screen. (See page 48.) Displays the input signal, lamp use time, remaining lamp life, etc. Displays the Complete Menu for advanced settings and adjustments. Useful Features Menu Selections...
... reduces the cooling fan noise and power consumption, thereby prolonging the operating life of the lamp. (See page 43.) Selects the language displayed on the screen. (See page 48.) Displays the input signal, lamp use time, remaining lamp life, etc. Displays the Complete Menu for advanced settings and adjustments. Useful Features Menu Selections...

XR-55S | XR-55X Operation Manual
Page 53
... 4 Speaker 5 RS-232C 6 Fan Mode 7 System Lock 8 Keylock SCR PRJ-ADJ1 PRJ2 On On On On 9600bps Normal Disable Off Q PRJ-ADJ2 Pict. ENTER END Lamp Timer(Life) SEL./ADJ. 0h ENTER 0 min 100% END 1 Auto Sync (Auto Sync Adjustment) Selectable items Description On Auto Sync adjustment will automatically enter Standby...
... 4 Speaker 5 RS-232C 6 Fan Mode 7 System Lock 8 Keylock SCR PRJ-ADJ1 PRJ2 On On On On 9600bps Normal Disable Off Q PRJ-ADJ2 Pict. ENTER END Lamp Timer(Life) SEL./ADJ. 0h ENTER 0 min 100% END 1 Auto Sync (Auto Sync Adjustment) Selectable items Description On Auto Sync adjustment will automatically enter Standby...
XR-55S | XR-55X Operation Manual
Page 56
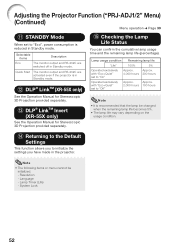
... - System Lock 52 Quick Start The monitor output and RS-232C are switched off in Standby mode. DLP® LinkTM (XR-55X only) See the Operation Manual for Stereoscopic 3D Projection provided separately. Lamp Timer (Life) - Returning to the Default Settings This function allows you to "Eco", power consumption is reduced in Standby...
... - System Lock 52 Quick Start The monitor output and RS-232C are switched off in Standby mode. DLP® LinkTM (XR-55X only) See the Operation Manual for Stereoscopic 3D Projection provided separately. Lamp Timer (Life) - Returning to the Default Settings This function allows you to "Eco", power consumption is reduced in Standby...

XR-55S | XR-55X Operation Manual
Page 58
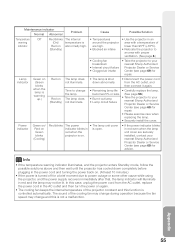
...lower left corner of the air vents, or the setting location, the temperature warning indicator will enter Standby mode. Red on The lamp is shut down abnormally or requires to perform the measures described on page 55. When you try to blockage of the picture with... the temperature warning indicator blinking. Maintenance Indicators ■ The warning lights (power indicator, lamp indicator and temperature warning indicator) on the projector indicate problems inside the projector increases, due to turn off and then the projector will ...
...lower left corner of the air vents, or the setting location, the temperature warning indicator will enter Standby mode. Red on The lamp is shut down abnormally or requires to perform the measures described on page 55. When you try to blockage of the picture with... the temperature warning indicator blinking. Maintenance Indicators ■ The warning lights (power indicator, lamp indicator and temperature warning indicator) on the projector indicate problems inside the projector increases, due to turn off and then the projector will ...
XR-55S | XR-55X Operation Manual
Page 59
... outlet, and then connect it again. • Remaining lamp life • Carefully replace the lamp. becomes 5% or less. (See page 56.) • Burnt-out lamp • Lamp circuit failure • Take the projector to your nearest Sharp Authorized Projector Dealer or Service Center (see page 69) ...for advice. The lamp does not illuminate. • The lamp is shut down completely before plugging in the power...
... outlet, and then connect it again. • Remaining lamp life • Carefully replace the lamp. becomes 5% or less. (See page 56.) • Burnt-out lamp • Lamp circuit failure • Take the projector to your nearest Sharp Authorized Projector Dealer or Service Center (see page 69) ...for advice. The lamp does not illuminate. • The lamp is shut down completely before plugging in the power...

XR-55S | XR-55X Operation Manual
Page 60
IMPORTANT NOTE TO U.S. Replacing the Lamp Caution • Do not remove the lamp unit from your place of purchase, nearest Sharp Authorized Projector Dealer or Service Center. Hg LAMP CONTAINS MERCURY For State Lamp Disposal Information www.lamprecycle.org or 1-800-BE-SHARP U.S.A ONLY Caution Concerning the Lamp ■ This projector utilizes a pressurized mercury lamp. The period of time...
IMPORTANT NOTE TO U.S. Replacing the Lamp Caution • Do not remove the lamp unit from your place of purchase, nearest Sharp Authorized Projector Dealer or Service Center. Hg LAMP CONTAINS MERCURY For State Lamp Disposal Information www.lamprecycle.org or 1-800-BE-SHARP U.S.A ONLY Caution Concerning the Lamp ■ This projector utilizes a pressurized mercury lamp. The period of time...

XR-55S | XR-55X Operation Manual
Page 61
... 2 Disconnect the power cord. • Unplug the power cord from the projector right after use. Loosen the user service screw (1) that secures the lamp unit cover. The lamp and parts around the lamp will be very hot and may cause burns or injury. STANDBY/ON button AC socket User service screw (for the... lamp unit cover and lamp unit. 1 Press STANDBY/ON on the projector or STANDBY on the remote control to the lamp, make sure you carefully follow the steps below. • Do not loosen other screws except...
... 2 Disconnect the power cord. • Unplug the power cord from the projector right after use. Loosen the user service screw (1) that secures the lamp unit cover. The lamp and parts around the lamp will be very hot and may cause burns or injury. STANDBY/ON button AC socket User service screw (for the... lamp unit cover and lamp unit. 1 Press STANDBY/ON on the projector or STANDBY on the remote control to the lamp, make sure you carefully follow the steps below. • Do not loosen other screws except...

XR-55S | XR-55X Operation Manual
Page 62
... Info • Make sure to secure the lamp unit cover. At this may cause the lamp to the projector. Resetting the Lamp Timer Reset the lamp timer after replacing the lamp. Regarding the Lamp (Continued) 4 Remove the lamp unit. • Loosen the securing screw from the lamp unit. Hold the lamp unit and pull it . If you reset the...
... Info • Make sure to secure the lamp unit cover. At this may cause the lamp to the projector. Resetting the Lamp Timer Reset the lamp timer after replacing the lamp. Regarding the Lamp (Continued) 4 Remove the lamp unit. • Loosen the securing screw from the lamp unit. Hold the lamp unit and pull it . If you reset the...

