
XR-55S | XR-55X Operation Manual
Page 1
MUTIMEDIA PROJECTOR MODEL XR-55X XR-50S OPERATION MANUAL Introduction Easy Start Setup Connections Basic Operation Useful Features Appendix
MUTIMEDIA PROJECTOR MODEL XR-55X XR-50S OPERATION MANUAL Introduction Easy Start Setup Connections Basic Operation Useful Features Appendix

XR-55S | XR-55X Operation Manual
Page 2
IMPORTANT • For your assistance in reporting the loss or theft of your Projector, please record the Model and Serial Number located on the bottom of the projector and retain this information. • Before recycling the packaging, please ensure that you have checked the contents of the carton thoroughly against the list of "Supplied accessories" on page 11. Model No.: Serial No.: ii
IMPORTANT • For your assistance in reporting the loss or theft of your Projector, please record the Model and Serial Number located on the bottom of the projector and retain this information. • Before recycling the packaging, please ensure that you have checked the contents of the carton thoroughly against the list of "Supplied accessories" on page 11. Model No.: Serial No.: ii

XR-55S | XR-55X Operation Manual
Page 4
..., Spanisch, Italienisch, Niederländisch, Schwedisch, Portugiesisch, Chinesisch, Koreanisch und Arabisch. Carefully read through the operation instructions before operating the projector. Leggere attentamente le istruzioni per l'uso in dotazione contiene istruzioni per l'uso prima di usare il proiettore. Den medföljande CD-...Sie die Bedienungsanleitung vor der Verwendung des Projektors sorgfältig durch. Lees de handleiding zorgvuldig door voor u de projector in het Engels, Duits, Frans, Spaans, Italiaans, Nederlands, Zweeds, Portugees, Chinees, Koreaans en Arabisch. iv
..., Spanisch, Italienisch, Niederländisch, Schwedisch, Portugiesisch, Chinesisch, Koreanisch und Arabisch. Carefully read through the operation instructions before operating the projector. Leggere attentamente le istruzioni per l'uso in dotazione contiene istruzioni per l'uso prima di usare il proiettore. Den medföljande CD-...Sie die Bedienungsanleitung vor der Verwendung des Projektors sorgfältig durch. Lees de handleiding zorgvuldig door voor u de projector in het Engels, Duits, Frans, Spaans, Italiaans, Nederlands, Zweeds, Portugees, Chinees, Koreaans en Arabisch. iv
XR-55S | XR-55X Operation Manual
Page 5
... SHOCK. DO NOT REMOVE SCREWS EXCEPT SPECIFIED USER SERVICE SCREW. The lightning flash with the projector. 1. ONLY PRODUCT DISPOSAL This product utilizes tin-lead solder, and lamp containing a small amount of your new SHARP Projector, using the projector, please read this product to your local authorities, the Electronics Industries Alliance: www.eiae.org...
... SHOCK. DO NOT REMOVE SCREWS EXCEPT SPECIFIED USER SERVICE SCREW. The lightning flash with the projector. 1. ONLY PRODUCT DISPOSAL This product utilizes tin-lead solder, and lamp containing a small amount of your new SHARP Projector, using the projector, please read this product to your local authorities, the Electronics Industries Alliance: www.eiae.org...
XR-55S | XR-55X Operation Manual
Page 6
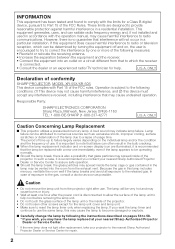
... lamp unit. • Make sure to reset the lamp timer only when replacing the lamp. ONLY Declaration of conformity SHARP PROJECTOR, MODEL XR-55X/XR-50S This device complies with a new one or more of the projector. • Do not loosen other screws except for help. This equipment generates, uses, and can be vented into an...
... lamp unit. • Make sure to reset the lamp timer only when replacing the lamp. ONLY Declaration of conformity SHARP PROJECTOR, MODEL XR-55X/XR-50S This device complies with a new one or more of the projector. • Do not loosen other screws except for help. This equipment generates, uses, and can be vented into an...
XR-55S | XR-55X Operation Manual
Page 7
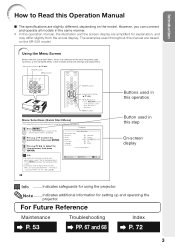
...to Read this Operation Manual ■ The specifications are based on the XR-55X model. Press ENTER to display the Complete Menu screen. • If you can also be performed by using the projector. "PRJ-ADJ2" - Indicates additional information for explanation, and may differ slightly ... ENTER END 38 Buttons used in this operation Button used in the same manner. • In this manual are slightly different, depending on the projector. 1 Press MENU. • The "Quick Start Menu" screen for using the buttons on the model. The examples used functions, or the ...
...to Read this Operation Manual ■ The specifications are based on the XR-55X model. Press ENTER to display the Complete Menu screen. • If you can also be performed by using the projector. "PRJ-ADJ2" - Indicates additional information for explanation, and may differ slightly ... ENTER END 38 Buttons used in this operation Button used in the same manner. • In this manual are slightly different, depending on the projector. 1 Press MENU. • The "Quick Start Menu" screen for using the buttons on the model. The examples used functions, or the ...
XR-55S | XR-55X Operation Manual
Page 8
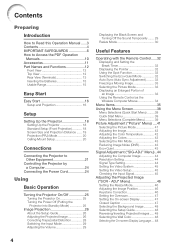
...13 Inserting the Batteries 15 Usable Range 15 Easy Start Easy Start 16 Setup and Projection 16 Setup Setting Up the Projector 18 Setting Up the Projector 18 Standard Setup (Front Projection 18 Screen Size and Projection Distance ...... 19 Projection (PRJ) Mode 20 Ceiling-Mount ...Setup 20 Connections Connecting the Projector to Other Equipment 21 Controlling the Projector by a Computer 24 Connecting the Power Cord 24 Using Basic Operation Turning the Projector On/Off 25 Turning the Projector On 25 Turning the Power Off (Putting the Projector into Standby Mode 25 Image Projection...
...13 Inserting the Batteries 15 Usable Range 15 Easy Start Easy Start 16 Setup and Projection 16 Setup Setting Up the Projector 18 Setting Up the Projector 18 Standard Setup (Front Projection 18 Screen Size and Projection Distance ...... 19 Projection (PRJ) Mode 20 Ceiling-Mount ...Setup 20 Connections Connecting the Projector to Other Equipment 21 Controlling the Projector by a Computer 24 Connecting the Power Cord 24 Using Basic Operation Turning the Projector On/Off 25 Turning the Projector On 25 Turning the Power Off (Putting the Projector into Standby Mode 25 Image Projection...
XR-55S | XR-55X Operation Manual
Page 9
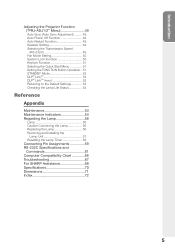
Introduction Adjusting the Projector Function ("PRJ-ADJ1/2" Menu 49 Auto Sync (Auto Sync Adjustment) ......... 49 Auto Power Off Function 49 Auto Restart Function 49 Speaker Setting 49 Selecting the Transmission Speed (RS-232C 49 Fan Mode Setting 50 System Lock Function 50 Keylock Function 51 Selecting the Quick Start Menu 51 Setting the FUNCTION... 57 Resetting the Lamp Timer 58 Connecting Pin Assignments 59 RS-232C Specifications and Commands 61 Computer Compatibility Chart 66 Troubleshooting 67 For SHARP Assistance 68 Specifications 70 Dimensions 71 Index 72 5
Introduction Adjusting the Projector Function ("PRJ-ADJ1/2" Menu 49 Auto Sync (Auto Sync Adjustment) ......... 49 Auto Power Off Function 49 Auto Restart Function 49 Speaker Setting 49 Selecting the Transmission Speed (RS-232C 49 Fan Mode Setting 50 System Lock Function 50 Keylock Function 51 Selecting the Quick Start Menu 51 Setting the FUNCTION... 57 Resetting the Lamp Timer 58 Connecting Pin Assignments 59 RS-232C Specifications and Commands 61 Computer Compatibility Chart 66 Troubleshooting 67 For SHARP Assistance 68 Specifications 70 Dimensions 71 Index 72 5
XR-55S | XR-55X Operation Manual
Page 12
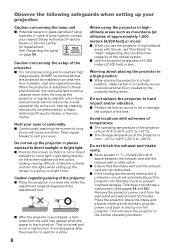
...so as not to rest your nearest Sharp Authorized Projector Dealer or Service Center for a while. Take regular breaks to hit or damage the surface of glass particles if lamp ruptures. Caution regarding placing of the projector ■ Place the projector on a level site within the ... not obstructed. ■ If the cooling fan becomes obstructed, a protection circuit will automatically put the projector into Standby mode to avoid personal injury caused by a Sharp Authorized Projector Dealer or Service Center. Caution concerning the lamp unit ■ Potential hazard of the lens. See ...
...so as not to rest your nearest Sharp Authorized Projector Dealer or Service Center for a while. Take regular breaks to hit or damage the surface of glass particles if lamp ruptures. Caution regarding placing of the projector ■ Place the projector on a level site within the ... not obstructed. ■ If the cooling fan becomes obstructed, a protection circuit will automatically put the projector into Standby mode to avoid personal injury caused by a Sharp Authorized Projector Dealer or Service Center. Caution concerning the lamp unit ■ Potential hazard of the lens. See ...

XR-55S | XR-55X Operation Manual
Page 13
...hereby granted, free of charge, to Fonts or Font Software that you close the lens shutter. ■ Do not expose the projector to direct sunlight or place next to reproduce and distribute the Font Software, including without prior written authorization from the Gnome Foundation or... blink. This does not indicate malfunction. Closed Caption uses Bitstream Vera fonts Copyright (c) 2003 by holding the lens. ■ When storing the projector, ensure that has been modified and is automatically controlled. The Font Software may be connected. ■ Please read the operation manuals ...
...hereby granted, free of charge, to Fonts or Font Software that you close the lens shutter. ■ Do not expose the projector to direct sunlight or place next to reproduce and distribute the Font Software, including without prior written authorization from the Gnome Foundation or... blink. This does not indicate malfunction. Closed Caption uses Bitstream Vera fonts Copyright (c) 2003 by holding the lens. ■ When storing the projector, ensure that has been modified and is automatically controlled. The Font Software may be connected. ■ Please read the operation manuals ...

XR-55S | XR-55X Operation Manual
Page 14
Please download Adobe® Reader® from the Internet (http://www.adobe.com). How to access the projector manuals. Note • If the desired pdf file cannot be opened by double clicking the mouse, start Adobe® Reader® first, then ...
Please download Adobe® Reader® from the Internet (http://www.adobe.com). How to access the projector manuals. Note • If the desired pdf file cannot be opened by double clicking the mouse, start Adobe® Reader® first, then ...
XR-55S | XR-55X Operation Manual
Page 15
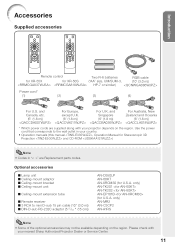
...Ceiling-mount extension tube ■ Remote receiver ■ 3 RCA to the wall outlet in "< >" are supplied along with your projector depends on the region. only) AN-MR2 AN-C3CP2 AN-A1RS Note • Some of the optional accessories may not be available... your nearest Sharp Authorized Projector Dealer or Service Center. 11 Introduction Accessories Supplied accessories Remote control Two R-6 batteries RGB cable for XR-55X for Stereoscopic 3D Projection and CD-ROM ) Note • Codes in your country. • Operation manuals (this manual , Operation Manual for XR-50S ("AA"...
...Ceiling-mount extension tube ■ Remote receiver ■ 3 RCA to the wall outlet in "< >" are supplied along with your projector depends on the region. only) AN-MR2 AN-C3CP2 AN-A1RS Note • Some of the optional accessories may not be available... your nearest Sharp Authorized Projector Dealer or Service Center. 11 Introduction Accessories Supplied accessories Remote control Two R-6 batteries RGB cable for XR-55X for Stereoscopic 3D Projection and CD-ROM ) Note • Codes in your country. • Operation manuals (this manual , Operation Manual for XR-50S ("AA"...
XR-55S | XR-55X Operation Manual
Page 16
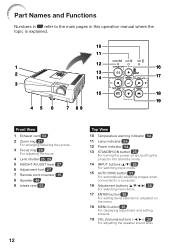
... Temperature warning indicator 54 11 Lamp indicator 54 12 Power indicator 54 13 STANDBY/ON button 25 For turning the power on and putting the projector into Standby mode. 14 INPUT buttons (P/R) 29 For switching Input mode. 15 AUTO SYNC button 33 For automatically adjusting images when connected to a computer. 16...
... Temperature warning indicator 54 11 Lamp indicator 54 12 Power indicator 54 13 STANDBY/ON button 25 For turning the power on and putting the projector into Standby mode. 14 INPUT buttons (P/R) 29 For switching Input mode. 15 AUTO SYNC button 33 For automatically adjusting images when connected to a computer. 16...
XR-55S | XR-55X Operation Manual
Page 17
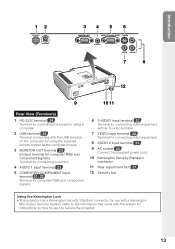
Introduction 12 34 5 6 7 8 12 9 10 11 Rear View (Terminals) 1 RS-232C terminal 24 Terminal for controlling the projector using the supplied remote control as the computer mouse. 3 MONITOR OUT terminal 23 (Output terminal for computer RGB and component signals.)... the supplied power cord. 10 Kensington Security Standard connector 11 Rear adjustment foot 27 12 Security bar Using the Kensington Lock • This projector has a Kensington Security Standard connector for using a computer. 2 USB terminal 34 Terminal connecting with a Kensington MicroSaver Security System. Refer to...
Introduction 12 34 5 6 7 8 12 9 10 11 Rear View (Terminals) 1 RS-232C terminal 24 Terminal for controlling the projector using the supplied remote control as the computer mouse. 3 MONITOR OUT terminal 23 (Output terminal for computer RGB and component signals.)... the supplied power cord. 10 Kensington Security Standard connector 11 Rear adjustment foot 27 12 Security bar Using the Kensington Lock • This projector has a Kensington Security Standard connector for using a computer. 2 USB terminal 34 Terminal connecting with a Kensington MicroSaver Security System. Refer to...
XR-55S | XR-55X Operation Manual
Page 18
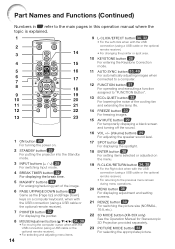
... 6 7 17 8 18 9 19 10 20 11 21 12 22 13 23 1 ON button 25 For turning the power on. 2 STANDBY button 25 For putting the projector into the Standby mode. 3 INPUT buttons ( / ) 29 For switching Input mode. 4 BREAK TIMER button 32 For displaying the break time. 5 MAGNIFY buttons 33 For...button 38 For displaying adjustment and setting screens. 21 RESIZE button 30 For switching the picture size (NORMAL, 16:9, etc.). 22 3D MODE button (XR-55X only) See the Operation Manual for Stereoscopic 3D Projection provided separately. 23 PICTURE MODE button 33 For selecting the appropriate picture.
... 6 7 17 8 18 9 19 10 20 11 21 12 22 13 23 1 ON button 25 For turning the power on. 2 STANDBY button 25 For putting the projector into the Standby mode. 3 INPUT buttons ( / ) 29 For switching Input mode. 4 BREAK TIMER button 32 For displaying the break time. 5 MAGNIFY buttons 33 For...button 38 For displaying adjustment and setting screens. 21 RESIZE button 30 For switching the picture size (NORMAL, 16:9, etc.). 22 3D MODE button (XR-55X only) See the Operation Manual for Stereoscopic 3D Projection provided separately. 23 PICTURE MODE button 33 For selecting the appropriate picture.
XR-55S | XR-55X Operation Manual
Page 19
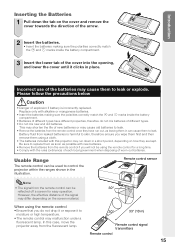
...from the remote control can be used to moisture or high temperature. • The remote control may malfunction under a fluorescent lamp. In this projector may run down the tab on the cover and remove the cover towards the direction of the arrow. 2 Insert the batteries. • Insert the ...; Ensure that you will not be 30° reflected off a screen for a long time. • Comply with this case, move the projector away from the remote control once they are kept. This may cause old batteries to leak. • Remove the batteries from the fluorescent lamp...
...from the remote control can be used to moisture or high temperature. • The remote control may malfunction under a fluorescent lamp. In this projector may run down the tab on the cover and remove the cover towards the direction of the arrow. 2 Insert the batteries. • Insert the ...; Ensure that you will not be 30° reflected off a screen for a long time. • Comply with this case, move the projector away from the remote control once they are kept. This may cause old batteries to leak. • Remove the batteries from the fluorescent lamp...
XR-55S | XR-55X Operation Manual
Page 20
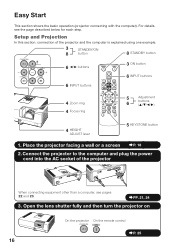
Easy Start This section shows the basic operation (projector connecting with the computer). For details, see pages 22 and 23. _PP. 21, 24 3. Open the lens shutter fully and then turn the projector on On the projector On the remote control _P. 25 16 Place the projector facing a wall or a screen _P. 18 2....Connect the projector to the computer and plug the power cord into the AC socket of the...
Easy Start This section shows the basic operation (projector connecting with the computer). For details, see pages 22 and 23. _PP. 21, 24 3. Open the lens shutter fully and then turn the projector on On the projector On the remote control _P. 25 16 Place the projector facing a wall or a screen _P. 18 2....Connect the projector to the computer and plug the power cord into the AC socket of the...
XR-55S | XR-55X Operation Manual
Page 21
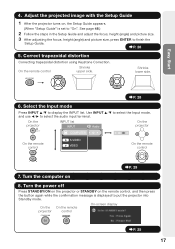
... On the remote control S S-VIDEO V VIDEO On the remote control _P. 29 7. Turn the power off Press STANDBY/ON on the projector or STANDBY on the remote control, and then press the button again while the confirmation message is set to "On". Use INPUT P/R to ... Setup Guide and adjust the focus, height (angle) and picture size. 3 After adjusting the focus, height (angle) and picture size, press ENTER to put the projector into Standby mode. On the remote control Shrinks upper side. Adjust the projected image with the Setup Guide 1 After the...
... On the remote control S S-VIDEO V VIDEO On the remote control _P. 29 7. Turn the power off Press STANDBY/ON on the projector or STANDBY on the remote control, and then press the button again while the confirmation message is set to "On". Use INPUT P/R to ... Setup Guide and adjust the focus, height (angle) and picture size. 3 After adjusting the focus, height (angle) and picture size, press ENTER to put the projector into Standby mode. On the remote control Shrinks upper side. Adjust the projected image with the Setup Guide 1 After the...

XR-55S | XR-55X Operation Manual
Page 22
... the best image quality. (See page 28.) Standard Setup (Front Projection) ■ Place the projector at and level. Setting Up the Projector Setting Up the Projector For optimal image quality, position the projector perpendicular to the screen with the projector's feet flat the required distance from the screen according to the desired picture size...
... the best image quality. (See page 28.) Standard Setup (Front Projection) ■ Place the projector at and level. Setting Up the Projector Setting Up the Projector For optimal image quality, position the projector perpendicular to the screen with the projector's feet flat the required distance from the screen according to the desired picture size...

XR-55S | XR-55X Operation Manual
Page 23
... (52'') 89 cm (35'') 311 cm (123'') 249 cm (98'') 187 cm (74'') 149 cm (59'') 125 cm (49'') 100 cm (39'') 75 cm (29'') 50 cm (20'') 9.4 m (30' 11") 11.4 m (37' 5") 7.5 m (24' 9") 9.1 m (29' 11") 5.6 m (18' 6") 6.8 m (22' 5") 4.5 m (14' 10") 5.5 m (18' 0") 3.8 m (12' 4") 4.6 m (15' 0") 3.0 m (9' 11") 3.6 m (12' 0") 2.3 m (7' 5") 2.7 m (9' 0") 1.5 m (4' 11") ...cm (±6 17/32") ±12 cm (±4 29/32") ±8 cm (±3 17/64") When using the projector with screen sizes not listed in the above charts, calculate the values according to the bottom of error in the values in the diagrams...
... (52'') 89 cm (35'') 311 cm (123'') 249 cm (98'') 187 cm (74'') 149 cm (59'') 125 cm (49'') 100 cm (39'') 75 cm (29'') 50 cm (20'') 9.4 m (30' 11") 11.4 m (37' 5") 7.5 m (24' 9") 9.1 m (29' 11") 5.6 m (18' 6") 6.8 m (22' 5") 4.5 m (14' 10") 5.5 m (18' 0") 3.8 m (12' 4") 4.6 m (15' 0") 3.0 m (9' 11") 3.6 m (12' 0") 2.3 m (7' 5") 2.7 m (9' 0") 1.5 m (4' 11") ...cm (±6 17/32") ±12 cm (±4 29/32") ±8 cm (±3 17/64") When using the projector with screen sizes not listed in the above charts, calculate the values according to the bottom of error in the values in the diagrams...


