
Operation Manual
Page 3
Always refit the fuse cover after replacing the fuse. DANGER: The fuse from the cut-off plug should the cut-off the mains plug and fit an appropriate type. Under no circumstances ... Brown : Live As the colours of the wires in the mains lead of the socket outlet in a safe manner. Should the fuse need to be replaced, a BSI or ASTA approved BS 1362 fuse marked or and of the same rating as follows: • The wire which is coloured green-and-yellow...
Always refit the fuse cover after replacing the fuse. DANGER: The fuse from the cut-off plug should the cut-off the mains plug and fit an appropriate type. Under no circumstances ... Brown : Live As the colours of the wires in the mains lead of the socket outlet in a safe manner. Should the fuse need to be replaced, a BSI or ASTA approved BS 1362 fuse marked or and of the same rating as follows: • The wire which is coloured green-and-yellow...

Operation Manual
Page 6
...lead solder, and a pressurized lamp containing a small amount of the FCC Rules. This SHARP projector uses a DLP® chip. If this device must conform to. Caution Concerning Lamp Replacement See "Replacing the Lamp" on , the user is connected. • Consult the dealer or an.... This equipment generates, uses, and can be regulated due to environmental considerations. U.S.A. ONLY Declaration of conformity SHARP PROJECTOR, MODEL XR-40X/XR-30X/XR-30S This device complies with Part 15 of the unit. This will not occur in a residential installation. ONLY 2
...lead solder, and a pressurized lamp containing a small amount of the FCC Rules. This SHARP projector uses a DLP® chip. If this device must conform to. Caution Concerning Lamp Replacement See "Replacing the Lamp" on , the user is connected. • Consult the dealer or an.... This equipment generates, uses, and can be regulated due to environmental considerations. U.S.A. ONLY Declaration of conformity SHARP PROJECTOR, MODEL XR-40X/XR-30X/XR-30S This device complies with Part 15 of the unit. This will not occur in a residential installation. ONLY 2
Operation Manual
Page 9
Introduction Reference Appendix Maintenance 47 Maintenance Indicators 48 Regarding the Lamp 50 Lamp 50 Caution Concerning the Lamp 50 Replacing the Lamp 50 Removing and Installing the Lamp Unit 51 Resetting the Lamp Timer 52 Connecting Pin Assignments 53 RS-232C Specifications and Command Settings 55 Computer Compatibility Chart 60 Troubleshooting 61 For SHARP Assistance 63 Specifications 64 Dimensions 65 Index 66 5
Introduction Reference Appendix Maintenance 47 Maintenance Indicators 48 Regarding the Lamp 50 Lamp 50 Caution Concerning the Lamp 50 Replacing the Lamp 50 Removing and Installing the Lamp Unit 51 Resetting the Lamp Timer 52 Connecting Pin Assignments 53 RS-232C Specifications and Command Settings 55 Computer Compatibility Chart 60 Troubleshooting 61 For SHARP Assistance 63 Specifications 64 Dimensions 65 Index 66 5

Operation Manual
Page 11
.... c. d. If the product has been dropped or damaged in any kind into the product. Replacement Parts When replacement parts are required, be sure the service technician has used replacement parts specified by following conditions: a. Overloading Do not overload wall outlets, extension cords, or integral... opening or removing covers may expose you may touch dangerous voltage points or short-out parts that produce heat. • DLP® and the DLP logo are registered trademarks of Texas Instruments. • Microsoft® and Windows® are trademarks or registered trademarks of...
.... c. d. If the product has been dropped or damaged in any kind into the product. Replacement Parts When replacement parts are required, be sure the service technician has used replacement parts specified by following conditions: a. Overloading Do not overload wall outlets, extension cords, or integral... opening or removing covers may expose you may touch dangerous voltage points or short-out parts that produce heat. • DLP® and the DLP logo are registered trademarks of Texas Instruments. • Microsoft® and Windows® are trademarks or registered trademarks of...

Operation Manual
Page 12
.... Caution concerning the lamp unit ■ Potential hazard of the lens. As long as not to maintain high image quality, SHARP recommends that this can affect the longevity of space between the exhaust vent and the nearest wall or obstruction. ■ Ensure ... screen for long hours will disappear after the projector is used for replacement. Rest your projector. Warning about placing the projector in a high position ■ When placing the projector in a high position, make certain it is regularly cleaned, use the projector in places exposed to "High". This will ...
.... Caution concerning the lamp unit ■ Potential hazard of the lens. As long as not to maintain high image quality, SHARP recommends that this can affect the longevity of space between the exhaust vent and the nearest wall or obstruction. ■ Ensure ... screen for long hours will disappear after the projector is used for replacement. Rest your projector. Warning about placing the projector in a high position ■ When placing the projector in a high position, make certain it is regularly cleaned, use the projector in places exposed to "High". This will ...

Operation Manual
Page 14
... check with your country. • Operation manual (this manual and CD-ROM ) Note • Codes in "< >" are Replacement parts codes. except U.K. (6' (1.8 m)) (6' (1.8 m)) For U.K. Optional accessories ■ 3 RCA to the wall outlet in your nearest Sharp Authorized Projector Dealer or Service Center. 10 and For Europe, Canada, etc. Accessories Supplied accessories Two R-6 batteries RGB cable...
... check with your country. • Operation manual (this manual and CD-ROM ) Note • Codes in "< >" are Replacement parts codes. except U.K. (6' (1.8 m)) (6' (1.8 m)) For U.K. Optional accessories ■ 3 RCA to the wall outlet in your nearest Sharp Authorized Projector Dealer or Service Center. 10 and For Europe, Canada, etc. Accessories Supplied accessories Two R-6 batteries RGB cable...

Operation Manual
Page 18
Battery fluid from leaked batteries is incorrectly replaced. Replace only with this projector may run out, as possible with new batteries. • Remove the batteries from the remote control once they are kept. Please follow the precautions below. Be sure to replace them as soon as leaving them in place. This may cause old batteries...
Battery fluid from leaked batteries is incorrectly replaced. Replace only with this projector may run out, as possible with new batteries. • Remove the batteries from the remote control once they are kept. Please follow the precautions below. Be sure to replace them as soon as leaving them in place. This may cause old batteries...
Operation Manual
Page 29
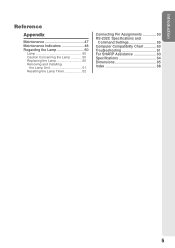
... the breaker switch is turned on. (See page 43.) • English is set to start operation. Turning the Projector On/Off Turning the Projector on Note that the connections to external equipment and power outlet should be done before performing the operations written below. ...running. 25 This is normal operation as faulty operation. • If the projector is put the projector into standby mode. • The projector cannot be turned on while cooling. It should be replaced. • When switching on the projector, a slight flickering of the lamp. Info • When "Auto Restart...
... the breaker switch is turned on. (See page 43.) • English is set to start operation. Turning the Projector On/Off Turning the Projector on Note that the connections to external equipment and power outlet should be done before performing the operations written below. ...running. 25 This is normal operation as faulty operation. • If the projector is put the projector into standby mode. • The projector cannot be turned on while cooling. It should be replaced. • When switching on the projector, a slight flickering of the lamp. Info • When "Auto Restart...
Operation Manual
Page 52
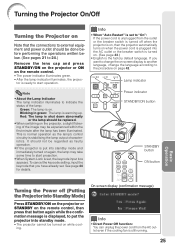
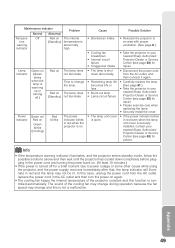
..., due to blockage of the air vents, or the setting location, " " will not turn on the projector a fourth time without replacing the lamp, the projector will illuminate in red. ■ If you perform the measures described on rising, the lamp will turn off and the temperature ...See page 49.) 48 The lamp is shut down abnormally or requires to (red), the lamp will automatically turn off and then the projector will run, and then the projec- Top View Temperature warning indicator Lamp indicator Power indicator About the temperature warning indicator If the temperature inside...
..., due to blockage of the air vents, or the setting location, " " will not turn on the projector a fourth time without replacing the lamp, the projector will illuminate in red. ■ If you perform the measures described on rising, the lamp will turn off and the temperature ...See page 49.) 48 The lamp is shut down abnormally or requires to (red), the lamp will automatically turn off and then the projector will run, and then the projec- Top View Temperature warning indicator Lamp indicator Power indicator About the temperature warning indicator If the temperature inside...
Operation Manual
Page 53
... AC outlet, and then connect it again. • Carefully replace the lamp. (See page 51.) • Take the projector to your nearest Sharp Authorized Projector Dealer or Service Center (see page 63) for repair. • Please exercise care when replacing the lamp. • Securely install the cover. •...ventilation. (See page 8.) • Take the projector to your nearest Sharp Authorized Projector Dealer or Service Center (see page 63) for repair. • Disconnect the power cord from the AC outlet, replace the power cord in red when the projector is on (Green blinks when the lamp is...
... AC outlet, and then connect it again. • Carefully replace the lamp. (See page 51.) • Take the projector to your nearest Sharp Authorized Projector Dealer or Service Center (see page 63) for repair. • Please exercise care when replacing the lamp. • Securely install the cover. •...ventilation. (See page 8.) • Take the projector to your nearest Sharp Authorized Projector Dealer or Service Center (see page 63) for repair. • Disconnect the power cord from the AC outlet, replace the power cord in red when the projector is on (Green blinks when the lamp is...

Operation Manual
Page 54
...lamp will be very hot and may cause burns or injury. • Wait at your nearest Sharp Authorized Projector Dealer or Service Center. * If the new lamp does not light after replacement, take your projector to fully cool before removing the lamp unit. ■ Carefully change the lamp by a 90-... is important to note that failure can be vented into the room from the exhaust vent. Replacing the Lamp Caution • Do not remove the lamp unit from your nearest Sharp Authorized Projector Dealer or Service Center to failure largely varies depending on -screen display icon are illuminated, it...
...lamp will be very hot and may cause burns or injury. • Wait at your nearest Sharp Authorized Projector Dealer or Service Center. * If the new lamp does not light after replacement, take your projector to fully cool before removing the lamp unit. ■ Carefully change the lamp by a 90-... is important to note that failure can be vented into the room from the exhaust vent. Replacing the Lamp Caution • Do not remove the lamp unit from your nearest Sharp Authorized Projector Dealer or Service Center to failure largely varies depending on -screen display icon are illuminated, it...
Operation Manual
Page 56
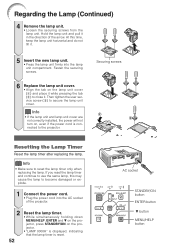
... lamp. Info • Make sure to secure the lamp unit cover. Fasten the securing screws. 6 Replace the lamp unit cover. • Align the tab on the projector. • "LAMP 0000H" is displayed, indicating that the lamp timer is connected to become damaged or explode. 1 Connect the power cord. ... lamp unit. Securing screws Resetting the Lamp Timer Reset the lamp timer after replacing the lamp. At this may cause the lamp to the projector. Hold the lamp unit and pull it in the direction of the projector. 2 52 Reset the lamp timer. • While simultaneously holding down MENU...
... lamp. Info • Make sure to secure the lamp unit cover. Fasten the securing screws. 6 Replace the lamp unit cover. • Align the tab on the projector. • "LAMP 0000H" is displayed, indicating that the lamp timer is connected to become damaged or explode. 1 Connect the power cord. ... lamp unit. Securing screws Resetting the Lamp Timer Reset the lamp timer after replacing the lamp. At this may cause the lamp to the projector. Hold the lamp unit and pull it in the direction of the projector. 2 52 Reset the lamp timer. • While simultaneously holding down MENU...
Operation Manual
Page 66
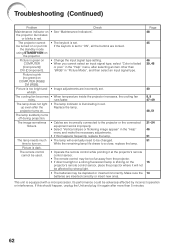
... select an input signal type, select "Color is faded or poor" in the "Help" menu, after the Replace the lamp. The cooling fan becomes • When temperature inside the projector increases, the cooling fan noisy. up even after selecting an item other than 5 minutes. 62...The remote control may be turned on or put into the standby mode using STANDBY/ON on the projector's remote control sensor, place the projector where it will eventually need to a close, replace the lamp. Picture is equipped with a microprocessor. The image sometimes flickers. • Cables are...
... select an input signal type, select "Color is faded or poor" in the "Help" menu, after the Replace the lamp. The cooling fan becomes • When temperature inside the projector increases, the cooling fan noisy. up even after selecting an item other than 5 minutes. 62...The remote control may be turned on or put into the standby mode using STANDBY/ON on the projector's remote control sensor, place the projector where it will eventually need to a close, replace the lamp. Picture is equipped with a microprocessor. The image sometimes flickers. • Cables are...

Operation Manual
Page 70
... 43 PRJ Mode 19, 42 Progressive 40 R-CLICK/RETURN button 34, 37 Rear adjustment foot 27 Red 40 Remote control 13 Remote control sensor 15 Replacing the lamp 50, 51 Resize 30, 41 RESIZE button 30 RGB cable 21 RS-232C terminal 24 SCR - Index Accessories 10 AC socket 24 Adjustment... MODE button 33 POINTER button 32 Power cord 24 Power indicator 48 PRJ - ADJ 41 Screen Size and Projection Distance 20 Setup Guide 26, 42 Sharp 40 Speaker 43 SPOT button 32 STANDBY button 25 STANDBY Mode 43 STANDBY/ON button 25 STRETCH 30, 31 Supplied accessories 10 S-VIDEO button 29...
... 43 PRJ Mode 19, 42 Progressive 40 R-CLICK/RETURN button 34, 37 Rear adjustment foot 27 Red 40 Remote control 13 Remote control sensor 15 Replacing the lamp 50, 51 Resize 30, 41 RESIZE button 30 RGB cable 21 RS-232C terminal 24 SCR - Index Accessories 10 AC socket 24 Adjustment... MODE button 33 POINTER button 32 Power cord 24 Power indicator 48 PRJ - ADJ 41 Screen Size and Projection Distance 20 Setup Guide 26, 42 Sharp 40 Speaker 43 SPOT button 32 STANDBY button 25 STANDBY Mode 43 STANDBY/ON button 25 STRETCH 30, 31 Supplied accessories 10 S-VIDEO button 29...


