
XL-S10 Operation Manual
Page 2
XL-S10 SPECIAL NOTES Important Instruction CAUTION: TO REDUCE THE RISK OF ELECTRIC SHOCK, DO NOT REMOVE COVER (OR BACK). NO USER-SERVICEABLE PARTS INSIDE. Explanation of Graphical Symbols: The lightning flash with the instructions, may cause harmful interference to the presence of important operating and maintenance (servicing) instructions in a residential installation. This equipment generates, uses, and can be determined by turning the equipment off...
XL-S10 SPECIAL NOTES Important Instruction CAUTION: TO REDUCE THE RISK OF ELECTRIC SHOCK, DO NOT REMOVE COVER (OR BACK). NO USER-SERVICEABLE PARTS INSIDE. Explanation of Graphical Symbols: The lightning flash with the instructions, may cause harmful interference to the presence of important operating and maintenance (servicing) instructions in a residential installation. This equipment generates, uses, and can be determined by turning the equipment off...

XL-S10 Operation Manual
Page 3
... from the type of the product and to your home, consult your product dealer or local power company. This is a safety feature. This is a safety feature. If replacement of power supply to protect it from battery power, or other ). The safety and operating instructions should be sure the service technician has used a replacement plug specified by items placed upon or against them...
... from the type of the product and to your home, consult your product dealer or local power company. This is a safety feature. This is a safety feature. If replacement of power supply to protect it from battery power, or other ). The safety and operating instructions should be sure the service technician has used a replacement plug specified by items placed upon or against them...
XL-S10 Operation Manual
Page 4
... product should not be sure the service technician has used replacement parts specified by a qualified technician to restore the product to dangerous voltage or other hazards. 23 Safety Check - When replacement parts are covered by the operating instructions as to this product from the wall outlet and disconnect the antenna or cable system. XL-S10 IMPORTANT SAFETY INSTRUCTIONS (continued) Important Instruction 15 Outdoor Antenna Grounding -
... product should not be sure the service technician has used replacement parts specified by a qualified technician to restore the product to dangerous voltage or other hazards. 23 Safety Check - When replacement parts are covered by the operating instructions as to this product from the wall outlet and disconnect the antenna or cable system. XL-S10 IMPORTANT SAFETY INSTRUCTIONS (continued) Important Instruction 15 Outdoor Antenna Grounding -
XL-S10 Operation Manual
Page 5
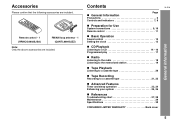
... Playback Listening to a cassette tape 21, 22 ! Contents ! Preparation for Use System connections 9, 10 Remote control 11 ! Tape Recording Recording to a CD 14 - 16 Programmed play 17 ! References Troubleshooting chart 27, 28 Maintenance 29 Specifications 30 CONSUMER LIMITED WARRANTY Back cover General Information XL-S10 5 Basic Operation Sound control 12 Setting the clock 13 ! Radio Listening to the radio 18 Listening to a cassette tape 20 ! Advanced Features Timer and...
... Playback Listening to a cassette tape 21, 22 ! Contents ! Preparation for Use System connections 9, 10 Remote control 11 ! Tape Recording Recording to a CD 14 - 16 Programmed play 17 ! References Troubleshooting chart 27, 28 Maintenance 29 Specifications 30 CONSUMER LIMITED WARRANTY Back cover General Information XL-S10 5 Basic Operation Sound control 12 Setting the clock 13 ! Radio Listening to the radio 18 Listening to a cassette tape 20 ! Advanced Features Timer and...
XL-S10 Operation Manual
Page 6
... does not work properly, unplug and plug it from direct sunlight, strong magnetic fields, excessive dust, humidity and electronic/electrical equipment (home computers, facsimiles, etc.) which generate electrical noise. Volume control The sound level at least 4" (10 cm) of this may result in a well-ventilated area and that which is at a given volume setting depends on top of free space on...
... does not work properly, unplug and plug it from direct sunlight, strong magnetic fields, excessive dust, humidity and electronic/electrical equipment (home computers, facsimiles, etc.) which generate electrical noise. Volume control The sound level at least 4" (10 cm) of this may result in a well-ventilated area and that which is at a given volume setting depends on top of free space on...

XL-S10 Operation Manual
Page 7
.... Tape Pause Button 20, 21, 22 22. Equalizer Indicator 12 24. FM Stereo Mode Indicator 18 33. Subwoofer Pre-output Jack 26 37. CD Eject Button 14 10. CD Play or Pause, Tuning Up Button 14, 15, 18 13. Volume Indicator 12 23. CD Play Indicator 14 29. FM/AM Loop Antenna Jack 9 35. AC Power Cord 10 General Information XL-S10 7 Bass/Treble Selector Button 12 5. CD Track Up or Fast Forward, Tuner Preset Up Button...
.... Tape Pause Button 20, 21, 22 22. Equalizer Indicator 12 24. FM Stereo Mode Indicator 18 33. Subwoofer Pre-output Jack 26 37. CD Eject Button 14 10. CD Play or Pause, Tuning Up Button 14, 15, 18 13. Volume Indicator 12 23. CD Play Indicator 14 29. FM/AM Loop Antenna Jack 9 35. AC Power Cord 10 General Information XL-S10 7 Bass/Treble Selector Button 12 5. CD Track Up or Fast Forward, Tuner Preset Up Button...
XL-S10 Operation Manual
Page 10
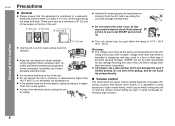
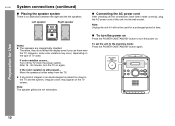
... connections (continued) ! Move the speakers further away from the power switch). After 15 - 30 minutes, turn the power on again. Left speaker Right speaker ! Note: Unplug the unit if it will not be used . To turn the power on Press the POWER ON/STAND-BY button to turn the TV on . Connecting the AC power cord After checking all the connections have been made correctly, plug the AC power cord of time...
... connections (continued) ! Move the speakers further away from the power switch). After 15 - 30 minutes, turn the power on again. Left speaker Right speaker ! Note: Unplug the unit if it will not be used . To turn the power on Press the POWER ON/STAND-BY button to turn the TV on . Connecting the AC power cord After checking all the connections have been made correctly, plug the AC power cord of time...

XL-S10 Operation Manual
Page 11
... the power turn on the unit to the remote sensor on the unit with a soft cloth. This will prevent potential damage due to be used for battery use: " Replace all old batteries with operation. Caution: " Do not use : " Replace the batteries if the operating distance is not to battery leakage. Remote control ! Change the lighting or the direction of time. Now, you can enjoy the music. 8" - 20' (0.2 m - 6 m) XL-S10...
... the power turn on the unit to the remote sensor on the unit with a soft cloth. This will prevent potential damage due to be used for battery use: " Replace all old batteries with operation. Caution: " Do not use : " Replace the batteries if the operating distance is not to battery leakage. Remote control ! Change the lighting or the direction of time. Now, you can enjoy the music. 8" - 20' (0.2 m - 6 m) XL-S10...

XL-S10 Operation Manual
Page 12
...or +) button to increase the volume and the VOLUME - Remote control operation: Press the VOLUME + button to adjust the treble. -3 ... 0 ... 4 When it is turned clockwise, the volume will decrease. Remote control operation: Press the BASS (- Adjusting the treble Main unit operation: 1 Press the BASS/TREBLE button to select "TrE". 2 Within 5 seconds, turn the VOLUME control to adjust the treble. Adjusting the bass Main unit operation: 1 Press the BASS/TREBLE button to select "BASS". 2 Within 5 seconds, turn the VOLUME control to adjust the bass. Basic Operation XL-S10 Sound control 12...
...or +) button to increase the volume and the VOLUME - Remote control operation: Press the VOLUME + button to adjust the treble. -3 ... 0 ... 4 When it is turned clockwise, the volume will decrease. Remote control operation: Press the BASS (- Adjusting the treble Main unit operation: 1 Press the BASS/TREBLE button to select "TrE". 2 Within 5 seconds, turn the VOLUME control to adjust the treble. Adjusting the bass Main unit operation: 1 Press the BASS/TREBLE button to select "BASS". 2 Within 5 seconds, turn the VOLUME control to adjust the bass. Basic Operation XL-S10 Sound control 12...
XL-S10 Operation Manual
Page 13
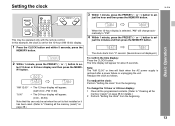
... as follows. XL-S10 Basic Operation This may be set for details.] 2 Perform "Setting the clock" from the beginning. 13 Setting the clock 3 Within 1 minute, press the PRESET ( or ) button to ad- The time display will appear. (AM 12:00 - PM 11:59) "0:00" The 24-hour display will change the 12-hour or 24-hour display: 1 Clear all the memory (reset)" on page...
... as follows. XL-S10 Basic Operation This may be set for details.] 2 Perform "Setting the clock" from the beginning. 13 Setting the clock 3 Within 1 minute, press the PRESET ( or ) button to ad- The time display will appear. (AM 12:00 - PM 11:59) "0:00" The 24-hour display will change the 12-hour or 24-hour display: 1 Clear all the memory (reset)" on page...
XL-S10 Operation Manual
Page 14
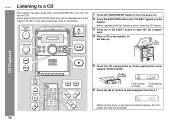
... state of tracks time ( ) button to turn the power on. 2 Press the FUNCTION button until "Cd dISC" appears on the display. bel side up. When operating with the remote control, press the CD button. 3 Press the CD EJECT button to a CD This system can play audio CDs, and CD-R/RW discs but can not record CDs. When the last track on the spindle, la- XL-S10 Listening to...
... state of tracks time ( ) button to turn the power on. 2 Press the FUNCTION button until "Cd dISC" appears on the display. bel side up. When operating with the remote control, press the CD button. 3 Press the CD EJECT button to a CD This system can play audio CDs, and CD-R/RW discs but can not record CDs. When the last track on the spindle, la- XL-S10 Listening to...
XL-S10 Operation Manual
Page 18
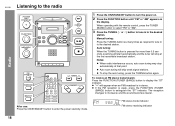
... point. ! When radio interference occurs, auto scan tuning may stop the auto tuning, press the TUNING button again. Notes: ! To receive an FM stereo transmission: Press the FUNCTION (TUNER (BAND)) button to the desired station. Radio XL-S10 Listening to the radio 1 Press the ON/STAND-BY button to monaural, and the sound becomes clearer. The reception changes to turn the power on. 2 Press the FUNCTION button until "FM" or "AM" appears on the display.
... point. ! When radio interference occurs, auto scan tuning may stop the auto tuning, press the TUNING button again. Notes: ! To receive an FM stereo transmission: Press the FUNCTION (TUNER (BAND)) button to the desired station. Radio XL-S10 Listening to the radio 1 Press the ON/STAND-BY button to monaural, and the sound becomes clearer. The reception changes to turn the power on. 2 Press the FUNCTION button until "FM" or "AM" appears on the display.
XL-S10 Operation Manual
Page 19
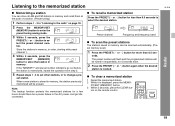
.../SET (MEMORY) button to enter the preset tuning saving mode. 3 Within 5 seconds, press the PRESET ( or ) button to select the preset channel number. Listening to the memorized station " Memorizing a station You can be scanned automatically. (Preset memory scan) 1 Press the PRESET ( or ) button for more than 0.5 seconds to select the desired station. Radio XL-S10 19 Note: The backup function protects the memorized stations for a few hours should there be a power failure or the AC power cord...
.../SET (MEMORY) button to enter the preset tuning saving mode. 3 Within 5 seconds, press the PRESET ( or ) button to select the preset channel number. Listening to the memorized station " Memorizing a station You can be scanned automatically. (Preset memory scan) 1 Press the PRESET ( or ) button for more than 0.5 seconds to select the desired station. Radio XL-S10 19 Note: The backup function protects the memorized stations for a few hours should there be a power failure or the AC power cord...

XL-S10 Operation Manual
Page 21
For recording, use metal or CrO tapes. To interrupt recording: Press the button. Tape Recording XL-S10 21 The volume and sound controls can be performed. 5 Press the button. 6 Press the button, which also engages the button. 4 Press the button again to cancel the pause mode. 8 Press the ( ) button for CD. When operating with the remote control, press the CD button. 3 Load the desired disc. 4 Load a cassette into the cassette compartment...
For recording, use metal or CrO tapes. To interrupt recording: Press the button. Tape Recording XL-S10 21 The volume and sound controls can be performed. 5 Press the button. 6 Press the button, which also engages the button. 4 Press the button again to cancel the pause mode. 8 Press the ( ) button for CD. When operating with the remote control, press the CD button. 3 Load the desired disc. 4 Load a cassette into the cassette compartment...
XL-S10 Operation Manual
Page 23
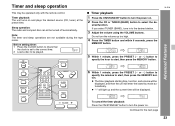
... be played. Note: The timer and sleep operations are not available during the tape mode. Before setting timer: 1 Press the CLOCK button to check that the clock is set to the correct time. 2 Load a disc to be operated only with the remote control. Continued to the desired station. 3 Adjust the volume using the VOLUME buttons. XL-S10 Advanced Features 6 Within 1 minute, press the PRESET ( or ) button to specify the minutes to turn the power...
... be played. Note: The timer and sleep operations are not available during the tape mode. Before setting timer: 1 Press the CLOCK button to check that the clock is set to the correct time. 2 Load a disc to be operated only with the remote control. Continued to the desired station. 3 Adjust the volume using the VOLUME buttons. XL-S10 Advanced Features 6 Within 1 minute, press the PRESET ( or ) button to specify the minutes to turn the power...
XL-S10 Operation Manual
Page 24
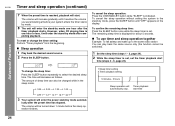
... function cannot be switched). 1 Set the sleep time (steps 1 - 2, page 24). 2 While the sleep timer is set, set . The volume will increase gradually until "OFF" appears on the display. " Sleep operation 1 Play back the desired sound source. 2 Press the SLEEP button. To cancel the sleep operation without setting the system to the same radio station You can also be turned down 1 minute before your system enters the timer standby mode...
... function cannot be switched). 1 Set the sleep time (steps 1 - 2, page 24). 2 While the sleep timer is set, set . The volume will increase gradually until "OFF" appears on the display. " Sleep operation 1 Play back the desired sound source. 2 Press the SLEEP button. To cancel the sleep operation without setting the system to the same radio station You can also be turned down 1 minute before your system enters the timer standby mode...
XL-S10 Operation Manual
Page 25
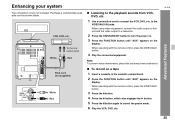
... FUNCTION button until "AUX" appears on the display. Enhancing your system The connection cord is not included. Note: To prevent noise interference, place this unit and the video output to a television. 2 Press the ON/STAND-BY button to cancel the pause mode. 6 Play the VCR, DVD, etc. Advanced Features XL-S10 25 When using video equipment, connect the audio output to this unit away from VCR, DVD, etc. 1 Use a connection cord to the VIDEO/AUX...
... FUNCTION button until "AUX" appears on the display. Enhancing your system The connection cord is not included. Note: To prevent noise interference, place this unit and the video output to a television. 2 Press the ON/STAND-BY button to cancel the pause mode. 6 Play the VCR, DVD, etc. Advanced Features XL-S10 25 When using video equipment, connect the audio output to this unit away from VCR, DVD, etc. 1 Use a connection cord to the VIDEO/AUX...
XL-S10 Operation Manual
Page 27
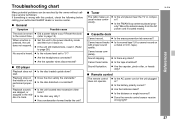
... the antenna away from the AC power cord if located nearby. Is it . (Refer to the power stand-by the owner without calling a service technician. Cannot hear treble. ! Does the remote control sensor receive strong light? Are the headphones connected? ! Is the battery polarity correct? ! Did a power failure occur? Is the tape stretched? start. stopped in the middle of the unit plugged does not operate. " Cassette deck...
... the antenna away from the AC power cord if located nearby. Is it . (Refer to the power stand-by the owner without calling a service technician. Cannot hear treble. ! Does the remote control sensor receive strong light? Are the headphones connected? ! Is the battery polarity correct? ! Did a power failure occur? Is the tape stretched? start. stopped in the middle of the unit plugged does not operate. " Cassette deck...
XL-S10 Operation Manual
Page 28
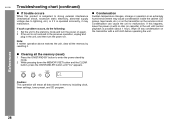
... stand-by mode and turn the power on the remote control. XL-S10 Troubleshooting chart (continued) " If trouble occurs When this happens, leave the power on the transmitter with no disc (or cassette) in memory including clock, timer settings, tuner preset, and CD program. 28 " Clearing all the memory by mode. 2 While pressing down the MEMORY/SET button and the CLEAR button, press the ON/STAND-BY button until normal...
... stand-by mode and turn the power on the remote control. XL-S10 Troubleshooting chart (continued) " If trouble occurs When this happens, leave the power on the transmitter with no disc (or cassette) in memory including clock, timer settings, tuner preset, and CD program. 28 " Clearing all the memory by mode. 2 While pressing down the MEMORY/SET button and the CLEAR button, press the ON/STAND-BY button until normal...

XL-S10 Operation Manual
Page 30
...) 5.1 lbs. (2.3 kg) " Amplifier Output power Output terminals Input terminals 5 watts minimum RMS per channel into 4 ohms from these values in individual units. The performance specification figures indicated are nominal values of continuous improvement, SHARP reserves the right to 15 kHz, 10% total harmonic distortion Speakers: 4 ohms Headphones: 16 - 50 ohms (recommended: 32 ohms) Subwoofer pre-out (audio signal): 500 mV/47 k ohms Video/Auxiliary (audio signal): 500 mV/47 k ohms " Tuner Frequency range FM: 87.5 - 108...
...) 5.1 lbs. (2.3 kg) " Amplifier Output power Output terminals Input terminals 5 watts minimum RMS per channel into 4 ohms from these values in individual units. The performance specification figures indicated are nominal values of continuous improvement, SHARP reserves the right to 15 kHz, 10% total harmonic distortion Speakers: 4 ohms Headphones: 16 - 50 ohms (recommended: 32 ohms) Subwoofer pre-out (audio signal): 500 mV/47 k ohms Video/Auxiliary (audio signal): 500 mV/47 k ohms " Tuner Frequency range FM: 87.5 - 108...


