
XG-NV7XU Operation Manual
Page 1
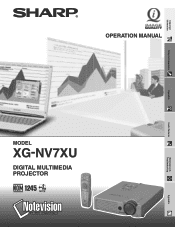
OPERATION MANUAL MODEL XG-NV7XU DIGITAL MULTIMEDIA PROJECTOR Important Information Setup & Connections Operation Useful Features Maintenance & Troubleshooting Appendix
OPERATION MANUAL MODEL XG-NV7XU DIGITAL MULTIMEDIA PROJECTOR Important Information Setup & Connections Operation Useful Features Maintenance & Troubleshooting Appendix
XG-NV7XU Operation Manual
Page 2
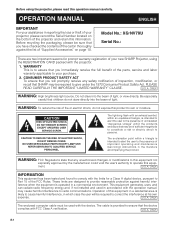
...not expressly approved by the manufacturer could void the user's authority to your new SHARP Projector, using the projector, please read this equip- DO NOT REMOVE SCREWS EXCEPT...ment. Operation of the parts, service and labor warranty applicable to operate this operation manual carefully. U.S.A. REFER SERVICING TO QUALIFIED SERVICE PERSONNEL. WARNING: FCC Regulations state that you...list of "Supplied Accessories" on the bottom of light, or view directly. Model No.: XG-NV7XU Serial No.: There are designed to comply with FCC Class A verification. U.S.A. This equipment ...
...not expressly approved by the manufacturer could void the user's authority to your new SHARP Projector, using the projector, please read this equip- DO NOT REMOVE SCREWS EXCEPT...ment. Operation of the parts, service and labor warranty applicable to operate this operation manual carefully. U.S.A. REFER SERVICING TO QUALIFIED SERVICE PERSONNEL. WARNING: FCC Regulations state that you...list of "Supplied Accessories" on the bottom of light, or view directly. Model No.: XG-NV7XU Serial No.: There are designed to comply with FCC Class A verification. U.S.A. This equipment ...
XG-NV7XU Operation Manual
Page 5
... the GUI (Graphical User Interface) Menu Screens 23 Using IrCOM for Windows and Macintosh 6 For SHARP Assistance (U.S.A. Important Information Setup & Connections Contents Important Information IMPORTANT SAFEGUARDS 2 Outstanding Features 3 Contents 4 Usage Guidelines 5 How to Access the PDF Operation Manuals (for Wireless Presentations ......... 25 Selecting the On-screen Display Language ... 26 Selecting the Video...
... the GUI (Graphical User Interface) Menu Screens 23 Using IrCOM for Windows and Macintosh 6 For SHARP Assistance (U.S.A. Important Information Setup & Connections Contents Important Information IMPORTANT SAFEGUARDS 2 Outstanding Features 3 Contents 4 Usage Guidelines 5 How to Access the PDF Operation Manuals (for Wireless Presentations ......... 25 Selecting the On-screen Display Language ... 26 Selecting the Video...
XG-NV7XU Operation Manual
Page 7
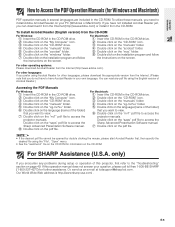
... CD-ROM drive. 2 Double click on the "CD-ROM" icon. 3 Double click on the "manuals" folder. 4 Double click on the "xg-nv7xu" folder. 5 Double click on the language (name of this operation manual does not answer your PC (Windows or Macintosh). For Macintosh: 1 Insert the CD-ROM in the ...CD-ROM in your own language. For SHARP Assistance (U.S.A. E-6 If you have Acrobat Reader in the CD-ROM drive. 2 Double click on the "My Computer" icon. 3 Double click on the "CD-ROM" drive. 4 Double click on the "manuals" folder. 5 Double click on the "xg-nv7xu" folder. 6 Double click on the language...
... CD-ROM drive. 2 Double click on the "CD-ROM" icon. 3 Double click on the "manuals" folder. 4 Double click on the "xg-nv7xu" folder. 5 Double click on the language (name of this operation manual does not answer your PC (Windows or Macintosh). For Macintosh: 1 Insert the CD-ROM in the ...CD-ROM in your own language. For SHARP Assistance (U.S.A. E-6 If you have Acrobat Reader in the CD-ROM drive. 2 Double click on the "My Computer" icon. 3 Double click on the "CD-ROM" drive. 4 Double click on the "manuals" folder. 5 Double click on the "xg-nv7xu" folder. 6 Double click on the language...
XG-NV7XU Operation Manual
Page 8
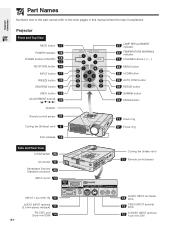
... RCA 12 S-VIDEO INPUT terminal: 4 pin mini DIN Important Information Part Names Numbers next to the part names refer to the main pages in this manual where the topic is explained.
... RCA 12 S-VIDEO INPUT terminal: 4 pin mini DIN Important Information Part Names Numbers next to the part names refer to the main pages in this manual where the topic is explained.
XG-NV7XU Operation Manual
Page 11
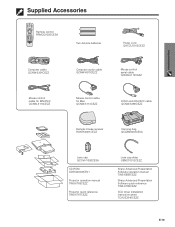
...-232C cable QCNW-5288CEZZ Remote mouse receiver RUNTK0661CEZZ Carrying bag GCASN0003CESA Lens cap GCOVH1308CESA CD-ROM UDSKA0009CE01 Projector operation manual TINS-6786CEZZ Projector quick reference TINS-6787CEZZ Lens cap strap UBNDT0012CEZZ Sharp Advanced Presentation Software operation manual TINS-6888CEZZ Sharp Advanced Presentation Software quick reference TINS-6788CEZZ IrDA driver installation instruction sheet TCAUZ3046CEZZ E-10
...-232C cable QCNW-5288CEZZ Remote mouse receiver RUNTK0661CEZZ Carrying bag GCASN0003CESA Lens cap GCOVH1308CESA CD-ROM UDSKA0009CE01 Projector operation manual TINS-6786CEZZ Projector quick reference TINS-6787CEZZ Lens cap strap UBNDT0012CEZZ Sharp Advanced Presentation Software operation manual TINS-6888CEZZ Sharp Advanced Presentation Software quick reference TINS-6788CEZZ IrDA driver installation instruction sheet TCAUZ3046CEZZ E-10
XG-NV7XU Operation Manual
Page 12
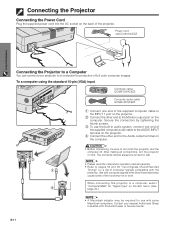
The computer should always be turned on last. • Please read the computer's operation manual carefully. • Refer to pages 55 and 56 "Input Signals (Recommended Timing)" for use the built-in audio system, connect one end of ... port on the projector. 2 Connect the other end to work. Use with the projector. Contact your projector to a Computer You can connect your nearest Authorized Sharp Industrial LCD Products Dealer or Service Center. CAUTION • Before connecting, be required for a list of full color computer images. Setup & Connections Connecting the...
The computer should always be turned on last. • Please read the computer's operation manual carefully. • Refer to pages 55 and 56 "Input Signals (Recommended Timing)" for use the built-in audio system, connect one end of ... port on the projector. 2 Connect the other end to work. Use with the projector. Contact your projector to a Computer You can connect your nearest Authorized Sharp Industrial LCD Products Dealer or Service Center. CAUTION • Before connecting, be required for a list of full color computer images. Setup & Connections Connecting the...

XG-NV7XU Operation Manual
Page 15
... projector. 2 Connect a RS-232C cable (sold separately) 1 DIN-D-sub RS-232C cable CAUTION • Do not connect or remove RS-232C cable to the operation manual of the computer for details. This may damage your computer. • The wireless mouse or RS-232C function may not operate if your computer port...
... projector. 2 Connect a RS-232C cable (sold separately) 1 DIN-D-sub RS-232C cable CAUTION • Do not connect or remove RS-232C cable to the operation manual of the computer for details. This may damage your computer. • The wireless mouse or RS-232C function may not operate if your computer port...
XG-NV7XU Operation Manual
Page 23
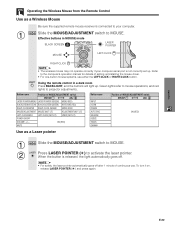
... lights refer to mouse operations, and red lights to MOUSE. Operation E-22 Slide the MOUSE/ADJUSTMENT switch to projector adjustments. Refer to the computer's operation manual for details of continuous use either the LEFT-CLICK or RIGHT-CLICK button. When the button is connected to activate the laser pointer. To turn...
... lights refer to mouse operations, and red lights to MOUSE. Operation E-22 Slide the MOUSE/ADJUSTMENT switch to projector adjustments. Refer to the computer's operation manual for details of continuous use either the LEFT-CLICK or RIGHT-CLICK button. When the button is connected to activate the laser pointer. To turn...

XG-NV7XU Operation Manual
Page 26
... Software • This function requires the supplied Sharp Advanced Presentation Software (SAPS). • Install the SAPS in the supplied CD-ROM on the computer. • See the operation manual of view. (Slide the MOUSE/ADJUSTMENT switch MOUSE ADJ. f 3 Press INPUT to the ADJ. Operation Using IrCOM for installation and operating instructions. •...
... Software • This function requires the supplied Sharp Advanced Presentation Software (SAPS). • Install the SAPS in the supplied CD-ROM on the computer. • See the operation manual of view. (Slide the MOUSE/ADJUSTMENT switch MOUSE ADJ. f 3 Press INPUT to the ADJ. Operation Using IrCOM for installation and operating instructions. •...
XG-NV7XU Operation Manual
Page 31
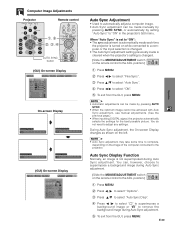
...(GUI) On-screen Display Auto Sync Adjustment • Used to automatically adjust a computer image. • Auto Sync adjustment can be made manually by pressing AUTO SYNC, or automatically by pressing AUTO SYNC. • When the optimum image cannot be made is cleared when the projector's...Auto Sync adjustment. 5 To exit from the GUI, press MENU. • Automatic adjustments can be achieved with Auto Sync adjustment, use manual adjustments. (See the previous page.) • When inputting DIGITAL signal, the projector automatically selects the settings for the best possible picture. You...
...(GUI) On-screen Display Auto Sync Adjustment • Used to automatically adjust a computer image. • Auto Sync adjustment can be made manually by pressing AUTO SYNC, or automatically by pressing AUTO SYNC. • When the optimum image cannot be made is cleared when the projector's...Auto Sync adjustment. 5 To exit from the GUI, press MENU. • Automatic adjustments can be achieved with Auto Sync adjustment, use manual adjustments. (See the previous page.) • When inputting DIGITAL signal, the projector automatically selects the settings for the best possible picture. You...

XG-NV7XU Operation Manual
Page 42
... a custom image. Custom image must be 256-color BMP file with a picture size of Background Images Selected item Sharp Custom Blue None Background image SHARP default image User customized image (i.e. company logo) Blue screen Black screen (Slide the MOUSE/ADJUSTMENT switch MOUSE ADJ. ...of 1,024 ן768 or lower. Useful Features E-41 your company logo) as the background image. Please see the Sharp Advanced Presentation Software operation manual for how to the ADJ. Setting a Background Image Projector Remote control 1, 6 2, 3, 4 5 (GUI) On-screen Display This...
... a custom image. Custom image must be 256-color BMP file with a picture size of Background Images Selected item Sharp Custom Blue None Background image SHARP default image User customized image (i.e. company logo) Blue screen Black screen (Slide the MOUSE/ADJUSTMENT switch MOUSE ADJ. ...of 1,024 ן768 or lower. Useful Features E-41 your company logo) as the background image. Please see the Sharp Advanced Presentation Software operation manual for how to the ADJ. Setting a Background Image Projector Remote control 1, 6 2, 3, 4 5 (GUI) On-screen Display This...

XG-NV7XU Operation Manual
Page 43
See pages 14 and 25 in this operation manual, and also the supplied Sharp Advanced Presentation Software operation manual for how to save the setting. 6 To exit from the GUI, press MENU. • By selecting "Custom", the projector can be loaded on ...the remote control to the ADJ. your company logo) can display a custom image (i.e. Please see the Sharp Advanced Presentation Software operation manual for detailed instructions. Useful Features E-42 Description of 1,024 ן768 or lower. on the projector via IrCOM or an ...
See pages 14 and 25 in this operation manual, and also the supplied Sharp Advanced Presentation Software operation manual for how to save the setting. 6 To exit from the GUI, press MENU. • By selecting "Custom", the projector can be loaded on ...the remote control to the ADJ. your company logo) can display a custom image (i.e. Please see the Sharp Advanced Presentation Software operation manual for detailed instructions. Useful Features E-42 Description of 1,024 ן768 or lower. on the projector via IrCOM or an ...
XG-NV7XU Operation Manual
Page 50
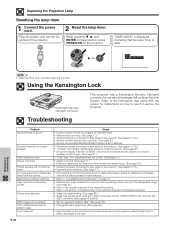
...sound. While pressing ƒ, © and ENTER on the projector, press POWER ON on the projector, push the lens firmly in the operation manual of the transmitting device. • Refer to the section "Troubleshooting" in place, and rotate to the information that the lamp timer is too ... image. (See page 37.) • "Color" and "Tint" adjustments are out of the designated range. (See page 25.) • Refer to the operation manual of the supplied software. • Adjust the phase setting. (See page 29.) • Noise may appear when used with the corresponding mark on the projector...
...sound. While pressing ƒ, © and ENTER on the projector, press POWER ON on the projector, push the lens firmly in the operation manual of the transmitting device. • Refer to the section "Troubleshooting" in place, and rotate to the information that the lamp timer is too ... image. (See page 37.) • "Color" and "Tint" adjustments are out of the designated range. (See page 25.) • Refer to the operation manual of the supplied software. • Adjust the phase setting. (See page 29.) • Noise may appear when used with the corresponding mark on the projector...

XG-NV7XU Operation Manual
Page 57
... from INPUT 2 with 1,024 lines, causing part of the image to be able to change display modes can be found in your notebook computer's operation manual. • This projector can receive 640 ן350 VESA format VGA signals, however, "640 ן400" will appear on the notebook...
... from INPUT 2 with 1,024 lines, causing part of the image to be able to change display modes can be found in your notebook computer's operation manual. • This projector can receive 640 ן350 VESA format VGA signals, however, "640 ן400" will appear on the notebook...
XG-NV7XU Operation Manual
Page 58
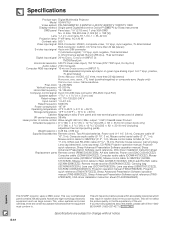
... mouse receiver, Carrying bag, Lens cap (attached), Lens cap strap, CD-ROM, Projector operation manual, Projector quick reference, Sharp Advanced Presentation Software operation manual, Sharp Advanced Presentation Software quick reference, IrDA driver installation instruction sheet Replacement parts Remote control (RRMCG1530CESA), AA...certain acceptable tolerances that the equipment must conform to change without notice. Specifications Product type Digital Multimedia Projector Model XG-NV7XU Video system PAL/SECAM/NTSC 3.58/NTSC 4.43/DTV 480P/DTV 720P/DTV 1080I Display method Single panel ...
... mouse receiver, Carrying bag, Lens cap (attached), Lens cap strap, CD-ROM, Projector operation manual, Projector quick reference, Sharp Advanced Presentation Software operation manual, Sharp Advanced Presentation Software quick reference, IrDA driver installation instruction sheet Replacement parts Remote control (RRMCG1530CESA), AA...certain acceptable tolerances that the equipment must conform to change without notice. Specifications Product type Digital Multimedia Projector Model XG-NV7XU Video system PAL/SECAM/NTSC 3.58/NTSC 4.43/DTV 480P/DTV 720P/DTV 1080I Display method Single panel ...
Quick Reference Guide
Page 2
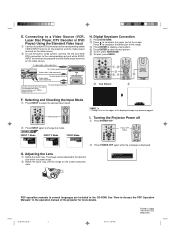
...jagged. EXAMPLE INPUT 1 Mode INPUT 2 Mode VIDEO Mode • Straight lines or the edges of the image. See "How to Access the PDF Operation Manuals" in the CD-ROM. Selecting and Checking the Input Mode 1 Press INPUT to the desired size within the zoom range. 2 Rotate the focus ring until... AUDIO INPUT terminals on the projector and the Audio output terminals on the video source. 2 To use the built-in Japan TINS-6787CEZZ 9P08-JWG XG-NV7XU/QR (E) 2 99.11.8, 2:07 PM Printed in audio system, connect the red and white RCA connectors to be adjusted to select the desired ...
...jagged. EXAMPLE INPUT 1 Mode INPUT 2 Mode VIDEO Mode • Straight lines or the edges of the image. See "How to Access the PDF Operation Manuals" in the CD-ROM. Selecting and Checking the Input Mode 1 Press INPUT to the desired size within the zoom range. 2 Rotate the focus ring until... AUDIO INPUT terminals on the projector and the Audio output terminals on the video source. 2 To use the built-in Japan TINS-6787CEZZ 9P08-JWG XG-NV7XU/QR (E) 2 99.11.8, 2:07 PM Printed in audio system, connect the red and white RCA connectors to be adjusted to select the desired ...


