
XG-C40XU Operation Manual
Page 2
... REMOVE SCREWS EXCEPT SPECIFIED USER SERVICE SCREW. NO USER-SERVICEABLE PARTS EXCEPT LAMP UNIT. The cable is intended to alert the user to correct the ...maintenance (servicing) instructions in reporting the loss or theft of your new SHARP LCD Projector, using the LCD projector, please read this information. The exclamation point within the product's enclosure that...projector and retain this operation manual carefully. ONLY INFORMATION This equipment has been tested and found to comply with the operation manual, may be used in a commercial environment. Model No.: XG-C40XU...
... REMOVE SCREWS EXCEPT SPECIFIED USER SERVICE SCREW. NO USER-SERVICEABLE PARTS EXCEPT LAMP UNIT. The cable is intended to alert the user to correct the ...maintenance (servicing) instructions in reporting the loss or theft of your new SHARP LCD Projector, using the LCD projector, please read this information. The exclamation point within the product's enclosure that...projector and retain this operation manual carefully. ONLY INFORMATION This equipment has been tested and found to comply with the operation manual, may be used in a commercial environment. Model No.: XG-C40XU...

XG-C40XU Operation Manual
Page 3
... normal operation, when turning the power off . FAILURE TO OBSERVE THIS WILL RESULT IN PREMATURE LAMP FAILURE. Important Information WARNING: The cooling fan in this projector continues to environmental considerations. Disposal of mercury. PRODUCT DISPOSAL This product utilizes tin-lead solder, ...off always use the ON/OFF buttons. ALLOW 1 HOUR TO COOL BEFORE REPLACING THE LAMP. DURING NORMAL OPERATION, NEVER TURN THE PROJECTOR OFF BY DISCONNECTING THE POWER CORD. LAMP REPLACEMENT CAUTION BEFORE REMOVING THE SCREW, DISCONNECT POWER CORD. SEE OPERATION MANUAL. L'INTERIEUR DU...
... normal operation, when turning the power off . FAILURE TO OBSERVE THIS WILL RESULT IN PREMATURE LAMP FAILURE. Important Information WARNING: The cooling fan in this projector continues to environmental considerations. Disposal of mercury. PRODUCT DISPOSAL This product utilizes tin-lead solder, ...off always use the ON/OFF buttons. ALLOW 1 HOUR TO COOL BEFORE REPLACING THE LAMP. DURING NORMAL OPERATION, NEVER TURN THE PROJECTOR OFF BY DISCONNECTING THE POWER CORD. LAMP REPLACEMENT CAUTION BEFORE REMOVING THE SCREW, DISCONNECT POWER CORD. SEE OPERATION MANUAL. L'INTERIEUR DU...
XG-C40XU Operation Manual
Page 6
... Sync Adjustment 34 Auto Sync Display Function 34 Maintenance & Troubleshooting Air Filter Maintenance 47 Lamp/Maintenance Indicators 49 Replacing the Projection Lamp 50 Using the Kensington Lock 52 Troubleshooting 52 Appendix Transporting the Projector 53 Connection Pin Assignments 54 RS-232C Port Specifications 55 Computer Compatibility Chart 57 Specifications ... Contents Important Information IMPORTANT SAFEGUARDS 3 Outstanding Features 4 Contents 5 Usage Guidelines 6 How to Access the PDF Operation Manuals (for Windows and Macintosh 8 For SHARP Assistance (U.S.A.
... Sync Adjustment 34 Auto Sync Display Function 34 Maintenance & Troubleshooting Air Filter Maintenance 47 Lamp/Maintenance Indicators 49 Replacing the Projection Lamp 50 Using the Kensington Lock 52 Troubleshooting 52 Appendix Transporting the Projector 53 Connection Pin Assignments 54 RS-232C Port Specifications 55 Computer Compatibility Chart 57 Specifications ... Contents Important Information IMPORTANT SAFEGUARDS 3 Outstanding Features 4 Contents 5 Usage Guidelines 6 How to Access the PDF Operation Manuals (for Windows and Macintosh 8 For SHARP Assistance (U.S.A.
XG-C40XU Operation Manual
Page 7
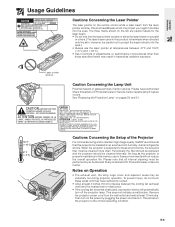
.... To prevent injury, do not touch these areas until they have Authorized Sharp Industrial LCD Products Dealer or Service Center replace lamp if rupture occurs. LAMPE A MOYENNE PRESSION: RISQUE D'EXPLOSION. HANDLE WITH CARE. When the projector is properly maintained in . Remove the projector power cord from the laser pointer window. DANGER POTENTIEL DE PARTICULES DE VERRE...
.... To prevent injury, do not touch these areas until they have Authorized Sharp Industrial LCD Products Dealer or Service Center replace lamp if rupture occurs. LAMPE A MOYENNE PRESSION: RISQUE D'EXPLOSION. HANDLE WITH CARE. When the projector is properly maintained in . Remove the projector power cord from the laser pointer window. DANGER POTENTIEL DE PARTICULES DE VERRE...
XG-C40XU Operation Manual
Page 8
... turned on after a 90-second coolingoff period the power will enter standby mode. Refer to replace the lamp. E-7 and " " will flash in the lower-left corner of the fan may change during projector operation due to setup problems or a dirty air filter, "TEMP." See pages 50 and 51 for ...2,000 hours, the projector power will automatically turn off . The sound of the picture. If the lamp has been used for details. IMPORTANT • Microsoft and Windows are registered trademarks in the United States and ...
... turned on after a 90-second coolingoff period the power will enter standby mode. Refer to replace the lamp. E-7 and " " will flash in the lower-left corner of the fan may change during projector operation due to setup problems or a dirty air filter, "TEMP." See pages 50 and 51 for ...2,000 hours, the projector power will automatically turn off . The sound of the picture. If the lamp has been used for details. IMPORTANT • Microsoft and Windows are registered trademarks in the United States and ...
XG-C40XU Operation Manual
Page 10
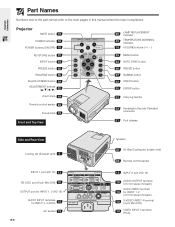
Projector MUTE button 19 POWER indicator 18 POWER buttons (ON/OFF) 18 KEYSTONE button 22 INPUT button 19 FREEZE button 35 ENLARGE button 36 BLACK SCREEN button 39 ADJUSTMENT buttons 25 Zoom knob 19 Remote control sensor 23 Focus knob 19 Front and Top View 49 LAMP REPLACEMENT indicator 49 TEMPERATURE WARNING indicator...
Projector MUTE button 19 POWER indicator 18 POWER buttons (ON/OFF) 18 KEYSTONE button 22 INPUT button 19 FREEZE button 35 ENLARGE button 36 BLACK SCREEN button 39 ADJUSTMENT buttons 25 Zoom knob 19 Remote control sensor 23 Focus knob 19 Front and Top View 49 LAMP REPLACEMENT indicator 49 TEMPERATURE WARNING indicator...

XG-C40XU Operation Manual
Page 19
...a slight odor may take a short while before the lamp turns on. • If the keylock level is set to a wall outlet. Green: Lamp is ready. Operation Operation Basic Operations 2 1 Make the necessary connections before operating the projector. • If the power is turned off and ... the remote control. (See page 43.) • After the projector is unpacked and turned on , the LAMP REPLACEMENT indicator lights indicating the status of the lamp. Wait until the indicator stops flashing before proceeding. Red: Change the lamp. E-18 Connect the power cord to "Level A" or "Level...
...a slight odor may take a short while before the lamp turns on. • If the keylock level is set to a wall outlet. Green: Lamp is ready. Operation Operation Basic Operations 2 1 Make the necessary connections before operating the projector. • If the power is turned off and ... the remote control. (See page 43.) • After the projector is unpacked and turned on , the LAMP REPLACEMENT indicator lights indicating the status of the lamp. Wait until the indicator stops flashing before proceeding. Red: Change the lamp. E-18 Connect the power cord to "Level A" or "Level...

XG-C40XU Operation Manual
Page 20
... be displayed. 6 Press VOLUME to adjust the volume. 7 Press MUTE to turn the sound back on , the POWER indicator and the LAMP REPLACEMENT indicator illuminate green. • The POWER indicator flashes if the bottom filter cover is being received, "NO SIGNAL" will then enter ... within the zoom range. 4 Slide the focus knob until the cooling fan stops before disconnecting the power cord. • The power can be displayed. The projector will be turned on the screen becomes clear. 6 7 8 5 EXAMPLE 5 INPUT 1 Mode d INPUT 4 (S-VIDEO) Mode 6 INPUT 2 Mode g f INPUT3 (VIDEO) Mode s ...
... be displayed. 6 Press VOLUME to adjust the volume. 7 Press MUTE to turn the sound back on , the POWER indicator and the LAMP REPLACEMENT indicator illuminate green. • The POWER indicator flashes if the bottom filter cover is being received, "NO SIGNAL" will then enter ... within the zoom range. 4 Slide the focus knob until the cooling fan stops before disconnecting the power cord. • The power can be displayed. The projector will be turned on the screen becomes clear. 6 7 8 5 EXAMPLE 5 INPUT 1 Mode d INPUT 4 (S-VIDEO) Mode 6 INPUT 2 Mode g f INPUT3 (VIDEO) Mode s ...

XG-C40XU Operation Manual
Page 27
...;3 Reset I/P Conversion Treble מ30 ם30 Bass מ30 ם30 Reset Lamp Timer BLK SCRN Disp [ON/OFF] OSD Display [ON/OFF] Video System Background Startup Image Economy Mode Auto Power Off [ON/OFF] Keylock...241;ol Nederlands Français Italiano Svenska Português Interlaced Progressive Auto PAL (50/60Hz) SECAM NTSC4.43 NTSC3.58 Sharp Custom Blue None Sharp Custom None Normal Level A Level B Old Password New Password Reconfirm PRJ Mode Status Front CeilingםFront Rear ...
...;3 Reset I/P Conversion Treble מ30 ם30 Bass מ30 ם30 Reset Lamp Timer BLK SCRN Disp [ON/OFF] OSD Display [ON/OFF] Video System Background Startup Image Economy Mode Auto Power Off [ON/OFF] Keylock...241;ol Nederlands Français Italiano Svenska Português Interlaced Progressive Auto PAL (50/60Hz) SECAM NTSC4.43 NTSC3.58 Sharp Custom Blue None Sharp Custom None Normal Level A Level B Old Password New Password Reconfirm PRJ Mode Status Front CeilingםFront Rear ...

XG-C40XU Operation Manual
Page 44
....) 1 Press MENU. 2 Press ß/© to the ADJ. on the projector. The lamp usage time will be displayed. (GUI) On-screen Display • It is recommended that the lamp be entered before adjusting the keylock level. Useful Features E-43 Only INPUT, VOLUME,...approximately 1,900 hours of Keylock Levels Selected item Normal Level A Level B Description All operation buttons are available. Description of usage. Checking the Lamp Usage Time Projector Remote control 1 2 This function allows you to the ADJ. position.) 1 Press MENU. 2 Press ß /© to select "...
....) 1 Press MENU. 2 Press ß/© to the ADJ. on the projector. The lamp usage time will be displayed. (GUI) On-screen Display • It is recommended that the lamp be entered before adjusting the keylock level. Useful Features E-43 Only INPUT, VOLUME,...approximately 1,900 hours of Keylock Levels Selected item Normal Level A Level B Description All operation buttons are available. Description of usage. Checking the Lamp Usage Time Projector Remote control 1 2 This function allows you to the ADJ. position.) 1 Press MENU. 2 Press ß /© to select "...
XG-C40XU Operation Manual
Page 50
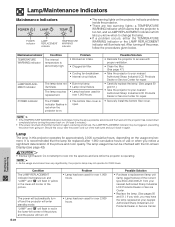
... checked with proper ventilation. • Clean the filter. (See page 47.) • Take the projector to your nearest Authorized Sharp Industrial LCD Products Dealer or Service Center for over 2,000 hours. Condition The LAMP REPLACEMENT indicator illuminates red, and "LAMP" and " " will flash in yellow in the lower-left corner of the picture, and the...
... checked with proper ventilation. • Clean the filter. (See page 47.) • Take the projector to your nearest Authorized Sharp Industrial LCD Products Dealer or Service Center for over 2,000 hours. Condition The LAMP REPLACEMENT indicator illuminates red, and "LAMP" and " " will flash in yellow in the lower-left corner of the picture, and the...
XG-C40XU Operation Manual
Page 51
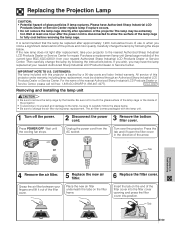
...cover. Be sure not to touch the glass surface of the lamp cage or the inside of the projector. Wait until the cooling fan stops. Grasp the air filter between your nearest Authorized Sharp Industrial LCD Products Dealer or Service Center. Press POWER OFF. or Tab ...after the power cord is disconnected to allow the surface of this projector is recommended that the lamp be obtained through an Authorized Sharp Industrial LCD Products Dealer or Service Center. U.S.A. Replacing the Projection Lamp CAUTION: • Potential hazard of the filter cover into the...
...cover. Be sure not to touch the glass surface of the lamp cage or the inside of the projector. Wait until the cooling fan stops. Grasp the air filter between your nearest Authorized Sharp Industrial LCD Products Dealer or Service Center. Press POWER OFF. or Tab ...after the power cord is disconnected to allow the surface of this projector is recommended that the lamp be obtained through an Authorized Sharp Industrial LCD Products Dealer or Service Center. U.S.A. Replacing the Projection Lamp CAUTION: • Potential hazard of the filter cover into the...

XG-C40XU Operation Manual
Page 52
... firmly into the AC socket of the projector. 2 Reset the lamp timer. Then tighten the user service screw. Slide the lamp cage cover in the direction of the arrow. "LAMP 0000H" is displayed, indicating that secures the lamp cage cover. Replacing the Projection Lamp 7 Remove the lamp cage cover. 8 Remove the lamp cage. Plug the power cord into...
... firmly into the AC socket of the projector. 2 Reset the lamp timer. Then tighten the user service screw. Slide the lamp cage cover in the direction of the arrow. "LAMP 0000H" is displayed, indicating that secures the lamp cage cover. Replacing the Projection Lamp 7 Remove the lamp cage cover. 8 Remove the lamp cage. Plug the power cord into...

XG-C40XU Operation Manual
Page 53
... 480P images do not appear. • Set the resolution mode to MOUSE. Refer to "Lamp/Maintenance Indicators" on the projector. Maintenance & Troubleshooting E-52 Sound is heard but no sound. • Projector power cord is not plugged into the wall outlet. • The bottom filter cover is... not securely installed. • Selected input is wrong. (See page 19.) • Cables incorrectly connected to rear panel of the projector. (See pages 13-17.) • "Contrast" and "Bright" adjustments are not correct. (See page 28.) Picture is blurred. • ...
... 480P images do not appear. • Set the resolution mode to MOUSE. Refer to "Lamp/Maintenance Indicators" on the projector. Maintenance & Troubleshooting E-52 Sound is heard but no sound. • Projector power cord is not plugged into the wall outlet. • The bottom filter cover is... not securely installed. • Selected input is wrong. (See page 19.) • Cables incorrectly connected to rear panel of the projector. (See pages 13-17.) • "Contrast" and "Bright" adjustments are not correct. (See page 28.) Picture is blurred. • ...
XG-C40XU Operation Manual
Page 59
...8486; (stereo) HORIZONTAL SYNC. Specifications Product type LCD Projector Model XG-C40XU Video system PAL/SECAM/NTSC 3.58/NTSC 4.43/DTV 480P/DTV 720P/DTV 1080I Display method LCD panel ן3, RGB optical shutter method LCD panel Panel size: 0.9Љ (13.9 [H] ... Remote mouse receiver, Extra air filter, Lens cap (attached), CD-ROM, LCD projector operation manual, LCD projector quick reference, Sharp Advanced Presentation Software operation manual Replacement parts Lamp unit (Lamp/cage module) (BQC-XGC40XU/1), Remote control (RRMCG1579CESA), AA size batteries, Power ...
...8486; (stereo) HORIZONTAL SYNC. Specifications Product type LCD Projector Model XG-C40XU Video system PAL/SECAM/NTSC 3.58/NTSC 4.43/DTV 480P/DTV 720P/DTV 1080I Display method LCD panel ן3, RGB optical shutter method LCD panel Panel size: 0.9Љ (13.9 [H] ... Remote mouse receiver, Extra air filter, Lens cap (attached), CD-ROM, LCD projector operation manual, LCD projector quick reference, Sharp Advanced Presentation Software operation manual Replacement parts Lamp unit (Lamp/cage module) (BQC-XGC40XU/1), Remote control (RRMCG1579CESA), AA size batteries, Power ...

XG-C40XU Operation Manual
Page 62
... Interface 25 I INPUT 1 port 13 INPUT 2 port 13 INPUT button 19 Intelligent compression and expansion 4 I/P conversion 30 K Kensington Security Standard connector 52 KEYSTONE button 22 L LAMP REPLACEMENT indicator 49 LASER POINTER button 24 Laser pointer window 6 LEFT-CLICK button 24 Lens cap 53 M MENU button 25 MOUSE/ADJUSTMENT switch 23 MOUSE... T TEMPERATURE WARNING indicator 49 TOOLS button 45 U UNDO button 22 USB mouse control cable 17 V VIDEO INPUT 3 terminal 14 VOLUME buttons 19 W Wireless mouse 23 X XGA resolution 4 Appendix E-61
... Interface 25 I INPUT 1 port 13 INPUT 2 port 13 INPUT button 19 Intelligent compression and expansion 4 I/P conversion 30 K Kensington Security Standard connector 52 KEYSTONE button 22 L LAMP REPLACEMENT indicator 49 LASER POINTER button 24 Laser pointer window 6 LEFT-CLICK button 24 Lens cap 53 M MENU button 25 MOUSE/ADJUSTMENT switch 23 MOUSE... T TEMPERATURE WARNING indicator 49 TOOLS button 45 U UNDO button 22 USB mouse control cable 17 V VIDEO INPUT 3 terminal 14 VOLUME buttons 19 W Wireless mouse 23 X XGA resolution 4 Appendix E-61


