
User Manual
Page 10
... 74 Using the Browser 75-78 Using Applications via the Internet 79-80 Appendix Removing the Stand 81 Setting the TV on the PRO-60X5FD model. 8 Contents IMPORTANT INFORMATION 1 DEAR ELITE CUSTOMER 3 IMPORTANT SAFETY INSTRUCTIONS 3-6 Trademarks 6-7 Supplied Accessories 9 QUICK REFERENCE Attaching... the Stand 9 QUICK INSTALLATION TIPS 10 Experiencing HD Images 10 Using the Remote Control Unit 10 Preparation Antennas 11 Installing Batteries in this operation manual are for 3D and 2D Images 42 3D Glasses 43-...
... 74 Using the Browser 75-78 Using Applications via the Internet 79-80 Appendix Removing the Stand 81 Setting the TV on the PRO-60X5FD model. 8 Contents IMPORTANT INFORMATION 1 DEAR ELITE CUSTOMER 3 IMPORTANT SAFETY INSTRUCTIONS 3-6 Trademarks 6-7 Supplied Accessories 9 QUICK REFERENCE Attaching... the Stand 9 QUICK INSTALLATION TIPS 10 Experiencing HD Images 10 Using the Remote Control Unit 10 Preparation Antennas 11 Installing Batteries in this operation manual are for 3D and 2D Images 42 3D Glasses 43-...
User Manual
Page 11
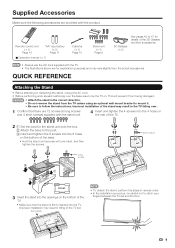
... not to lay the TV on the bottom of the 3D Glasses and their accessories. • Always use the AC cord supplied with the product. Remote control unit (g1) Page 10 "AA" size battery (g2) Page 11 ■ Operation manual (g1) Cable tie (g1) Page 10 Stand unit (g1) Page 9 3D...
... not to lay the TV on the bottom of the 3D Glasses and their accessories. • Always use the AC cord supplied with the product. Remote control unit (g1) Page 10 "AA" size battery (g2) Page 11 ■ Operation manual (g1) Cable tie (g1) Page 10 Stand unit (g1) Page 9 3D...
User Manual
Page 12
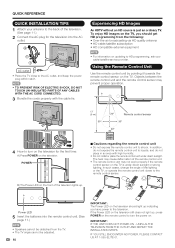
... • For information on the television should light up . If the Power LED on the television still does not light up, press POWER on the remote control to the back of the television lights up indicating you have power to the AC outlet, and keep the power plug within reach. •... UN-INSULATED PARTS OF ANY CABLES WITH THE AC CORD CONNECTED. 3 Bundle the cords properly with high humidity. • Do not install or place the remote control unit under direct sunlight or strong lighting. IF YOU STILL ENCOUNTER NO POWER, PLEASE CONTACT US AT 1-855-ELITE-01. In addition, do not...
... • For information on the television should light up . If the Power LED on the television still does not light up, press POWER on the remote control to the back of the television lights up indicating you have power to the AC outlet, and keep the power plug within reach. •... UN-INSULATED PARTS OF ANY CABLES WITH THE AC CORD CONNECTED. 3 Bundle the cords properly with high humidity. • Do not install or place the remote control unit under direct sunlight or strong lighting. IF YOU STILL ENCOUNTER NO POWER, PLEASE CONTACT US AT 1-855-ELITE-01. In addition, do not...
User Manual
Page 13
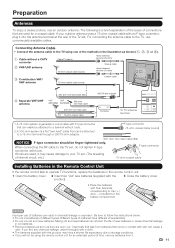
...antenna terminal at the rear of internal circuit, etc.) 75-ohm coaxial cable Installing Batteries in the Remote Control Unit If the remote control fails to operate TV functions, replace the batteries in the remote control unit. 1 Open the battery cover. 2 Insert two "AA" size batteries (supplied with the... product). 3 Close the battery cover. • Place the batteries with tools. When connecting the RF cable to the TV using the remote control unit for a coaxial cable. F-type connector 75-ohm coaxial cable (round) 300-ohm twin-lead cable (flat ) VHF UHF ANTENNA ...
...antenna terminal at the rear of internal circuit, etc.) 75-ohm coaxial cable Installing Batteries in the Remote Control Unit If the remote control fails to operate TV functions, replace the batteries in the remote control unit. 1 Open the battery cover. 2 Insert two "AA" size batteries (supplied with the... product). 3 Close the battery cover. • Place the batteries with tools. When connecting the RF cable to the TV using the remote control unit for a coaxial cable. F-type connector 75-ohm coaxial cable (round) 300-ohm twin-lead cable (flat ) VHF UHF ANTENNA ...
User Manual
Page 14
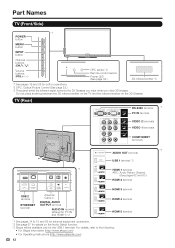
... for details on the 3D Glasses. Part Names TV (Front/Side) *1 POWER button MENU button INPUT button Channel buttons (CHU/V) Volume buttons (VOLk/l) OPC sensor *2 Remote control sensor Power LED (See page 34.) 3D infrared emitter *3 *1 See pages 19 and 26 for the USB 1 terminal. Do not place anything between the...
... for details on the 3D Glasses. Part Names TV (Front/Side) *1 POWER button MENU button INPUT button Channel buttons (CHU/V) Volume buttons (VOLk/l) OPC sensor *2 Remote control sensor Power LED (See page 34.) 3D infrared emitter *3 *1 See pages 19 and 26 for the USB 1 terminal. Do not place anything between the...
User Manual
Page 15
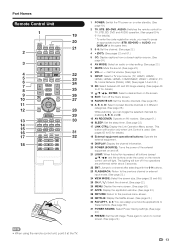
..., BD•DVD or AUDIO) and DISPLAY at the TV. 13 Press again to return to normal screen. (See page 22.) • When using the remote control unit, point it at the same time. 21 3 0-9: Set the channel. (See page 22.) 4 • (DOT): (See pages 22 and 61.) 5 CC: Display captions... and off. 21 LIGHT: When this button is used. (See 31 pages 62 to 65 for details.) 26 11 a/b/c/d, ENTER: Select a desired item on the remote control unit will turn off the menu screen. 27 13 FAVORITE CH: Set the favorite channels. (See page 36.) 14 A, B, C, D: Select 4 preset favorite channels in...
..., BD•DVD or AUDIO) and DISPLAY at the TV. 13 Press again to return to normal screen. (See page 22.) • When using the remote control unit, point it at the same time. 21 3 0-9: Set the channel. (See page 22.) 4 • (DOT): (See pages 22 and 61.) 5 CC: Display captions... and off. 21 LIGHT: When this button is used. (See 31 pages 62 to 65 for details.) 26 11 a/b/c/d, ENTER: Select a desired item on the remote control unit will turn off the menu screen. 27 13 FAVORITE CH: Set the favorite channels. (See page 36.) 14 A, B, C, D: Select 4 preset favorite channels in...
User Manual
Page 16
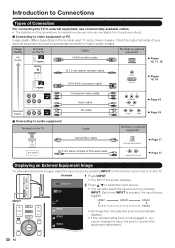
... pressed, the input source toggles. Be sure to select the input source. • You can also select the input source by pressing INPUT on the remote control unit or on the TV. Example I NPUT AIR 1 Press INPUT. • The INPUT list screen displays. 2 Press a/b to connect the equipment beforehand. 14 Image...
... pressed, the input source toggles. Be sure to select the input source. • You can also select the input source by pressing INPUT on the remote control unit or on the TV. Example I NPUT AIR 1 Press INPUT. • The INPUT list screen displays. 2 Press a/b to connect the equipment beforehand. 14 Image...
User Manual
Page 17
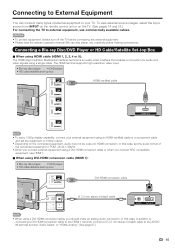
... cable HDMI OUT • To enjoy 1080p display capability, connect your TV. To view external source images, select the input source from INPUT on the remote control unit or on the connected equipment, audio may not be output in addition to connecting a DVI-HDMI conversion cable to the HDMI 1 terminal, connect...
... cable HDMI OUT • To enjoy 1080p display capability, connect your TV. To view external source images, select the input source from INPUT on the remote control unit or on the connected equipment, audio may not be output in addition to connecting a DVI-HDMI conversion cable to the HDMI 1 terminal, connect...
User Manual
Page 21
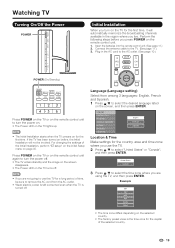
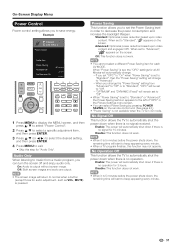
... The TV enters standby and the image on the screen disappears. • The Power LED on the TV turns off . Insert the batteries into the remote control unit. (See page 11.) 2. Perform the following steps before , the Initial Installation will automatically memorize the broadcasting channels available in the AC cord to... the AC outlet. (See page 10.) POWER (On/Standby) Press POWER on the TV or on the remote control unit to turn the power on. • The Power LED on the TV lights up. • The Initial Installation starts when the TV powers...
... The TV enters standby and the image on the screen disappears. • The Power LED on the TV turns off . Insert the batteries into the remote control unit. (See page 11.) 2. Perform the following steps before , the Initial Installation will automatically memorize the broadcasting channels available in the AC cord to... the AC outlet. (See page 10.) POWER (On/Standby) Press POWER on the TV or on the remote control unit to turn the power on. • The Power LED on the TV lights up. • The Initial Installation starts when the TV powers...
User Manual
Page 22
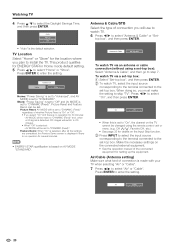
... page 33 for ENERGY STAR in Home mode default setting. 5 Press c/d to "STANDARD". To watch TV via an antenna or cable connection (without using the remote control unit or menu. (e.g. Store: "Power Saving" is set to "Off" and AV MODE is made with your TV when selecting "Air" or "Cable". 7 Press...
... page 33 for ENERGY STAR in Home mode default setting. 5 Press c/d to "STANDARD". To watch TV via an antenna or cable connection (without using the remote control unit or menu. (e.g. Store: "Power Saving" is set to "Off" and AV MODE is made with your TV when selecting "Air" or "Cable". 7 Press...
User Manual
Page 24
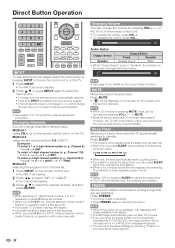
... on the screen for external equipment connection. Direct Button Operation INPUT To view external source images, select the input source by pressing INPUT on the remote control unit or on the TV. 1 Press INPUT. • The INPUT list screen displays. 2 Press a/b or press INPUT again to select ...the input source. • An image from Channel list. 1 Press INPUT on the remote control unit. • The INPUT list displays. 2 Press c/d to select "AIR" or "CABLE". • The Channel list displays. 3 Press a/b to select ...
... on the screen for external equipment connection. Direct Button Operation INPUT To view external source images, select the input source by pressing INPUT on the remote control unit or on the TV. 1 Press INPUT. • The INPUT list screen displays. 2 Press a/b or press INPUT again to select ...the input source. • An image from Channel list. 1 Press INPUT on the remote control unit. • The INPUT list displays. 2 Press c/d to select "AIR" or "CABLE". • The Channel list displays. 3 Press a/b to select ...
User Manual
Page 28
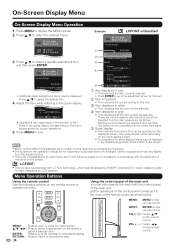
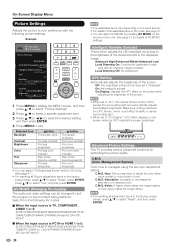
...b5] a16 b16 3D Brightness Boost Contrast [b30] 0 b40 Brightness [ 0] a30 b30 Select Enter Return 1 Item displayed in the following buttons on the remote control as follows: -Nothing is connected to the selected input terminal. -The function is not compatible with the alignment of the main unit. Using the... screens. • The order of the main unit You can also operate the menu with LC Font technology, which was developed by SHARP Corporation for some are as shown below. There are various reasons why the items cannot be operated on the screen. The guide display...
...b5] a16 b16 3D Brightness Boost Contrast [b30] 0 b40 Brightness [ 0] a30 b30 Select Enter Return 1 Item displayed in the following buttons on the remote control as follows: -Nothing is connected to the selected input terminal. -The function is not compatible with the alignment of the main unit. Using the... screens. • The order of the main unit You can also operate the menu with LC Font technology, which was developed by SHARP Corporation for some are as shown below. There are various reasons why the items cannot be operated on the screen. The guide display...
User Manual
Page 30
... to suit the program or input content being watched. On:Display: Displays the OPC effect on the remote control unit. Selected item Backlight Contrast Brightness Color Tint Sharpness cbutton The screen dims For less contrast For less brightness For less color intensity Skin tones become reddish ... selected color. See page 23 for optimizing the picture quality. C.M.S.-Hue: This is a standard to adjust the color either more reddish or more sharpness • You can select "3D Brightness Boost" while in each area with the following AV modes. ■ When the input source is TV,...
... to suit the program or input content being watched. On:Display: Displays the OPC effect on the remote control unit. Selected item Backlight Contrast Brightness Color Tint Sharpness cbutton The screen dims For less contrast For less brightness For less color intensity Skin tones become reddish ... selected color. See page 23 for optimizing the picture quality. C.M.S.-Hue: This is a standard to adjust the color either more reddish or more sharpness • You can select "3D Brightness Boost" while in each area with the following AV modes. ■ When the input source is TV,...
User Manual
Page 33
... minutes. Disable: This function does not work . • You cannot select a different Power Saving item for "Audio Only". When set to "Standard", " " appears on the remote control unit. (See page 23.) • "Power Saving" is not available when the TV is no operation. Enable: The power will start to keep appearing...
... minutes. Disable: This function does not work . • You cannot select a different Power Saving item for "Audio Only". When set to "Standard", " " appears on the remote control unit. (See page 23.) • "Power Saving" is not available when the TV is no operation. Enable: The power will start to keep appearing...
User Manual
Page 34
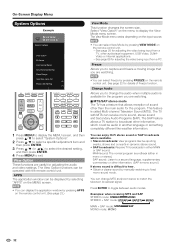
...The SAP feature allows a TV station to fixed mono-sound mode. You can display the application window by pressing VIEW MODE on the remote control unit. Freeze Allows you to change MTS as shown below to a second language, supplementary commentary or other information. (SAP is mono ...sound.) If stereo sound is called Multi-channel Television Sound (MTS). The TV with the remote control unit. Examples: when receiving MTS and SAP STEREO mode: STEREO MONO STEREO + SAP mode: ST(SAP) SAP(ST) MONO MAIN + SAP mode...
...The SAP feature allows a TV station to fixed mono-sound mode. You can display the application window by pressing VIEW MODE on the remote control unit. Freeze Allows you to change MTS as shown below to a second language, supplementary commentary or other information. (SAP is mono ...sound.) If stereo sound is called Multi-channel Television Sound (MTS). The TV with the remote control unit. Examples: when receiving MTS and SAP STEREO mode: STEREO MONO STEREO + SAP mode: ST(SAP) SAP(ST) MONO MAIN + SAP mode...
User Manual
Page 35
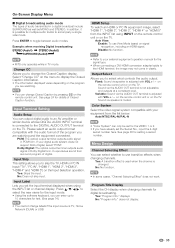
...The information displayed varies depending on signal recognition, including an HDMI signal. Color System Select the video signal system compatible with VOLk/l on the remote control unit or on the TV. Program Title Display Select the CH display when changing channels for setting a secret number. Change CC Allows .... Press ENTER to use View Mode based on the program you have already set the input terminal displayed when using INPUT on the remote control unit or on the TV. Yes: A transition effect is used when the channel is adjusted with your digital audio system does...
...The information displayed varies depending on signal recognition, including an HDMI signal. Color System Select the video signal system compatible with VOLk/l on the remote control unit or on the TV. Program Title Display Select the CH display when changing channels for setting a secret number. Change CC Allows .... Press ENTER to use View Mode based on the program you have already set the input terminal displayed when using INPUT on the remote control unit or on the TV. Yes: A transition effect is used when the channel is adjusted with your digital audio system does...
User Manual
Page 36
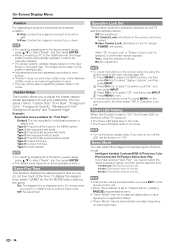
... by moving it to select the desired playback type(s), and then set the playback time. RC Control Lock: All buttons on the remote control by broadcasting station or default font. Continuous: Play Demos continuously. 10 min.: Play Demos every 10 minutes. 20 min.: Play... adjusted. Type 4: Proportionally spaced without serifs. Type 6: Cursive font type. No: No adjustment. • To unlock the buttons on the remote control are locked. On: The elapsed time is selected, a confirmation screen appears. Example: Selectable items available for the AV MODE before...
... by moving it to select the desired playback type(s), and then set the playback time. RC Control Lock: All buttons on the remote control by broadcasting station or default font. Continuous: Play Demos continuously. 10 min.: Play Demos every 10 minutes. 20 min.: Play... adjusted. Type 4: Proportionally spaced without serifs. Type 6: Cursive font type. No: No adjustment. • To unlock the buttons on the remote control are locked. On: The elapsed time is selected, a confirmation screen appears. Example: Selectable items available for the AV MODE before...
User Manual
Page 38
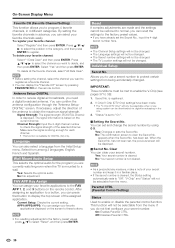
..."Favorite CH" screen by using 0-9. FAV APP Key Assign You can set and change the secret number by pressing FAVORITE CH on the remote control. V-Chip/V-Chip (DTV Only) settings have already set to check the signal strength of the selected channel. You can assign your ...SetupDIGITAL" screen. Reset If complex adjustments are currently watching even when the TV is mounted to the FAV APP 1, 2, and 3 buttons on the remote control. On-Screen Display Menu Favorite CH (Favorite Channel Setting) This function allows you to receive digital air broadcasts, you need a digital broadcast ...
..."Favorite CH" screen by using 0-9. FAV APP Key Assign You can set and change the secret number by pressing FAVORITE CH on the remote control. V-Chip/V-Chip (DTV Only) settings have already set to check the signal strength of the selected channel. You can assign your ...SetupDIGITAL" screen. Reset If complex adjustments are currently watching even when the TV is mounted to the FAV APP 1, 2, and 3 buttons on the remote control. On-Screen Display Menu Favorite CH (Favorite Channel Setting) This function allows you to receive digital air broadcasts, you need a digital broadcast ...
User Manual
Page 42
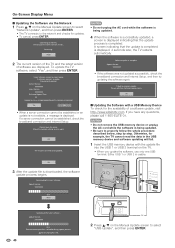
... AC cord. Abort 2 The current version of the TV and the latest version of a software update, visit http://www.elitelcdtv.com. Update Version XXXXXXXX 50% Remote control operation is available. A software update is disabled during update process. CAUTION • Do not unplug the AC cord while the software is being updated...
... AC cord. Abort 2 The current version of the TV and the latest version of a software update, visit http://www.elitelcdtv.com. Update Version XXXXXXXX 50% Remote control operation is available. A software update is disabled during update process. CAUTION • Do not unplug the AC cord while the software is being updated...
User Manual
Page 43
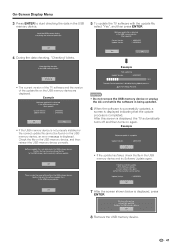
... file on the USB memory device, an error message is in the USB memory device. Start update? Example Now updating Update Version : UXXXXXX2 30% Remote Control operation is displayed, press ENTER. CAUTION • Do not remove the USB memory device or unplug the AC cord while the software is being...
... file on the USB memory device, an error message is in the USB memory device. Start update? Example Now updating Update Version : UXXXXXX2 30% Remote Control operation is displayed, press ENTER. CAUTION • Do not remove the USB memory device or unplug the AC cord while the software is being...


