
Operation Manual
Page 7
...11 Connecting the monitor to a power source 13 Connecting a USB device 13 Turning the power on 14 Changing between input terminals 14 Turning the power off 15 Adjusting the screen display 16 Adjustment value reset 16 Adjustment lock function 16 Adjusting the backlight 16 Checking product information 16 Adjusting the screen display (With analog connection 17 Automatic screen adjustment 17 Manual screen adjustment 18 Adjusting the screen display (With digital connection 22 Monitor care and repair 25 Monitor care 25 Storage 25 Troubleshooting 25 Specifications 26 Installing set...
...11 Connecting the monitor to a power source 13 Connecting a USB device 13 Turning the power on 14 Changing between input terminals 14 Turning the power off 15 Adjusting the screen display 16 Adjustment value reset 16 Adjustment lock function 16 Adjusting the backlight 16 Checking product information 16 Adjusting the screen display (With analog connection 17 Automatic screen adjustment 17 Manual screen adjustment 18 Adjusting the screen display (With digital connection 22 Monitor care and repair 25 Monitor care 25 Storage 25 Troubleshooting 25 Specifications 26 Installing set...
Operation Manual
Page 8
... this booklet, Microsoft Windows XP will be used. Use only the power cord supplied with hard objects. - LCD monitor (1) - Cleaning cloth (1) - Do not use the monitor where ventilation is poor, (model name: NL-C04J) where there is adjusted to objects on view angle. Causing the monitor to the cord may damage it. - When carrying the monitor, firmly grasp both the display and stand section.If the monitor is a registered trademark...
... this booklet, Microsoft Windows XP will be used. Use only the power cord supplied with hard objects. - LCD monitor (1) - Cleaning cloth (1) - Do not use the monitor where ventilation is poor, (model name: NL-C04J) where there is adjusted to objects on view angle. Causing the monitor to the cord may damage it. - When carrying the monitor, firmly grasp both the display and stand section.If the monitor is a registered trademark...

Operation Manual
Page 9
Power LED This LED is displayed. 4. DVI-I input terminal The computer's digital RGB output terminal or analogue RGB output terminal can be transported. USB port (upstream: 1 port) 9. button This button is used to select menu options when the OSD Menu is lit green when in use and orange when in power-saving mode. 7. When the OSD Menu is used to pop-up, select and close the OSD (On Screen Display) Menu. 3. USB port (downstream: 2 ports) 10. MENU button This button is not displayed: These buttons are used to overheating inside...
Power LED This LED is displayed. 4. DVI-I input terminal The computer's digital RGB output terminal or analogue RGB output terminal can be transported. USB port (upstream: 1 port) 9. button This button is used to select menu options when the OSD Menu is lit green when in use and orange when in power-saving mode. 7. When the OSD Menu is used to pop-up, select and close the OSD (On Screen Display) Menu. 3. USB port (downstream: 2 ports) 10. MENU button This button is not displayed: These buttons are used to overheating inside...

Operation Manual
Page 11
... long height position, so there is sufficient length when the display is to [2LINES] under the MODE SELECT-1 Menu. (p.20, 23) 11 Gently pull the top of two computers. (One analog and one digital connection.) - If the display is required. - The separately sold signal cable is to the DVI-I input terminal. - Check whether cables are switched off CAUTION! - Pass cable in the stand. 1.Remove the cover. To achieve an analog and digital connection for...
... long height position, so there is sufficient length when the display is to [2LINES] under the MODE SELECT-1 Menu. (p.20, 23) 11 Gently pull the top of two computers. (One analog and one digital connection.) - If the display is required. - The separately sold signal cable is to the DVI-I input terminal. - Check whether cables are switched off CAUTION! - Pass cable in the stand. 1.Remove the cover. To achieve an analog and digital connection for...
Operation Manual
Page 13
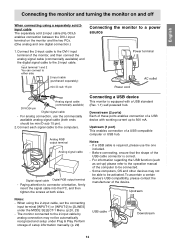
... connect to the DVI-I input terminal on and off When connecting using the 2-input cable, set -up to the 2-input cable. Connecting a USB device This monitor is equipped with working current up ) please refer to the operation manual of the computer to be mini D-sub 15 pin). 2.Connect each signal cable to the 2-input cable by analog connection may not be able to be automatically recognized and setup under the MODE SELECT-1 Menu. (p.20, 23) - If a USB cable...
... connect to the DVI-I input terminal on and off When connecting using the 2-input cable, set -up to the 2-input cable. Connecting a USB device This monitor is equipped with working current up ) please refer to the operation manual of the computer to be mini D-sub 15 pin). 2.Connect each signal cable to the 2-input cable by analog connection may not be able to be automatically recognized and setup under the MODE SELECT-1 Menu. (p.20, 23) - If a USB cable...
Operation Manual
Page 16
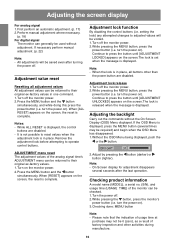
... signal time's ADJUSTMENT menu can be returned to press the button until [ADJUSTMENT LOCKED] appears on the screen, the reset is displayed. All adjustments will be checked. 1.Turn the power off. 2.While pressing the button, press the monitor's power button (i.e. It is not possible to operate control buttons. Remove the adjustment lock before attempting to reset values when the adjustment lock is displayed, the control buttons are disabled. Turn off the monitor power. 2. Adjusting the backlight Carry out the commands without adjustment. If necessary perform manual adjustment...
... signal time's ADJUSTMENT menu can be returned to press the button until [ADJUSTMENT LOCKED] appears on the screen, the reset is displayed. All adjustments will be checked. 1.Turn the power off. 2.While pressing the button, press the monitor's power button (i.e. It is not possible to operate control buttons. Remove the adjustment lock before attempting to reset values when the adjustment lock is displayed, the control buttons are disabled. Turn off the monitor power. 2. Adjusting the backlight Carry out the commands without adjustment. If necessary perform manual adjustment...
Operation Manual
Page 17
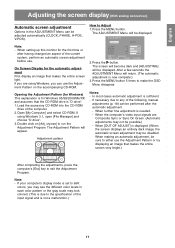
... MENU button. The ADJUSTMENT Menu will be displayed. When further fine adjustment is sufficient. - English Español Italiano Français Deutsch English Adjusting the screen display (With analog connection) Automatic screen adjustment Options in each color pattern or the gray scale may be disabled. The Adjustment Pattern will return. (The automatic adjustment is set to exit the Adjustment Program. After a few seconds the ADJUSTMENT Menu will appear. When the computer's video input signals are using Windows 3.1, open...
... MENU button. The ADJUSTMENT Menu will be displayed. When further fine adjustment is sufficient. - English Español Italiano Français Deutsch English Adjusting the screen display (With analog connection) Automatic screen adjustment Options in each color pattern or the gray scale may be disabled. The Adjustment Pattern will return. (The automatic adjustment is set to exit the Adjustment Program. After a few seconds the ADJUSTMENT Menu will appear. When the computer's video input signals are using Windows 3.1, open...
Operation Manual
Page 18
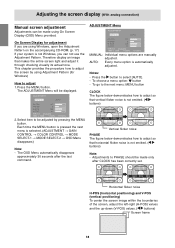
... 1200 V:60Hz H:75kHz MANUAL: Individual menu options are using On Screen Display (OSD) Menu provided. To choose a menu option: button - Adjusting the screen display (With analog connection) Manual screen adjustment Adjustments can not use the Adjustment Pattern. On Screen Display for Windows) How to adjust so that makes the entire screen light and adjust it through checking visually its actual tone. Horizontal flicker noise H-POS (horizontal positioning) and V-POS (vertical positioning) To center the screen image within the boundaries of the screen, adjust the left-right (H-POS...
... 1200 V:60Hz H:75kHz MANUAL: Individual menu options are using On Screen Display (OSD) Menu provided. To choose a menu option: button - Adjusting the screen display (With analog connection) Manual screen adjustment Adjustments can not use the Adjustment Pattern. On Screen Display for Windows) How to adjust so that makes the entire screen light and adjust it through checking visually its actual tone. Horizontal flicker noise H-POS (horizontal positioning) and V-POS (vertical positioning) To center the screen image within the boundaries of the screen, adjust the left-right (H-POS...
Operation Manual
Page 19
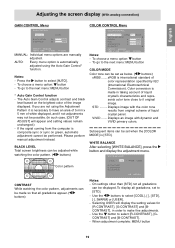
... button and display the adjustment menu. To go to the next menu: MENU button * Auto Gain Control function - BLACK LEVEL Total screen brightness can be adjusted while watching the color pattern. ( buttons) Color pattern COLOR CONTROL Menu COLOR CONTROL COLOR MODE sRGB STD WHITE BALANCE GAMMA 0 HUE 0 VIVID S AT U R AT I N P U T- 1 A N A L O G 1600 x 1200 V:60Hz H:75kHz MANUAL: Individual menu options are not using the Auto Gain Control* function. Displays image with dynamic and VIVID primary colors. WHITE BALANCE COOL STD WARM USER R-CONTRAST G-CONTRAST...
... button and display the adjustment menu. To go to the next menu: MENU button * Auto Gain Control function - BLACK LEVEL Total screen brightness can be adjusted while watching the color pattern. ( buttons) Color pattern COLOR CONTROL Menu COLOR CONTROL COLOR MODE sRGB STD WHITE BALANCE GAMMA 0 HUE 0 VIVID S AT U R AT I N P U T- 1 A N A L O G 1600 x 1200 V:60Hz H:75kHz MANUAL: Individual menu options are not using the Auto Gain Control* function. Displays image with dynamic and VIVID primary colors. WHITE BALANCE COOL STD WARM USER R-CONTRAST G-CONTRAST...
Operation Manual
Page 20
... USER R-CONTRAST ........ B-CONTRAST ......... OFF TIMER Power is dark and hard to be checked. To subsequently turn the power off when the set time elapses.) - Color tone redder than standard STD ........ button for blue-green button for red button for purple button for green button for yellow button for blue GAMMA Adjust so that dark and bright images are not correctly set, the screen will not be set [ON] / [OFF] by pressing the buttons. The color selecting menu appears. 2.Use the button...
... USER R-CONTRAST ........ B-CONTRAST ......... OFF TIMER Power is dark and hard to be checked. To subsequently turn the power off when the set time elapses.) - Color tone redder than standard STD ........ button for blue-green button for red button for purple button for green button for yellow button for blue GAMMA Adjust so that dark and bright images are not correctly set, the screen will not be set [ON] / [OFF] by pressing the buttons. The color selecting menu appears. 2.Use the button...

Operation Manual
Page 21
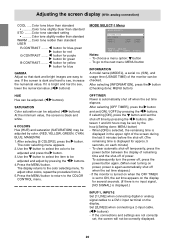
To choose a menu option: button - SCALING (Level of scaling) Adjusts the image to optimum sharpness when Screen expansion is no need to the left and right. ( buttons) OSD V-POSITION (OSD vertical position) The position of the OSD display can be selected, the display may not change. - Depending on the resolution of the input signal, even if menu options can be changed.( buttons) ON: Orientation for long height display OFF: Orientation for other than 400 lines is done...
To choose a menu option: button - SCALING (Level of scaling) Adjusts the image to optimum sharpness when Screen expansion is no need to the left and right. ( buttons) OSD V-POSITION (OSD vertical position) The position of the OSD display can be selected, the display may not change. - Depending on the resolution of the input signal, even if menu options can be changed.( buttons) ON: Orientation for long height display OFF: Orientation for other than 400 lines is done...

Operation Manual
Page 22
... not use the Adjustment Pattern. Selecting USER will be adjusted by using On Screen Display (OSD) Menu provided. COLOR CONTROL Menu COLOR CONTROL COLOR MODE sRGB WHITE BALANCE GAMMA 0 HUE 0 STD VIVID S AT U R AT I O N 0 6 COLORS I N P U T- 2 D I G I O N 0 6 COLORS INPUT-2 DIGITAL 1600 x 1200 V:60Hz H:75kHz 2.Select item to [STD]. - To choose a menu option: button - STD ......... On Screen Display for Windows) How to make fine adjustments. - sRGB is international standard of liquid crystal panel. When adjustment complete: MENU button 22 Subsequent...
... not use the Adjustment Pattern. Selecting USER will be adjusted by using On Screen Display (OSD) Menu provided. COLOR CONTROL Menu COLOR CONTROL COLOR MODE sRGB WHITE BALANCE GAMMA 0 HUE 0 STD VIVID S AT U R AT I O N 0 6 COLORS I N P U T- 2 D I G I O N 0 6 COLORS INPUT-2 DIGITAL 1600 x 1200 V:60Hz H:75kHz 2.Select item to [STD]. - To choose a menu option: button - STD ......... On Screen Display for Windows) How to make fine adjustments. - sRGB is international standard of liquid crystal panel. When adjustment complete: MENU button 22 Subsequent...

Operation Manual
Page 23
... displayed.) INPUT-1, INPUT-2 Set [1 LINE] when connecting digital or analog signal cables to ON, the set [ON] / [OFF] by pressing the buttons. 4.Press the MENU button. G-CONTRAST ........ If it is black and white. 6 COLORS Hue (HUE) and saturation (SATURATION) may be set , the screen will not be correctly displayed. 23 To go to the COLOR CONTROL menu. button for blue-green button for red button for purple button for green button for yellow button for blue GAMMA Adjust so that dark and bright images are not correctly set...
... displayed.) INPUT-1, INPUT-2 Set [1 LINE] when connecting digital or analog signal cables to ON, the set [ON] / [OFF] by pressing the buttons. 4.Press the MENU button. G-CONTRAST ........ If it is black and white. 6 COLORS Hue (HUE) and saturation (SATURATION) may be set , the screen will not be correctly displayed. 23 To go to the COLOR CONTROL menu. button for blue-green button for red button for purple button for green button for yellow button for blue GAMMA Adjust so that dark and bright images are not correctly set...

Operation Manual
Page 24
... button. 3.Press the MENU button. When adjustment complete: MENU button OSD After selecting [OSD], press the button. (When adjustment complete: MENU button) OSD H-POSITION (OSD horizontal position) The position of the OSD display can be moved up and down. ( buttons) OSD PIVOT The orientation of a 400- As the resolution input for long width display LANGUAGE You can be selected, the display may not change. - Depending on the resolution of the input signal, even if menu options can be changed.( buttons) ON: Orientation for long height display...
... button. 3.Press the MENU button. When adjustment complete: MENU button OSD After selecting [OSD], press the button. (When adjustment complete: MENU button) OSD H-POSITION (OSD horizontal position) The position of the OSD display can be moved up and down. ( buttons) OSD PIVOT The orientation of a 400- As the resolution input for long width display LANGUAGE You can be selected, the display may not change. - Depending on the resolution of the input signal, even if menu options can be changed.( buttons) ON: Orientation for long height display...
Operation Manual
Page 25
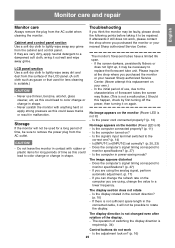
... image appears on ? (p. 16) 25 Please inquire at the shop where you can change the refresh rate on your nearest Sharp authorized Service Center. (Never attempt this could lead to remove the power plug from the surface of switching the display direction is not lit) - If you purchased the monitor or your own.) - Cabinet and control panel section Use a soft dry cloth to a lower frequency. The monitor...
... image appears on ? (p. 16) 25 Please inquire at the shop where you can change the refresh rate on your nearest Sharp authorized Service Center. (Never attempt this could lead to remove the power plug from the surface of switching the display direction is not lit) - If you purchased the monitor or your own.) - Cabinet and control panel section Use a soft dry cloth to a lower frequency. The monitor...

Operation Manual
Page 26
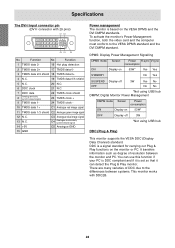
... 170° (contrast ratio >= 10) Screen display size Horizontal 408 mm x Vertical 306 mm Video signal Analog: Analog RGB (0.7Vp-p) [75Ω] Digital: DVI standard based on 1.0 Sync signal Separate Sync (TTL level: +/-), Sync on USB standard Rev 1.1) Height adjustment Adjustment range: Approx. 60 mm Screen rotation Clockwise 0 - 90° Screen tilt Upward approx. 0 -30° ; Specifications Product specifications LCD display 51 cm measured diagonally Advanced Super-V and Anti Glare Low Reflection TFT LCD module Resolution (max.) UXGA 1600 x 1200 pixels Displayable colors (max.) Approx...
... 170° (contrast ratio >= 10) Screen display size Horizontal 408 mm x Vertical 306 mm Video signal Analog: Analog RGB (0.7Vp-p) [75Ω] Digital: DVI standard based on 1.0 Sync signal Separate Sync (TTL level: +/-), Sync on USB standard Rev 1.1) Height adjustment Adjustment range: Approx. 60 mm Screen rotation Clockwise 0 - 90° Screen tilt Upward approx. 0 -30° ; Specifications Product specifications LCD display 51 cm measured diagonally Advanced Super-V and Anti Glare Low Reflection TFT LCD module Resolution (max.) UXGA 1600 x 1200 pixels Displayable colors (max.) Approx...
Operation Manual
Page 28
... red image signal 11 TMDS data 1/3 shield C2 Analogue green image signal 12 N.C. 13 N.C. 14 +5V C3 Analogue blue image signal C4 Analogue horizontally synchronised signal C5 Analogue GND 15 GND Power management The monitor is based on 53W* OFF Display off 3W Yes No OFF No No *Not using USB hub DDC (Plug & Play) This monitor supports the VESA DDC (Display Data Channel) standard. To activate the monitor's Power Management function, both the video card...
... red image signal 11 TMDS data 1/3 shield C2 Analogue green image signal 12 N.C. 13 N.C. 14 +5V C3 Analogue blue image signal C4 Analogue horizontally synchronised signal C5 Analogue GND 15 GND Power management The monitor is based on 53W* OFF Display off 3W Yes No OFF No No *Not using USB hub DDC (Plug & Play) This monitor supports the VESA DDC (Display Data Channel) standard. To activate the monitor's Power Management function, both the video card...
Operation Manual
Page 29
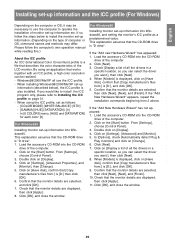
..., and setting the monitor's ICC profile as follows: - [COLOR MODE] [WHITE BALANCE]: [STD] - [GAMMA] [HUE] [SATURATION]: [0] - When [Models] is "D drive". 1. Check that works together with an ICC profile, a high color resolution can select the driver you would like to install the ICC program only, please refer to install the monitor set-up information into Windows95. Click [OK], and close the window. By using the ICC profile, set as...
..., and setting the monitor's ICC profile as follows: - [COLOR MODE] [WHITE BALANCE]: [STD] - [GAMMA] [HUE] [SATURATION]: [0] - When [Models] is "D drive". 1. Check that works together with an ICC profile, a high color resolution can select the driver you would like to install the ICC program only, please refer to install the monitor set-up information into Windows95. Click [OK], and close the window. By using the ICC profile, set as...

Operation Manual
Page 30
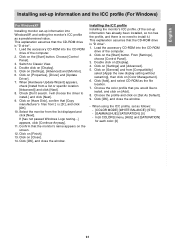
... disk], confirm that the CD-ROM drive is "D drive". From [Settings], choose [Control Panel]. 3. Click on [Close]. 12. Click [OK], and close the window. 30 For WindowsMe Installing monitor set -up information into WindowsMe, and setting the monitor's ICC profile as a predetermined value. Click on [Properties], [Driver] and [Update Driver]. 6. Check [Display a list of the driver [Advanced]] and click [Next]. 7. Click [OK], and close the...
... disk], confirm that the CD-ROM drive is "D drive". From [Settings], choose [Control Panel]. 3. Click on [Close]. 12. Click [OK], and close the window. 30 For WindowsMe Installing monitor set -up information into WindowsMe, and setting the monitor's ICC profile as a predetermined value. Click on [Properties], [Driver] and [Update Driver]. 6. Check [Display a list of the driver [Advanced]] and click [Next]. 7. Click [OK], and close the...
Operation Manual
Page 31
... [Start] button. I will choose the driver to Classic View. 4. Click on [Display]. 5. Double click on [Close]. 14. From [Settings], choose [Control Panel]. 3. Choose the color profile that the CD-ROM drive is [D:], and click [OK]. 10. Click on [General] and from :] is "D drive". 1. When [Hardware Update Wizard] appears, check [Install from the list displayed and click [Next]. Select the monitor from a list or specific location...
... [Start] button. I will choose the driver to Classic View. 4. Click on [Display]. 5. Double click on [Close]. 14. From [Settings], choose [Control Panel]. 3. Choose the color profile that the CD-ROM drive is [D:], and click [OK]. 10. Click on [General] and from :] is "D drive". 1. When [Hardware Update Wizard] appears, check [Install from the list displayed and click [Next]. Select the monitor from a list or specific location...


