Operation Manual
Page 3
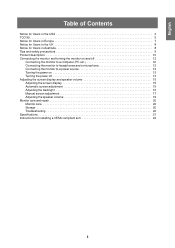
... on 13 Turning the power off 13 Adjusting the screen display and speaker volume 15 Adjusting the screen display 15 Automatic screen adjustment 15 Adjusting the backlight 16 Manual screen adjustment 17 Adjusting the speaker volume 19 Monitor care and repair 20 Monitor care 20 Storage 20 Troubleshooting 20 Specifications 21 Instructions for installing a VESA compliant...
... on 13 Turning the power off 13 Adjusting the screen display and speaker volume 15 Adjusting the screen display 15 Automatic screen adjustment 15 Adjusting the backlight 16 Manual screen adjustment 17 Adjusting the speaker volume 19 Monitor care and repair 20 Monitor care 20 Storage 20 Troubleshooting 20 Specifications 21 Instructions for installing a VESA compliant...
Operation Manual
Page 9
... than usual. - Please understand that supplied may be missing or be noticeable. Do not use by Sharp Corporation. Causing the monitor to this booklet, Microsoft Windows 2000 will be used for other fluids. Do not place any other ...monitor. This monitor and its accessories may be transported. - Operation manual (1) Notes: - Do not try to emit high quality video signals. - and the other than the specified equipment. - The LCD panel has been manufactured using a computer able to open the AC adapter. - LCD monitor (1) - Authorship rights to the Monitor...
... than usual. - Please understand that supplied may be missing or be noticeable. Do not use by Sharp Corporation. Causing the monitor to this booklet, Microsoft Windows 2000 will be used for other fluids. Do not place any other ...monitor. This monitor and its accessories may be transported. - Operation manual (1) Notes: - Do not try to emit high quality video signals. - and the other than the specified equipment. - The LCD panel has been manufactured using a computer able to open the AC adapter. - LCD monitor (1) - Authorship rights to the Monitor...
Operation Manual
Page 13
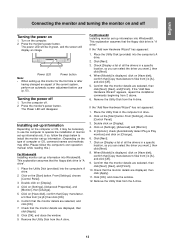
... into Windows98. Installing set-up information etc. If so, follow the computer's own operation manual while reading this monitor for the first time or after having changed an aspect of monitor set -up information into Windows95. When [Models] is displayed, click on 1. Click [OK...current system, perform an automatic screen adjustment before use the computer to use (p. 15). Turning the power off . 2. The Power LED will display an image. This explanation assumes that the monitor details are selected, then click [Next], [Next], and [Finish]. 10....
... into Windows98. Installing set-up information etc. If so, follow the computer's own operation manual while reading this monitor for the first time or after having changed an aspect of monitor set -up information into Windows95. When [Models] is displayed, click on 1. Click [OK...current system, perform an automatic screen adjustment before use the computer to use (p. 15). Turning the power off . 2. The Power LED will display an image. This explanation assumes that the monitor details are selected, then click [Next], [Next], and [Finish]. 10....
Operation Manual
Page 15
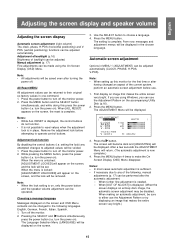
...be sure to turn off . First display an image that makes the entire screen very bright.) 15 POS V - Note: - The screen will become dark and [ADJUSTING] will be changed ...backlight (p.16) Brightness of the current system, perform an automatic screen adjustment before attempting to the following , manual adjustments (p. 17) can be adjusted. When setting up this press the power button (i.e. AD J US ... original ex-factory values in place. When [ALL RESET] appears on ). Turn off the monitor power. 2. After a few seconds the ADJUSTMENT Menu will appear on the screen. 3. It...
...be sure to turn off . First display an image that makes the entire screen very bright.) 15 POS V - Note: - The screen will become dark and [ADJUSTING] will be changed ...backlight (p.16) Brightness of the current system, perform an automatic screen adjustment before attempting to the following , manual adjustments (p. 17) can be adjusted. When setting up this press the power button (i.e. AD J US ... original ex-factory values in place. When [ALL RESET] appears on ). Turn off the monitor power. 2. After a few seconds the ADJUSTMENT Menu will appear on the screen. 3. It...
Operation Manual
Page 17
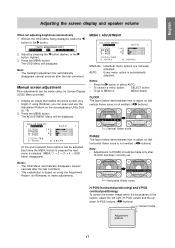
...displayed, press the button or the button. [ AUTO BRIGHTNESS OFF ] B R I G H T 31 [ ] 2. Note: - Manual screen adjustment Fine adjustments can be adjusted. Notes: - To go to MENU 2: MENU button CLOCK The figure below demonstrates how to adjust ...pressing the button (darker) or the button (lighter). 3. Press the MENU button. POS 1 4 0 5 060 05 1024x768 V : 60Hz H : 4 8kHz MANUAL: Individual menu options are manually adjusted. To choose a menu option: SELECT button - POS V - This explanation is not emitted. ( buttons) Note: - Press the MENU button. The backlight ...
...displayed, press the button or the button. [ AUTO BRIGHTNESS OFF ] B R I G H T 31 [ ] 2. Note: - Manual screen adjustment Fine adjustments can be adjusted. Notes: - To go to MENU 2: MENU button CLOCK The figure below demonstrates how to adjust ...pressing the button (darker) or the button (lighter). 3. Press the MENU button. POS 1 4 0 5 060 05 1024x768 V : 60Hz H : 4 8kHz MANUAL: Individual menu options are manually adjusted. To choose a menu option: SELECT button - POS V - This explanation is not emitted. ( buttons) Note: - Press the MENU button. The backlight ...
Operation Manual
Page 18
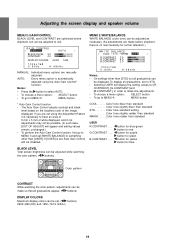
...alteration.) WH I N CONTROL [ MANUA L AUTO ] BLACK LEVEL 3 0 CONTRAST 40 DISPLAY COLORS 2 6 0K 16 M 1024x768 V : 60Hz H : 4 8kHz MANUAL: Individual menu options are made so that all graduations can be disabled. COOL . . . . . Selecting USER will be adjusted to suit. CONTRAST], [G-CONTRAST] and... CONTRAST While watching the color pattern, adjustments can be made before shipment, but can be adjusted as necessary. (As adjustments are manually adjusted. AUTO: Every menu option is set [WHITE BALANCE] to something other than [USER]. On settings other than [STD] ...
...alteration.) WH I N CONTROL [ MANUA L AUTO ] BLACK LEVEL 3 0 CONTRAST 40 DISPLAY COLORS 2 6 0K 16 M 1024x768 V : 60Hz H : 4 8kHz MANUAL: Individual menu options are made so that all graduations can be disabled. COOL . . . . . Selecting USER will be adjusted to suit. CONTRAST], [G-CONTRAST] and... CONTRAST While watching the color pattern, adjustments can be made before shipment, but can be adjusted as necessary. (As adjustments are manually adjusted. AUTO: Every menu option is set [WHITE BALANCE] to something other than [USER]. On settings other than [STD] ...

Operation Manual
Page 22
...compliant only with non-interlaced. - If the monitor is not receiving any signal (synch signal), [NO SIGNAL] will appear. N.C. GND DDC data For H-sync signal input For V-sync signal input DDC clock 22 Follow your computer's instruction manual to set the timing to be compatible with 15 pins Number 1 2 3 4 5 6... 7 8 9 10 11 12 13 14 15 Function Red video signal input Green video signal input Blue video signal input N.C. For ...
...compliant only with non-interlaced. - If the monitor is not receiving any signal (synch signal), [NO SIGNAL] will appear. N.C. GND DDC data For H-sync signal input For V-sync signal input DDC clock 22 Follow your computer's instruction manual to set the timing to be compatible with 15 pins Number 1 2 3 4 5 6... 7 8 9 10 11 12 13 14 15 Function Red video signal input Green video signal input Blue video signal input N.C. For ...

