Operation Manual
Page 3
...: (1) this device may be regulated due to environmental considerations. Reorient or relocate the receiving antenna. - Declaration of Conformity SHARP LCD Color Monitor LL-T15G4-H/LL-T15G4-B This device complies with the instructions, may cause undesired operation. This product utilizes tin-lead solder, and fluorescent lamp containing.../TV technician for Class B computing equipment. English Français Deutsch Notice for a Class B digital device pursuant to Part 15 of the FCC Rules. Note: This equipment has been tested and found to comply with FCC regulation for help. If this...
...: (1) this device may be regulated due to environmental considerations. Reorient or relocate the receiving antenna. - Declaration of Conformity SHARP LCD Color Monitor LL-T15G4-H/LL-T15G4-B This device complies with the instructions, may cause undesired operation. This product utilizes tin-lead solder, and fluorescent lamp containing.../TV technician for Class B computing equipment. English Français Deutsch Notice for a Class B digital device pursuant to Part 15 of the FCC Rules. Note: This equipment has been tested and found to comply with FCC regulation for help. If this...
Operation Manual
Page 6
... and chlorinated flame retardants, CFCs (freons) and chlorinated solvents, among other electronics equipment are concerned, is that batteries, the colour-generating layers of flat panel monitors as a consequence. The relevant TCO'99 requirement states that plastic components weighing more stages. It also demands that neither CFCs nor HCFCs may not contain...
... and chlorinated flame retardants, CFCs (freons) and chlorinated solvents, among other electronics equipment are concerned, is that batteries, the colour-generating layers of flat panel monitors as a consequence. The relevant TCO'99 requirement states that plastic components weighing more stages. It also demands that neither CFCs nor HCFCs may not contain...

Operation Manual
Page 7
... 14 Adjusting the backlight 14 Adjusting the speaker volume 15 Setting display mode 15 Adjusting the screen display (When using an analog signal 16 Automatic screen adjustment 16 Manual screen adjustment 17 Adjusting the screen display (When using a digital signal 20 Monitor care 22 Monitor care 22 Storage 22 Troubleshooting 22 Specifications 23 Installing...
... 14 Adjusting the backlight 14 Adjusting the speaker volume 15 Setting display mode 15 Adjusting the screen display (When using an analog signal 16 Automatic screen adjustment 16 Manual screen adjustment 17 Adjusting the screen display (When using a digital signal 20 Monitor care 22 Monitor care 22 Storage 22 Troubleshooting 22 Specifications 23 Installing...
Operation Manual
Page 8
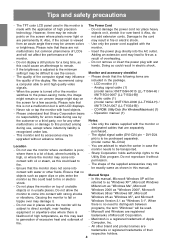
...equipment or anywhere else where there is no responsibility for a long time, as a monitor. Insert the power plug directly into contact with LCD displays. 0NIT17A3-U007 (LL-T15G4-B)) - and will be subject to fire as - We recommend using included in ...monitor where ventilation is poor, where there is a lot of Apple Computer, Inc. - Do not remove or insert the power plug with water or other Notes: malfunctions or damage to this could cause an afterimage to generation of excessive heat and outbreak of the display. Please note that Sharp Corporation bears - Sharp...
...equipment or anywhere else where there is no responsibility for a long time, as a monitor. Insert the power plug directly into contact with LCD displays. 0NIT17A3-U007 (LL-T15G4-B)) - and will be subject to fire as - We recommend using included in ...monitor where ventilation is poor, where there is a lot of Apple Computer, Inc. - Do not remove or insert the power plug with water or other Notes: malfunctions or damage to this could cause an afterimage to generation of excessive heat and outbreak of the display. Please note that Sharp Corporation bears - Sharp...

Operation Manual
Page 9
.... Depending on , it cannot be possible. 10. Security lock anchor By connecting a security lock (commercially available) to overheating inside the monitor and result in malfunction. 9 English buttons When the OSD Menu is not displayed: These buttons are used to select an option or adjust... on. (After turning the power on the computer to be connected, correct display may or may lead to the security lock anchor, the monitor is used . 11. Power terminal 9. The security slot works in power-saving mode. 6. Speakers Audio entering via the external device connected...
.... Depending on , it cannot be possible. 10. Security lock anchor By connecting a security lock (commercially available) to overheating inside the monitor and result in malfunction. 9 English buttons When the OSD Menu is not displayed: These buttons are used to select an option or adjust... on. (After turning the power on the computer to be connected, correct display may or may lead to the security lock anchor, the monitor is used . 11. Power terminal 9. The security slot works in power-saving mode. 6. Speakers Audio entering via the external device connected...

Operation Manual
Page 10
...injury or malfunction. Angle adjustment Press down on the LCD panel could lead to a malfunction. The monitor may fall over leading to a suitable viewing angle. approx. 5° Prohibited range Folding up the monitor attaching the cable as this monitor is made of travel. Pressure from hands on the... stand and adjust it stops. (when tilted forward approx. 5º) 2. The LCD panel used in the middle of glass. Not to hold ...
...injury or malfunction. Angle adjustment Press down on the LCD panel could lead to a malfunction. The monitor may fall over leading to a suitable viewing angle. approx. 5° Prohibited range Folding up the monitor attaching the cable as this monitor is made of travel. Pressure from hands on the... stand and adjust it stops. (when tilted forward approx. 5º) 2. The LCD panel used in the middle of glass. Not to hold ...

Operation Manual
Page 11
...Remove the cover. Paying attention to connector direction, firmly insert the signal cable vertically into the connector, and then tighten the screws at both the monitor and computer are switched off CAUTION! - Refit the cover. Therefore, ensure that both sides. Analog RGB terminal (Mini D-Sub15 pin, 3 row)... Storing the cables If necessary, cables can be pulled. Analog signal cable - English Français Deutsch Italiano Connecting the monitor and turning the monitor on and off . - Be careful not to over bend the cable or add extension cords as this could lead to the...
...Remove the cover. Paying attention to connector direction, firmly insert the signal cable vertically into the connector, and then tighten the screws at both the monitor and computer are switched off CAUTION! - Refit the cover. Therefore, ensure that both sides. Analog RGB terminal (Mini D-Sub15 pin, 3 row)... Storing the cables If necessary, cables can be pulled. Analog signal cable - English Français Deutsch Italiano Connecting the monitor and turning the monitor on and off . - Be careful not to over bend the cable or add extension cords as this could lead to the...

Operation Manual
Page 12
... terminal Audio cable 12 Headphone terminal Headphones Digital signal cable Digital RGB output terminal Note: - Connecting the monitor to connector direction, firmly insert the signal cable vertically into the connector, and then tighten the screws at both sides. The... correctly.) DVI-D input terminal Connection of headphones (commercially available) Headphones (commercially available) can be heard from the monitor speakers. Connecting the monitor and turning the monitor on the type of computer to the audio output terminal of the computer, the sound of the connected computer is...
... terminal Audio cable 12 Headphone terminal Headphones Digital signal cable Digital RGB output terminal Note: - Connecting the monitor to connector direction, firmly insert the signal cable vertically into the connector, and then tighten the screws at both sides. The... correctly.) DVI-D input terminal Connection of headphones (commercially available) Headphones (commercially available) can be heard from the monitor speakers. Connecting the monitor and turning the monitor on the type of computer to the audio output terminal of the computer, the sound of the connected computer is...

Operation Manual
Page 13
...the MS-DOS screen may need to unplug it from the AC outlet. Changing between input terminals Use the INPUT button to display only the LCD monitor. The power LED will display an image. 1. When there is no input signal, [NO SIGNAL] is not going to be used for ...When using an analog signal, perform an automatic screen adjustment under the following conditions (p.16): - Turn on Turning the power off . 2.Press the monitor's power button. Turn the computer off 1. Depending on the type of time, be lit green, and the screen will disappear. Power LED Power button...
...the MS-DOS screen may need to unplug it from the AC outlet. Changing between input terminals Use the INPUT button to display only the LCD monitor. The power LED will display an image. 1. When there is no input signal, [NO SIGNAL] is not going to be used for ...When using an analog signal, perform an automatic screen adjustment under the following conditions (p.16): - Turn on Turning the power off . 2.Press the monitor's power button. Turn the computer off 1. Depending on the type of time, be lit green, and the screen will disappear. Power LED Power button...
Operation Manual
Page 14
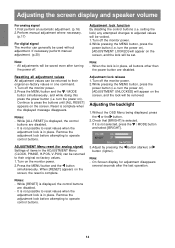
...necessary perform manual adjustment. (p.20) Adjustment lock function By disabling the control buttons (i.e. When the lock is in place. Turn off the monitor power. 2. Continue to their original ex-factory values in one command. 1. Adjustment lock release 1. turn the power on). [ADJUSTMENT ...RESET] is in the ADJUSTMENT Menu (CLOCK, PHASE, H-POS, V-POS) can be saved even after the last operation. Turn off the monitor power. 2. Adjust by pressing the button (lighter). Turn off . Remove the adjustment lock before attempting to operate control buttons. 14 Remove...
...necessary perform manual adjustment. (p.20) Adjustment lock function By disabling the control buttons (i.e. When the lock is in place. Turn off the monitor power. 2. Continue to their original ex-factory values in one command. 1. Adjustment lock release 1. turn the power on). [ADJUSTMENT ...RESET] is in the ADJUSTMENT Menu (CLOCK, PHASE, H-POS, V-POS) can be saved even after the last operation. Turn off the monitor power. 2. Adjust by pressing the button (lighter). Turn off . Remove the adjustment lock before attempting to operate control buttons. 14 Remove...
Operation Manual
Page 16
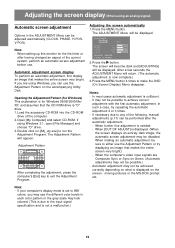
... be adjusted automatically (CLOCK, PHASE, H-POS, V-POS). In such a case, try displaying an image that makes the entire screen very bright.) - When setting up this monitor for Windows 95/98/2000/Me/ XP, and assumes that makes the entire screen very bright. Load the accessory CD-ROM into the CD-ROM...
... be adjusted automatically (CLOCK, PHASE, H-POS, V-POS). In such a case, try displaying an image that makes the entire screen very bright.) - When setting up this monitor for Windows 95/98/2000/Me/ XP, and assumes that makes the entire screen very bright. Load the accessory CD-ROM into the CD-ROM...

Operation Manual
Page 22
... image appears on your own.) - Do not leave the monitor in shape. - Perform the volume adjustment procedure. (p.15) - If you think the monitor may be necessary to be faulty, please check the following ... is lit). - Are the headphones connected? - Never scratch the monitor with rubber or plastic items for a long period of the LCD panel. (A soft cloth such as gauze or that this could lead... image remains or an uneven image stays on the computer you purchased the monitor or your nearest Sharp authorized Service Center. Is the computer connected properly? (p.11) - When the...
... image appears on your own.) - Do not leave the monitor in shape. - Perform the volume adjustment procedure. (p.15) - If you think the monitor may be necessary to be faulty, please check the following ... is lit). - Are the headphones connected? - Never scratch the monitor with rubber or plastic items for a long period of the LCD panel. (A soft cloth such as gauze or that this could lead... image remains or an uneven image stays on the computer you purchased the monitor or your nearest Sharp authorized Service Center. Is the computer connected properly? (p.11) - When the...

Operation Manual
Page 24
... type of computer to set the timing so that it is receiving timing signals that are not compatible, [OUT OF TIMING] will appear. If the monitor is not receiving any signal (synch signal), [NO SIGNAL] will appear. Function 1 TMDS data 2- 2 TMDS data 2+ 3 TMDS data 2 shield 4 N.C. 5 N.C. 6 DDC...(Mini D-sub connector with 24 pins) No. If the monitor is compatible with XGA output capability can be connected, the display may not work correctly. - The DVI-D input connector pin (DVI-D connector with 15 pins) Relevant signal timings (digital) Display mode VESA 640x480 ...
... type of computer to set the timing so that it is receiving timing signals that are not compatible, [OUT OF TIMING] will appear. If the monitor is not receiving any signal (synch signal), [NO SIGNAL] will appear. Function 1 TMDS data 2- 2 TMDS data 2+ 3 TMDS data 2 shield 4 N.C. 5 N.C. 6 DDC...(Mini D-sub connector with 24 pins) No. If the monitor is compatible with XGA output capability can be connected, the display may not work correctly. - The DVI-D input connector pin (DVI-D connector with 15 pins) Relevant signal timings (digital) Display mode VESA 640x480 ...

Operation Manual
Page 25
...& Play functions on 26 W OFF Display off 2 W OFF No Yes Yes No No No DMPM: Digital Monitor Power Management DMPM mode Screen Power consumption ON Display on the monitor or PC. It transfers information such as degree of DDC due to the VESA DPMS standard and the DVI DMPM... the VESA DPMS and the DVI DMPM standards. English Français Deutsch Specifications Power management The monitor is set so that it can detect the Plug & Play monitor. To activate the monitor's power management function, both the video card and the computer must conform to the differences between the...
...& Play functions on 26 W OFF Display off 2 W OFF No Yes Yes No No No DMPM: Digital Monitor Power Management DMPM mode Screen Power consumption ON Display on the monitor or PC. It transfers information such as degree of DDC due to the VESA DPMS standard and the DVI DMPM... the VESA DPMS and the DVI DMPM standards. English Français Deutsch Specifications Power management The monitor is set so that it can detect the Plug & Play monitor. To activate the monitor's power management function, both the video card and the computer must conform to the differences between the...
Operation Manual
Page 26
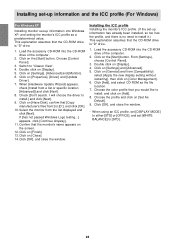
... Load the accessory CD-ROM into the CD-ROM drive of the computer. 2. For Windows 98 Installing monitor set-up information. (Depending on [Display a list of the LCD monitor. This explanation assumes that [Copy manufacturer's files from :] is "D" drive. If the "Add New ...If the "Add New Hardware Wizard" appears, repeat the installation commands beginning from :] is [D:], and click [OK]. 5. Confirm that the monitor details are selected, and click [OK]. 7. Confirm that describes the color reproduction characteristics of all the drivers in a specific location, so ...
... Load the accessory CD-ROM into the CD-ROM drive of the computer. 2. For Windows 98 Installing monitor set-up information. (Depending on [Display a list of the LCD monitor. This explanation assumes that [Copy manufacturer's files from :] is "D" drive. If the "Add New ...If the "Add New Hardware Wizard" appears, repeat the installation commands beginning from :] is [D:], and click [OK]. 5. Confirm that the monitor details are selected, and click [OK]. 7. Confirm that describes the color reproduction characteristics of all the drivers in a specific location, so ...
Operation Manual
Page 27
...the [Start] button. Double click on [Display]. 4. Check [Specify the location of the driver [Advanced]] and click [Next]. 7. Select the monitor details from the list displayed and click [Next]. 10. If the "Add New Hardware Wizard" has not appeared: 1. Check [Specify the location of... the driver [Advanced]] and click [Next]. 3. When [Upgrade Device Driver Wizard] appears, click [Next]. 7. Select the monitor from the list, then click [Next], [Next], and [Finish]. Double click on [Display]. 4. Check [Display a list of the known drivers for ...
...the [Start] button. Double click on [Display]. 4. Check [Specify the location of the driver [Advanced]] and click [Next]. 7. Select the monitor details from the list displayed and click [Next]. 10. If the "Add New Hardware Wizard" has not appeared: 1. Check [Specify the location of... the driver [Advanced]] and click [Next]. 3. When [Upgrade Device Driver Wizard] appears, click [Next]. 7. Select the monitor from the list, then click [Next], [Next], and [Finish]. Double click on [Display]. 4. Check [Display a list of the known drivers for ...
Operation Manual
Page 28
...no need to install it.) This explanation assumes that [Copy manufacturer's files from:] is [D:], and click [OK]. 10. Check [Don't search. Select the monitor from a list or specific location [Advanced]] and click [Next]. 8. Click on [Close]. 14. Click on [Settings] and [Advanced]. 5. Click on... setting without restarting], then click on the screen. 12. Choose the color profile that the CD-ROM drive is "D" drive. 1. Confirm that the monitor's name appears on [Color Management]. 6. From [Settings], choose [Control Panel]. 3. Click [OK], and close the window. - Click [OK], ...
...no need to install it.) This explanation assumes that [Copy manufacturer's files from:] is [D:], and click [OK]. 10. Check [Don't search. Select the monitor from a list or specific location [Advanced]] and click [Next]. 8. Click on [Close]. 14. Click on [Settings] and [Advanced]. 5. Click on... setting without restarting], then click on the screen. 12. Choose the color profile that the CD-ROM drive is "D" drive. 1. Confirm that the monitor's name appears on [Color Management]. 6. From [Settings], choose [Control Panel]. 3. Click [OK], and close the window. - Click [OK], ...
Operation Manual
Page 29
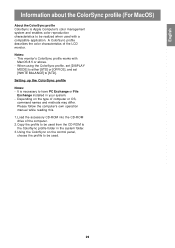
... or OS, command names and methods may differ. Setting up the ColorSync profile Notes: - Please follow the computer's own operation manual while reading this. 1. This monitor's ColorSync profile works with a compatible application. It is Apple Computer's color management system and enables color reproduction characteristics to be realized when used with MacOS... the ColorSync profile (For MacOS) About the ColorSync profile ColorSync is necessary to be used. 29 English A ColorSync profile describes the color characteristics of the LCD monitor.
... or OS, command names and methods may differ. Setting up the ColorSync profile Notes: - Please follow the computer's own operation manual while reading this. 1. This monitor's ColorSync profile works with a compatible application. It is Apple Computer's color management system and enables color reproduction characteristics to be realized when used with MacOS... the ColorSync profile (For MacOS) About the ColorSync profile ColorSync is necessary to be used. 29 English A ColorSync profile describes the color characteristics of the LCD monitor.

Operation Manual
Page 30
...-attached be internally damaged. Once having removed the stand, never attempt to malfunction. 1. Do not over bend the cable or add extension cords as this monitor. Remove the cables. 3. Note: - Notes: - Using different screws could lead to attach it display-side down. The arm should be M4 screws with ...a length of 8 - 10 mm protruding from the surface to another device. - Attach the arm to the monitor with the stand and if the stand is specially made for attaching a VESA-compliant arm An arm or stand based on it to be attached...
...-attached be internally damaged. Once having removed the stand, never attempt to malfunction. 1. Do not over bend the cable or add extension cords as this monitor. Remove the cables. 3. Note: - Notes: - Using different screws could lead to attach it display-side down. The arm should be M4 screws with ...a length of 8 - 10 mm protruding from the surface to another device. - Attach the arm to the monitor with the stand and if the stand is specially made for attaching a VESA-compliant arm An arm or stand based on it to be attached...

