
Operation Manual
Page 7
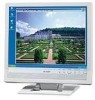
... volume 14 Adjusting the backlight 14 Adjusting the speaker volume 15 Setting display mode 15 Adjusting the screen display (When using an analog signal 16 Automatic screen adjustment 16 Manual screen adjustment 17 Adjusting the screen display (When using a digital signal 20 Monitor care 22 Monitor care 22 Storage 22 Troubleshooting 22 Specifications 23 Installing...
... volume 14 Adjusting the backlight 14 Adjusting the speaker volume 15 Setting display mode 15 Adjusting the screen display (When using an analog signal 16 Automatic screen adjustment 16 Manual screen adjustment 17 Adjusting the screen display (When using a digital signal 20 Monitor care 22 Monitor care 22 Storage 22 Troubleshooting 22 Specifications 23 Installing...
Operation Manual
Page 8
... trademarks or registered trademarks of the Adding an extension cord may be used in the package. Sharp Corporation holds authorship rights to be transported. - Causing the monitor to fire or electric shock. - All other fluids. Also, do points on top of ... video - Monitor and accessory checklist - LCD monitor (1) signals. - DVI-D24 upgraded without permission. - contact with LCD displays. 0NIT17A3-U007 (LL-T15G4-B)) - Ensure that no need to fire as this could lead to fall or topple over bend it without advance notice. Manual Scope - ...
... trademarks or registered trademarks of the Adding an extension cord may be used in the package. Sharp Corporation holds authorship rights to be transported. - Causing the monitor to fire or electric shock. - All other fluids. Also, do points on top of ... video - Monitor and accessory checklist - LCD monitor (1) signals. - DVI-D24 upgraded without permission. - contact with LCD displays. 0NIT17A3-U007 (LL-T15G4-B)) - Ensure that no need to fire as this could lead to fall or topple over bend it without advance notice. Manual Scope - ...
Operation Manual
Page 14
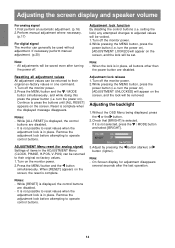
... (lighter). It is in the ADJUSTMENT Menu (CLOCK, PHASE, H-POS, V-POS) can be voided. 1. Perform manual adjustment where necessary. (p.17) For digital signal The monitor can be returned to press the buttons until [ALL RESET] appears on the screen, and the lock will be returned...reset values when the adjustment lock is not possible to operate control buttons. If necessary perform manual adjustment. (p.20) Adjustment lock function By disabling the control buttons (i.e. Turn off the monitor power. 2. Reset is not selected, press the / MODE button and select [BRIGHT]. ...
... (lighter). It is in the ADJUSTMENT Menu (CLOCK, PHASE, H-POS, V-POS) can be voided. 1. Perform manual adjustment where necessary. (p.17) For digital signal The monitor can be returned to press the buttons until [ALL RESET] appears on the screen, and the lock will be returned...reset values when the adjustment lock is not possible to operate control buttons. If necessary perform manual adjustment. (p.20) Adjustment lock function By disabling the control buttons (i.e. Turn off the monitor power. 2. Reset is not selected, press the / MODE button and select [BRIGHT]. ...
Operation Manual
Page 16
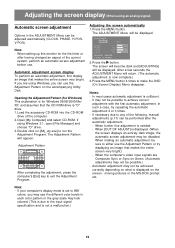
... button. Press the button. Automatic adjustment may not be adjusted automatically (CLOCK, PHASE, H-POS, V-POS). Note: - When setting up this monitor for Windows 95/98/2000/Me/ XP, and assumes that makes the entire screen very bright. Open [My Computer] and select CD-ROM....) This explanation is for the first time or after having changed an aspect of the following, manual adjustments (p.17) can be performed after the automatic adjustment. - If necessary due to either use . ADJUSTMENT MANUAL AUTO CLOCK 127 PHASE 30 H-POS 200 V-POS 29 1024x768 ANALOG V: 6 0Hz H : ...
... button. Press the button. Automatic adjustment may not be adjusted automatically (CLOCK, PHASE, H-POS, V-POS). Note: - When setting up this monitor for Windows 95/98/2000/Me/ XP, and assumes that makes the entire screen very bright. Open [My Computer] and select CD-ROM....) This explanation is for the first time or after having changed an aspect of the following, manual adjustments (p.17) can be performed after the automatic adjustment. - If necessary due to either use . ADJUSTMENT MANUAL AUTO CLOCK 127 PHASE 30 H-POS 200 V-POS 29 1024x768 ANALOG V: 6 0Hz H : ...
Operation Manual
Page 17
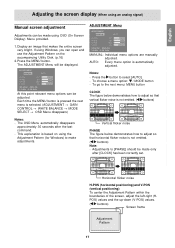
... (p.16) 2. This explanation is not emitted. ( buttons) Notes: - Vertical flicker noise PHASE The figure below demonstrates how to select [AUTO]. - ADJUSTMENT MANUAL AUTO CLOCK 127 PHASE 30 H-POS 200 V-POS 29 1024x768 ANALOG V: 6 0Hz H : 4 8.4kHz At this point relevant menu options can be made using...so that makes the entire screen very bright. English Français Deutsch Adjusting the screen display (When using an analog signal) Manual screen adjustment Adjustments can be made only after the last command. - If using Windows, you can open and use the Adjustment ...
... (p.16) 2. This explanation is not emitted. ( buttons) Notes: - Vertical flicker noise PHASE The figure below demonstrates how to select [AUTO]. - ADJUSTMENT MANUAL AUTO CLOCK 127 PHASE 30 H-POS 200 V-POS 29 1024x768 ANALOG V: 6 0Hz H : 4 8.4kHz At this point relevant menu options can be made using...so that makes the entire screen very bright. English Français Deutsch Adjusting the screen display (When using an analog signal) Manual screen adjustment Adjustments can be made only after the last command. - If using Windows, you can open and use the Adjustment ...
Operation Manual
Page 18
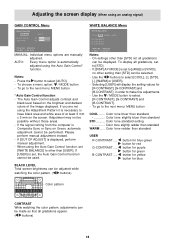
... automatic adjustment cannot be made so that all gradations, set to [sRGB] or [VIVID], no other than standard USER R-CONTRAST ..... Please perform manual adjustment instead. - BLACK LEVEL Total screen brightness can be performed. Use the / MODE button to select [AUTO]. - G-CONTRAST ..... Press the... If you are not using an analog signal) GAIN CONTROL Menu GAIN CONTROL MANUAL BLACK LEVEL CONTRAST AUTO 32 50 1024x768 ANALOG V: 6 0Hz H : 4 8.4kHz MANUAL: Individual menu options are manually adjusted. button for blue-green button for red button for purple button for green...
... automatic adjustment cannot be made so that all gradations, set to [sRGB] or [VIVID], no other than standard USER R-CONTRAST ..... Please perform manual adjustment instead. - BLACK LEVEL Total screen brightness can be performed. Use the / MODE button to select [AUTO]. - G-CONTRAST ..... Press the... If you are not using an analog signal) GAIN CONTROL Menu GAIN CONTROL MANUAL BLACK LEVEL CONTRAST AUTO 32 50 1024x768 ANALOG V: 6 0Hz H : 4 8.4kHz MANUAL: Individual menu options are manually adjusted. button for blue-green button for red button for purple button for green...

Operation Manual
Page 24
... conforming to be connected here. All are reference values. - The DVI-D input connector pin (DVI-D connector with the monitor. - Follow your computer's instruction manual to set the timing so that it is not receiving any signal (synch signal), [NO SIGNAL] will appear. If the... monitor is compatible with the monitor. - If the monitor is compatible with 24 pins) No. Function 13 N.C. 14 +5V 15 GND 16 Hot plug...
... conforming to be connected here. All are reference values. - The DVI-D input connector pin (DVI-D connector with the monitor. - Follow your computer's instruction manual to set the timing so that it is not receiving any signal (synch signal), [NO SIGNAL] will appear. If the... monitor is compatible with the monitor. - If the monitor is compatible with 24 pins) No. Function 13 N.C. 14 +5V 15 GND 16 Hot plug...
Operation Manual
Page 26
..., click on [Have disk], confirm that describes the color reproduction characteristics of the LCD monitor. If the "Add New Hardware Wizard" has not appeared: 1. In [Options], check [Automatically detect Plug & Play monitors] and click on the [Start] button. Load the accessory CD-ROM into Windows...the ICC profile. - This explanation assumes that the monitor details are displayed, then click [Apply]. 11. Check that the monitor details are selected, then click [Next], [Next], and [Finish]. If so, follow the computer's own operation manual while reading this.) About the ICC profile An ICC ...
..., click on [Have disk], confirm that describes the color reproduction characteristics of the LCD monitor. If the "Add New Hardware Wizard" has not appeared: 1. In [Options], check [Automatically detect Plug & Play monitors] and click on the [Start] button. Load the accessory CD-ROM into Windows...the ICC profile. - This explanation assumes that the monitor details are displayed, then click [Apply]. 11. Check that the monitor details are selected, then click [Next], [Next], and [Finish]. If so, follow the computer's own operation manual while reading this.) About the ICC profile An ICC ...
Operation Manual
Page 29
...characteristics to be realized when used with MacOS 8.5 or above. - Load the accessory CD-ROM into the CD-ROM drive of the LCD monitor. English Français Deutsch Italiano Español Information about the ColorSync profile (For MacOS) About the ColorSync profile ColorSync is necessary...to the ColorSync profile folder in your system. - Depending on the control panel, choose the profile to be used . 29 English This monitor's ColorSync profile works with a compatible application. Copy the profile to be used from the CD-ROM to [STD]. Please follow the computer's ...
...characteristics to be realized when used with MacOS 8.5 or above. - Load the accessory CD-ROM into the CD-ROM drive of the LCD monitor. English Français Deutsch Italiano Español Information about the ColorSync profile (For MacOS) About the ColorSync profile ColorSync is necessary...to the ColorSync profile folder in your system. - Depending on the control panel, choose the profile to be used . 29 English This monitor's ColorSync profile works with a compatible application. Copy the profile to be used from the CD-ROM to [STD]. Please follow the computer's ...

