LC-22DV17U Operation Manual
Page 6
... to provide some protection against voltage surges and built-up static charges. This will be unplugged easily from the AC outlet, or from the AC INPUT terminal on the top or near a swimming pool; No objects filled with the product. To prevent this does not affect the performance of candle or...
... to provide some protection against voltage surges and built-up static charges. This will be unplugged easily from the AC outlet, or from the AC INPUT terminal on the top or near a swimming pool; No objects filled with the product. To prevent this does not affect the performance of candle or...
LC-22DV17U Operation Manual
Page 10
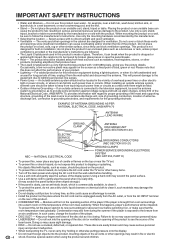
... Before attaching (or detaching) the stand, unplug the AC cord from Sharp in the TV falling over. 1 Confirm the 3 screws supplied with the TV. Screws (X3) 3 For protection, sheets are available directly from the AC input terminal. • Before performing work spread cushioning over the base area ...to lay the TV on the bottom of the stand may result in single (00Z-LCD-CLOTH) or triple (00Z-LCD- Soft cushion NOTE • To detach the stand,...
... Before attaching (or detaching) the stand, unplug the AC cord from Sharp in the TV falling over. 1 Confirm the 3 screws supplied with the TV. Screws (X3) 3 For protection, sheets are available directly from the AC input terminal. • Before performing work spread cushioning over the base area ...to lay the TV on the bottom of the stand may result in single (00Z-LCD-CLOTH) or triple (00Z-LCD- Soft cushion NOTE • To detach the stand,...
LC-22DV17U Operation Manual
Page 14
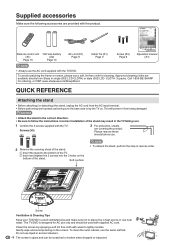
Part names TV/DVD (Front) TV/DVD (Left) EJECT button Remote control sensor POWER indicator Channel Channel Volume (VOL buttons /▲/▶PLAY button /▼/
Part names TV/DVD (Front) TV/DVD (Left) EJECT button Remote control sensor POWER indicator Channel Channel Volume (VOL buttons /▲/▶PLAY button /▼/
LC-22DV17U Operation Manual
Page 15
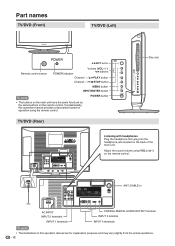
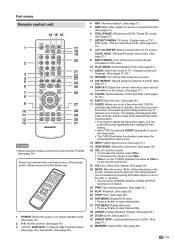
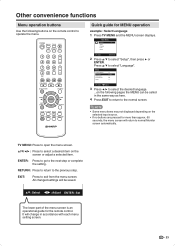
... SLEEP repeatedly to 2 hours. "Mute" will enter the standby mode when the remaining time reaches zero. 18 INPUT: Select input source. (See page 15.) 19 VIEW MODE: Select the screen size. (See page 18.) 20 VOL +/-:.../ DVD mode - on the remote control unit. 21 CH / : Select the channel. (See page 16.) 22 MUTE: Mute the sound. on the TV/DVD operates the same as VOL+/- Part names Remote control unit 14 ...15 16 1 17 18 19 20 2 21 3 22 4 23 5 24 6 25 7 26 8 9 27 10 28 11 29 12 30 13 31 NOTE •...
... SLEEP repeatedly to 2 hours. "Mute" will enter the standby mode when the remaining time reaches zero. 18 INPUT: Select input source. (See page 15.) 19 VIEW MODE: Select the screen size. (See page 18.) 20 VOL +/-:.../ DVD mode - on the remote control unit. 21 CH / : Select the channel. (See page 16.) 22 MUTE: Mute the sound. on the TV/DVD operates the same as VOL+/- Part names Remote control unit 14 ...15 16 1 17 18 19 20 2 21 3 22 4 23 5 24 6 25 7 26 8 9 27 10 28 11 29 12 30 13 31 NOTE •...

LC-22DV17U Operation Manual
Page 17
...9650;/▼. Displaying an external equipment image To view external source images, select the input source from "Source Selection" menu using an HDMI-DVI conversion adapter/cable, use INPUT 3 and AUDIO terminal. 15 Connecting to your external equipment operation manual for the signal... tuner, HDMI equipment, game console or camcorder. Source Selection 0.TV 1.Input1 2.Input2 3.Input3 4.Input4 5.DVD [0-5]:Select • Each time INPUT is pressed, "Source Selection" item toggles. • You can connect many types of external equipment to External Equipment Connecting a DVD player,...
...9650;/▼. Displaying an external equipment image To view external source images, select the input source from "Source Selection" menu using an HDMI-DVI conversion adapter/cable, use INPUT 3 and AUDIO terminal. 15 Connecting to your external equipment operation manual for the signal... tuner, HDMI equipment, game console or camcorder. Source Selection 0.TV 1.Input1 2.Input2 3.Input3 4.Input4 5.DVD [0-5]:Select • Each time INPUT is pressed, "Source Selection" item toggles. • You can connect many types of external equipment to External Equipment Connecting a DVD player,...
LC-22DV17U Operation Manual
Page 19
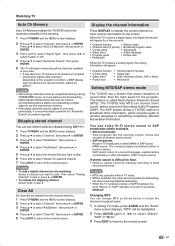
... a feature that you want to skip. 6 Press ◀/▶ to select "Delete" for selected channel. 7 Press EXIT to return to display the current channel (or input source) information on the screen. NOTE • Memorizing channels is called Multi-channel Television Sound (MTS). This feature is best accomplished during evening "PRIMETIME" hours...
... a feature that you want to skip. 6 Press ◀/▶ to select "Delete" for selected channel. 7 Press EXIT to return to display the current channel (or input source) information on the screen. NOTE • Memorizing channels is called Multi-channel Television Sound (MTS). This feature is best accomplished during evening "PRIMETIME" hours...
LC-22DV17U Operation Manual
Page 20
... to return to the normal screen. You can select one of the screen. To erase channel labels 1 Select a channel with a label which you finish inputting the label name, press ENTER. 5 Press EXIT to return to the normal screen. 6 Repeat steps 1-5 for the type of video signal currently being received... NOTE • You can enter to the same menu screen from "Picture" menu. • You cannot select "Side Bar" and "S.Stretch" when a 720p, 1080i or 1080p signal is pressed, View Mode item toggles. • You can also select View Mode item by pressing You can sequentially select a view...
... to return to the normal screen. You can select one of the screen. To erase channel labels 1 Select a channel with a label which you finish inputting the label name, press ENTER. 5 Press EXIT to return to the normal screen. 6 Repeat steps 1-5 for the type of video signal currently being received... NOTE • You can enter to the same menu screen from "Picture" menu. • You cannot select "Side Bar" and "S.Stretch" when a 720p, 1080i or 1080p signal is pressed, View Mode item toggles. • You can also select View Mode item by pressing You can sequentially select a view...
LC-22DV17U Operation Manual
Page 22
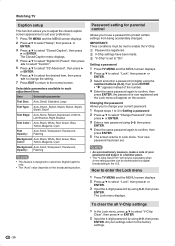
...the screen. To clear the all V-Chip settings 1 In the Lock menu, press ▲/▼ to select "Lock", then press ▶ or ENTER. 3 Input the 4-digit password by using 0-9, then press ENTER. How to enter the Lock menu 1 Press TV MENU and the MENU screen displays. 2 Press ▲/&#...9660; to select "V-Chip Clear", then press ▶ or ENTER. 2 Input the 4-digit password by using 0-9, then press ENTER. Watching TV Caption setup This function allows you to adjust the closed caption screen appearance to suit...
...the screen. To clear the all V-Chip settings 1 In the Lock menu, press ▲/▼ to select "Lock", then press ▶ or ENTER. 3 Input the 4-digit password by using 0-9, then press ENTER. How to enter the Lock menu 1 Press TV MENU and the MENU screen displays. 2 Press ▲/&#...9660; to select "V-Chip Clear", then press ▶ or ENTER. 2 Input the 4-digit password by using 0-9, then press ENTER. Watching TV Caption setup This function allows you to adjust the closed caption screen appearance to suit...
LC-22DV17U Operation Manual
Page 25
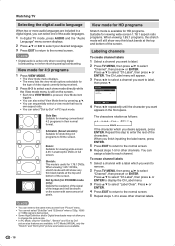
... Video Label Auto Shut Off Reset >> English >> Off >> : Select : Adjust 3 Press ◀/▶ to select the desired language. ...on the following buttons on the selected input source. • If no buttons are pressed for more than approx. 60 seconds, the menu screen will be called in accordance with each menu setting...
... Video Label Auto Shut Off Reset >> English >> Off >> : Select : Adjust 3 Press ◀/▶ to select the desired language. ...on the following buttons on the selected input source. • If no buttons are pressed for more than approx. 60 seconds, the menu screen will be called in accordance with each menu setting...
LC-22DV17U Operation Manual
Page 26
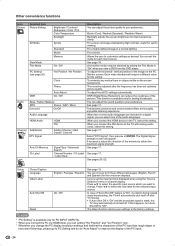
...PC settings automatically. Let you set the mode for PC INPUT (INPUT4). * When you connect the PC via HDMI input, you can adjust the picture quality to your settings to the factory settings. See pages 20~22. Setup Closed Caption Language Video Label Auto Shut Off Reset...do an "Auto Adjust" to improve the display of the PC input. 24 Select "DTV Signal", then press ▶ or ENTER. Other convenience functions Icon Picture Audio Channel Lock Selected item Picture Setting Brightness / Contrast / Sharpness / Color / Tint Color Temperature Backlight AV Mode Sports Standard ...
...PC settings automatically. Let you set the mode for PC INPUT (INPUT4). * When you connect the PC via HDMI input, you can adjust the picture quality to your settings to the factory settings. See pages 20~22. Setup Closed Caption Language Video Label Auto Shut Off Reset...do an "Auto Adjust" to improve the display of the PC input. 24 Select "DTV Signal", then press ▶ or ENTER. Other convenience functions Icon Picture Audio Channel Lock Selected item Picture Setting Brightness / Contrast / Sharpness / Color / Tint Color Temperature Backlight AV Mode Sports Standard ...
LC-22DV17U Operation Manual
Page 27
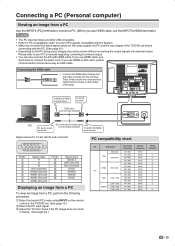
... terminal To PC IN terminal RGB cable (commercially available) PC To Audio output ∅3.5 mm stereo minijack cable (commercially available) To AUDIO PC/HDMI terminals input terminal Signal names for 15-pin mini D-sub connecter 543 21 10 9 8 7 6 15 14 13 12 11 Pin No Signal name R G B Not ...Hz ○ 25 Connecting a PC (Personal computer) Viewing an image from a PC, perform the following procedure. ① Select the Input4 (PC) mode using INPUT on both sides of the plug. If you use HDMI cable, you don't have to external output. • You can also connect the PC with...
... terminal To PC IN terminal RGB cable (commercially available) PC To Audio output ∅3.5 mm stereo minijack cable (commercially available) To AUDIO PC/HDMI terminals input terminal Signal names for 15-pin mini D-sub connecter 543 21 10 9 8 7 6 15 14 13 12 11 Pin No Signal name R G B Not ...Hz ○ 25 Connecting a PC (Personal computer) Viewing an image from a PC, perform the following procedure. ① Select the Input4 (PC) mode using INPUT on both sides of the plug. If you use HDMI cable, you don't have to external output. • You can also connect the PC with...
LC-22DV17U Operation Manual
Page 29
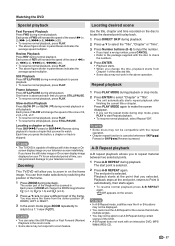
... PLAY MODE during playback. 2 Press ▲/▼ to select the "Title", "Chapter" or "Time". 3 Press Number buttons (0-9) to input the number. • If you want to your TV for the scenes that you input a wrong number, press CANCEL. • Refer to the package supplied with the repeat operation. • Chapter repeat function...
... PLAY MODE during playback. 2 Press ▲/▼ to select the "Title", "Chapter" or "Time". 3 Press Number buttons (0-9) to input the number. • If you want to your TV for the scenes that you input a wrong number, press CANCEL. • Refer to the package supplied with the repeat operation. • Chapter repeat function...
LC-22DV17U Operation Manual
Page 35
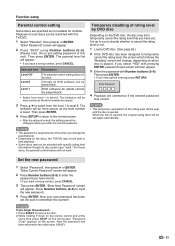
...buttons (0-9). (Please note, this is pre-setting password of the rating level will be changed unless you select "YES" with pressing ENTER, password input screen will appear. 2 Press Number buttons (0-9) to remove the disc. 2. If you enter the correct password. "Enter Current Password" screen will... ▲/▼ to select from level 1 to level 8. The parental level list will appear. Now the password has been returned to input the new password. 4 Press ENTER. Temporary disabling of such discs can be restricted with Number buttons (0-9). Playback of rating level by DVD...
...buttons (0-9). (Please note, this is pre-setting password of the rating level will be changed unless you select "YES" with pressing ENTER, password input screen will appear. 2 Press Number buttons (0-9) to remove the disc. 2. If you enter the correct password. "Enter Current Password" screen will... ▲/▼ to select from level 1 to level 8. The parental level list will appear. Now the password has been returned to input the new password. 4 Press ENTER. Temporary disabling of such discs can be restricted with Number buttons (0-9). Playback of rating level by DVD...
LC-22DV17U Operation Manual
Page 37
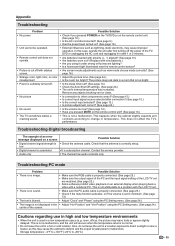
... vent or clean. • Is connection to malfunction. Troubleshooting-Digital broadcasting The example of the LCD TV set ? (See page 13.) • Check the Auto Shut Off settings. (See ...25.) • Check if the mute function activates, or if the volume is set to a problem with the LCD TV set. • There is no image. • Make sure the RGB cable is properly connected. (See ...page 25.) • Make sure the output signal of the PC and the input signal setting of an error message displayed on the remote control unit? (See page 13.) • This is...
... vent or clean. • Is connection to malfunction. Troubleshooting-Digital broadcasting The example of the LCD TV set ? (See page 13.) • Check the Auto Shut Off settings. (See ...25.) • Check if the mute function activates, or if the volume is set to a problem with the LCD TV set. • There is no image. • Make sure the RGB cable is properly connected. (See ...page 25.) • Make sure the output signal of the PC and the input signal setting of an error message displayed on the remote control unit? (See page 13.) • This is...
LC-22DV17U Operation Manual
Page 38
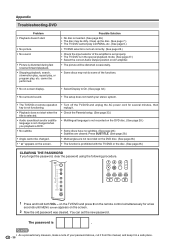
... play, repeat play, or program play CD-ROMs, etc. (See page 6.) • TV/DVD selector is not set correctly. (See page 26.) • Check the input selector of the functions. • No on-screen display. • Select Display to On. (See page 32.) • No surround sound. • The setup does...
... play, repeat play, or program play CD-ROMs, etc. (See page 6.) • TV/DVD selector is not set correctly. (See page 26.) • Check the input selector of the functions. • No on-screen display. • Select Display to On. (See page 32.) • No surround sound. • The setup does...

LC-22DV17U Operation Manual
Page 39
... without prior notice. Appendix Specifications Item Model: LC-22DV17U LCD panel 22" Class (211/2 Diagonal) Active Matrix (a-Si TFT LCD) Resolution 1,049,088 pixels (1366 x 768) TV Function...BTSC System Audio out 1.5W x 2 Terminals Side INPUT 1 AV in, S-VIDEO in INPUT 2 COMPONENT in, Audio in INPUT 3 HDMI in with HDCP, Audio in INPUT 4 15-pin mini D-sub female connector, Audio ... via Cable are unreceivable. *2 The dimensional drawings are nominal values of continuous improvement, SHARP reserves the right to make design and specification changes for power output decrease of about...
... without prior notice. Appendix Specifications Item Model: LC-22DV17U LCD panel 22" Class (211/2 Diagonal) Active Matrix (a-Si TFT LCD) Resolution 1,049,088 pixels (1366 x 768) TV Function...BTSC System Audio out 1.5W x 2 Terminals Side INPUT 1 AV in, S-VIDEO in INPUT 2 COMPONENT in, Audio in INPUT 3 HDMI in with HDCP, Audio in INPUT 4 15-pin mini D-sub female connector, Audio ... via Cable are unreceivable. *2 The dimensional drawings are nominal values of continuous improvement, SHARP reserves the right to make design and specification changes for power output decrease of about...


