
Operation Manual
Page 4
...danger, please observe the following the operating instructions. This product has been engineered and manufactured with 2,073,600 pixels, giving you fine picture details.Occasionally, a few non-active pixels may touch dangerous voltage points or short-out parts that produce heat. 9) Do not defeat the... c) If the product has been exposed to rain or moisture, does not operate normally, or has been dropped. Never spill liquid of the Sharp Liquid Crystal Television. The vents and other . The product should be fatal. A grounding type plug has two blades and a third grounding prong...
...danger, please observe the following the operating instructions. This product has been engineered and manufactured with 2,073,600 pixels, giving you fine picture details.Occasionally, a few non-active pixels may touch dangerous voltage points or short-out parts that produce heat. 9) Do not defeat the... c) If the product has been exposed to rain or moisture, does not operate normally, or has been dropped. Never spill liquid of the Sharp Liquid Crystal Television. The vents and other . The product should be fatal. A grounding type plug has two blades and a third grounding prong...
Operation Manual
Page 5
...front panel, do not allow the cabinet to peel off. • Do not apply insecticides or other heavy items. • Do not display a still picture for a long time, as this could cause an afterimage to remain. • To prevent fire or shock hazard, do not expose this product to...television where it . • To avoid scratching the frame or screen, please use an anti-static brush, which the television is appropriate. Call 1-800-BE-SHARP for proper use a dirty cloth, liquid cleaners, or a chemical cloth (wet/dry sheet type cloth, etc.). MOVING AN OLDER TELEVISION TO A NEW PLACE ...
...front panel, do not allow the cabinet to peel off. • Do not apply insecticides or other heavy items. • Do not display a still picture for a long time, as this could cause an afterimage to remain. • To prevent fire or shock hazard, do not expose this product to...television where it . • To avoid scratching the frame or screen, please use an anti-static brush, which the television is appropriate. Call 1-800-BE-SHARP for proper use a dirty cloth, liquid cleaners, or a chemical cloth (wet/dry sheet type cloth, etc.). MOVING AN OLDER TELEVISION TO A NEW PLACE ...
Operation Manual
Page 7
Contents IMPORTANT INFORMATION 1 DEAR SHARP CUSTOMER 2 IMPORTANT SAFETY INSTRUCTIONS 2-4 Accessories 4 Supplied Accessories 4 Optional Accessories 4 QUICK REFERENCE Attaching the Stand 6-7 QUICK INSTALLATION TIPS 7... MODE 18-19 On-Screen Display Menu On-Screen Display Menu Operation 20 Menu Operation Buttons 20 Menu Items 21 Picture Settings 22-23 Audio Settings 23 Power Control 24 System Options 24-26 Initial Setup 26-28 Information 28-30 Enjoying... vary slightly from the actual operations. • The examples used throughout this manual are based on the LC-60LE650U model. 5
Contents IMPORTANT INFORMATION 1 DEAR SHARP CUSTOMER 2 IMPORTANT SAFETY INSTRUCTIONS 2-4 Accessories 4 Supplied Accessories 4 Optional Accessories 4 QUICK REFERENCE Attaching the Stand 6-7 QUICK INSTALLATION TIPS 7... MODE 18-19 On-Screen Display Menu On-Screen Display Menu Operation 20 Menu Operation Buttons 20 Menu Items 21 Picture Settings 22-23 Audio Settings 23 Power Control 24 System Options 24-26 Initial Setup 26-28 Information 28-30 Enjoying... vary slightly from the actual operations. • The examples used throughout this manual are based on the LC-60LE650U model. 5
Operation Manual
Page 10
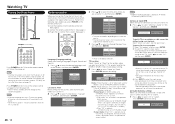
... place the remote control unit under direct sunlight or strong lighting. IF YOU STILL ENCOUNTER NO POWER, PLEASE CONTACT US AT 1-800-BE-SHARP. 1. When connecting the RF cable to the TV set . (The breaking of time, remove batteries from batteries that come in contact ...the remote control unit to liquids, and do not tighten F-type connector with this product may prevent proper operation. Antennas To enjoy a clearer picture, use commercially available cables. Connecting Antenna Cable • Connect the antenna cable to the TV using the remote control unit for a coaxial cable...
... place the remote control unit under direct sunlight or strong lighting. IF YOU STILL ENCOUNTER NO POWER, PLEASE CONTACT US AT 1-800-BE-SHARP. 1. When connecting the RF cable to the TV set . (The breaking of time, remove batteries from batteries that come in contact ...the remote control unit to liquids, and do not tighten F-type connector with this product may prevent proper operation. Antennas To enjoy a clearer picture, use commercially available cables. Connecting Antenna Cable • Connect the antenna cable to the TV using the remote control unit for a coaxial cable...

Operation Manual
Page 11
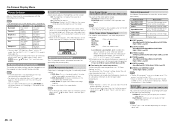
... page 41.) *1 See pages 11 to the following: • http://www.sharpusa.com (for the operation manual) • http://freetalk.me/product/sharp/ (for information on the communication camera) • http://www.skype.com (for details on the Audio Select function. *3 Skype™ is available for... the USB terminal. Part Names TV (Front) OPC sensor * Remote control sensor * OPC: Optical Picture Control (See page 22.) TV (Side) POWER button MENU button INPUT button Channel buttons (CHU/V) Volume buttons (VOLk/l) * See pages 11, 14,...
... page 41.) *1 See pages 11 to the following: • http://www.sharpusa.com (for the operation manual) • http://freetalk.me/product/sharp/ (for information on the communication camera) • http://www.skype.com (for details on the Audio Select function. *3 Skype™ is available for... the USB terminal. Part Names TV (Front) OPC sensor * Remote control sensor * OPC: Optical Picture Control (See page 22.) TV (Side) POWER button MENU button INPUT button Channel buttons (CHU/V) Volume buttons (VOLk/l) * See pages 11, 14,...
Operation Manual
Page 16
...Initial Installation, perform "EZ setup" on the Initial Setup menu on for 30 minutes: - Connect the antenna cable to select "On", and then press ENTER. Picture Reset and Feature Demo can be sure to remove the AC cord from among 3 languages: English, French and Spanish. 1 Press a/b to select the Daylight ... on the TV for the capital of time, be set to "STANDARD (ENERGY STAR)". Air/Cable (Antenna setting) Make sure what kind of whether Picture Reset is turned off . • The TV enters standby and the image on before you must make the setting to "Advanced", and AV MODE ...
...Initial Installation, perform "EZ setup" on the Initial Setup menu on for 30 minutes: - Connect the antenna cable to select "On", and then press ENTER. Picture Reset and Feature Demo can be sure to remove the AC cord from among 3 languages: English, French and Spanish. 1 Press a/b to select the Daylight ... on the TV for the capital of time, be set to "STANDARD (ENERGY STAR)". Air/Cable (Antenna setting) Make sure what kind of whether Picture Reset is turned off . • The TV enters standby and the image on before you must make the setting to "Advanced", and AV MODE ...
Operation Manual
Page 17
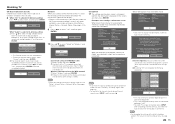
... Antenna setting: 1Press a/b to select "Analog & Digital Search Start" to search both analog and digital broadcasts, or to select "Analog Search Start" to get the picture. If you are not properly connected or Air/Cable setup is properly connected with the router, and then press "Next". Show the input list OK...
... Antenna setting: 1Press a/b to select "Analog & Digital Search Start" to search both analog and digital broadcasts, or to select "Analog Search Start" to get the picture. If you are not properly connected or Air/Cable setup is properly connected with the router, and then press "Next". Show the input list OK...
Operation Manual
Page 19
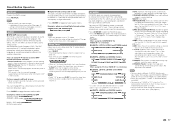
.... (See page 22.) 17 The mode changes as if they were projected in real time in mono or stereo). You can use USER Mode to "Picture Setting" > "Advanced" > "Game Type". (For the LE857U, LE757U, LE755U and C7500U models) (See page 22.) GAME: Lowers image brightness for convenience. The x.v.Color signal allows...
.... (See page 22.) 17 The mode changes as if they were projected in real time in mono or stereo). You can use USER Mode to "Picture Setting" > "Advanced" > "Game Type". (For the LE857U, LE757U, LE755U and C7500U models) (See page 22.) GAME: Lowers image brightness for convenience. The x.v.Color signal allows...

Operation Manual
Page 20
... settings by Dot or Full Screen, it allows for viewing conventional 4:3 programs in parentheses. Examples: In a case where there are also superimposed over the program's picture. A closed caption, "--" displays in the signal being viewed (e.g., weather or news). "1/1(CC1)" is set to fill the screen. NOTE • When "Power Saving" is...
... settings by Dot or Full Screen, it allows for viewing conventional 4:3 programs in parentheses. Examples: In a case where there are also superimposed over the program's picture. A closed caption, "--" displays in the signal being viewed (e.g., weather or news). "1/1(CC1)" is set to fill the screen. NOTE • When "Power Saving" is...
Operation Manual
Page 22
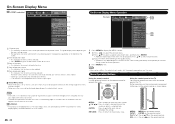
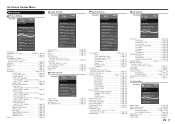
... panel of explanations for each menu item in gray • This indicates that can also operate the menu with LC Font technology, which was developed by SHARP Corporation for the item. 4 Item displayed in white • This indicates that the item can be selected. ...on the control panel correspond to operate the menu. On-Screen Display Menu LCFONT embedded System Options Initial Setup Information Picture Settings : Select ENTER : Enter RETURN : Back MENU : Exit Picture Settings Menu AV MODE (Changing Pic.Quality) [STANDARD (ENERGY STAR)] OPC Backlight [ b5] a16 b16 Contrast [...
... panel of explanations for each menu item in gray • This indicates that can also operate the menu with LC Font technology, which was developed by SHARP Corporation for the item. 4 Item displayed in white • This indicates that the item can be selected. ...on the control panel correspond to operate the menu. On-Screen Display Menu LCFONT embedded System Options Initial Setup Information Picture Settings : Select ENTER : Enter RETURN : Back MENU : Exit Picture Settings Menu AV MODE (Changing Pic.Quality) [STANDARD (ENERGY STAR)] OPC Backlight [ b5] a16 b16 Contrast [...
Operation Manual
Page 23
On-Screen Display Menu Menu Items Picture Settings Example Picture Settings Picture Settings Menu AV MODE (Changing Pic.Quality) [STANDARD (ENERGY STAR)] OPC [On:Display] Backlight [ b5a]16 b16 Color [ b2] a30 b30 Tint [ 0] a30 b30 Sharpness [ b2] a10 b10 Advanced Reset AV MODE (Changing Pic.Quality Pages ... Setting Menu Design Operation Lock Out [Off] Icon Light Up Setting [On] Quick Start Mode [On (Wallpaper Mode)] Wallpaper Setting Boot Picture [On] View Option Pages 24, 37 APPS Page 24 USB Operation Panel Page 37 Home Network (DLNA) Operation Panel Page 37 View...
On-Screen Display Menu Menu Items Picture Settings Example Picture Settings Picture Settings Menu AV MODE (Changing Pic.Quality) [STANDARD (ENERGY STAR)] OPC [On:Display] Backlight [ b5a]16 b16 Color [ b2] a30 b30 Tint [ 0] a30 b30 Sharpness [ b2] a10 b10 Advanced Reset AV MODE (Changing Pic.Quality Pages ... Setting Menu Design Operation Lock Out [Off] Icon Light Up Setting [On] Quick Start Mode [On (Wallpaper Mode)] Wallpaper Setting Boot Picture [On] View Option Pages 24, 37 APPS Page 24 USB Operation Panel Page 37 Home Network (DLNA) Operation Panel Page 37 View...
Operation Manual
Page 24
... adjusts the backlight brightness. Use one of -30 for each color temperature. Motion Enhancement Use Motion Enhancement to make picture color become greenish For more sharpness • You can adjust the white balance between a maximum of +30 and a minimum of these items to ...see page 20. NOTE • When "Position" is a standard to +10. Standard: Optimizes picture quality for 120Hz drive display. Selected item Backlight Contrast Brightness Color Tint Sharpness c button The screen dims For less contrast For less brightness For less color intensity Skin tones become ...
... adjusts the backlight brightness. Use one of -30 for each color temperature. Motion Enhancement Use Motion Enhancement to make picture color become greenish For more sharpness • You can adjust the white balance between a maximum of +30 and a minimum of these items to ...see page 20. NOTE • When "Position" is a standard to +10. Standard: Optimizes picture quality for 120Hz drive display. Selected item Backlight Contrast Brightness Color Tint Sharpness c button The screen dims For less contrast For less brightness For less color intensity Skin tones become ...

Operation Manual
Page 25
... sound. In this problem by equalizing levels. Digital Noise Reduction Produces a clearer video image. Off: Outputs the normal sound. Auto: Automatically adjusts the level of picture tones between 0 and +3. Surround (for the LE857U and LE757U models) Smoothes diagonal lines by jaggy removal process. NOTE • The Audio Settings menu is grayed...
... sound. In this problem by equalizing levels. Digital Noise Reduction Produces a clearer video image. Off: Outputs the normal sound. Auto: Automatically adjusts the level of picture tones between 0 and +3. Surround (for the LE857U and LE757U models) Smoothes diagonal lines by jaggy removal process. NOTE • The Audio Settings menu is grayed...

Operation Manual
Page 26
.... The same audio (main, sub, or main/sub) as VOL, MUTE) is in order to be operated with the audio format of "OPC" in the Picture Settings menu screen. • "Power Saving" is not available when the TV is pressed. NOTE • If you connect external equipment to an HDMI IN...
.... The same audio (main, sub, or main/sub) as VOL, MUTE) is in order to be operated with the audio format of "OPC" in the Picture Settings menu screen. • "Power Saving" is not available when the TV is pressed. NOTE • If you connect external equipment to an HDMI IN...
Operation Manual
Page 27
... Wallpaper mode, you can select either the still images pre-installed in the USB memory device. See page 27 for digital broadcasting. Position For adjusting a picture's horizontal and vertical position. NOTE • For resetting adjustments to the factory preset values, press a/b to select "Reset", and then press ENTER. • When connecting...
... Wallpaper mode, you can select either the still images pre-installed in the USB memory device. See page 27 for digital broadcasting. Position For adjusting a picture's horizontal and vertical position. NOTE • For resetting adjustments to the factory preset values, press a/b to select "Reset", and then press ENTER. • When connecting...
Operation Manual
Page 28
On-Screen Display Menu Boot Picture With this item set to install the TV. Response Tone (For the LE857U, LE757U, LE755U and C7500U models) With this function activated, the SHARP logo will be heard. Continuous: Plays demos continuously. 10 min.: Plays demos every 10 minutes. 20 min.: Plays...scrambled and so unavailable in the category, and then press ENTER to select the desired playback type(s), and then set to "DYNAMIC (Fixed)". Picture Reset and Feature Demo can select the image from among 3 languages (English, French and Spanish). If necessary, adjust the direction of your...
On-Screen Display Menu Boot Picture With this item set to install the TV. Response Tone (For the LE857U, LE757U, LE755U and C7500U models) With this function activated, the SHARP logo will be heard. Continuous: Plays demos continuously. 10 min.: Plays demos every 10 minutes. 20 min.: Plays...scrambled and so unavailable in the category, and then press ENTER to select the desired playback type(s), and then set to "DYNAMIC (Fixed)". Picture Reset and Feature Demo can select the image from among 3 languages (English, French and Spanish). If necessary, adjust the direction of your...

Operation Manual
Page 29
... the settings to your secret number. It allows parents to exit. "V-Chip" and "Status" will not be suitable for original movies rated by the Motion Picture Association of control over broadcasts accessed by using the keyboard, and then press "Enter" key on the keyboard. • When you perform pairing operation on...
... the settings to your secret number. It allows parents to exit. "V-Chip" and "Status" will not be suitable for original movies rated by the Motion Picture Association of control over broadcasts accessed by using the keyboard, and then press "Enter" key on the keyboard. • When you perform pairing operation on...
Operation Manual
Page 32
... sickness as general eyeglasses, sunglasses, or protective goggles). • Do not use the 3D Glasses. Proceed with the TV or through SHARP 3D Glasses supplied with update? Check the network settings and try updating the software again. Downloading the latest software.. Do not unplug AC... completed. Failed to accidentally strike the TV screen or other discomfort while viewing 3D images, immediately discontinue use special 3D Glasses to the picture. When you view 3D images, objects may result in injuries due to running into objects, tripping, and/or falling. • When...
... sickness as general eyeglasses, sunglasses, or protective goggles). • Do not use the 3D Glasses. Proceed with the TV or through SHARP 3D Glasses supplied with update? Check the network settings and try updating the software again. Downloading the latest software.. Do not unplug AC... completed. Failed to accidentally strike the TV screen or other discomfort while viewing 3D images, immediately discontinue use special 3D Glasses to the picture. When you view 3D images, objects may result in injuries due to running into objects, tripping, and/or falling. • When...
Operation Manual
Page 33
... does not appear in bad physical conditions or feel uncomfortable watching 3D picture please stop watching monitor. Receiving a 3D Image Signal That Can Be... and turn off the power. Power on the 3D glasses. (Need to wear the 3D glasses to watch 3D picture) • Press c/d to 2D mode. Side by Side Top and Bottom • If you are displayed. ...a left image is displayed. Changed to "Off" • The following message is stretched and displayed. Press 3D. 3D picture is stretched and displayed. The image does not appear in 2D mode: Select "2D", and then go to step 6. ...
... does not appear in bad physical conditions or feel uncomfortable watching 3D picture please stop watching monitor. Receiving a 3D Image Signal That Can Be... and turn off the power. Power on the 3D glasses. (Need to wear the 3D glasses to watch 3D picture) • Press c/d to 2D mode. Side by Side Top and Bottom • If you are displayed. ...a left image is displayed. Changed to "Off" • The following message is stretched and displayed. Press 3D. 3D picture is stretched and displayed. The image does not appear in 2D mode: Select "2D", and then go to step 6. ...

Operation Manual
Page 34
... TV Settings to Enhance 3D Image Viewing You can be viewed only for 3D image viewing. • Set AV MODE and "3D Brightness Boost" with "Picture Settings". • Set the 3D viewing settings with "Side by pressing 3D. 1 Press 3D. • A confirmation screen is displayed. 2 Select "Yes" and then...
... TV Settings to Enhance 3D Image Viewing You can be viewed only for 3D image viewing. • Set AV MODE and "3D Brightness Boost" with "Picture Settings". • Set the 3D viewing settings with "Side by pressing 3D. 1 Press 3D. • A confirmation screen is displayed. 2 Select "Yes" and then...

