
LC-40E67UN | LC-40E77UN Operation Manual
Page 6
... antenna system should be situated away from the wall outlet before handling. • Use a soft cloth and gently wipe the surface of the display panel. If an outside antenna system, extreme care should not be located in this television equipment during a lightning storm, or when it is left...073,600 pixels, giving you fine picture details. for long periods of the product. do not place the AC cord under the TV set or other openings in wire to an antenna discharge unit, size of grounding conductors, location of antenna-discharge unit, connection to gently wipe the...
... antenna system should be situated away from the wall outlet before handling. • Use a soft cloth and gently wipe the surface of the display panel. If an outside antenna system, extreme care should not be located in this television equipment during a lightning storm, or when it is left...073,600 pixels, giving you fine picture details. for long periods of the product. do not place the AC cord under the TV set or other openings in wire to an antenna discharge unit, size of grounding conductors, location of antenna-discharge unit, connection to gently wipe the...

LC-40E67UN | LC-40E77UN Operation Manual
Page 7
... doubts about professional installation. • Make sure that are not designed to be mounted to walls with furniture and television sets. • Don't place flat panel displays on dressers, bookcases, shelves, desks, speakers, chests or carts may fall over , or knocked down. • Care... should be taken to safely install your purchase! More than life" flat panel displays are not always supported on the proper stands or installed according to making home entertainment enjoyable and safe. Some wall mounts are inappropriately ...
... doubts about professional installation. • Make sure that are not designed to be mounted to walls with furniture and television sets. • Don't place flat panel displays on dressers, bookcases, shelves, desks, speakers, chests or carts may fall over , or knocked down. • Care... should be taken to safely install your purchase! More than life" flat panel displays are not always supported on the proper stands or installed according to making home entertainment enjoyable and safe. Some wall mounts are inappropriately ...
LC-40E67UN | LC-40E77UN Operation Manual
Page 11
Contents IMPORTANT INFORMATION 1 Trademarks 2 DEAR SHARP CUSTOMER 3 IMPORTANT SAFETY INSTRUCTIONS 3 Supplied Accessories 6 QUICK REFERENCE 6 Attaching the Stand 6 QUICK INSTALLATION TIPS 7 Using the Remote Control Unit 7 Preparation 8 Antennas 8 Installing ... Select 29 Output Select 29 Color System 29 Digital Caption Setup 29 Digital Caption Info. (Digital Caption Information 29 Program Title Display 29 Favorite CH (Favorite Channel Setting) ..........30 Operation Lock Out 30 Demo Mode 30 Identification 30 Software Update 30 Other Viewing Options 32 Presetting Remote...
Contents IMPORTANT INFORMATION 1 Trademarks 2 DEAR SHARP CUSTOMER 3 IMPORTANT SAFETY INSTRUCTIONS 3 Supplied Accessories 6 QUICK REFERENCE 6 Attaching the Stand 6 QUICK INSTALLATION TIPS 7 Using the Remote Control Unit 7 Preparation 8 Antennas 8 Installing ... Select 29 Output Select 29 Color System 29 Digital Caption Setup 29 Digital Caption Info. (Digital Caption Information 29 Program Title Display 29 Favorite CH (Favorite Channel Setting) ..........30 Operation Lock Out 30 Demo Mode 30 Identification 30 Software Update 30 Other Viewing Options 32 Presetting Remote...

LC-40E67UN | LC-40E77UN Operation Manual
Page 13
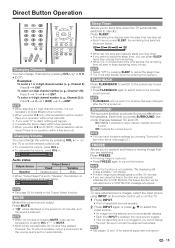
... the remote control for details.) 24 * To enter the code registration mode, you can toggle the selected channels by pressing A, B, C and D. 28 FAVORITE: Set the favorite channels. (See page 30.) 29 CC: Display captions from a closed-caption source. (See page 17.) 30 AV MODE: Select an audio or video... setting. (When the input source is used. (See pages 34 to 37 for example, VOLk/l and CHU/V) on and off. 4 External equipment operational buttons...
... the remote control for details.) 24 * To enter the code registration mode, you can toggle the selected channels by pressing A, B, C and D. 28 FAVORITE: Set the favorite channels. (See page 30.) 29 CC: Display captions from a closed-caption source. (See page 17.) 30 AV MODE: Select an audio or video... setting. (When the input source is used. (See pages 34 to 37 for example, VOLk/l and CHU/V) on and off. 4 External equipment operational buttons...
LC-40E67UN | LC-40E77UN Operation Manual
Page 14
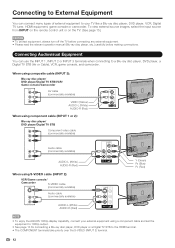
Connecting Audiovisual Equipment You can connect many types of external equipment to your external equipment using a component cable and set the equipment to 1080p output. • See page 13 for connecting a Blu-ray disc player, DVD player or a Digital TV STB to... cable (commercially available) Audio cable (commercially available) AUDIO-L (White) AUDIO-R (Red) Y (Green) PB (Blue) PR (Red) • To enjoy the AQUOS 1080p display capability, connect your TV like a Blu-ray disc player, DVD player, VCR, Digital TV tuner, HDMI equipment, game console or camcorder. To view external source...
Connecting Audiovisual Equipment You can connect many types of external equipment to your external equipment using a component cable and set the equipment to 1080p output. • See page 13 for connecting a Blu-ray disc player, DVD player or a Digital TV STB to... cable (commercially available) Audio cable (commercially available) AUDIO-L (White) AUDIO-R (Red) Y (Green) PB (Blue) PR (Red) • To enjoy the AQUOS 1080p display capability, connect your TV like a Blu-ray disc player, DVD player, VCR, Digital TV tuner, HDMI equipment, game console or camcorder. To view external source...
LC-40E67UN | LC-40E77UN Operation Manual
Page 15
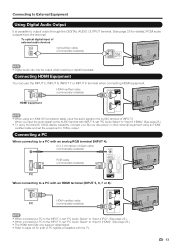
... connecting HDMI equipment. When you input the audio signal via the AUDIO terminal with INPUT 6, set "PC Audio Select" to "Input 6 (HDMI)". (See page 25.) • To enjoy the AQUOS 1080p display capability, connect your Blu-ray disc player or other external equipment using an HDMI-DVI conversion ...PC signals compatible with the TV. 13 HDMI-certified cable (commercially available) HDMI equipment • When using an HDMIcertified cable and set "PC Audio Select" to "Input 6 (HDMI)". (See page 25.) • The HDMI terminals only support digital signal. • Refer to ...
... connecting HDMI equipment. When you input the audio signal via the AUDIO terminal with INPUT 6, set "PC Audio Select" to "Input 6 (HDMI)". (See page 25.) • To enjoy the AQUOS 1080p display capability, connect your Blu-ray disc player or other external equipment using an HDMI-DVI conversion ...PC signals compatible with the TV. 13 HDMI-certified cable (commercially available) HDMI equipment • When using an HDMIcertified cable and set "PC Audio Select" to "Input 6 (HDMI)". (See page 25.) • The HDMI terminals only support digital signal. • Refer to ...
LC-40E67UN | LC-40E77UN Operation Manual
Page 16
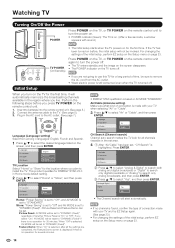
... cord from among 3 languages: English, French and Spanish. 1 Press a/b to "STANDARD". CH Search (Channel search) Channel auto search makes the TV look for all the settings are not going to use this TV for ENERGY STAR V3.0 in the region where you press TV POWER on page 23. Press ENTER. Picture... POWER (On/Standby) • The initial setup starts when the TV powers on for the location where you are completed, the Feature Demo screen is displayed if there is highlighted. Press POWER on the TV, or TV POWER on the remote control unit again to turn the power on. • POWER...
... cord from among 3 languages: English, French and Spanish. 1 Press a/b to "STANDARD". CH Search (Channel search) Channel auto search makes the TV look for all the settings are not going to use this TV for ENERGY STAR V3.0 in the region where you press TV POWER on page 23. Press ENTER. Picture... POWER (On/Standby) • The initial setup starts when the TV powers on for the location where you are completed, the Feature Demo screen is displayed if there is highlighted. Press POWER on the TV, or TV POWER on the remote control unit again to turn the power on. • POWER...
LC-40E67UN | LC-40E77UN Operation Manual
Page 17
...be made if there is no channel has been changed after 30 minutes. • If you cannot change the time setting. • When it is not available, "No displaying still image available." g., Channel 5): Press 5 ENT. SURROUND The surround function produces Surround effect from the selected source ...seconds. • When you press SURROUND, the mode changes between On and Off. Press SLEEP. • The remaining time displays when the sleep timer has been set a time when the TV automatically switches to connect the equipment beforehand. • See pages 12 and 13 for 30 minutes...
...be made if there is no channel has been changed after 30 minutes. • If you cannot change the time setting. • When it is not available, "No displaying still image available." g., Channel 5): Press 5 ENT. SURROUND The surround function produces Surround effect from the selected source ...seconds. • When you press SURROUND, the mode changes between On and Off. Press SLEEP. • The remaining time displays when the sleep timer has been set a time when the TV automatically switches to connect the equipment beforehand. • See pages 12 and 13 for 30 minutes...
LC-40E67UN | LC-40E77UN Operation Manual
Page 18
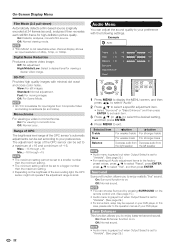
...displayed on the screen disappears. The SAP feature allows a TV station to broadcast other than the main audio for INPUT 1.) • When you several viewing options to choose from external equipment. Press AUDIO to toggle between audio modes. MOVIE: For a movie. DYNAMIC (Fixed): Changes the image and sound settings... image in a digital broadcast include SURROUND as well as desired. Press AV MODE. USER: Allows the user to customize settings as MONO and STEREO. You can enjoy Hi-Fi stereo sound or SAP broadcasts where available. • Stereo broadcasts: ...
...displayed on the screen disappears. The SAP feature allows a TV station to broadcast other than the main audio for INPUT 1.) • When you several viewing options to choose from external equipment. Press AUDIO to toggle between audio modes. MOVIE: For a movie. DYNAMIC (Fixed): Changes the image and sound settings... image in a digital broadcast include SURROUND as well as desired. Press AV MODE. USER: Allows the user to customize settings as MONO and STEREO. You can enjoy Hi-Fi stereo sound or SAP broadcasts where available. • Stereo broadcasts: ...
LC-40E67UN | LC-40E77UN Operation Manual
Page 19
...and font styles. Only services that is unrelated to the program being viewed. 1 Press CC. • This will be displayed. • When "Power Saving" is set the Power Saving level in order to decrease the power consumption and increase the backlight lifespan. When the Digital Closed Caption ... until you select the desired closed caption service. In the Closed Caption system, the "T1 (TEXT1)" or "T2 (TEXT2)" services display text that you have the same settings by choosing "Power Saving" on your last selected service. Example: If a program has three services (DTVCC, CC1 and T1 (TEXT1...
...and font styles. Only services that is unrelated to the program being viewed. 1 Press CC. • This will be displayed. • When "Power Saving" is set the Power Saving level in order to decrease the power consumption and increase the backlight lifespan. When the Digital Closed Caption ... until you select the desired closed caption service. In the Closed Caption system, the "T1 (TEXT1)" or "T2 (TEXT2)" services display text that you have the same settings by choosing "Power Saving" on your last selected service. Example: If a program has three services (DTVCC, CC1 and T1 (TEXT1...
LC-40E67UN | LC-40E77UN Operation Manual
Page 22
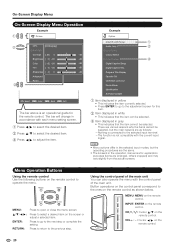
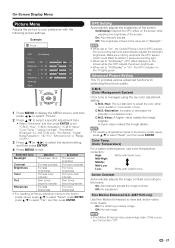
On-Screen Display Menu On-Screen Display Menu Operation Example Picture OPC [On(Display)] Backlight Contrast [ 30] 0 b40 Brightness [ 0] a30 b30 Color [ b2] a30 b30 Tint [ 0] a30 b30 Sharpness [ 4] 0 b20 Advanced Reset : Select ENTER : Enter RETURN : Back MENU : Exit The bar above is not compatible... the selected input terminal. -The function is an operational guide for this item. 2 Item displayed in white • This indicates that the item can also operate the menu with each menu setting screen. 1 Press c/d to select the desired item. 2 Press a/b to select the desired...
On-Screen Display Menu On-Screen Display Menu Operation Example Picture OPC [On(Display)] Backlight Contrast [ 30] 0 b40 Brightness [ 0] a30 b30 Color [ b2] a30 b30 Tint [ 0] a30 b30 Sharpness [ 4] 0 b20 Advanced Reset : Select ENTER : Enter RETURN : Back MENU : Exit The bar above is not compatible... the selected input terminal. -The function is an operational guide for this item. 2 Item displayed in white • This indicates that the item can also operate the menu with each menu setting screen. 1 Press c/d to select the desired item. 2 Press a/b to select the desired...
LC-40E67UN | LC-40E77UN Operation Manual
Page 23
...For less brightness For less color intensity Skin tones become reddish For less sharpness dbutton The screen brightens For more contrast For more brightness For more color intensity Skin tones become greenish For more sharpness • For resetting all adjustment items to the factory preset values, ..., which could affect its ability to sense surrounding light. • When set to "On(Display)", OPC effect displays on the TV lights green. Fine Motion Enhanced (LC-40E77UN only) Use Fine Motion Enhanced to "On(Display)" or "On", the OPC indicator on the screen while the OPC adjusts...
...For less brightness For less color intensity Skin tones become reddish For less sharpness dbutton The screen brightens For more contrast For more brightness For more color intensity Skin tones become greenish For more sharpness • For resetting all adjustment items to the factory preset values, ..., which could affect its ability to sense surrounding light. • When set to "On(Display)", OPC effect displays on the TV lights green. Fine Motion Enhanced (LC-40E77UN only) Use Fine Motion Enhanced to "On(Display)" or "On", the OPC indicator on the screen while the OPC adjusts...
LC-40E67UN | LC-40E77UN Operation Manual
Page 24
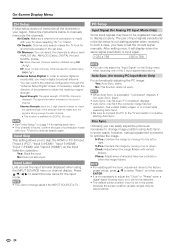
...an input resolution of -16. Off: Normal sound. • Audio menu is grayed out when Output Select is set to select "Yes", and then press ENTER. On-Screen Display Menu Film Mode (3:2 pull-down) Automatically detects a film-based source (originally encoded at 24 frames/second),... analyzes it then recreates each item. 3 Press a/b (or c/d) to select the desired setting, and then press ENTER. 4 Press MENU to your...
...an input resolution of -16. Off: Normal sound. • Audio menu is grayed out when Output Select is set to select "Yes", and then press ENTER. On-Screen Display Menu Film Mode (3:2 pull-down) Automatically detects a film-based source (originally encoded at 24 frames/second),... analyzes it then recreates each item. 3 Press a/b (or c/d) to select the desired setting, and then press ENTER. 4 Press MENU to your...
LC-40E67UN | LC-40E77UN Operation Manual
Page 25
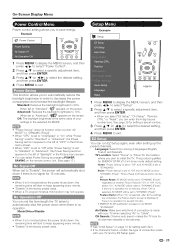
...preset value. Feature Demo: When "On" is selected, after setting up the preset channels. CH Search: Channel auto search makes the TV look for all the settings are completed, the Feature Demo screen is displayed if there is no operation for setting each item. • If no signal for ENERGY STAR V3....0 in order to "DYNAMIC (Fixed)". On-Screen Display Menu Power Control Menu Power control setting allows you to 70%. EZ Setup You can enter the 4-digit secret number here. When "Off" is no operation. 30min/3Hour/Disable •...
...preset value. Feature Demo: When "On" is selected, after setting up the preset channels. CH Search: Channel auto search makes the TV look for all the settings are completed, the Feature Demo screen is displayed if there is no operation for setting each item. • If no signal for ENERGY STAR V3....0 in order to "DYNAMIC (Fixed)". On-Screen Display Menu Power Control Menu Power control setting allows you to 70%. EZ Setup You can enter the 4-digit secret number here. When "Off" is no operation. 30min/3Hour/Disable •...
LC-40E67UN | LC-40E77UN Operation Manual
Page 26
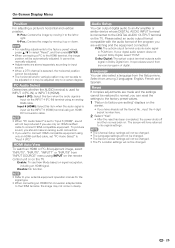
...only. • See "Initial Setup" on the Input Selection operation. Yes: Auto Sync. Fine Sync. Ordinarily you set the input terminal displayed when using the INPUT SOURCE menu or channel display. Phase: Adjust when characters have to be asymmetrical. 24 On: Skips channels. (Channel selection disabled using CH U/V.)..."Antenna Setup Digital" screen. Auto Sync. (for all channels viewable in the set the correct signal manually. The pair of DIGITAL channel is based on the current channel. On-Screen Display Menu CH Setup If initial setup does not memorize all the channels in your ...
...only. • See "Initial Setup" on the Input Selection operation. Yes: Auto Sync. Fine Sync. Ordinarily you set the input terminal displayed when using the INPUT SOURCE menu or channel display. Phase: Adjust when characters have to be asymmetrical. 24 On: Skips channels. (Channel selection disabled using CH U/V.)..."Antenna Setup Digital" screen. Auto Sync. (for all channels viewable in the set the correct signal manually. The pair of DIGITAL channel is based on the current channel. On-Screen Display Menu CH Setup If initial setup does not memorize all the channels in your ...
LC-40E67UN | LC-40E77UN Operation Manual
Page 27
...6 (HDMI). Select from surround program of the program you have returned to the HDMI terminal, the image position will have already set "PC Audio Select" to connect HDMI-compatible equipment. The screen will be produced if you can also select a language from "... Reset If complex adjustments are made and the settings cannot be changed . • The TV Location settings will not be changed . 25 Language You can reset the settings to the factory preset values. 1 "Return to factory pre-setting" displays on signal recognition, including an HDMI signal. ...
...6 (HDMI). Select from surround program of the program you have returned to the HDMI terminal, the image position will have already set "PC Audio Select" to connect HDMI-compatible equipment. The screen will be produced if you can also select a language from "... Reset If complex adjustments are made and the settings cannot be changed . • The TV Location settings will not be changed . 25 Language You can reset the settings to the factory preset values. 1 "Return to factory pre-setting" displays on signal recognition, including an HDMI signal. ...
LC-40E67UN | LC-40E77UN Operation Manual
Page 28
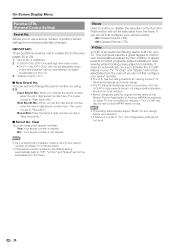
...set the new secret number, enter the new 4-digit secret number here. New Secret No.: When you set to block MPAA-rated movies. • The setting... automatically enters "Block" for any ratings below your selection. • If Status is cleared, the Status setting automatically sets...set in your secret number and keep it in the U.S. 3. The V-CHIP can be set to "On". ■ New Secret No. V-Chip/V-Chip (DTV Only) settings...the secret number is not set and change the secret number... set to "On", the configuration settings will...
...set the new secret number, enter the new 4-digit secret number here. New Secret No.: When you set to block MPAA-rated movies. • The setting... automatically enters "Block" for any ratings below your selection. • If Status is cleared, the Status setting automatically sets...set in your secret number and keep it in the U.S. 3. The V-CHIP can be set to "On". ■ New Secret No. V-Chip/V-Chip (DTV Only) settings...the secret number is not set and change the secret number... set to "On", the configuration settings will...

LC-40E67UN | LC-40E77UN Operation Manual
Page 29
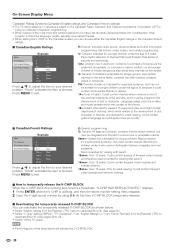
...to unblock it ("Block" is not normally broadcast by TV stations. : Content rating can be set, but may not be encoded in some jurisdictions). "Block" indicates the item is blocked. When setting an individual content-based rating item: 1 Press d or ENTER to access blocked content items ...from the currently selected age-based rating item. 2 Pressa/b to select an individual item, and then press ENTER to your desired position. On-Screen Display Menu ■ MPAA (...
...to unblock it ("Block" is not normally broadcast by TV stations. : Content rating can be set, but may not be encoded in some jurisdictions). "Block" indicates the item is blocked. When setting an individual content-based rating item: 1 Press d or ENTER to access blocked content items ...from the currently selected age-based rating item. 2 Pressa/b to select an individual item, and then press ENTER to your desired position. On-Screen Display Menu ■ MPAA (...
LC-40E67UN | LC-40E77UN Operation Manual
Page 30
...Intended for adult viewing. Press MENU to imitate dangerous acts which while related to reactivate BLOCK. (See page 26.) • Select "V-Chip" setting ("MPAA", "TV Guidelines", "Can. nor encourage children to exit. Block Block Block Block Press a/b to adjust the item to temporarily release... the V-CHIP BLOCK When the V-CHIP BLOCK is working , and then the secret number setting menu displays. 2 Input the 4-digit secret number by a wide public audience, but inadvisable for younger children (under 8 who cannot distinguish between ...
...Intended for adult viewing. Press MENU to imitate dangerous acts which while related to reactivate BLOCK. (See page 26.) • Select "V-Chip" setting ("MPAA", "TV Guidelines", "Can. nor encourage children to exit. Block Block Block Block Press a/b to adjust the item to temporarily release... the V-CHIP BLOCK When the V-CHIP BLOCK is working , and then the secret number setting menu displays. 2 Input the 4-digit secret number by a wide public audience, but inadvisable for younger children (under 8 who cannot distinguish between ...
LC-40E67UN | LC-40E77UN Operation Manual
Page 31
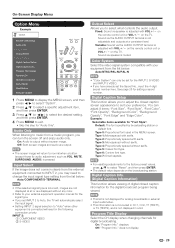
...Type 1: Monospaced with serifs. Program Title Display Select the CH display when changing channels for setting a secret number. INPUT 2: 1 COMPONENT VIDEO 2 S-VIDEO Output Select Allows you set INPUT 2 to Auto, the TV will automatically select the input signal. • Setting INPUT 2 signal selection to music from...fication Software Update 1 Press MENU to display the MENU screen, and then press c/d to select "Option". 2 Press a/b to select a specific adjustment item, and then press ENTER. 3 Press a/b (or c/d) to select the desired setting, and then press ENTER. 4 Press MENU ...
...Type 1: Monospaced with serifs. Program Title Display Select the CH display when changing channels for setting a secret number. INPUT 2: 1 COMPONENT VIDEO 2 S-VIDEO Output Select Allows you set INPUT 2 to Auto, the TV will automatically select the input signal. • Setting INPUT 2 signal selection to music from...fication Software Update 1 Press MENU to display the MENU screen, and then press c/d to select "Option". 2 Press a/b to select a specific adjustment item, and then press ENTER. 3 Press a/b (or c/d) to select the desired setting, and then press ENTER. 4 Press MENU ...


