
Service Manual
Page 5
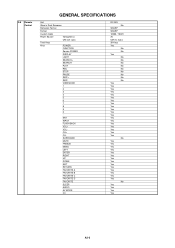
...+ VOLCH+ CHSURROUND MUTE FREEZE MENU LEFT ENTER RIGHT UP DOWN EXIT RETURN FAVORITE A FAVORITE B FAVORITE C FAVORITE D FAVORITE SLEEP AUDIO AV MODE CC RC-MQ No SHARP SHARP 10000 / 10001 3V UM-3 x 2 pcs 39 Keys Yes No No Yes No No No No No No No No No Yes Yes Yes Yes Yes... Yes Yes Yes Yes No Yes Yes Yes Yes Yes Yes Yes Yes Yes Yes Yes Yes Yes Yes No Yes Yes Yes Yes A2-2 G-9 Remote Control GENERAL SPECIFICATIONS Unit Glow in Dark Remocon Remocon Format Format Custom Code Power Source Voltage(D.C) UM size x pcs Total Keys Keys POWER FUNCTION Source...
...+ VOLCH+ CHSURROUND MUTE FREEZE MENU LEFT ENTER RIGHT UP DOWN EXIT RETURN FAVORITE A FAVORITE B FAVORITE C FAVORITE D FAVORITE SLEEP AUDIO AV MODE CC RC-MQ No SHARP SHARP 10000 / 10001 3V UM-3 x 2 pcs 39 Keys Yes No No Yes No No No No No No No No No Yes Yes Yes Yes Yes... Yes Yes Yes Yes No Yes Yes Yes Yes Yes Yes Yes Yes Yes Yes Yes Yes Yes Yes No Yes Yes Yes Yes A2-2 G-9 Remote Control GENERAL SPECIFICATIONS Unit Glow in Dark Remocon Remocon Format Format Custom Code Power Source Voltage(D.C) UM size x pcs Total Keys Keys POWER FUNCTION Source...
Service Manual
Page 7
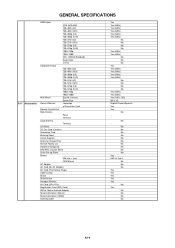
... (16:9) 720×576p (4:3) 720×576p (16:9) 1280×720p 1920×1080i Wall Mount Size W x H(mm) Screw Size Owner's Manual Language w/Guarantee Card Remote Control Unit Rod Antenna Poles Terminal Loop Antenna Terminal U/V Mixer DC Car Cord (Center+) Guarantee Card Warning Sheet Circuit Diagram Antenna Change Plug Service Facility...
... (16:9) 720×576p (4:3) 720×576p (16:9) 1280×720p 1920×1080i Wall Mount Size W x H(mm) Screw Size Owner's Manual Language w/Guarantee Card Remote Control Unit Rod Antenna Poles Terminal Loop Antenna Terminal U/V Mixer DC Car Cord (Center+) Guarantee Card Warning Sheet Circuit Diagram Antenna Change Plug Service Facility...
Service Manual
Page 13
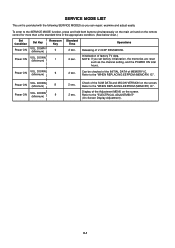
... ON total hours. DOWN (Minimum) 6 2 sec. DOWN (Minimum) 8 Power ON VOL. DOWN (Minimum) 9 2 sec. 2 sec. Check of factory TV data. Initialization of the SUM DATA and MICON VERSION on the screen. Display of MEMORY IC. DOWN (Minimum) 1 Standard Time Operations 2 sec. Power ON VOL...the "WHEN REPLACING EEPROM (MEMORY) IC". C-1 Power ON VOL. Can be checked of the INITIAL DATA of the Adjustment MENU on the remote control for more than a the standard time in the appropriate condition. (See below chart.) Set Condition Power ON Set Key VOL. Releasing ...
... ON total hours. DOWN (Minimum) 6 2 sec. DOWN (Minimum) 8 Power ON VOL. DOWN (Minimum) 9 2 sec. 2 sec. Check of factory TV data. Initialization of the SUM DATA and MICON VERSION on the screen. Display of MEMORY IC. DOWN (Minimum) 1 Standard Time Operations 2 sec. Power ON VOL...the "WHEN REPLACING EEPROM (MEMORY) IC". C-1 Power ON VOL. Can be checked of the INITIAL DATA of the Adjustment MENU on the remote control for more than a the standard time in the appropriate condition. (See below chart.) Set Condition Power ON Set Key VOL. Releasing ...
Service Manual
Page 14
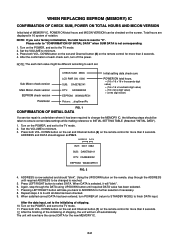
...to be changed is not corresponding. 1. Press both VOL. Sub Micon check version Main Micon check version EEPROM check version Parameter CHECK SUM: 3ED6 LCD PWR ON: 0000 SUB: DA0E782141 DTV: CA09E83052 EEPROM: W34N02PE01 Picture: _dispSmartPic Initial setting data check sum. POWER ON total hours. = (16 x...turn off (return to STANDBY MODE) to select DATA. Press both VOL. C-2 Turn on the POWER, and set to the TV mode. 2. Turn on the remote control for more than 2 seconds. DOWN button on the set and Channel button (6) on the POWER, and set a factory initialization...
...to be changed is not corresponding. 1. Press both VOL. Sub Micon check version Main Micon check version EEPROM check version Parameter CHECK SUM: 3ED6 LCD PWR ON: 0000 SUB: DA0E782141 DTV: CA09E83052 EEPROM: W34N02PE01 Picture: _dispSmartPic Initial setting data check sum. POWER ON total hours. = (16 x...turn off (return to STANDBY MODE) to select DATA. Press both VOL. C-2 Turn on the POWER, and set to the TV mode. 2. Turn on the remote control for more than 2 seconds. DOWN button on the set and Channel button (6) on the POWER, and set a factory initialization...
Service Manual
Page 15
...CUT OFF (W), "B DRIVE (W)" or "B CUTOFF(W)". 7. To display the adjustment screen for TV, AV, COMPONENT, HDMI and PC mode, press the INPUT button on the remote control for more than 15 minutes. 2. Press the INPUT button on the remote control to the AV mode. 4. ADJUSTMENT PROCEDURE Read and perform these adjustments when... button (03) on the remote control to minimum. 2. FUNCTION 31 BAK LIGHT MIN 32 BRIGHTNESS CENT 33 BRIGHTNESS MAX 34 BRIGHTNESS MIN 35 TINT 36 SHARP H1 MAX 37 SHARP H1 MIN 38 SHARP H2 MAX 39 SHARP H2 MIN 40 SHARP V1 MAX 41 SHARP V1 MIN 42 CONTRAST CENTER ...
...CUT OFF (W), "B DRIVE (W)" or "B CUTOFF(W)". 7. To display the adjustment screen for TV, AV, COMPONENT, HDMI and PC mode, press the INPUT button on the remote control for more than 15 minutes. 2. Press the INPUT button on the remote control to the AV mode. 4. ADJUSTMENT PROCEDURE Read and perform these adjustments when... button (03) on the remote control to minimum. 2. FUNCTION 31 BAK LIGHT MIN 32 BRIGHTNESS CENT 33 BRIGHTNESS MAX 34 BRIGHTNESS MIN 35 TINT 36 SHARP H1 MAX 37 SHARP H1 MIN 38 SHARP H2 MAX 39 SHARP H2 MIN 40 SHARP V1 MAX 41 SHARP V1 MIN 42 CONTRAST CENTER ...


