
LC-20S5U Operation Manual
Page 7
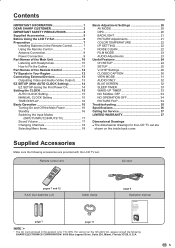
...the 125-240V AC, please consult the following accessories are shown on the inside back cover. SHARP ELECTRONICS CORPORATION 6100 Blue Lagoon Drive, Suite 230, Miami, Florida 33126, U.S.A. 5 Supplied Accessories Make sure the following . ...Contents IMPORTANT INFORMATION 1 DEAR SHARP CUSTOMER 2 IMPORTANT SAFETY PRECAUTIONS 2 Supplied Accessories 5 Before Using the LCD TV Set 6 Preparation 7 Installing Batteries in the Remote Control 7 Using the Remote Control 7 Antenna Connection 8 Power Connection 9 Part Names of the ...
...the 125-240V AC, please consult the following accessories are shown on the inside back cover. SHARP ELECTRONICS CORPORATION 6100 Blue Lagoon Drive, Suite 230, Miami, Florida 33126, U.S.A. 5 Supplied Accessories Make sure the following . ...Contents IMPORTANT INFORMATION 1 DEAR SHARP CUSTOMER 2 IMPORTANT SAFETY PRECAUTIONS 2 Supplied Accessories 5 Before Using the LCD TV Set 6 Preparation 7 Installing Batteries in the Remote Control 7 Using the Remote Control 7 Antenna Connection 8 Power Connection 9 Part Names of the ...
LC-20S5U Operation Manual
Page 8
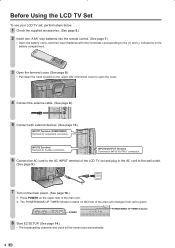
... the AC INPUT terminal of the LCD TV set , perform steps below. 1 Check the supplied accessories. (See page 5.) 2 Insert two "AAA" size batteries into the remote control. (See page 7.) • Open the battery cover, and then insert batteries with their terminals corresponding to the (+) and (-) indications in the AC cord to...
... the AC INPUT terminal of the LCD TV set , perform steps below. 1 Check the supplied accessories. (See page 5.) 2 Insert two "AAA" size batteries into the remote control. (See page 7.) • Open the battery cover, and then insert batteries with their terminals corresponding to the (+) and (-) indications in the AC cord to...
LC-20S5U Operation Manual
Page 9
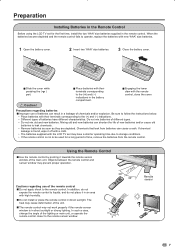
... different types. • Do not mix old and new batteries. Using the Remote Control ■ Use the remote control by pointing it towards the remote sensor window of the lighting or main unit, or operate the remote control closer to follow the instructions below. • Place batteries with high humidity... a long period of chemicals and/or explosion. The heat may cause deformation of the unit. ■ The remote control may prevent proper operation. In addition, do not expose the remote control to liquids, and do not place it off with a cloth. • The batteries supplied with the...
... different types. • Do not mix old and new batteries. Using the Remote Control ■ Use the remote control by pointing it towards the remote sensor window of the lighting or main unit, or operate the remote control closer to follow the instructions below. • Place batteries with high humidity... a long period of chemicals and/or explosion. The heat may cause deformation of the unit. ■ The remote control may prevent proper operation. In addition, do not expose the remote control to liquids, and do not place it off with a cloth. • The batteries supplied with the...
LC-20S5U Operation Manual
Page 12
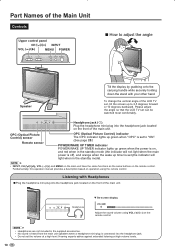
...forward or 10 degrees backward. Fundamentally, this operation manual provides a description based on the front of the main unit. OPC (Optical Picture Control) sensor Remote sensor OPC (Optical Picture Control) indicator The OPC indicator lights up green when "OPC" is set to "ON". (See page 20.) POWER/WAKE.... • No sound is heard from the main unit speakers when a headphone mini-plug is on the remote control. Headphone jack ( ) Plug the headphone mini-plug into the headphone jack located on the remote control. A • INPUT, CH ( )/( ), VOL (-)/(+) and MENU on the main unit have the...
...forward or 10 degrees backward. Fundamentally, this operation manual provides a description based on the front of the main unit. OPC (Optical Picture Control) sensor Remote sensor OPC (Optical Picture Control) indicator The OPC indicator lights up green when "OPC" is set to "ON". (See page 20.) POWER/WAKE.... • No sound is heard from the main unit speakers when a headphone mini-plug is on the remote control. Headphone jack ( ) Plug the headphone mini-plug into the headphone jack located on the remote control. A • INPUT, CH ( )/( ), VOL (-)/(+) and MENU on the main unit have the...
LC-20S5U Operation Manual
Page 14
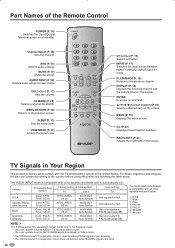
... ( )/( ) (P. 17) Sets the volume. DISPLAY (P. 16) Displays the receiving channel and the current time for 10 seconds. Country TV broadcasting system Factory setting of the Remote Control POWER (P. 16) Switches the Liquid Crystal Television power on the screen. INPUT (P. 17) Switches the input source between INPUT1, INPUT2, INPUT3 and TV mode...
... ( )/( ) (P. 17) Sets the volume. DISPLAY (P. 16) Displays the receiving channel and the current time for 10 seconds. Country TV broadcasting system Factory setting of the Remote Control POWER (P. 16) Switches the Liquid Crystal Television power on the screen. INPUT (P. 17) Switches the input source between INPUT1, INPUT2, INPUT3 and TV mode...
LC-20S5U Operation Manual
Page 16
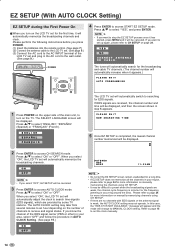
... LCD TV set will change to MANUAL CLOCK setting. Press '/" to select "YES", and press ENTER. If you press POWER. (1) Insert the batteries into the remote control. (See page 7.) (2) Connect the antenna cable to the LCD TV set. (See page 8.) (3) Connect the AC cord to the AC INPUT terminal of the...
... LCD TV set will change to MANUAL CLOCK setting. Press '/" to select "YES", and press ENTER. If you press POWER. (1) Insert the batteries into the remote control. (See page 7.) (2) Connect the antenna cable to the LCD TV set. (See page 8.) (3) Connect the AC cord to the AC INPUT terminal of the...
LC-20S5U Operation Manual
Page 20
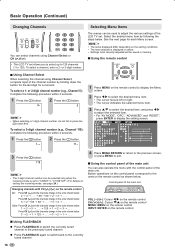
... • The 3-digit channel number can be selected only when the receiving mode is displayed in memory. ■ Using the remote control ■ Using Channel Select When selecting the channel using Channel Select or CH This LCD TV set . Selecting Menu Items The...; . . . A • The items displayed differ depending on the setting conditions. • The item selected is set to the ones on the remote control ■ Using FLASHBACK ● Press FLASHBACK to switch the currently tuned channel to the previously tuned channel. ● Press FLASHBACK again to switch back...
... • The 3-digit channel number can be selected only when the receiving mode is displayed in memory. ■ Using the remote control ■ Using Channel Select When selecting the channel using Channel Select or CH This LCD TV set . Selecting Menu Items The...; . . . A • The items displayed differ depending on the setting conditions. • The item selected is set to the ones on the remote control ■ Using FLASHBACK ● Press FLASHBACK to switch the currently tuned channel to the previously tuned channel. ● Press FLASHBACK again to switch back...
LC-20S5U Operation Manual
Page 21
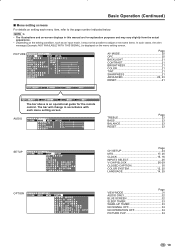
... OFF] B A C K L I G H T � [ BRIGHT�] C O N T R A S T 4 �0 ] B R I G H T N E S S 0 COLOR 5 TINT 0 ] S H A R P N E S S 0 ADVANCED RESET Page AV MODE 20 OPC 20 BACKLIGHT 21 CONTRAST 21 BRIGHTNESS 21 COLOR 21 TINT 21 SHARPNESS 21 ADVANCED 22, 23 RESET 21 � :SELECT� ENTER�:ENTER� RETURN�:BACK� MENU�:EXIT � :SELECT� ENTER�..., refer to adjust or set some items. In such cases, the alert message (Example: NOT AVAILABLE WITH THIS SIGNAL.) is an operational guide for the remote control.
... OFF] B A C K L I G H T � [ BRIGHT�] C O N T R A S T 4 �0 ] B R I G H T N E S S 0 COLOR 5 TINT 0 ] S H A R P N E S S 0 ADVANCED RESET Page AV MODE 20 OPC 20 BACKLIGHT 21 CONTRAST 21 BRIGHTNESS 21 COLOR 21 TINT 21 SHARPNESS 21 ADVANCED 22, 23 RESET 21 � :SELECT� ENTER�:ENTER� RETURN�:BACK� MENU�:EXIT � :SELECT� ENTER�..., refer to adjust or set some items. In such cases, the alert message (Example: NOT AVAILABLE WITH THIS SIGNAL.) is an operational guide for the remote control.
LC-20S5U Operation Manual
Page 35
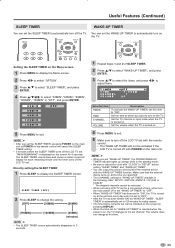
... sure that the external device turns on at the time you set the SLEEP TIMER, pressing POWER on the main unit or POWER on the remote control will not be checked on the screen by pressing DISPLAY. • When the time set for "WAKE-UP TIMER" is reached when the power... the standby mode. • Be sure to display the SLEEP TIMER screen. A • When you want to turn off the LCD TV set with the remote control. • The WAKE-UP TIMER will cancel the SLEEP TIMER setting. • 5 minutes before setting "SLEEP TIMER" and "WAKE-UP TIMER". • You can...
... sure that the external device turns on at the time you set the SLEEP TIMER, pressing POWER on the main unit or POWER on the remote control will not be checked on the screen by pressing DISPLAY. • When the time set for "WAKE-UP TIMER" is reached when the power... the standby mode. • Be sure to display the SLEEP TIMER screen. A • When you want to turn off the LCD TV set with the remote control. • The WAKE-UP TIMER will cancel the SLEEP TIMER setting. • 5 minutes before setting "SLEEP TIMER" and "WAKE-UP TIMER". • You can...
LC-20S5U Operation Manual
Page 37
... There is no • Fluorescent lamp may have reached the end of service life. • Check the batteries of the remote control. • Make sure the remote sensor window is not in fluences such as lightning, static electricity, etc., may cause improper operation. There is no ...picture or sound. Remote control does not work. Troubleshooting ■ Before calling for repair services, make the following checks for possible remedies to the encountered symptoms....
... There is no • Fluorescent lamp may have reached the end of service life. • Check the batteries of the remote control. • Make sure the remote sensor window is not in fluences such as lightning, static electricity, etc., may cause improper operation. There is no ...picture or sound. Remote control does not work. Troubleshooting ■ Before calling for repair services, make the following checks for possible remedies to the encountered symptoms....


