FO-DC535 | FO-DC635 Operation Manual
Page 7
... 64 Batch Page Numbering (Page Counter 66 Receiving Faxes 67 Substitute Reception to Memory 69 Dual-line Option (FO-DC635 only 70 Verification Stamp Option 74 PC Fax Function (Requires the FO-LN1 Option 75 5 Table of Contents Introduction 1... Important safety information 3 Table of Contents 5 A Look at the Operation Panel 8 1. Installation 14 Unpacking Checklist 14 Connections 15 Installing the Print Cartridges 18 Loading Printing Paper 22 Entering Your Name and Fax Number 25 Setting...
... 64 Batch Page Numbering (Page Counter 66 Receiving Faxes 67 Substitute Reception to Memory 69 Dual-line Option (FO-DC635 only 70 Verification Stamp Option 74 PC Fax Function (Requires the FO-LN1 Option 75 5 Table of Contents Introduction 1... Important safety information 3 Table of Contents 5 A Look at the Operation Panel 8 1. Installation 14 Unpacking Checklist 14 Connections 15 Installing the Print Cartridges 18 Loading Printing Paper 22 Entering Your Name and Fax Number 25 Setting...

FO-DC535 | FO-DC635 Operation Manual
Page 8
... Using Programs 178 Duplex Scanning for Destinations and User Authorization 112 4. Making Copies 150 6. Table of Unwanted Faxes 195 Telephone Billing 197 Distinctive Ring 199 6 Network Printer Option 123 Installing the Printer Driver 124 Setting Up Status and Alert Messages 140 Printing from a Computer 142 Opening the Printer Driver 144 Printer Driver...
... Using Programs 178 Duplex Scanning for Destinations and User Authorization 112 4. Making Copies 150 6. Table of Unwanted Faxes 195 Telephone Billing 197 Distinctive Ring 199 6 Network Printer Option 123 Installing the Printer Driver 124 Setting Up Status and Alert Messages 140 Printing from a Computer 142 Opening the Printer Driver 144 Printer Driver...

FO-DC535 | FO-DC635 Operation Manual
Page 9
Troubleshooting 220 Problems and Solutions 220 Messages and Signals 227 Clearing Paper Jams 230 FCC Regulatory Information 233 QUICK REFERENCE GUIDE 237 GUÍA DE REFERENCIA RÁPIDA 238 GUIDE DE RÉFÉRENCE RAPIDE 239 Index 240 7 Maintenance 218 Cleaning the Scanning Glass and Rollers 218 The Housing 218 Replacing the Verification Stamp 219 10. Table of Contents 7. Printing Lists and Reports 212 9. Optional Settings 201 8.
Troubleshooting 220 Problems and Solutions 220 Messages and Signals 227 Clearing Paper Jams 230 FCC Regulatory Information 233 QUICK REFERENCE GUIDE 237 GUÍA DE REFERENCIA RÁPIDA 238 GUIDE DE RÉFÉRENCE RAPIDE 239 Index 240 7 Maintenance 218 Cleaning the Scanning Glass and Rollers 218 The Housing 218 Replacing the Verification Stamp 219 10. Table of Contents 7. Printing Lists and Reports 212 9. Optional Settings 201 8.
FO-DC535 | FO-DC635 Operation Manual
Page 11
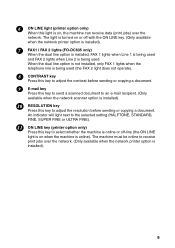
6 ON LINE light (printer option only) When this light is installed). 9 An indicator will light next to the selected setting (HALFTONE, STANDARD, FINE, SUPER FINE or ULTRA FINE). 11 ON LINE key (printer option only) Press this key to adjust the resolution before sending or ... or off with the ON LINE key. (Only available when the network printer option is installed). 7 FAX1 / FAX 2 lights (FO-DC635 only) When the dual line option is installed, FAX 1 lights when Line 1 is being used and FAX 2 lights when Line 2 is being used . The machine must be online to an e-mail recipient. (Only...
6 ON LINE light (printer option only) When this light is installed). 9 An indicator will light next to the selected setting (HALFTONE, STANDARD, FINE, SUPER FINE or ULTRA FINE). 11 ON LINE key (printer option only) Press this key to adjust the resolution before sending or ... or off with the ON LINE key. (Only available when the network printer option is installed). 7 FAX1 / FAX 2 lights (FO-DC635 only) When the dual line option is installed, FAX 1 lights when Line 1 is being used and FAX 2 lights when Line 2 is being used . The machine must be online to an e-mail recipient. (Only...
FO-DC535 | FO-DC635 Operation Manual
Page 13
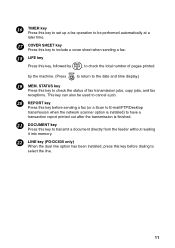
... to return to the date and time display.) 19 MEM. 16 TIMER key Press this key to set up a fax operation to be used to cancel a job. 20 REPORT key Press this key before sending a fax (or a Scan to E-mail/FTP/Desktop transmission when the network scanner option is installed) to have a ...finished. 21 DOCUMENT key Press this key to transmit a document directly from the feeder without reading it into memory. 22 LINE key (FO-DC635 only) When the dual line option has been installed, press this key, followed by START/ ENTER , to check the total number of fax transmission jobs, copy jobs, and...
... to return to the date and time display.) 19 MEM. 16 TIMER key Press this key to set up a fax operation to be used to cancel a job. 20 REPORT key Press this key before sending a fax (or a Scan to E-mail/FTP/Desktop transmission when the network scanner option is installed) to have a ...finished. 21 DOCUMENT key Press this key to transmit a document directly from the feeder without reading it into memory. 22 LINE key (FO-DC635 only) When the dual line option has been installed, press this key, followed by START/ ENTER , to check the total number of fax transmission jobs, copy jobs, and...

FO-DC535 | FO-DC635 Operation Manual
Page 15
...the MENU key settings. 31 COPY key Press this key to make a copy of a document that is in the feeder. 32 Dial keypad (numeric keys) Use these keys to dial and program fax numbers. 33 ... and verify the response of the receiving fax machine. 35 START/ENTER key Press this key to select special functions and settings. 30 UP and DOWN arrow keys Volume setting: Press these keys to search for "... key Press this key to dial a Speed Dial number. 29 MENU key Press this key to begin fax transmission when using Speed Dialing, Direct Keypad Dialing, or Normal Dialing. If the network scanner option is ...
...the MENU key settings. 31 COPY key Press this key to make a copy of a document that is in the feeder. 32 Dial keypad (numeric keys) Use these keys to dial and program fax numbers. 33 ... and verify the response of the receiving fax machine. 35 START/ENTER key Press this key to select special functions and settings. 30 UP and DOWN arrow keys Volume setting: Press these keys to search for "... key Press this key to dial a Speed Dial number. 29 MENU key Press this key to begin fax transmission when using Speed Dialing, Direct Keypad Dialing, or Normal Dialing. If the network scanner option is ...

FO-DC535 | FO-DC635 Operation Manual
Page 16
... labels Operation manual Points to a warm place, it is moved from Keep the area the machine. Installation Unpacking Checklist Before setting up Do not place the machine in mind when setting up , make sure you have all of documents for transmission. Do not place the machine near heaters or air conditioners. Keep...
... labels Operation manual Points to a warm place, it is moved from Keep the area the machine. Installation Unpacking Checklist Before setting up Do not place the machine in mind when setting up , make sure you have all of documents for transmission. Do not place the machine near heaters or air conditioners. Keep...

FO-DC535 | FO-DC635 Operation Manual
Page 18
Connections Connecting the telephone line cord Insert one end of the line cord into a standard (RJ11C) single-line wall telephone jack. See page 207. Connecting a telephone (optional) If desired, you must set for pulse dialing by changing Option Setting 22. Insert the other end into the jack on the back of the machine. 16 Note: The machine is set the machine for touch-tone dialing. If you are on the back of the machine marked TEL. SET jack on a pulse dial (rotary) line, you can connect a telephone to the TEL. LINE.
Connections Connecting the telephone line cord Insert one end of the line cord into a standard (RJ11C) single-line wall telephone jack. See page 207. Connecting a telephone (optional) If desired, you must set for pulse dialing by changing Option Setting 22. Insert the other end into the jack on the back of the machine. 16 Note: The machine is set the machine for touch-tone dialing. If you are on the back of the machine marked TEL. SET jack on a pulse dial (rotary) line, you can connect a telephone to the TEL. LINE.
FO-DC535 | FO-DC635 Operation Manual
Page 27
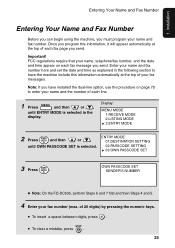
... and then or until ENTRY MODE is selected. of your name and fax number. Important! Enter your name and fax number here and set the date and time as explained in the display. OWN PASSCODE SET SENDER'S NUMBER ♦ Note: On the FO-DC635, perform Steps 6 and 7 first and then Steps 4 and 5.... 4 Enter your name and the number of each fax page you have the machine include this information automatically at the top of...
... and then or until ENTRY MODE is selected. of your name and fax number. Important! Enter your name and fax number here and set the date and time as explained in the display. OWN PASSCODE SET SENDER'S NUMBER ♦ Note: On the FO-DC635, perform Steps 6 and 7 first and then Steps 4 and 5.... 4 Enter your name and the number of each fax page you have the machine include this information automatically at the top of...

FO-DC535 | FO-DC635 Operation Manual
Page 29
... date and time by pressing the keys on the operation panel as shown below. 1 Press MENU and then or until DATE&TIME SET is selected in reports, and at the top of each page you transmit. 1. Display: MENU MODE 1:RECEIVE MODE 2:LISTING MODE 3:ENTRY MODE 2 ...then or until ENTRY MODE is selected. Example: The 5th 0 5 27 ENTRY MODE 01:DESTINATION SETTING 02:PASSCODE SETTING 03:OWN PASSCODE SET 04:DATE&TIME SET 3 Press START/ ENTER . Installation Setting the Date and Time Setting the Date and Time The date and time appear in the display, in the display. The currently...
... date and time by pressing the keys on the operation panel as shown below. 1 Press MENU and then or until DATE&TIME SET is selected in reports, and at the top of each page you transmit. 1. Display: MENU MODE 1:RECEIVE MODE 2:LISTING MODE 3:ENTRY MODE 2 ...then or until ENTRY MODE is selected. Example: The 5th 0 5 27 ENTRY MODE 01:DESTINATION SETTING 02:PASSCODE SETTING 03:OWN PASSCODE SET 04:DATE&TIME SET 3 Press START/ ENTER . Installation Setting the Date and Time Setting the Date and Time The date and time appear in the display, in the display. The currently...

FO-DC535 | FO-DC635 Operation Manual
Page 30
or to select P.M. 9 Press START/ ENTER to start the clock. 10 STOP Press twice to return to "59"). Example: 2006 2 0 0 64 7 Enter a two-digit number for the hour ("01" to "12") and a two-digit number for the minute ("00" to the date and time display. 28 Example: 9:25 0 9 2 5 8 Press to select A.M. Setting the Date and Time 6 Enter the year (four digits).
or to select P.M. 9 Press START/ ENTER to start the clock. 10 STOP Press twice to return to "59"). Example: 2006 2 0 0 64 7 Enter a two-digit number for the hour ("01" to "12") and a two-digit number for the minute ("00" to the date and time display. 28 Example: 9:25 0 9 2 5 8 Press to select A.M. Setting the Date and Time 6 Enter the year (four digits).

FO-DC535 | FO-DC635 Operation Manual
Page 31
... clock to the date and time display. 29 Display: MENU MODE 1:RECEIVE MODE 2:DESTINATION SETTING 3:ENTRY MODE 2 Press START/ ENTER and then or until ENTRY MODE is selected. 02: PASSCODE SETTING 03:OWN PASSCODE SET 04:DATE&TIME SET 05: DAY LIGHT SAVING 3 Press START/ ENTER . 1. DAY LIGHT SAVING 1=YES 2=NO 4 Press 1 to turn...
... clock to the date and time display. 29 Display: MENU MODE 1:RECEIVE MODE 2:DESTINATION SETTING 3:ENTRY MODE 2 Press START/ ENTER and then or until ENTRY MODE is selected. 02: PASSCODE SETTING 03:OWN PASSCODE SET 04:DATE&TIME SET 05: DAY LIGHT SAVING 3 Press START/ ENTER . 1. DAY LIGHT SAVING 1=YES 2=NO 4 Press 1 to turn...

FO-DC535 | FO-DC635 Operation Manual
Page 32
... error beeps may sound and the display may not respond normally when you press MENU . Continue to protect the settings that PASSWORD SET is selected and press START/ ENTER . Setting an administrator password 1 Press the following sequence of keys: MENU , COPY , , , 1 , START/ ...password each time you press MENU to configure a MENU setting. Administrator Password Administrator Password The administrator of the machine can also be set and protection is set and enabled in Chapter 3, the administrator password can set a password to press the above keys. ADMIN PASSWORD ...
... error beeps may sound and the display may not respond normally when you press MENU . Continue to protect the settings that PASSWORD SET is selected and press START/ ENTER . Setting an administrator password 1 Press the following sequence of keys: MENU , COPY , , , 1 , START/ ...password each time you press MENU to configure a MENU setting. Administrator Password Administrator Password The administrator of the machine can also be set and protection is set and enabled in Chapter 3, the administrator password can set a password to press the above keys. ADMIN PASSWORD ...

FO-DC535 | FO-DC635 Operation Manual
Page 33
... the procedure on the following page), make sure that NO is the initial factory-set password). • Each character/digit that you will return to enter the old (currently set) password. • If you are setting the password for your dealer. 31 Take care not to select YES and press ...START/ ENTER . In the event that you enter will print out the password for the first time, enter "Sharp" (this is selected and press ...
... the procedure on the following page), make sure that NO is the initial factory-set password). • Each character/digit that you will return to enter the old (currently set) password. • If you are setting the password for your dealer. 31 Take care not to select YES and press ...START/ ENTER . In the event that you enter will print out the password for the first time, enter "Sharp" (this is selected and press ...

FO-DC535 | FO-DC635 Operation Manual
Page 34
...to enter the password each time you press MENU to configure a MENU setting. Administrator Password Changing the Password Protect setting Follow the steps below if you need to change the Password Protect setting (enable or disable password protection). 1 Press the following sequence of ADMIN ... with the numeric and/or letter keys as appropriate, press START/ ENTER , and then continue as usual. 32 Display: ADMIN PASSWORD 1:PASSWORD SET 2:PASSWORD PROTECTION • This is selected and press START/ . Continue to enter the password. 5 When you have finished entering the password,...
...to enter the password each time you press MENU to configure a MENU setting. Administrator Password Changing the Password Protect setting Follow the steps below if you need to change the Password Protect setting (enable or disable password protection). 1 Press the following sequence of ADMIN ... with the numeric and/or letter keys as appropriate, press START/ ENTER , and then continue as usual. 32 Display: ADMIN PASSWORD 1:PASSWORD SET 2:PASSWORD PROTECTION • This is selected and press START/ . Continue to enter the password. 5 When you have finished entering the password,...

FO-DC535 | FO-DC635 Operation Manual
Page 40
... letters or fine drawings. If you don't adjust the resolution before sending a document. If it doesn't, the next best available setting will be reproduced in 64 shades of document reproduction. Adjusting the Resolution and Contrast If desired, you the fastest and most economical transmission...and illustrations. Use HALF TONE for transmitting and copying a document. Adjusting the Resolution and Contrast 3 Adjust the resolution and/or contrast settings (if desired) and then dial the receiving machine as explained in FINE, SUPER FINE, or ULTRA FINE resolution, the receiving machine ...
... letters or fine drawings. If you don't adjust the resolution before sending a document. If it doesn't, the next best available setting will be reproduced in 64 shades of document reproduction. Adjusting the Resolution and Contrast If desired, you the fastest and most economical transmission...and illustrations. Use HALF TONE for transmitting and copying a document. Adjusting the Resolution and Contrast 3 Adjust the resolution and/or contrast settings (if desired) and then dial the receiving machine as explained in FINE, SUPER FINE, or ULTRA FINE resolution, the receiving machine ...

FO-DC535 | FO-DC635 Operation Manual
Page 41
... ( LIGHT) 39 Use DARK for normal documents. RESOLUTION HALF TONE STANDARD FINE SUPER FINE ULTRA FINE Contrast The machine has three contrast settings. AUTO DARK LIGHT Use AUTO for faint documents. Use LIGHT for documents with a dark background. CONTRAST To adjust the contrast, press ...until the indicator light next to the desired setting comes on. Send/Receive Documents Adjusting the Resolution and Contrast To adjust the resolution setting, press RESOLUTION one or more times until the desired...
... ( LIGHT) 39 Use DARK for normal documents. RESOLUTION HALF TONE STANDARD FINE SUPER FINE ULTRA FINE Contrast The machine has three contrast settings. AUTO DARK LIGHT Use AUTO for faint documents. Use LIGHT for documents with a dark background. CONTRAST To adjust the contrast, press ...until the indicator light next to the desired setting comes on. Send/Receive Documents Adjusting the Resolution and Contrast To adjust the resolution setting, press RESOLUTION one or more times until the desired...
FO-DC535 | FO-DC635 Operation Manual
Page 42
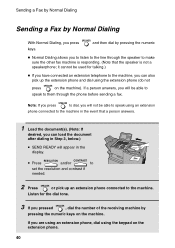
...3 SPEAKER If you pressed , dial the number of the receiving machine by pressing the numeric keys. ♦ Normal Dialing allows you to listen to set the resolution and contrast if needed. 2 SPEAKER Press or pick up the extension phone and dial using the keypad on the machine. If a person ...answers, you can also pick up an extension phone connected to make sure the other fax machine is responding. (Note that the speaker is not a speakerphone; If you can load the document after dialing in the display. • Press...
...3 SPEAKER If you pressed , dial the number of the receiving machine by pressing the numeric keys. ♦ Normal Dialing allows you to listen to set the resolution and contrast if needed. 2 SPEAKER Press or pick up the extension phone and dial using the keypad on the machine. If a person ...answers, you can also pick up an extension phone connected to make sure the other fax machine is responding. (Note that the speaker is not a speakerphone; If you can load the document after dialing in the display. • Press...
FO-DC535 | FO-DC635 Operation Manual
Page 43
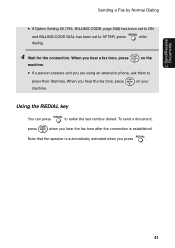
...REDIAL key You can press REDIAL to press their Start key. Send/Receive Documents Sending a Fax by Normal Dialing • If Option Setting 26 (TEL. REDIAL Note that the speaker is established. When you hear a fax tone, press START/ ENTER on your machine. To send a document, press START/ ... dialed. When you press . 41 2. BILLING CODE, page 208) has been set to ON REDIAL and BILLING CODE DIAL has been set to AFTER, press after the connection is automatically activated when you hear the fax tone, press START/ ENTER on the machine. • If a person answers...
...REDIAL key You can press REDIAL to press their Start key. Send/Receive Documents Sending a Fax by Normal Dialing • If Option Setting 26 (TEL. REDIAL Note that the speaker is established. When you hear a fax tone, press START/ ENTER on your machine. To send a document, press START/ ... dialed. When you press . 41 2. BILLING CODE, page 208) has been set to ON REDIAL and BILLING CODE DIAL has been set to AFTER, press after the connection is automatically activated when you hear the fax tone, press START/ ENTER on the machine. • If a person answers...

FO-DC535 | FO-DC635 Operation Manual
Page 44
...shared use on the FO-DC535. For information on creating and using the operation panel, see page 57. If the network scanner option is selected in the display. Make sure that DESTINATION SETTING is usually convenient to program your computer. Up to store fax numbers using the operation... panel of the machine. ENTRY MODE 01:DESTINATION SETTING 02:PASSCODE SETTING 03:OWN PASSCODE SET 42 To store an e-mail address in a Rapid...
...shared use on the FO-DC535. For information on creating and using the operation panel, see page 57. If the network scanner option is selected in the display. Make sure that DESTINATION SETTING is usually convenient to program your computer. Up to store fax numbers using the operation... panel of the machine. ENTRY MODE 01:DESTINATION SETTING 02:PASSCODE SETTING 03:OWN PASSCODE SET 42 To store an e-mail address in a Rapid...


