
Operation Manual
Page 2
... REMOVE COVER. ENGLISH Before using the projector, please read this product to rain or moisture. U.S.A. Introduction IMPORTANT • For your Projector, please record the Serial Number located on page 10. CAUTION RISK OF ELECTRIC SHOCK. Model No.: DT-510 Serial No.: WARNING: High brightness light... source. See bottom of the projector and retain this equipment. The lightning flash with arrowhead symbol, within the product's enclosure that ...
... REMOVE COVER. ENGLISH Before using the projector, please read this product to rain or moisture. U.S.A. Introduction IMPORTANT • For your Projector, please record the Serial Number located on page 10. CAUTION RISK OF ELECTRIC SHOCK. Model No.: DT-510 Serial No.: WARNING: High brightness light... source. See bottom of the projector and retain this equipment. The lightning flash with arrowhead symbol, within the product's enclosure that ...

Operation Manual
Page 3
...Rules. U.S.A. Operation is no guarantee that interference will not affect the picture quality or the life expectancy of conformity SHARP PROJECTOR, MODEL DT-510 This device complies with the operation manual, may result in the United States of mercury. For disposal or recycling ... ONLY Declaration of the unit. 2 ONLY PRODUCT DISPOSAL This projector utilizes tin-lead solder, and a pressurized lamp containing a small amount of America, the Electronic Industries Alliance: www.eiae.org . This SHARP projector uses a DLP® chip. This very sophisticated panel contains 921,600 pixels...
...Rules. U.S.A. Operation is no guarantee that interference will not affect the picture quality or the life expectancy of conformity SHARP PROJECTOR, MODEL DT-510 This device complies with the operation manual, may result in the United States of mercury. For disposal or recycling ... ONLY Declaration of the unit. 2 ONLY PRODUCT DISPOSAL This projector utilizes tin-lead solder, and a pressurized lamp containing a small amount of America, the Electronic Industries Alliance: www.eiae.org . This SHARP projector uses a DLP® chip. This very sophisticated panel contains 921,600 pixels...
Operation Manual
Page 4
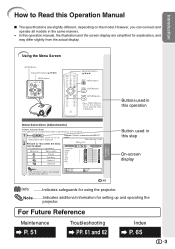
...mode Selected input mode Menu icons Picture Picture Mode Contrast Bright Color Tint Sharp Red Blue INPUT 1 Standard 0 0 0 0 0 0 0 Note • The "Fine Sync" menu is not available for setting up and operating the projector. RETURN ENTER END 41 Useful Features Button used in this operation Menu Selections... simplified for explanation, and may differ slightly from the actual display. However, you can also be performed by using the projector. Buttons used in the same manner. • In this operation manual, the illustration and the screen display are slightly different, depending...
...mode Selected input mode Menu icons Picture Picture Mode Contrast Bright Color Tint Sharp Red Blue INPUT 1 Standard 0 0 0 0 0 0 0 Note • The "Fine Sync" menu is not available for setting up and operating the projector. RETURN ENTER END 41 Useful Features Button used in this operation Menu Selections... simplified for explanation, and may differ slightly from the actual display. However, you can also be performed by using the projector. Buttons used in the same manner. • In this operation manual, the illustration and the screen display are slightly different, depending...
Operation Manual
Page 5
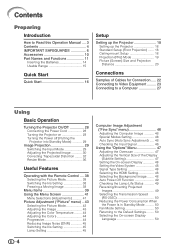
... 10 Part Names and Functions 11 Inserting the Batteries 14 Usable Range 15 Quick Start Quick Start 16 Setup Setting up the Projector 18 Setting up the Projector 18 Standard Setup (Front Projection) ....... 18 Ceiling-mount Setup 18 Projection (PRJ) Mode 19 Picture (Screen) Size and ... Video Equipment ......... 23 Connecting to a Computer 27 Using Basic Operation Turning the Projector On/Off 28 Connecting the Power Cord 28 Turning the Projector on 28 Turning the Power off (Putting the Projector into Standby Mode 29 Image Projection 29 Switching the Input Mode 29 Adjusting the ...
... 10 Part Names and Functions 11 Inserting the Batteries 14 Usable Range 15 Quick Start Quick Start 16 Setup Setting up the Projector 18 Setting up the Projector 18 Standard Setup (Front Projection) ....... 18 Ceiling-mount Setup 18 Projection (PRJ) Mode 19 Picture (Screen) Size and ... Video Equipment ......... 23 Connecting to a Computer 27 Using Basic Operation Turning the Projector On/Off 28 Connecting the Power Cord 28 Turning the Projector on 28 Turning the Power off (Putting the Projector into Standby Mode 29 Image Projection 29 Switching the Input Mode 29 Adjusting the ...
Operation Manual
Page 9
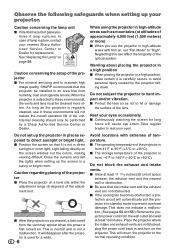
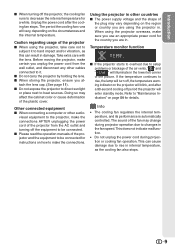
.... Do not set "Fan Mode" to prevent overheat damage. This will automatically put the projector into standby mode to "High". When the projector is carefully secure to rest your nearest Sharp Authorized Service Center or Dealer for long hours will not reduce the overall operation life of... glass par- Take regular breaks to avoid personal injury caused by a Sharp Authorized Service Center or Dealer. Warning about placing the projector in places exposed to the normal operating condition. Rest your projector. Close the curtains and dim the lights when setting up the screen in ...
.... Do not set "Fan Mode" to prevent overheat damage. This will automatically put the projector into standby mode to "High". When the projector is carefully secure to rest your nearest Sharp Authorized Service Center or Dealer for long hours will not reduce the overall operation life of... glass par- Take regular breaks to avoid personal injury caused by a Sharp Authorized Service Center or Dealer. Warning about placing the projector in places exposed to the normal operating condition. Rest your projector. Close the curtains and dim the lights when setting up the screen in ...
Operation Manual
Page 10
... cooling fan runs will turn off, the temperature warn- This does not indicate malfunction. • Do not unplug the power cord during projector operation due to make certain you attach the lens cap. (See page 11). If the temperature continues to decrease the internal temperature for... details. Introduction I When turning off the projector, the cooling fan runs to rise, the lamp will vary, depending on the circumstances and the internal temperature. Unplug the power cord after ...
... cooling fan runs will turn off, the temperature warn- This does not indicate malfunction. • Do not unplug the power cord during projector operation due to make certain you attach the lens cap. (See page 11). If the temperature continues to decrease the internal temperature for... details. Introduction I When turning off the projector, the cooling fan runs to rise, the lamp will vary, depending on the circumstances and the internal temperature. Unplug the power cord after ...
Operation Manual
Page 12
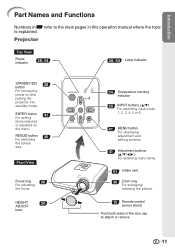
Projector Top View Power indicator 28, 54 28, 54 Lamp indicator STANDBY/ON 28 button For turning the power on the menu. RESIZE button 36 For ... topic is explained. Front View Focus ring 30 For adjusting the focus. ENTER button For setting 41 items selected or adjusted on and putting the projector into standby mode.
Projector Top View Power indicator 28, 54 28, 54 Lamp indicator STANDBY/ON 28 button For turning the power on the menu. RESIZE button 36 For ... topic is explained. Front View Focus ring 30 For adjusting the focus. ENTER button For setting 41 items selected or adjusted on and putting the projector into standby mode.
Operation Manual
Page 14
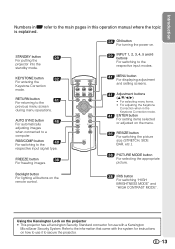
... size (STRETCH, SIDE BAR, etc.). 38 PICTURE MODE button For selecting the appropriate picture. Using the Kensington Lock on the projector • This projector has a Kensington Security Standard connector for instructions on how to use with a Kensington MicroSaver Security System. Introduction Numbers in Z ...refer to secure the projector. 13 KEYSTONE button 32 For entering the Keystone Correction mode. RGB/COMP. Refer to the information that came with the system...
... size (STRETCH, SIDE BAR, etc.). 38 PICTURE MODE button For selecting the appropriate picture. Using the Kensington Lock on the projector • This projector has a Kensington Security Standard connector for instructions on how to use with a Kensington MicroSaver Security System. Introduction Numbers in Z ...refer to secure the projector. 13 KEYSTONE button 32 For entering the Keystone Correction mode. RGB/COMP. Refer to the information that came with the system...

Operation Manual
Page 15
Caution • Danger of explosion if battery is harmful to skin, therefore ensure you will not be using a cloth. • The batteries included with this projector may cause old batteries to leak. Battery fluid from the remote control once they are kept. Replace only with the rules (ordinance) of each local ...
Caution • Danger of explosion if battery is harmful to skin, therefore ensure you will not be using a cloth. • The batteries included with this projector may cause old batteries to leak. Battery fluid from the remote control once they are kept. Replace only with the rules (ordinance) of each local ...

Operation Manual
Page 16
... • The signal from the fluorescent lamp. 15 However, the effective distance of the signal may malfunction under a fluorescent lamp. In this case, move the projector away from the remote control can be reflected off a screen for easy operation. When using the remote control • Ensure that you do not drop...
... • The signal from the fluorescent lamp. 15 However, the effective distance of the signal may malfunction under a fluorescent lamp. In this case, move the projector away from the remote control can be reflected off a screen for easy operation. When using the remote control • Ensure that you do not drop...

Operation Manual
Page 17
... the video equipment and plug the power cord into the AC socket of the projector _PP. 22-28 To INPUT 4 terminal AC socket Connect the audio output of the projector and the video equipment is explained using one ex- For details, see the page described below for... lever 7 Adjustment (P/R/O/Q) buttons 7 ENTER button 1. Remove the lens cap and turn the projector on _P. 28 On the On the remote projector control 16 Quick Start This section shows the basic operation (projector connecting with the video equipment). Setup and Projection In this section, connection of any video...
... the video equipment and plug the power cord into the AC socket of the projector _PP. 22-28 To INPUT 4 terminal AC socket Connect the audio output of the projector and the video equipment is explained using one ex- For details, see the page described below for... lever 7 Adjustment (P/R/O/Q) buttons 7 ENTER button 1. Remove the lens cap and turn the projector on _P. 28 On the On the remote projector control 16 Quick Start This section shows the basic operation (projector connecting with the video equipment). Setup and Projection In this section, connection of any video...

Operation Manual
Page 18
...ADJUST lever. Focus ring 7. Turn the Power off _P. 29 Press the STANDBY/ON button on the projector or the STANDBY button on the remote control. On the On the remote projector control On-screen Display • Unplug the power cord from the AC outlet after the cooling fan stops....-right, and lower-left positions of the projected image. • When you to switch the input mode. 6. Adjust the projector angle using the INPUT buttons on the projector or the INPUT 4 button on the remote control, and then press the button again while the confirmation message is displayed to set...
...ADJUST lever. Focus ring 7. Turn the Power off _P. 29 Press the STANDBY/ON button on the projector or the STANDBY button on the remote control. On the On the remote projector control On-screen Display • Unplug the power cord from the AC outlet after the cooling fan stops....-right, and lower-left positions of the projected image. • When you to switch the input mode. 6. Adjust the projector angle using the INPUT buttons on the projector or the INPUT 4 button on the remote control, and then press the button again while the confirmation message is displayed to set...
Operation Manual
Page 19
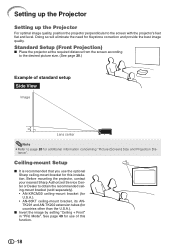
...• Refer to the desired picture size. (See page 20.) Example of this installation. See page 49 for use the optional Sharp ceiling-mount bracket for this function. 18 Doing so will eliminate the need for additional information concerning "Picture (Screen) Size and Projection...image by setting "Ceiling + Front" in "PRJ Mode". Before mounting the projector, contact your nearest Sharp Authorized Service Center or Dealer to the screen with the projector's feet flat and level. I Place the projector at the required distance from the screen according to page 20 for Keystone correction...
...• Refer to the desired picture size. (See page 20.) Example of this installation. See page 49 for use the optional Sharp ceiling-mount bracket for this function. 18 Doing so will eliminate the need for additional information concerning "Picture (Screen) Size and Projection...image by setting "Ceiling + Front" in "PRJ Mode". Before mounting the projector, contact your nearest Sharp Authorized Service Center or Dealer to the screen with the projector's feet flat and level. I Place the projector at the required distance from the screen according to page 20 for Keystone correction...

Operation Manual
Page 20
..." 5'1(11."8-6m'1-127".1'1m(12)."4-9m'2-"2.89m'1) (13."0-1m1-'63".5 m1)9'(16.00"m-2-27'1.012m"9)'(99."1-3m4-'51"0.5 m) Projection Distance 19 Projection (PRJ) Mode The projector can set the PRJ Mode in the diagram below.
..." 5'1(11."8-6m'1-127".1'1m(12)."4-9m'2-"2.89m'1) (13."0-1m1-'63".5 m1)9'(16.00"m-2-27'1.012m"9)'(99."1-3m4-'51"0.5 m) Projection Distance 19 Projection (PRJ) Mode The projector can set the PRJ Mode in the diagram below.

Operation Manual
Page 21
... = 0.04275χ / 0.3048 H (in) = 0.21794χ / 2.54 [m/cm] L1 (m) = 0.03694χ L2 (m) = 0.04275χ H (cm) = 0.21794χ 20 Setting up the Projector (Continued) Picture (Screen) Size and Projection Distance The projection screen size varies according to the distance from the lens center to the bottom of the... projector to the screen. Install the projector so that projected images are projected onto the screen at the optimum size by referring to the table below....
... = 0.04275χ / 0.3048 H (in) = 0.21794χ / 2.54 [m/cm] L1 (m) = 0.03694χ L2 (m) = 0.04275χ H (cm) = 0.21794χ 20 Setting up the Projector (Continued) Picture (Screen) Size and Projection Distance The projection screen size varies according to the distance from the lens center to the bottom of the... projector to the screen. Install the projector so that projected images are projected onto the screen at the optimum size by referring to the table below....

Operation Manual
Page 23
Equipment Input Signal Cable Terminal on the projector Audio-visual equipment HDMI video HDMI cable (commercially available) INPUT6 Component video Component cable (commercially available) Component video 3 RCA to 15-pin D-sub cable (optional ...
Equipment Input Signal Cable Terminal on the projector Audio-visual equipment HDMI video HDMI cable (commercially available) INPUT6 Component video Component cable (commercially available) Component video 3 RCA to 15-pin D-sub cable (optional ...

Operation Manual
Page 24
Connecting to Video Equipment Before connecting, ensure that the power cord of the projector is unplugged from the AC outlet and turn on the projector (INPUT1 or INPUT2) To component output (Y, CB/PB, CR/PR) terminal DVD, etc. To INPUT1 or INPUT2 terminal Component cable (commercially available) Connections 23 When connecting the component video equipment to be connected. After making all connections, turn off the devices to the component input terminal on the projector first and then the other devices.
Connecting to Video Equipment Before connecting, ensure that the power cord of the projector is unplugged from the AC outlet and turn on the projector (INPUT1 or INPUT2) To component output (Y, CB/PB, CR/PR) terminal DVD, etc. To INPUT1 or INPUT2 terminal Component cable (commercially available) Connections 23 When connecting the component video equipment to be connected. After making all connections, turn off the devices to the component input terminal on the projector first and then the other devices.

Operation Manual
Page 26
To INPUT5 terminal 3 RCA to the computer-RGB/ component input terminal on the projector (INPUT5) To component output (Y, CB/PB, CR/PR) terminal DVD, etc. Connections When connecting the component video equipment to 15-pin D-sub cable (optional accessory: AN-C3CP2) 25
To INPUT5 terminal 3 RCA to the computer-RGB/ component input terminal on the projector (INPUT5) To component output (Y, CB/PB, CR/PR) terminal DVD, etc. Connections When connecting the component video equipment to 15-pin D-sub cable (optional accessory: AN-C3CP2) 25

Operation Manual
Page 27
...; HDMI (High Definition Multimedia Interface) is a new specialized interface capable of delivering a video and audio signal to the terminal using just one cable. Since this projector does not support an audio signal by itself, use a cable that conforms to HDMI standards. tion video signal, multi-channel audio signal, and bi-directional...
...; HDMI (High Definition Multimedia Interface) is a new specialized interface capable of delivering a video and audio signal to the terminal using just one cable. Since this projector does not support an audio signal by itself, use a cable that conforms to HDMI standards. tion video signal, multi-channel audio signal, and bi-directional...

Operation Manual
Page 29
... first minute after the lamp has been illuminated. Green: The lamp is shut down . Supplied accessory Power cord AC socket To AC outlet Turning the Projector on Note that the connections to external equipment and power outlet should be replaced. • When switching on the... another language, change the language according to 28.) Remove the lens cap and press S STANDBY/ON on the projector or bON on the remote control. STANDBY/ON button ON button 28 Turning the Projector On/Off Connecting the Power Cord Plug the supplied power cord into the AC socket on the rear...
... first minute after the lamp has been illuminated. Green: The lamp is shut down . Supplied accessory Power cord AC socket To AC outlet Turning the Projector on Note that the connections to external equipment and power outlet should be replaced. • When switching on the... another language, change the language according to 28.) Remove the lens cap and press S STANDBY/ON on the projector or bON on the remote control. STANDBY/ON button ON button 28 Turning the Projector On/Off Connecting the Power Cord Plug the supplied power cord into the AC socket on the rear...


