
CD-MPX850 Operation Manual
Page 2
... the rear of the FCC Rules. Consult the dealer or an experienced radio/TV technician for proper grounding and, in case of loss or theft, please record below the model number and serial number which can radiate radio frequency energy and, if not installed and used in accordance with the copyright laws of Sharp that this equipment. CD-MPX850 SPECIAL NOTES Important Instruction...
... the rear of the FCC Rules. Consult the dealer or an experienced radio/TV technician for proper grounding and, in case of loss or theft, please record below the model number and serial number which can radiate radio frequency energy and, if not installed and used in accordance with the copyright laws of Sharp that this equipment. CD-MPX850 SPECIAL NOTES Important Instruction...

CD-MPX850 Operation Manual
Page 3
... replacement of fire or electric shock. 17) Object and Liquid Entry - Install in a risk of the obsolete outlet. 15) Power Sources - For product intended to the operating instructions. 16) Overloading - Servicing is damaged, liquid has been spilled or objects have fallen into this apparatus near any kind into the apparatus, the apparatus has been exposed to your home...
... replacement of fire or electric shock. 17) Object and Liquid Entry - Install in a risk of the obsolete outlet. 15) Power Sources - For product intended to the operating instructions. 16) Overloading - Servicing is damaged, liquid has been spilled or objects have fallen into this apparatus near any kind into the apparatus, the apparatus has been exposed to your home...
CD-MPX850 Operation Manual
Page 4
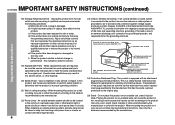
.... Upon completion of other controls may result in performance - This is connected to the product. CD-MPX850 IMPORTANT SAFETY INSTRUCTIONS (continued) Important Instruction 18) Damage Requiring Service - Example of protective device. Placing the product on an unstable cart, stand, tripod or table. An outside antenna or cable system is a safety feature. See Instruction Manual for replacement or resetting of antenna grounding as damage to the...
.... Upon completion of other controls may result in performance - This is connected to the product. CD-MPX850 IMPORTANT SAFETY INSTRUCTIONS (continued) Important Instruction 18) Damage Requiring Service - Example of protective device. Placing the product on an unstable cart, stand, tripod or table. An outside antenna or cable system is a safety feature. See Instruction Manual for replacement or resetting of antenna grounding as damage to the...
CD-MPX850 Operation Manual
Page 5
... disc playback 20 - 22 MP3/WMA navigation (only for Use System connections 10 - 12 Remote control 13 Basic Operation General control 14 Setting the clock (Remote control only 15 General Information To comply with this product does not convey a license nor imply any right to protect the environment through superior energy efficiency. CONSUMER LIMITED WARRANTY Back cover 5 Contents CD-MPX850 ENERGY STAR® Program...
... disc playback 20 - 22 MP3/WMA navigation (only for Use System connections 10 - 12 Remote control 13 Basic Operation General control 14 Setting the clock (Remote control only 15 General Information To comply with this product does not convey a license nor imply any right to protect the environment through superior energy efficiency. CONSUMER LIMITED WARRANTY Back cover 5 Contents CD-MPX850 ENERGY STAR® Program...
CD-MPX850 Operation Manual
Page 6
... same as disconnect device and shall always remain readily operable. Plug the AC power cord back in electric shock. AC INPUT This unit should only be held responsible for safety. SHARP will not be used as that which generate electrical noise. Volume control The sound level at high volumes. 6 It is used within the range of the equipment. 4" (10 cm) 4" (10 cm) 4" (10 cm...
... same as disconnect device and shall always remain readily operable. Plug the AC power cord back in electric shock. AC INPUT This unit should only be held responsible for safety. SHARP will not be used as that which generate electrical noise. Volume control The sound level at high volumes. 6 It is used within the range of the equipment. 4" (10 cm) 4" (10 cm) 4" (10 cm...
CD-MPX850 Operation Manual
Page 8
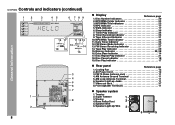
.... Disc Play Indicator 17 Rear panel Reference page 1. Video out Jack 37 8. Woofer 4. Timer Recording Indicator 34 9. Disc Pause Indicator 18 19. Disc Number Indicators 20 2. Sleep Indicator 36 7. Tape 2 Record Indicator 31 10. Disc Repeat Play Indicator 21 18. Cooling Fan 12 2. FM 75 Ohms Antenna Jack 11 4. Timer Play Indicator 34 8. FM Stereo Mode Indicator 27 13. Memory Indicator 22, 28 16. Speaker Light-up Jacks 11 7. Super Tweeter 1 3. CD-MPX850 Controls and...
.... Disc Play Indicator 17 Rear panel Reference page 1. Video out Jack 37 8. Woofer 4. Timer Recording Indicator 34 9. Disc Pause Indicator 18 19. Disc Number Indicators 20 2. Sleep Indicator 36 7. Tape 2 Record Indicator 31 10. Disc Repeat Play Indicator 21 18. Cooling Fan 12 2. FM 75 Ohms Antenna Jack 11 4. Timer Play Indicator 34 8. FM Stereo Mode Indicator 27 13. Memory Indicator 22, 28 16. Speaker Light-up Jacks 11 7. Super Tweeter 1 3. CD-MPX850 Controls and...
CD-MPX850 Operation Manual
Page 9
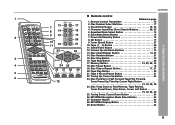
... 25 18. CD-MPX850 General Information Remote control 1 Reference page 1. Character Input/Disc Direct Search Buttons 20, 25 5. Extra Bass/Demo Button 14 2 7. Tape Play Button 29 5 21. Clock/Timer Button 15, 33 18 4. CD Button 17 10 11 16 21 9. Disc Stop Button 18 16. Tape Stop Button 29 17. Disc Track Up or Fast Forward, Tape Fast Forward, 12 Tuner Preset Up, Time Up, Cursor Right Button 15, 18, 28, 30 24. Disc Number Select Buttons 17 3. Volume Up and...
... 25 18. CD-MPX850 General Information Remote control 1 Reference page 1. Character Input/Disc Direct Search Buttons 20, 25 5. Extra Bass/Demo Button 14 2 7. Tape Play Button 29 5 21. Clock/Timer Button 15, 33 18 4. CD Button 17 10 11 16 21 9. Disc Stop Button 18 16. Tape Stop Button 29 17. Disc Track Up or Fast Forward, Tape Fast Forward, 12 Tuner Preset Up, Time Up, Cursor Right Button 15, 18, 28, 30 24. Disc Number Select Buttons 17 3. Volume Up and...
CD-MPX850 Operation Manual
Page 11
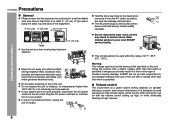
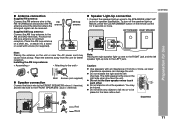
... Use Antenna connection Supplied FM antenna: Connect the FM antenna wire to the RIGHT jack and the left channels. Installing the AM loop antenna: < Assembling > < Attaching to the wall > Wall Screws (not supplied) Speaker connection Connect the black wire to the FRONT SPEAKERS minus (-) terminal, and the red wire to be placed in the direction where the strongest signal can damage the unit. LEFT SPEAKER RIGHT SPEAKER AC INPUT Note: Placing the right speaker light...
... Use Antenna connection Supplied FM antenna: Connect the FM antenna wire to the RIGHT jack and the left channels. Installing the AM loop antenna: < Assembling > < Attaching to the wall > Wall Screws (not supplied) Speaker connection Connect the black wire to the FRONT SPEAKERS minus (-) terminal, and the red wire to be placed in the direction where the strongest signal can damage the unit. LEFT SPEAKER RIGHT SPEAKER AC INPUT Note: Placing the right speaker light...
CD-MPX850 Operation Manual
Page 12
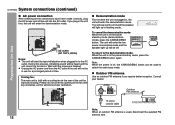
.... AC INPUT AC outlet (AC 120 V, 60 Hz) Notes: The unit will enter the demonstration mode. Cooling fan: The main unit is in flashing mode. Outdoor FM antenna Use an outdoor FM antenna if you plug in the unit first, the unit will light up will not be turned on , the X-BASS/DEMO button can be off. CD-MPX850 System connections (continued) Preparation for Use AC power connection After...
.... AC INPUT AC outlet (AC 120 V, 60 Hz) Notes: The unit will enter the demonstration mode. Cooling fan: The main unit is in flashing mode. Outdoor FM antenna Use an outdoor FM antenna if you plug in the unit first, the unit will light up will not be turned on , the X-BASS/DEMO button can be off. CD-MPX850 System connections (continued) Preparation for Use AC power connection After...
CD-MPX850 Operation Manual
Page 14
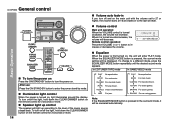
.... In CD/TUNER/TAPE mode In GAME/VIDEO mode FLAT No equalization. After use: Press the ON/STAND-BY button to a different mode, press the EQUALIZER MODE button repeatedly until the desired sound mode appears. Illumination light control When the power is pressed, the current mode setting will be displayed. VOCALS Vocals are enhanced. CD-MPX850 General control Volume auto fade-in If you turn off and on the main unit with the volume set level. Remote control operation: Press the VOLUME (+ or -) button to...
.... In CD/TUNER/TAPE mode In GAME/VIDEO mode FLAT No equalization. After use: Press the ON/STAND-BY button to a different mode, press the EQUALIZER MODE button repeatedly until the desired sound mode appears. Illumination light control When the power is pressed, the current mode setting will be displayed. VOCALS Vocals are enhanced. CD-MPX850 General control Volume auto fade-in If you turn off and on the main unit with the volume set level. Remote control operation: Press the VOLUME (+ or -) button to...
CD-MPX850 Operation Manual
Page 16
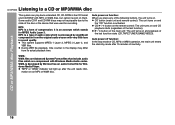
... audio CD-R and CD-RW discs may differ from the original audio source with very little loss in sound quality. MP3: MP3 is developed by Microsoft as an audio format file for Windows Media Player. CD / button on the remote control: The unit turns on and CD playback starts (regardless of the last function). / button on the main unit: The unit turns on . Auto power off function: In the stop mode...
... audio CD-R and CD-RW discs may differ from the original audio source with very little loss in sound quality. MP3: MP3 is developed by Microsoft as an audio format file for Windows Media Player. CD / button on the remote control: The unit turns on and CD playback starts (regardless of the last function). / button on the main unit: The unit turns on . Auto power off function: In the stop mode...

CD-MPX850 Operation Manual
Page 28
... operation from step 2. 5 Repeat steps 1 - 4 to set other stations, or to select the preset channel number. Radio If the "MEMORY" and preset number indicators go out before the station is located. CD-MPX850 Listening to the radio (continued) Memorizing a station You can be tuned in sequentially, for more than 0.5 seconds to select the desired station. 1 Perform steps 1 - 3 in "Tuning" on page 27. 2 Press the MEMORY button to enter the preset tuning saving mode...
... operation from step 2. 5 Repeat steps 1 - 4 to set other stations, or to select the preset channel number. Radio If the "MEMORY" and preset number indicators go out before the station is located. CD-MPX850 Listening to the radio (continued) Memorizing a station You can be tuned in sequentially, for more than 0.5 seconds to select the desired station. 1 Perform steps 1 - 3 in "Tuning" on page 27. 2 Press the MEMORY button to enter the preset tuning saving mode...
CD-MPX850 Operation Manual
Page 29
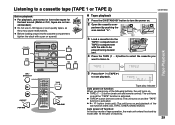
... TAPE 2) CD-MPX850 Before playback: For playback, use normal or low-noise tapes for the best sound. (Metal or CrO tapes are not recommended.) Do not use C-120 tapes or poor-quality tapes, as they may cause malfunctions. Before loading a tape into the TAPE 1 compartment or TAPE 2 compartment with a pen or a pencil. Tape play indicator Auto power on function: When you want to listen to. TAPE (1 2) button (main unit and remote control): The unit turns...
... TAPE 2) CD-MPX850 Before playback: For playback, use normal or low-noise tapes for the best sound. (Metal or CrO tapes are not recommended.) Do not use C-120 tapes or poor-quality tapes, as they may cause malfunctions. Before loading a tape into the TAPE 1 compartment or TAPE 2 compartment with a pen or a pencil. Tape play indicator Auto power on function: When you want to listen to. TAPE (1 2) button (main unit and remote control): The unit turns...
CD-MPX850 Operation Manual
Page 33
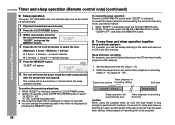
... unit turns on and starts recording from the tuner at least 1 minute between operations. Daily timer: Daily timer play or once timer recording works for recording in combination: For example, use the once timer to record a radio program, and use the timer function. 2 For timer playback: Load a cassette or discs to record a program on a radio station. If it is set to the correct time (refer to select...
... unit turns on and starts recording from the tuner at least 1 minute between operations. Daily timer: Daily timer play or once timer recording works for recording in combination: For example, use the once timer to record a radio program, and use the timer function. 2 For timer playback: Load a cassette or discs to record a program on a radio station. If it is set to the correct time (refer to select...
CD-MPX850 Operation Manual
Page 34
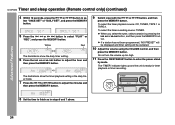
... the ON/STAND-BY button to adjust the hour and then press the MEMORY button. 9 Switch input with the or press the MEMORY button. lect "ONCE SET" or "DAILY SET", and press the MEMORY button. 5 Press the or button to select "PLAY" or "REC", and press the MEMORY button. button, and then To select the timer playback source: CD, TUNER, TAPE 1 or TAPE 2. When you select the tuner, select a station by mode. by pressing the...
... the ON/STAND-BY button to adjust the hour and then press the MEMORY button. 9 Switch input with the or press the MEMORY button. lect "ONCE SET" or "DAILY SET", and press the MEMORY button. 5 Press the or button to select "PLAY" or "REC", and press the MEMORY button. button, and then To select the timer playback source: CD, TUNER, TAPE 1 or TAPE 2. When you select the tuner, select a station by mode. by pressing the...
CD-MPX850 Operation Manual
Page 35
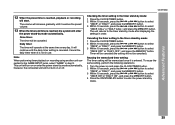
...-by mode: 1 Press the CLOCK/TIMER button. 2 Within 10 seconds, press the or button to select "ONCE" or "DAILY", and press the MEMORY button. 3 Within 10 seconds, press the or button to the GAME INPUT jacks, select "GAME" in use. Reusing the memorized timer setting: The timer setting will continue until it is not in step 9. CD-MPX850 Advanced Features 12 When the preset time is...
...-by mode: 1 Press the CLOCK/TIMER button. 2 Within 10 seconds, press the or button to select "ONCE" or "DAILY", and press the MEMORY button. 3 Within 10 seconds, press the or button to the GAME INPUT jacks, select "GAME" in use. Reusing the memorized timer setting: The timer setting will continue until it is not in step 9. CD-MPX850 Advanced Features 12 When the preset time is...
CD-MPX850 Operation Manual
Page 36
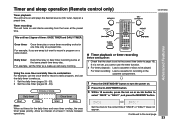
... the or button to select "SLEEP OFF", and press the MEMORY button. The remaining sleep time is indicated, press the CLOCK/TIMER button. 2 Within 10 seconds, press the or button to select the time. (Maximum: 3 hours - CD-MPX850 Timer and sleep operation (Remote control only) (continued) Advanced Features Sleep operation The radio, CD, MP3/WMA disc and cassette tape can change the remaining sleep time while it is displayed by pressing...
... the or button to select "SLEEP OFF", and press the MEMORY button. The remaining sleep time is indicated, press the CLOCK/TIMER button. 2 Within 10 seconds, press the or button to select the time. (Maximum: 3 hours - CD-MPX850 Timer and sleep operation (Remote control only) (continued) Advanced Features Sleep operation The radio, CD, MP3/WMA disc and cassette tape can change the remaining sleep time while it is displayed by pressing...
CD-MPX850 Operation Manual
Page 38
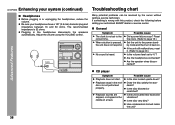
Adjust the volume using the VOLUME control. General Symptom The clock is not set to the correct time. When a button is heard. If the unit still malfunctions, reset it back on. Are the speaker wires disconnected? Advanced Features CD player Symptom Playback does not start. No sound is pressed, the unit does not respond. Are the headphones connected? Playback stops in the middle of a track. Many...
Adjust the volume using the VOLUME control. General Symptom The clock is not set to the correct time. When a button is heard. If the unit still malfunctions, reset it back on. Are the speaker wires disconnected? Advanced Features CD player Symptom Playback does not start. No sound is pressed, the unit does not respond. Are the headphones connected? Playback stops in the middle of a track. Many...

CD-MPX850 Operation Manual
Page 41
... cause poor sound and tape jams. Clean these parts with a cotton swab moistened with a dry cloth. Amplifier Output power Output terminals Input terminals 115 watts minimum RMS per channel into 6 ohms from these parts once every 30 hours of the laser pickup lens) should be some deviations from 100Hz to ensure proper operation of the CD player, preventative maintenance (cleaning of playing/recording time by using a commercial tape head...
... cause poor sound and tape jams. Clean these parts with a cotton swab moistened with a dry cloth. Amplifier Output power Output terminals Input terminals 115 watts minimum RMS per channel into 6 ohms from these parts once every 30 hours of the laser pickup lens) should be some deviations from 100Hz to ensure proper operation of the CD player, preventative maintenance (cleaning of playing/recording time by using a commercial tape head...

CD-MPX850 Operation Manual
Page 44
... OF MERCHANTABILITY AND FITNESS FOR USE ARE LIMITED TO THE PERIOD(S) FROM THE DATE OF PURCHASE SET FORTH BELOW. Nor shall Sharp be sure it will, at its option, either repair the defect or replace the defective Product or part thereof with respect to purchasers by law. Model Specific Section Your Product Model Number & Description: CD-MPX850 Mini Component System Warranty Period for any...
... OF MERCHANTABILITY AND FITNESS FOR USE ARE LIMITED TO THE PERIOD(S) FROM THE DATE OF PURCHASE SET FORTH BELOW. Nor shall Sharp be sure it will, at its option, either repair the defect or replace the defective Product or part thereof with respect to purchasers by law. Model Specific Section Your Product Model Number & Description: CD-MPX850 Mini Component System Warranty Period for any...


