
CD-ES770 Operation Manual
Page 2
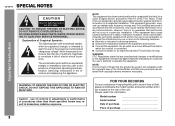
... receiving antenna. REFER SERVICING TO QUALIFIED SERVICE PERSONNEL. However, there is connected. NOTE This equipment has been tested and found to provide reasonable protection against harmful interference in case of the FCC Rules. Model number Serial number Date of purchase Place of important operating and maintenance (servicing) instructions in full compliance with the instructions, may be of sufficient magnitude to persons. CD-ES770 SPECIAL NOTES Important Instruction...
... receiving antenna. REFER SERVICING TO QUALIFIED SERVICE PERSONNEL. However, there is connected. NOTE This equipment has been tested and found to provide reasonable protection against harmful interference in case of the FCC Rules. Model number Serial number Date of purchase Place of important operating and maintenance (servicing) instructions in full compliance with the instructions, may be of sufficient magnitude to persons. CD-ES770 SPECIAL NOTES Important Instruction...
CD-ES770 Operation Manual
Page 3
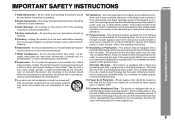
... the polarized plug. This is a safety feature. Important Instruction CD-ES770 3 This product should be blocked or covered. Alternate Warnings - See Instruction Manual for future reference. 3 Heed Warnings - Do not use instructions should be placed in a built-in the operating instructions should not be followed. 5 Cleaning - This is a safety feature. If you are not sure of the type of protective device...
... the polarized plug. This is a safety feature. Important Instruction CD-ES770 3 This product should be blocked or covered. Alternate Warnings - See Instruction Manual for future reference. 3 Heed Warnings - Do not use instructions should be placed in a built-in the operating instructions should not be followed. 5 Cleaning - This is a safety feature. If you are not sure of the type of protective device...
CD-ES770 Operation Manual
Page 4
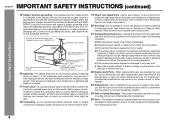
... sure the antenna or cable system is connected to the product, be sure the service technician has used replacement parts specified by the manufacturer or have fallen into the product, c) If the product has been exposed to rain or water, d) If the product does not operate normally by the operating instructions as an improper adjustment of any service or repairs to an antenna discharge...
... sure the antenna or cable system is connected to the product, be sure the service technician has used replacement parts specified by the manufacturer or have fallen into the product, c) If the product has been exposed to rain or water, d) If the product does not operate normally by the operating instructions as an improper adjustment of any service or repairs to an antenna discharge...

CD-ES770 Operation Manual
Page 5
... References Troubleshooting chart 32 - 34 Maintenance 34 Specifications 35 CONSUMER LIMITED WARRANTY Back cover 5 Contents CD-ES770 Page General Information Precautions 6 Controls and indicators 7 - 9 Preparation for Use System connections 10 - 12 Remote control 13 Basic Operation General control 14 Setting the clock 15 Important Instruction CD Playback Listening to a CD (CDs 16 - 17 Advanced CD playback 18 - 20 Radio Listening to the radio 21 - 22 Tape Playback Listening to protect the...
... References Troubleshooting chart 32 - 34 Maintenance 34 Specifications 35 CONSUMER LIMITED WARRANTY Back cover 5 Contents CD-ES770 Page General Information Precautions 6 Controls and indicators 7 - 9 Preparation for Use System connections 10 - 12 Remote control 13 Basic Operation General control 14 Setting the clock 15 Important Instruction CD Playback Listening to a CD (CDs 16 - 17 Advanced CD playback 18 - 20 Radio Listening to the radio 21 - 22 Tape Playback Listening to protect the...
CD-ES770 Operation Manual
Page 6
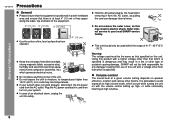
... unit. Warning: The voltage used within the range of the equipment. 4" (10 cm) 4" (10 cm) 4" (10 cm) Use the unit on this unit. Hold the AC power plug by the head when removing it from the AC outlet. Volume control The sound level at high volumes. 6 It is specified. Plug the AC power cord back in electric shock. SHARP will not be the same...
... unit. Warning: The voltage used within the range of the equipment. 4" (10 cm) 4" (10 cm) 4" (10 cm) Use the unit on this unit. Hold the AC power plug by the head when removing it from the AC outlet. Volume control The sound level at high volumes. 6 It is specified. Plug the AC power cord back in electric shock. SHARP will not be the same...
CD-ES770 Operation Manual
Page 7
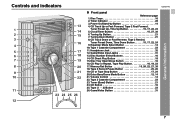
... 5. Tuning Down Button 21 8. Headphone Jack 32 12. Disc Number Select Buttons 16 14. CD or Tape Stop Button 17, 24 20. Tape 1 Cassette Compartment 23 11. Volume Control 14 22. CD Direct Play Button 18 15. Extra Bass/Demo Mode Button 12, 14 21. Disc Tray Open/Close Button 16 16. Controls and indicators 13 1 14 2 15 3 16 4 5 17 6 18 7 19 8 20 9 21 10 22 11 23 24 25 26 12 CD-ES770 Front panel Reference...
... 5. Tuning Down Button 21 8. Headphone Jack 32 12. Disc Number Select Buttons 16 14. CD or Tape Stop Button 17, 24 20. Tape 1 Cassette Compartment 23 11. Volume Control 14 22. CD Direct Play Button 18 15. Extra Bass/Demo Mode Button 12, 14 21. Disc Tray Open/Close Button 16 16. Controls and indicators 13 1 14 2 15 3 16 4 5 17 6 18 7 19 8 20 9 21 10 22 11 23 24 25 26 12 CD-ES770 Front panel Reference...
CD-ES770 Operation Manual
Page 9
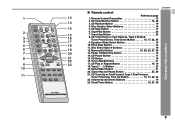
.... CD Random Button 19 4. Extra Bass Button 14 6 11. Disc Direct Search Buttons 18 19 12. CD Track Up or Fast Forward, Tape 2 Fast Forward, Tuner Preset Up, Time Up Button 15, 17, 22, 24 22. Volume Up and Down Buttons 14 23. Remote Control Transmitter 13 13 2. Disc Number Select Buttons 16 14 5. CD Track Down or Fast Reverse, Tape 2 Rewind, Tuner Preset Down, Time Down Button 15, 17, 22, 24 17 9. CD Pause Button 17 8 21 15. CD Play...
.... CD Random Button 19 4. Extra Bass Button 14 6 11. Disc Direct Search Buttons 18 19 12. CD Track Up or Fast Forward, Tape 2 Fast Forward, Tuner Preset Up, Time Up Button 15, 17, 22, 24 22. Volume Up and Down Buttons 14 23. Remote Control Transmitter 13 13 2. Disc Number Select Buttons 16 14 5. CD Track Down or Fast Reverse, Tape 2 Rewind, Tuner Preset Down, Time Down Button 15, 17, 22, 24 17 9. CD Pause Button 17 8 21 15. CD Play...
CD-ES770 Operation Manual
Page 11
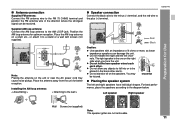
... AC power cord may Incorrect be placed in the direction where the strongest signal can damage the unit. Red Black Caution: Use speakers with screws (not supplied). Do not let the bare speaker wires touch each other. Note: Placing the antenna on a shelf, etc., or attach it to a stand or a wall with an impedance of 6 ohms or more, as lower impedance speakers can be received...
... AC power cord may Incorrect be placed in the direction where the strongest signal can damage the unit. Red Black Caution: Use speakers with screws (not supplied). Do not let the bare speaker wires touch each other. Note: Placing the antenna on a shelf, etc., or attach it to a stand or a wall with an impedance of 6 ohms or more, as lower impedance speakers can be received...
CD-ES770 Operation Manual
Page 12
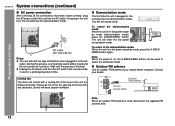
... power is used to select the extra bass mode. CD-ES770 System connections (continued) AC power connection After checking all the connections have been made correctly, plug the AC power cord of time. Consult your dealer. Please do not cover the opening of the fan with a cooling fan at the rear of the unit for a prolonged period of this will block proper ventilation. Outdoor FM antenna 75 ohm coaxial cable...
... power is used to select the extra bass mode. CD-ES770 System connections (continued) AC power connection After checking all the connections have been made correctly, plug the AC power cord of time. Consult your dealer. Please do not cover the opening of the fan with a cooling fan at the rear of the unit for a prolonged period of this will block proper ventilation. Outdoor FM antenna 75 ohm coaxial cable...
CD-ES770 Operation Manual
Page 13
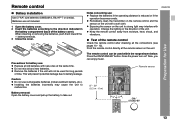
... remote control away from moisture, heat, shock, and vibrations. Does the power turn on the unit to the direction indicated in the battery compartment (back of the battery cover). Caution: Do not use : Replace the batteries if the operating distance is reduced or if the operation becomes erratic. Remote control CD-ES770 Preparation for long periods of time. Change the lighting or the direction of the unit. Remote...
... remote control away from moisture, heat, shock, and vibrations. Does the power turn on the unit to the direction indicated in the battery compartment (back of the battery cover). Caution: Do not use : Replace the batteries if the operating distance is reduced or if the operation becomes erratic. Remote control CD-ES770 Preparation for long periods of time. Change the lighting or the direction of the unit. Remote...

CD-ES770 Operation Manual
Page 14
... the extra bass mode, press the X-BASS/DEMO (X-BASS) button. CLASSIC For classical music. RACING For car racing games. Equalizer When the EQUALIZER (EQUALIZER MODE) button is turned clockwise, the volume will increase. FLAT No equalization. To change to enter the power stand-by mode. ROCK For rock music. CD-ES770 General control Volume control Main unit operation: When the VOLUME control is pressed, the current mode setting will be displayed. Remote control operation: Press the VOLUME (+ or -) button to turn on/off the light, hold down...
... the extra bass mode, press the X-BASS/DEMO (X-BASS) button. CLASSIC For classical music. RACING For car racing games. Equalizer When the EQUALIZER (EQUALIZER MODE) button is turned clockwise, the volume will increase. FLAT No equalization. To change to enter the power stand-by mode. ROCK For rock music. CD-ES770 General control Volume control Main unit operation: When the VOLUME control is pressed, the current mode setting will be displayed. Remote control operation: Press the VOLUME (+ or -) button to turn on/off the light, hold down...
CD-ES770 Operation Manual
Page 15
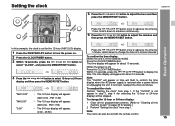
...programmed contents. [Refer to change the 12-hour or 24-hour display: 1 Clear all the memory (reset)" on page 33 for about 10 seconds. [When the power is restored after a power failure or unplugging the unit. To change the time in the stand-by mode] Press the CLOCK/TIMER button. Basic Operation Press the or button once to advance the time...or button to select "CLOCK", and press the MEMORY/SET button. If incorrect, readjust the clock as follows. Setting the clock CD-ES770 5 Press the or button to display the time. "AM 12:00" "AM 0:00" "0:00" The 12-hour display ...
...programmed contents. [Refer to change the 12-hour or 24-hour display: 1 Clear all the memory (reset)" on page 33 for about 10 seconds. [When the power is restored after a power failure or unplugging the unit. To change the time in the stand-by mode] Press the CLOCK/TIMER button. Basic Operation Press the or button once to advance the time...or button to select "CLOCK", and press the MEMORY/SET button. If incorrect, readjust the clock as follows. Setting the clock CD-ES770 5 Press the or button to display the time. "AM 12:00" "AM 0:00" "0:00" The 12-hour display ...
CD-ES770 Operation Manual
Page 22
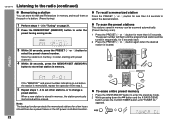
...-BY button to select the desired station. To recall a memorized station Press the PRESET ( or ) button for more than 0.5 seconds to enter the stand-by mode. 2 While pressing down the button and the X-BASS/DEMO button, press the CLOCK/TIMER button until "TUNER CL" appears. 22 The preset number will flash and the programmed stations will be a power failure or the AC power cord disconnection. Note: The backup function protects the memorized stations for...
...-BY button to select the desired station. To recall a memorized station Press the PRESET ( or ) button for more than 0.5 seconds to enter the stand-by mode. 2 While pressing down the button and the X-BASS/DEMO button, press the CLOCK/TIMER button until "TUNER CL" appears. 22 The preset number will flash and the programmed stations will be a power failure or the AC power cord disconnection. Note: The backup function protects the memorized stations for...
CD-ES770 Operation Manual
Page 27
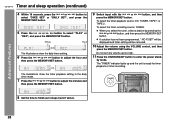
... example, use the once timer to record a radio program, and use the timer function. 2 For timer playback: Load a cassette or discs to select "ONCE" or "DAILY", and press the MEMORY/SET button. Set the unit to the next page 27 For example, if you cannot use the daily timer to record a program on and plays the desired source (CD, tuner, tape) at the preset time. If it is set , you...
... example, use the once timer to record a radio program, and use the timer function. 2 For timer playback: Load a cassette or discs to select "ONCE" or "DAILY", and press the MEMORY/SET button. Set the unit to the next page 27 For example, if you cannot use the daily timer to record a program on and plays the desired source (CD, tuner, tape) at the preset time. If it is set , you...
CD-ES770 Operation Manual
Page 28
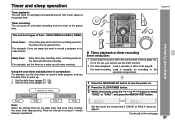
... you select the tuner, select a station by mode. Do not turn the volume up and the unit is ready for timer playback or timer recording. If a station has not been programmed, " NO P.SET" will be displayed and timer setting will be canceled. 10 Adjust the volume using the VOLUME control, and then press the MEMORY/SET button. CD-ES770 Timer and sleep operation (continued) 4 Within 10 seconds, press the or button to select "ONCE SET...
... you select the tuner, select a station by mode. Do not turn the volume up and the unit is ready for timer playback or timer recording. If a station has not been programmed, " NO P.SET" will be displayed and timer setting will be canceled. 10 Adjust the volume using the VOLUME control, and then press the MEMORY/SET button. CD-ES770 Timer and sleep operation (continued) 4 Within 10 seconds, press the or button to select "ONCE SET...
CD-ES770 Operation Manual
Page 29
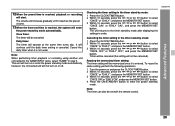
... the MEMORY/SET button. CD-ES770 Advanced Features 12 When the preset time is reached, the system will enter the power stand-by mode automatically. It will continue until it reaches the preset volume. 13 When the timer end time is reached, playback or recording will start. This unit will turn on or enter the power stand-by mode automatically, however, the connected unit will...
... the MEMORY/SET button. CD-ES770 Advanced Features 12 When the preset time is reached, the system will enter the power stand-by mode automatically. It will continue until it reaches the preset volume. 13 When the timer end time is reached, playback or recording will start. This unit will turn on or enter the power stand-by mode automatically, however, the connected unit will...
CD-ES770 Operation Manual
Page 30
... sleep and wake up to select the time. (Maximum: 3 hours - CD-ES770 Timer and sleep operation (continued) Advanced Features Sleep operation The radio, compact disc and cassette tape can all be turned off automatically. 1 Play back the desired sound source. 2 Press the CLOCK/TIMER button. 3 Within 10 seconds, press the or button to select "SLEEP", and press the MEMORY/SET button. 4 Press the or button to CD in the next morning...
... sleep and wake up to select the time. (Maximum: 3 hours - CD-ES770 Timer and sleep operation (continued) Advanced Features Sleep operation The radio, compact disc and cassette tape can all be turned off automatically. 1 Play back the desired sound source. 2 Press the CLOCK/TIMER button. 3 Within 10 seconds, press the or button to select "SLEEP", and press the MEMORY/SET button. 4 Press the or button to CD in the next morning...
CD-ES770 Operation Manual
Page 32
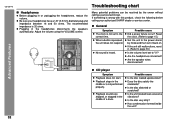
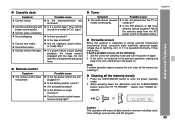
... the headphones connected? Adjust the volume using the VOLUME control. General Symptom The clock is not performed properly. Is the disc distorted or scratched? Has condensation formed inside the unit? 32 Advanced Features CD-ES770 Troubleshooting chart Headphones Before plugging in the headphones disconnects the speakers automatically. Possible cause Is the disc loaded upside down? Be sure your authorized SHARP dealer or service center. Reset the clock...
... the headphones connected? Adjust the volume using the VOLUME control. General Symptom The clock is not performed properly. Is the disc distorted or scratched? Has condensation formed inside the unit? 32 Advanced Features CD-ES770 Troubleshooting chart Headphones Before plugging in the headphones disconnects the speakers automatically. Possible cause Is the disc loaded upside down? Be sure your authorized SHARP dealer or service center. Reset the clock...
CD-ES770 Operation Manual
Page 33
... memory (reset) 1 Press the ON/STAND-BY button to the stand-by mode and turn the power on a metal or CrO tape.) Is there any slack? Cassette deck Symptom Cannot record. Is the tape stretched? Possible cause Is the AC power cord of the unit plugged in memory including clock, timer settings, tuner preset, and CD program. 33 Does the remote control sensor receive strong light? Move the antenna away from...
... memory (reset) 1 Press the ON/STAND-BY button to the stand-by mode and turn the power on a metal or CrO tape.) Is there any slack? Cassette deck Symptom Cannot record. Is the tape stretched? Possible cause Is the AC power cord of the unit plugged in memory including clock, timer settings, tuner preset, and CD program. 33 Does the remote control sensor receive strong light? Move the antenna away from...
CD-ES770 Operation Manual
Page 35
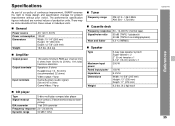
... distortion Speakers: 6 ohms Headphones: 16 - 50 ohms (recommended: 32 ohms) Video output: 1Vp-p Game/Auxiliary (audio signal): 500 mV/47 k ohms Game/Video: 1Vp-p CD player Type 5-disc multi-play compact disc player Signal readout Non-contact, 3-beam semiconductor laser pickup D/A converter 1-bit D/A converter Frequency response 20 - 20,000 Hz Dynamic range 90 dB (1 kHz) Tuner Frequency range FM: 87.5 - 108.0 MHz AM: 530 - 1,720 kHz Cassette deck Frequency response 50 - 14,000 Hz (normal tape) Signal/noise...
... distortion Speakers: 6 ohms Headphones: 16 - 50 ohms (recommended: 32 ohms) Video output: 1Vp-p Game/Auxiliary (audio signal): 500 mV/47 k ohms Game/Video: 1Vp-p CD player Type 5-disc multi-play compact disc player Signal readout Non-contact, 3-beam semiconductor laser pickup D/A converter 1-bit D/A converter Frequency response 20 - 20,000 Hz Dynamic range 90 dB (1 kHz) Tuner Frequency range FM: 87.5 - 108.0 MHz AM: 530 - 1,720 kHz Cassette deck Frequency response 50 - 14,000 Hz (normal tape) Signal/noise...


