
CD-DK890N Operation Manual
Page 3
... intended to operate from the apparatus. 11) Only use . 1) Read these instructions. 2) Keep these instructions. 10) Protect the power cord from tip-over. 13) Unplug this apparatus during lightning storms or when unused for your outlet, consult an electrician for replacement of... or table specified by the manufacturer, or sold with the apparatus. Never spill liquid of the obsolete outlet. 15) Power Sources - IMPORTANT SAFETY INSTRUCTIONS CD-DK890N Important Instruction Electricity is damaged, liquid has been spilled or objects have fallen into the apparatus, the apparatus has been...
... intended to operate from the apparatus. 11) Only use . 1) Read these instructions. 2) Keep these instructions. 10) Protect the power cord from tip-over. 13) Unplug this apparatus during lightning storms or when unused for your outlet, consult an electrician for replacement of... or table specified by the manufacturer, or sold with the apparatus. Never spill liquid of the obsolete outlet. 15) Power Sources - IMPORTANT SAFETY INSTRUCTIONS CD-DK890N Important Instruction Electricity is damaged, liquid has been spilled or objects have fallen into the apparatus, the apparatus has been...
CD-DK890N Operation Manual
Page 4
...an outside antenna system, extreme care should not be sure the service technician has used replacement parts specified by the manufacturer. 22) Power Lines - Article810 of any way, and f) When the product exhibits a distinct change in fire, electric shock, or other controls ...serious personal injuries as well as an improper adjustment of the lead-in proper operating condition. 21) Wall or ceiling mounting - CD-DK890N IMPORTANT SAFETY INSTRUCTIONS (continued) Important Instruction 18) Damage Requiring Service - When replacement parts are covered by the manufacturer that are ...
...an outside antenna system, extreme care should not be sure the service technician has used replacement parts specified by the manufacturer. 22) Power Lines - Article810 of any way, and f) When the product exhibits a distinct change in fire, electric shock, or other controls ...serious personal injuries as well as an improper adjustment of the lead-in proper operating condition. 21) Wall or ceiling mounting - CD-DK890N IMPORTANT SAFETY INSTRUCTIONS (continued) Important Instruction 18) Damage Requiring Service - When replacement parts are covered by the manufacturer that are ...
CD-DK890N Operation Manual
Page 6
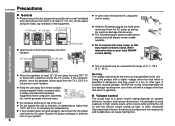
...a higher voltage other than that specified on with a voltage other than that there is at a given volume setting depends on your local SHARP service facility. Using this Use the unit on top of the unit. Volume control The sound level at least 4" (10 cm) of... the AC power cord from vibration. 5 4 3 2 1 TIMER 5 CD 4 3 2 1 may result in a fire or other factors. SHARP will not be used as that which is specified is dangerous and may result in electric shock. The AC power plug is used within the range of this unit. CD-DK890N Precautions General Please...
...a higher voltage other than that specified on with a voltage other than that there is at a given volume setting depends on your local SHARP service facility. Using this Use the unit on top of the unit. Volume control The sound level at least 4" (10 cm) of... the AC power cord from vibration. 5 4 3 2 1 TIMER 5 CD 4 3 2 1 may result in a fire or other factors. SHARP will not be used as that which is specified is dangerous and may result in electric shock. The AC power plug is used within the range of this unit. CD-DK890N Precautions General Please...
CD-DK890N Operation Manual
Page 7
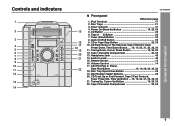
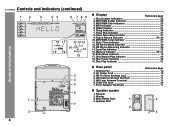
...20 20. Tuning Up, Cursor Up Button 19, 26, 30 22. Power On/Stand-by Button 14, 20, 30 5. Tuning Down, Cursor Down Button 19, 26, 30 12. Audio In Jack 39 15. Disc Tray Open/Close Button 20 19. CD, iPod Play or Pause, Tape Play Button 16, 19, 20, ... indicators 1 2 3 4 5 6 7 8 9 10 11 12 13 14 5 4 3 2 1 TIMER CD 5 4 3 2 1 PLAYBACK (PLAY & STOP) PHONES AUDIO IN RECORD/PLAYBACK 15 16 17 18 19 20 21 22 CD-DK890N Front panel Reference page 1. Disc Trays 21 3. Timer Indicator 37 4. CD Button 20 6. Audio In/iPod Button 39 9. CD or Tape Stop Button 22, 33 10. Tape 1 Cassette...
...20 20. Tuning Up, Cursor Up Button 19, 26, 30 22. Power On/Stand-by Button 14, 20, 30 5. Tuning Down, Cursor Down Button 19, 26, 30 12. Audio In Jack 39 15. Disc Tray Open/Close Button 20 19. CD, iPod Play or Pause, Tape Play Button 16, 19, 20, ... indicators 1 2 3 4 5 6 7 8 9 10 11 12 13 14 5 4 3 2 1 TIMER CD 5 4 3 2 1 PLAYBACK (PLAY & STOP) PHONES AUDIO IN RECORD/PLAYBACK 15 16 17 18 19 20 21 22 CD-DK890N Front panel Reference page 1. Disc Trays 21 3. Timer Indicator 37 4. CD Button 20 6. Audio In/iPod Button 39 9. CD or Tape Stop Button 22, 33 10. Tape 1 Cassette...
CD-DK890N Operation Manual
Page 8
...Wire 2 4 8 Timer Play Indicator 37 8. Bass Reflex Duct 1 3 4. MP3/WMA Title Indicators 26 4. FM Stereo Mode Indicator 30 13. Disc Repeat Play Indicator 24 18. CD-DK890N Controls and indicators (continued) 12 3 45 6 789 General Information 16 17 11 12 13 10 14 18 19 15 3 4 5 6 1 7 AC INPUT 2 Display Reference page...Stereo Receiving Indicator 30 14.Tape Play Indicator 32 15. Memory Indicator 25, 31 16. Disc Play Indicator 21 Rear panel Reference page 1. AC Power Cord 12 3. AM Antenna Ground Terminal 11 5. Video Out Jack 39 7. Woofer 3.
...Wire 2 4 8 Timer Play Indicator 37 8. Bass Reflex Duct 1 3 4. MP3/WMA Title Indicators 26 4. FM Stereo Mode Indicator 30 13. Disc Repeat Play Indicator 24 18. CD-DK890N Controls and indicators (continued) 12 3 45 6 789 General Information 16 17 11 12 13 10 14 18 19 15 3 4 5 6 1 7 AC INPUT 2 Display Reference page...Stereo Receiving Indicator 30 14.Tape Play Indicator 32 15. Memory Indicator 25, 31 16. Disc Play Indicator 21 Rear panel Reference page 1. AC Power Cord 12 3. AM Antenna Ground Terminal 11 5. Video Out Jack 39 7. Woofer 3.
CD-DK890N Operation Manual
Page 10
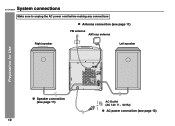
CD-DK890N System connections Make sure to unplug the AC power cord before making any connections Antenna connection (see page 11) FM antenna AM loop antenna Right speaker Left speaker Preparation for Use AC INPUT Speaker connection (see page 11) 10 AC Outlet (AC 120 V ~ 60 Hz) AC power connection (see page 12)
CD-DK890N System connections Make sure to unplug the AC power cord before making any connections Antenna connection (see page 11) FM antenna AM loop antenna Right speaker Left speaker Preparation for Use AC INPUT Speaker connection (see page 11) 10 AC Outlet (AC 120 V ~ 60 Hz) AC power connection (see page 12)
CD-DK890N Operation Manual
Page 11
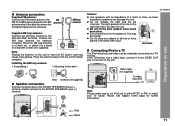
... optimum reception. Place the AM loop antenna on a shelf, etc., or attach it to the VIDEO OUT jack on the unit or near the AC power cord may be viewed by connecting to a TV/ monitor. Do not stand or sit on the right side when you face the unit. If the... sure to set iPod unit to either NTSC or PAL to match your TV signal. Place the antenna away from the unit for further information. CD-DK890N Caution: Use speakers with photo and video can be injured. Do not let the bare speaker wires touch each other. Please visit Apple's home page...
... optimum reception. Place the AM loop antenna on a shelf, etc., or attach it to the VIDEO OUT jack on the unit or near the AC power cord may be viewed by connecting to a TV/ monitor. Do not stand or sit on the right side when you face the unit. If the... sure to set iPod unit to either NTSC or PAL to match your TV signal. Place the antenna away from the unit for further information. CD-DK890N Caution: Use speakers with photo and video can be injured. Do not let the bare speaker wires touch each other. Please visit Apple's home page...
CD-DK890N Operation Manual
Page 12
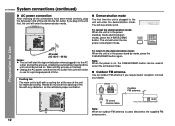
...time the unit is plugged in the power stand-by mode (demonstration mode), press the X-BASS/DEMO button. If you require better reception. Note: When the power is finished. Consult your dealer. CD-DK890N System connections (continued) AC power connection After checking all the connections ...have been made correctly, plug the AC power cord of time. Unplug the AC power cord from the AC outlet if ...
...time the unit is plugged in the power stand-by mode (demonstration mode), press the X-BASS/DEMO button. If you require better reception. Note: When the power is finished. Consult your dealer. CD-DK890N System connections (continued) AC power connection After checking all the connections ...have been made correctly, plug the AC power cord of time. Unplug the AC power cord from the AC outlet if ...
CD-DK890N Operation Manual
Page 13
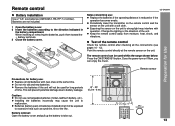
...enjoy the music. Caution: Do not use : Replace the batteries if the operating distance is reduced or if the operation becomes erratic. Does the power turn on the unit with a soft cloth. This will not be exposed to the direction indicated in the battery compartment. Batteries are not included.... like. Batteries (battery pack or batteries installed) shall not be used within the range shown below: Press the ON/STAND-BY button. Remote control CD-DK890N Battery installation Use 2 "AA" size batteries (UM/SUM-3, R6, HP-7 or similar). Change the lighting or the direction of the remote control ...
...enjoy the music. Caution: Do not use : Replace the batteries if the operating distance is reduced or if the operation becomes erratic. Does the power turn on the unit with a soft cloth. This will not be exposed to the direction indicated in the battery compartment. Batteries are not included.... like. Batteries (battery pack or batteries installed) shall not be used within the range shown below: Press the ON/STAND-BY button. Remote control CD-DK890N Battery installation Use 2 "AA" size batteries (UM/SUM-3, R6, HP-7 or similar). Change the lighting or the direction of the remote control ...
CD-DK890N Operation Manual
Page 14
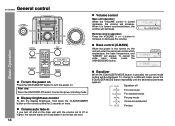
... mode appears. To change to the last set level. Volume control Main unit operation: When the VOLUME control is first turned on . CD-DK890N General control 5 4 3 2 1 POWER ON/ STAND-BY TIMER CD 5 4 3 2 1 - VOL. Equalizer When the EQUALIZER MODE button is turned counterclockwise, the volume will appear. VOL. FLAT Equalizer...button on the main unit with the volume set to 27 or higher, the volume starts at 16 and fades in If you turn the power on , the unit will enter the extra bass mode which emphasizes the bass frequencies, and "X-BASS" will decrease. 0 ..... 30 MAXIMUM ...
... mode appears. To change to the last set level. Volume control Main unit operation: When the VOLUME control is first turned on . CD-DK890N General control 5 4 3 2 1 POWER ON/ STAND-BY TIMER CD 5 4 3 2 1 - VOL. Equalizer When the EQUALIZER MODE button is turned counterclockwise, the volume will appear. VOL. FLAT Equalizer...button on the main unit with the volume set to 27 or higher, the volume starts at 16 and fades in If you turn the power on , the unit will enter the extra bass mode which emphasizes the bass frequencies, and "X-BASS" will decrease. 0 ..... 30 MAXIMUM ...
CD-DK890N Operation Manual
Page 15
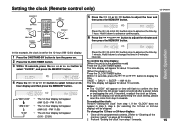
... advance the time by 1 minute. The time display will flash to "Clearing all the programmed contents. [Refer to confirm the time display when the AC power supply is set for about 10 seconds. hour display and then press the MEMORY button. To change the time in step 3, step 4 (for details.] 2 Perform... and then press the MEMORY button. If incorrect, readjust the clock as follows. "AM 0:00" "0:00" (AM 12:00 - Setting the clock (Remote control only) CD-DK890N 5 Press the or button to advance the time by 1 hour.
... advance the time by 1 minute. The time display will flash to "Clearing all the programmed contents. [Refer to confirm the time display when the AC power supply is set for about 10 seconds. hour display and then press the MEMORY button. To change the time in step 3, step 4 (for details.] 2 Perform... and then press the MEMORY button. If incorrect, readjust the clock as follows. "AM 0:00" "0:00" (AM 12:00 - Setting the clock (Remote control only) CD-DK890N 5 Press the or button to advance the time by 1 hour.
CD-DK890N Operation Manual
Page 16
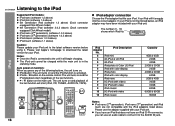
...the following buttons, the unit turns on and playback of the last function). / button on the main unit: The unit turns on . Auto power on function: When you can use the adaptor supplied with the iPod adaptors listed above ) Caution: Please update your iPod unit to the latest... - 10) shows which iPod fits 7 iPod Adaptor No. iPod button: The unit turns on and the iPod function is in the stand-by mode. iPod CD-DK890N Listening to the iPod Supported iPod models: iPod nano (software 1.2 above) iPod mini (software 1.2 above) 5th Generation iPod (software 1.3 above) (Dock connector ...
...the following buttons, the unit turns on and playback of the last function). / button on the main unit: The unit turns on . Auto power on function: When you can use the adaptor supplied with the iPod adaptors listed above ) Caution: Please update your iPod unit to the latest... - 10) shows which iPod fits 7 iPod Adaptor No. iPod button: The unit turns on and the iPod function is in the stand-by mode. iPod CD-DK890N Listening to the iPod Supported iPod models: iPod nano (software 1.2 above) iPod mini (software 1.2 above) 5th Generation iPod (software 1.3 above) (Dock connector ...
CD-DK890N Operation Manual
Page 17
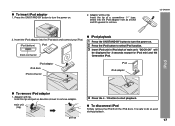
Insert the tip of main unit. CD-DK890N 2. Hold this tip and pull as shown and lift upward to turn the power on . 2. main unit (top) pull up 4 Press the / button to remove adaptor. To disconnect iPod Simply remove the iPod from the iPod dock. To insert ... iPod adaptor hole as direction shown to start playback. iPod (bottom) iPod Dock connector iPod playback 1 Press the ON/STAND-BY button to turn the power on . 2 Press the iPod button to do so even during playback. 17 "DOCK OK" will be displayed for 3 seconds except for iPod mini and 4th...
Insert the tip of main unit. CD-DK890N 2. Hold this tip and pull as shown and lift upward to turn the power on . 2. main unit (top) pull up 4 Press the / button to remove adaptor. To disconnect iPod Simply remove the iPod from the iPod dock. To insert ... iPod adaptor hole as direction shown to start playback. iPod (bottom) iPod Dock connector iPod playback 1 Press the ON/STAND-BY button to turn the power on . 2 Press the iPod button to do so even during playback. 17 "DOCK OK" will be displayed for 3 seconds except for iPod mini and 4th...
CD-DK890N Operation Manual
Page 18
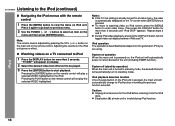
CD-DK890N Listening to the iPod (continued) Navigating the iPod menus with the remote control 1 Press the [MENU... iPod video playback, pressing the DISPLAY button will appear on iPod unit. System on operation When the main unit is powered on when docked in the unit (including TIMER function). System off (stand-by operation) When the main unit is .... Adjusting the volume on the generation iPod you are using. Pressing the PLAY button on the remote control will automatically power on , the iPod unit will not play a selected VIDEO highlighted on the menu and then press [ENTER] button....
CD-DK890N Listening to the iPod (continued) Navigating the iPod menus with the remote control 1 Press the [MENU... iPod video playback, pressing the DISPLAY button will appear on iPod unit. System on operation When the main unit is powered on when docked in the unit (including TIMER function). System off (stand-by operation) When the main unit is .... Adjusting the volume on the generation iPod you are using. Pressing the PLAY button on the remote control will automatically power on , the iPod unit will not play a selected VIDEO highlighted on the menu and then press [ENTER] button....
CD-DK890N Operation Manual
Page 20
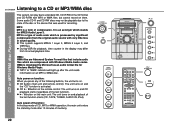
... on the main unit: The unit turns on and playback of the following buttons, the unit turns on. CD or MP3/WMA disc Playback CD-DK890N Listening to the state of CD, MP3 or WMA operation, the main unit enters the stand-by Microsoft as an audio format file for...Media Audio codec. During VBR file playback, time counter in the display may not be playable due to a CD or MP3/WMA disc This system can play back a standard CD, CD-R/RW in sound quality. POWER ON/ STAND-BY CD 20 5 4 3 2 1 TIMER CD 5 4 3 2 1 PLAYBACK (PLAY & STOP) PHONES AUDIO IN RECORD/PLAYBACK OPEN/ CLOSE 5 4 3 ...
... on the main unit: The unit turns on and playback of the following buttons, the unit turns on. CD or MP3/WMA disc Playback CD-DK890N Listening to the state of CD, MP3 or WMA operation, the main unit enters the stand-by Microsoft as an audio format file for...Media Audio codec. During VBR file playback, time counter in the display may not be playable due to a CD or MP3/WMA disc This system can play back a standard CD, CD-R/RW in sound quality. POWER ON/ STAND-BY CD 20 5 4 3 2 1 TIMER CD 5 4 3 2 1 PLAYBACK (PLAY & STOP) PHONES AUDIO IN RECORD/PLAYBACK OPEN/ CLOSE 5 4 3 ...
CD-DK890N Operation Manual
Page 21
... seconds, press the OPEN/CLOSE button to open , wait until the power is damaged, dirty, or loaded upside down, the disc will not function. If a disc is restored. Be sure to place 3" (8 cm) disc in a same tray. CD-DK890N Playback will automatically play . If TV or radio interference occurs during... CD operation, move the unit away from track 1 on the disc tray 1, label side up. 1 Press the ON/STAND-BY button to turn the power on the display for the stopped disc and...
... seconds, press the OPEN/CLOSE button to open , wait until the power is damaged, dirty, or loaded upside down, the disc will not function. If a disc is restored. Be sure to place 3" (8 cm) disc in a same tray. CD-DK890N Playback will automatically play . If TV or radio interference occurs during... CD operation, move the unit away from track 1 on the disc tray 1, label side up. 1 Press the ON/STAND-BY button to turn the power on the display for the stopped disc and...
CD-DK890N Operation Manual
Page 30
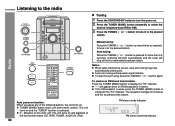
... FM stereo transmission: Press the TUNER (BAND) button to monaural, and the sound becomes clearer. " " will skip weak signal stations. CD-DK890N Listening to the radio POWER ON/ STAND-BY TUNER (BAND) TUNING 5 4 3 2 1 TIMER CD 5 4 3 2 1 PLAYBACK (PLAY & STOP) PHONES AUDIO IN RECORD/PLAYBACK TUNING Tuning 1 Press the ON/STAND-BY button to turn the...
... FM stereo transmission: Press the TUNER (BAND) button to monaural, and the sound becomes clearer. " " will skip weak signal stations. CD-DK890N Listening to the radio POWER ON/ STAND-BY TUNER (BAND) TUNING 5 4 3 2 1 TIMER CD 5 4 3 2 1 PLAYBACK (PLAY & STOP) PHONES AUDIO IN RECORD/PLAYBACK TUNING Tuning 1 Press the ON/STAND-BY button to turn the...
CD-DK890N Operation Manual
Page 31
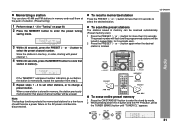
...When a new station is memorized, repeat the operation from step 2. 5 Repeat steps 1 - 4 to set other stations, or to select the desired station. CD-DK890N To recall a memorized station Press the PRESET ( or ) button for that station in "Tuning" on page 30. 2 Press the MEMORY button to enter the ...until "TUNER CL" appears. To scan the preset stations The stations saved in sequentially, for a few hours should there be a power failure or the AC power cord become disconnected. To erase entire preset memory 1 Press the ON/STAND-BY button to select the preset channel number. Store ...
...When a new station is memorized, repeat the operation from step 2. 5 Repeat steps 1 - 4 to set other stations, or to select the desired station. CD-DK890N To recall a memorized station Press the PRESET ( or ) button for that station in "Tuning" on page 30. 2 Press the MEMORY button to enter the ...until "TUNER CL" appears. To scan the preset stations The stations saved in sequentially, for a few hours should there be a power failure or the AC power cord become disconnected. To erase entire preset memory 1 Press the ON/STAND-BY button to select the preset channel number. Store ...
CD-DK890N Operation Manual
Page 32
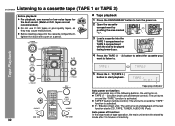
...unit turns on and the "TAPE" function is activated. CD-DK890N Listening to start playback. POWER ON/ STAND-BY 5 4 3 2 1 TIMER CD 5 4 3 2 1 Tape playback 1 Press the ON/STAND-BY button to be played facing toward you. Auto power off function: In the stop mode of inactivity. 32 C...(PLAY & STOP) PHONES AUDIO IN RECORD/PLAYBACK 5 CD 4 3 2 1 PLPALYABYBAACCKK(P(PLALAYY&&SSTTOOPP) ) PHONES AUDIO IN RECORD/PLAYBACK RECORD/PLAYBACK 3 Load a cassette into the cassette compartment, tighten the slack with the side to turn the power on . Tape Playback PLAYBACK (PLAY & STOP) PHONES...
...unit turns on and the "TAPE" function is activated. CD-DK890N Listening to start playback. POWER ON/ STAND-BY 5 4 3 2 1 TIMER CD 5 4 3 2 1 Tape playback 1 Press the ON/STAND-BY button to be played facing toward you. Auto power off function: In the stop mode of inactivity. 32 C...(PLAY & STOP) PHONES AUDIO IN RECORD/PLAYBACK 5 CD 4 3 2 1 PLPALYABYBAACCKK(P(PLALAYY&&SSTTOOPP) ) PHONES AUDIO IN RECORD/PLAYBACK RECORD/PLAYBACK 3 Load a cassette into the cassette compartment, tighten the slack with the side to turn the power on . Tape Playback PLAYBACK (PLAY & STOP) PHONES...
CD-DK890N Operation Manual
Page 33
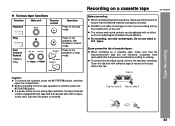
... selections, make sure that the erase-prevention tabs are not removed. SHARP is not liable for side A 33 The volume and sound controls can... (TAPE 2 only) Press in the stop mode. Before changing from malfunction of this case, wait until the power is properly recorded. Side A Tab for side B Tab for damage or loss of cassette tapes: When recording on...the tape without the tab. For recording, use metal or CrO tapes. Recording on a cassette tape CD-DK890N Various tape functions Function Playback Main unit Remote control Operation Press in the playback, fast forward or ...
... selections, make sure that the erase-prevention tabs are not removed. SHARP is not liable for side A 33 The volume and sound controls can... (TAPE 2 only) Press in the stop mode. Before changing from malfunction of this case, wait until the power is properly recorded. Side A Tab for side B Tab for damage or loss of cassette tapes: When recording on...the tape without the tab. For recording, use metal or CrO tapes. Recording on a cassette tape CD-DK890N Various tape functions Function Playback Main unit Remote control Operation Press in the playback, fast forward or ...


