
LC-37D40U | LC-45D40U Operation Manual
Page 7
... stand, unplug the AC cord from being damaged. 1. Soft cushion Hex key 4. Insert the stand into the 4 holes on the rear of the TV. Insert and tighten the 4 long screws into the opening on . Hex key Long screw NOTE • To detach the stand, perform the steps... using the 4 short screws and the hex key (supplied with the TV. Short screw 3. Supplied accessories Make sure the following accessories are provided with the TV. Attach the two parts of the TV. Confirm the 8 screws supplied with the product. Remote control unit (g1) "AAA" size battery (g2) AC cord (g1...
... stand, unplug the AC cord from being damaged. 1. Soft cushion Hex key 4. Insert the stand into the 4 holes on the rear of the TV. Insert and tighten the 4 long screws into the opening on . Hex key Long screw NOTE • To detach the stand, perform the steps... using the 4 short screws and the hex key (supplied with the TV. Short screw 3. Supplied accessories Make sure the following accessories are provided with the TV. Attach the two parts of the TV. Confirm the 8 screws supplied with the product. Remote control unit (g1) "AAA" size battery (g2) AC cord (g1...
LC-37D40U | LC-45D40U Operation Manual
Page 9
... (f) indications in the battery compartment. If the POWER indicator on the AQUOS television still does not light up, press TV POWER on the remote control to the BASIC ADJUSTMENT SETTINGS SECTION for EZ Setup and basic channel setup functions and USING EXTERNAL EQUIPMENT SECTION for ...TV functions, replace the batteries in the remote control unit. 1 Open the battery cover. 2 Insert two "AAA" size batteries (supplied with the product). 3 Close the battery cover. • Place the batteries with skin can cause a rash. IF YOU STILL ENCOUNTER NO POWER, PLEASE CONTACT US AT 1-800-BE-SHARP...
... (f) indications in the battery compartment. If the POWER indicator on the AQUOS television still does not light up, press TV POWER on the remote control to the BASIC ADJUSTMENT SETTINGS SECTION for EZ Setup and basic channel setup functions and USING EXTERNAL EQUIPMENT SECTION for ...TV functions, replace the batteries in the remote control unit. 1 Open the battery cover. 2 Insert two "AAA" size batteries (supplied with the product). 3 Close the battery cover. • Place the batteries with skin can cause a rash. IF YOU STILL ENCOUNTER NO POWER, PLEASE CONTACT US AT 1-800-BE-SHARP...
LC-37D40U | LC-45D40U Operation Manual
Page 10
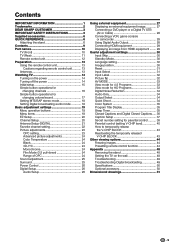
... DEAR SHARP CUSTOMER 3 IMPORTANT SAFETY INSTRUCTIONS 3 Supplied accessories 6 QUICK REFERENCE 6 Attaching the stand 6 Contents 9 Part names 10 TV (Front 10 TV (Rear 11 Remote control unit 12 Preparation 13 Using the remote control unit 13 Cautions regarding remote control unit........... 13 Antennas 13 Watching TV 14 ... Color System 35 Program Title Display 35 Sleep Timer 35 Closed Captions and Digital Closed Captions..... 36 Caption Setup 37 Secret number setting for parental control........... 38 Parental control (setting V-CHIP level 40 How to temporarily release the ...
... DEAR SHARP CUSTOMER 3 IMPORTANT SAFETY INSTRUCTIONS 3 Supplied accessories 6 QUICK REFERENCE 6 Attaching the stand 6 Contents 9 Part names 10 TV (Front 10 TV (Rear 11 Remote control unit 12 Preparation 13 Using the remote control unit 13 Cautions regarding remote control unit........... 13 Antennas 13 Watching TV 14 ... Color System 35 Program Title Display 35 Sleep Timer 35 Closed Captions and Digital Closed Captions..... 36 Caption Setup 37 Secret number setting for parental control........... 38 Parental control (setting V-CHIP level 40 How to temporarily release the ...
LC-37D40U | LC-45D40U Operation Manual
Page 13
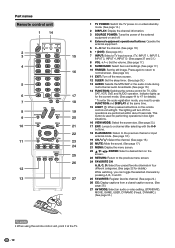
... 15 LIGHT D: When pressed all buttons on the remote 19 control unit will turn off . 4 External equipment operational buttons: Operate the external equipment. 5 0 - 9: Set the channel. (See page 16.) 6 • (DOT): (See page 46.) 15 7 INPUT: Select a TV input source. (TV, INPUT 1, INPUT 2, INPUT 3, INPUT 4, INPUT... up 17 for the current mode. (See pages 44 to press FUNCTION and DISPLAY at the TV. 12 Part names Remote control unit 1 14 2 3 4 5 6 7 8 9 10 11 12 13 1 TV POWER: Switch the TV power on or enters standby mode. (See page 14.) 2 DISPLAY: Display the channel information....
... 15 LIGHT D: When pressed all buttons on the remote 19 control unit will turn off . 4 External equipment operational buttons: Operate the external equipment. 5 0 - 9: Set the channel. (See page 16.) 6 • (DOT): (See page 46.) 15 7 INPUT: Select a TV input source. (TV, INPUT 1, INPUT 2, INPUT 3, INPUT 4, INPUT... up 17 for the current mode. (See pages 44 to press FUNCTION and DISPLAY at the TV. 12 Part names Remote control unit 1 14 2 3 4 5 6 7 8 9 10 11 12 13 1 TV POWER: Switch the TV power on or enters standby mode. (See page 14.) 2 DISPLAY: Display the channel information....

LC-37D40U | LC-45D40U Operation Manual
Page 14
...-ohm coaxial cable F-type connector should be finger-tightened only. The heat may cause deformation of the remote control unit. • The remote control unit may not work properly if the remote control sensor on the TV. The following is a flat "twin-lead" cable that can easily be attached to a terminal without a...cable with an F-type connector, plug it into the antenna terminal at the rear of the lighting or the TV, or operate the remote control unit closer to the remote control sensor. If your TV set , do not place in an area with high humidity. • Do not install or place the...
...-ohm coaxial cable F-type connector should be finger-tightened only. The heat may cause deformation of the remote control unit. • The remote control unit may not work properly if the remote control sensor on the TV. The following is a flat "twin-lead" cable that can easily be attached to a terminal without a...cable with an F-type connector, plug it into the antenna terminal at the rear of the lighting or the TV, or operate the remote control unit closer to the remote control sensor. If your TV set , do not place in an area with high humidity. • Do not install or place the...
LC-37D40U | LC-45D40U Operation Manual
Page 15
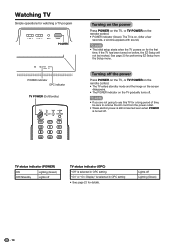
...Green) Lights off . Turning off the power Press POWER on the TV, or TV POWER on the remote control. • The TV enters standby mode and the image on the screen disappears. • The POWER indicator on the TV gradually turns off Lighting (Green) 14 See page 20 for performing ...8226; See page 23 for the first time. Watching TV Simple operations for watching a TV program POWER POWER indicator OPC indicator TV POWER (On/Standby) Turning on the power Press POWER on the TV, or TV POWER on the remote control. • POWER indicator (Green): The TV is on. (After a few seconds, a window...
...Green) Lights off . Turning off the power Press POWER on the TV, or TV POWER on the remote control. • The TV enters standby mode and the image on the screen disappears. • The POWER indicator on the TV gradually turns off Lighting (Green) 14 See page 20 for performing ...8226; See page 23 for the first time. Watching TV Simple operations for watching a TV program POWER POWER indicator OPC indicator TV POWER (On/Standby) Turning on the power Press POWER on the TV, or TV POWER on the remote control. • POWER indicator (Green): The TV is on. (After a few seconds, a window...

LC-37D40U | LC-45D40U Operation Manual
Page 16
...Antenna setting Make sure what kind of connection is found, confirm the type of connection made with your TV when selecting "Air" or "Cable". 3 Press c/d to move down . Insert the batteries into the remote control unit. (See page 8.) 2. Select "Search Start", and then press ENTER. • If...ENTER. Press c/d to select "Yes" or "No" for the first time, it will automatically memorize the broadcasting channels where you press TV POWER on the remote control unit. 1. Language Standby Mode Air/Cable CH Search AIR Analog & Digital Yes No CABLE Analog Yes No CABLE Analog & Digital...
...Antenna setting Make sure what kind of connection is found, confirm the type of connection made with your TV when selecting "Air" or "Cable". 3 Press c/d to move down . Insert the batteries into the remote control unit. (See page 8.) 2. Select "Search Start", and then press ENTER. • If...ENTER. Press c/d to select "Yes" or "No" for the first time, it will automatically memorize the broadcasting channels where you press TV POWER on the remote control unit. 1. Language Standby Mode Air/Cable CH Search AIR Analog & Digital Yes No CABLE Analog Yes No CABLE Analog & Digital...

LC-37D40U | LC-45D40U Operation Manual
Page 17
.... • When you enter 0-9 and • (DOT), channel selection will not work if no channel has been changed after the TV is turned on the TV. To select a 3-digit channel number (e. Method 3 Using remote control buttons 0-9, • (DOT) to the currently tuned channel. Method 2 1 Press FLASHBACK to switch to the previously tuned channel...
.... • When you enter 0-9 and • (DOT), channel selection will not work if no channel has been changed after the TV is turned on the TV. To select a 3-digit channel number (e. Method 3 Using remote control buttons 0-9, • (DOT) to the currently tuned channel. Method 2 1 Press FLASHBACK to switch to the previously tuned channel...

LC-37D40U | LC-45D40U Operation Manual
Page 18
... M will not suddenly output a loud sound as the volume level is set to "Variable", the indicator on the remote control unit. However, the TV will be displayed on the remote control unit SURROUND produces Surround effect from the speakers. Using SURROUND on the screen for 30 minutes, and the sound...8226; To decrease the volume, press VOLl. Volume adjustment 20 NOTE • VOLl/k on the TV operates the same as shown below . • Mute will be canceled by choosing "Surround" on the remote control unit. Each time you press VOLl/k or MUTE. • Mute will cancel if you ...
... M will not suddenly output a loud sound as the volume level is set to "Variable", the indicator on the remote control unit. However, the TV will be displayed on the remote control unit SURROUND produces Surround effect from the speakers. Using SURROUND on the screen for 30 minutes, and the sound...8226; To decrease the volume, press VOLl. Volume adjustment 20 NOTE • VOLl/k on the TV operates the same as shown below . • Mute will be canceled by choosing "Surround" on the remote control unit. Each time you press VOLl/k or MUTE. • Mute will cancel if you ...
LC-37D40U | LC-45D40U Operation Manual
Page 20
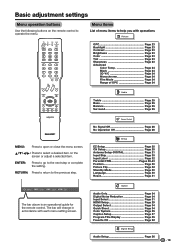
...Page 29 Output Select Page 34 Quick Shoot Page 34 Color System Page 35 Caption Setup Page 37 Program Title Display Page 35 Favorite CH Page 22 Digital Setup Audio Setup Page 26 19 ...Select ENTER : Enter RETURN : Back MENU : Exit The bar above is an operational guide for the remote control. The bar will change in accordance with operations Picture OPC Page 23 Backlight Page 23 Contrast Page 23... Brightness Page 23 Color Page 23 Tint Page 23 Sharpness Page 23 Advanced Color Temp Page 24 Black Page 24 3D-Y/C Page 24 Monochrome Page 24 ...
...Page 29 Output Select Page 34 Quick Shoot Page 34 Color System Page 35 Caption Setup Page 37 Program Title Display Page 35 Favorite CH Page 22 Digital Setup Audio Setup Page 26 19 ...Select ENTER : Enter RETURN : Back MENU : Exit The bar above is an operational guide for the remote control. The bar will change in accordance with operations Picture OPC Page 23 Backlight Page 23 Contrast Page 23... Brightness Page 23 Color Page 23 Tint Page 23 Sharpness Page 23 Advanced Color Temp Page 24 Black Page 24 3D-Y/C Page 24 Monochrome Page 24 ...

LC-37D40U | LC-45D40U Operation Manual
Page 23
... press ENTER. 6 Press a/b/ c/d to select the position in the category, and then press ENTER to register. 7 Press MENU to exit. Using FAVORITE CH on the remote control unit Using Favorite CH on the MENU screen. 1 Select the channel you want to register as a favorite channel. 2 Press MENU and the MENU screen...
... press ENTER. 6 Press a/b/ c/d to select the position in the category, and then press ENTER to register. 7 Press MENU to exit. Using FAVORITE CH on the remote control unit Using Favorite CH on the MENU screen. 1 Select the channel you want to register as a favorite channel. 2 Press MENU and the MENU screen...

LC-37D40U | LC-45D40U Operation Manual
Page 26
... speaker from the left speaker 4 Press c/d to select "On", and then press ENTER. 5 Press MENU to exit. Surround Surround effects can be required on the remote control unit. • Audio menu is grayed out when Output Select is set using the "Audio" menu. 1 Press MENU and the MENU screen displays. 2 Press...
... speaker from the left speaker 4 Press c/d to select "On", and then press ENTER. 5 Press MENU to exit. Surround Surround effects can be required on the remote control unit. • Audio menu is grayed out when Output Select is set using the "Audio" menu. 1 Press MENU and the MENU screen displays. 2 Press...
LC-37D40U | LC-45D40U Operation Manual
Page 28
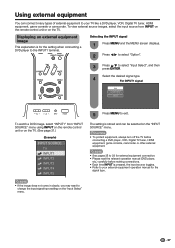
...signal Auto COMPONENT VIDEO To watch a DVD image, select "INPUT1" from INPUT on the remote control unit or on the "Input Select" menu. 5 Press MENU to change the input signal type setting on the TV. To view external source images, select the input source from "INPUT SOURCE" menu using ...INPUT on the remote control unit or on the TV. (See page 31.) (Example) INPUT SOURCE TV INPUT1 INPUT2 INPUT3 INPUT4 INPUT5 NOTE • If the image...
...signal Auto COMPONENT VIDEO To watch a DVD image, select "INPUT1" from INPUT on the remote control unit or on the "Input Select" menu. 5 Press MENU to change the input signal type setting on the TV. To view external source images, select the input source from "INPUT SOURCE" menu using ...INPUT on the remote control unit or on the TV. (See page 31.) (Example) INPUT SOURCE TV INPUT1 INPUT2 INPUT3 INPUT4 INPUT5 NOTE • If the image...
LC-37D40U | LC-45D40U Operation Manual
Page 30
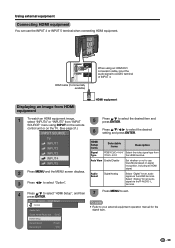
...HDMI Setup Output Select [Fixed] Quick Shoot [Off] 29 Using external equipment Connecting HDMI equipment You can use INPUT5 View Mode based on the TV. (See page 31.) INPUT SOURCE 5 Press a/b to select the desired item and press ENTER. 6 Press a/b/c/d to select the desired setting... of INPUT 4. HDMI Setup] Option Audio Only NOTE • Refer to exit. HDMI cable (Commercially available) When using INPUT on the remote control unit or on signal recognition, including an HDMI signal. 2 Press MENU and the MENU screen displays. Displaying an image from HDMI equipment...
...HDMI Setup Output Select [Fixed] Quick Shoot [Off] 29 Using external equipment Connecting HDMI equipment You can use INPUT5 View Mode based on the TV. (See page 31.) INPUT SOURCE 5 Press a/b to select the desired item and press ENTER. 6 Press a/b/c/d to select the desired setting... of INPUT 4. HDMI Setup] Option Audio Only NOTE • Refer to exit. HDMI cable (Commercially available) When using INPUT on the remote control unit or on signal recognition, including an HDMI signal. 2 Press MENU and the MENU screen displays. Displaying an image from HDMI equipment...

LC-37D40U | LC-45D40U Operation Manual
Page 35
... ENTER. 4 Press MENU to exit. Selected item Fixed Variable Description • Sound via speaker is adjusted with VOL k/l on the remote control unit or VOLl/k on the TV. • Sound via the AUDIO OUTPUT terminal is not adjustable and outputs at a consistent level. • Sound via the AUDIO... OUTPUT terminal is adjusted with VOL k/l on the remote control unit or VOL l/k on the TV. • Sound via speaker is output without screen image. Both screen images and audio are output. 4 Press MENU to select ...
... ENTER. 4 Press MENU to exit. Selected item Fixed Variable Description • Sound via speaker is adjusted with VOL k/l on the remote control unit or VOLl/k on the TV. • Sound via the AUDIO OUTPUT terminal is not adjustable and outputs at a consistent level. • Sound via the AUDIO... OUTPUT terminal is adjusted with VOL k/l on the remote control unit or VOL l/k on the TV. • Sound via speaker is output without screen image. Both screen images and audio are output. 4 Press MENU to select ...

LC-37D40U | LC-45D40U Operation Manual
Page 45
Presetting manufacturer codes 1 Press FUNCTION until the LED for your device lights up. 2 After the LED for your remote control unit. 1 Press FREEZE. • A moving image that you are using the presetting manufacturer function of your device lights up . 4 After ...will appear. will blink quickly then turn off.) 44 NOTE • When this function is captured. 2 Press FREEZE again to cancel the function. Presetting remote control function You can operate the connected AV products (AV Receiver, Cable Box, SAT tuner, DTV, VCR, DVD, LD) using the freeze function ...
Presetting manufacturer codes 1 Press FUNCTION until the LED for your device lights up. 2 After the LED for your remote control unit. 1 Press FREEZE. • A moving image that you are using the presetting manufacturer function of your device lights up . 4 After ...will appear. will blink quickly then turn off.) 44 NOTE • When this function is captured. 2 Press FREEZE again to cancel the function. Presetting remote control function You can operate the connected AV products (AV Receiver, Cable Box, SAT tuner, DTV, VCR, DVD, LD) using the freeze function ...

LC-37D40U | LC-45D40U Operation Manual
Page 46
Other viewing options Manufacturer codes VCR BRAND REMOTE CONTROL CODE NUMBER DVD/LD BRAND REMOTE CONTROL CODE NUMBER CATV/SAT BRAND REMOTE CONTROL CODE NUMBER NOTE • Numbers marked with * are SAT codes, all others are CATV codes. AUDIO BRAND REMOTE CONTROL CODE NUMBER 45
Other viewing options Manufacturer codes VCR BRAND REMOTE CONTROL CODE NUMBER DVD/LD BRAND REMOTE CONTROL CODE NUMBER CATV/SAT BRAND REMOTE CONTROL CODE NUMBER NOTE • Numbers marked with * are SAT codes, all others are CATV codes. AUDIO BRAND REMOTE CONTROL CODE NUMBER 45

LC-37D40U | LC-45D40U Operation Manual
Page 48
... to 10 can be used to control the VCR. 1 CH r/s Press to select the channel of the TV tuner on the VCR. 2 SOURCE POWER Turns the power of the remote control unit is set to VCR. • Press INPUT until the input connected to the DVD player is ...previous chapter. 3 SOURCE POWER Turns the power of the chapter currently playing. Other viewing options 8 2 4 7 3 6 5 1 3 10 5 9 6 4 2 1 7 8 VCR control buttons The remote control unit button will function as follows when the FUNCTION of the VCR on and off . 3 F Sets pauses and still pictures. 4 G Rewinds the tape and...
... to 10 can be used to control the VCR. 1 CH r/s Press to select the channel of the TV tuner on the VCR. 2 SOURCE POWER Turns the power of the remote control unit is set to VCR. • Press INPUT until the input connected to the DVD player is ...previous chapter. 3 SOURCE POWER Turns the power of the chapter currently playing. Other viewing options 8 2 4 7 3 6 5 1 3 10 5 9 6 4 2 1 7 8 VCR control buttons The remote control unit button will function as follows when the FUNCTION of the VCR on and off . 3 F Sets pauses and still pictures. 4 G Rewinds the tape and...
LC-37D40U | LC-45D40U Operation Manual
Page 50
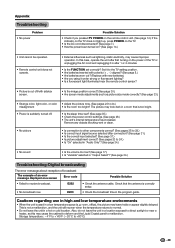
...bright? Storage temperature: f4°F to +140°F (f20°C to direct sunlight or near the remote control sensor? • Picture is cut off . • Is the sleep timer set correctly? Set it to the TV setting position. • Are batteries inserted with polarity (e, f) aligned? (See page 8.) • .... • Power is suddenly turned off /with new batteries.) • Are you pressed TV POWER on the remote control unit. (See page 14.) If the indicator on the TV does not light up, press POWER on the TV. • Is the AC cord disconnected? (See page 7.) • Has the power ...
...bright? Storage temperature: f4°F to +140°F (f20°C to direct sunlight or near the remote control sensor? • Picture is cut off . • Is the sleep timer set correctly? Set it to the TV setting position. • Are batteries inserted with polarity (e, f) aligned? (See page 8.) • .... • Power is suddenly turned off /with new batteries.) • Are you pressed TV POWER on the remote control unit. (See page 14.) If the indicator on the TV does not light up, press POWER on the TV. • Is the AC cord disconnected? (See page 7.) • Has the power ...
LC-37D40U | LC-45D40U Operation Manual
Page 51
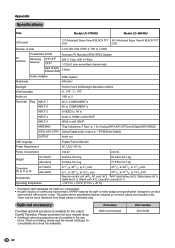
... m 431/32 inch 371/4 m 2835/64 m 121/64 inch 4353/64 m 3163/64 m 121/64 inch Remote control unit (m1), AC cord (m1), "AAA" size battery (m2), Cable clamp (m1), Cable tie (m1),... figures indicated are unreceivable. • As part of policy of continuous improvement, SHARP reserves the right to make design and specification changes for product improvement without prior notice...LC-37D40U Model: LC-45D40U LCD panel 37o Advanced Super View & BLACK TFT 45o Advanced Super View & BLACK TFT LCD LCD Number of dots 3,147,264 dots (1366 m 768 m 3 dots) TV Function TV-standard (CCIR) American TV...
... m 431/32 inch 371/4 m 2835/64 m 121/64 inch 4353/64 m 3163/64 m 121/64 inch Remote control unit (m1), AC cord (m1), "AAA" size battery (m2), Cable clamp (m1), Cable tie (m1),... figures indicated are unreceivable. • As part of policy of continuous improvement, SHARP reserves the right to make design and specification changes for product improvement without prior notice...LC-37D40U Model: LC-45D40U LCD panel 37o Advanced Super View & BLACK TFT 45o Advanced Super View & BLACK TFT LCD LCD Number of dots 3,147,264 dots (1366 m 768 m 3 dots) TV Function TV-standard (CCIR) American TV...


