Operation Manual
Page 3
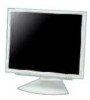
...the USA IMPORTANT: To aid in reporting in case of these materials may cause harmful interference to Part 15 of Conformity SHARP LCD Color Monitor LL-172A-W/LL-172A-B/LL-172G-W/LL-172G-B This device complies with FCC regulation for Class B computing equipment. Disposal of loss or theft,... please record the monitor's model and serial numbers in accordance with the limits for energy efficiency. English Français Deutsch Notice for...
...the USA IMPORTANT: To aid in reporting in case of these materials may cause harmful interference to Part 15 of Conformity SHARP LCD Color Monitor LL-172A-W/LL-172A-B/LL-172G-W/LL-172G-B This device complies with FCC regulation for Class B computing equipment. Disposal of loss or theft,... please record the monitor's model and serial numbers in accordance with the limits for energy efficiency. English Français Deutsch Notice for...

Operation Manual
Page 8
... can be used for the time being, permitted in printed circuit boards, cables, wires, casings and housings. Up to delay the spread of flat panel monitors as a consequence.
... can be used for the time being, permitted in printed circuit boards, cables, wires, casings and housings. Up to delay the spread of flat panel monitors as a consequence.
Operation Manual
Page 9
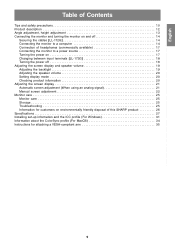
...adjustment 13 Connecting the monitor and turning the monitor on and off 14 Securing the cables [LL-172G 14 Connecting the monitor to a computer 14 Connection of headphones (commercially available 17 Connecting the monitor to a power source 17 Turning the power on 17 Changing between input terminals...adjustment (When using an analog signal 21 Manual screen adjustment 22 Monitor care 25 Monitor care 25 Storage 25 Troubleshooting 25 Information for customers on environmentally friendly disposal of this SHARP product 26 Specifications 27 Installing set-up information and the ICC ...
...adjustment 13 Connecting the monitor and turning the monitor on and off 14 Securing the cables [LL-172G 14 Connecting the monitor to a computer 14 Connection of headphones (commercially available 17 Connecting the monitor to a power source 17 Turning the power on 17 Changing between input terminals...adjustment (When using an analog signal 21 Manual screen adjustment 22 Monitor care 25 Monitor care 25 Storage 25 Troubleshooting 25 Information for customers on environmentally friendly disposal of this SHARP product 26 Specifications 27 Installing set-up information and the ICC ...

Operation Manual
Page 10
...a still picture for any other fluids. Ensure that these are permanently lit. Insert the power plug directly into contact with the application of LCDs and will be upgraded without advance notice. Tips and safety precautions - If the brightness is viewed from an acute angle there may result ... place heavy objects on it, stretch it or over may come into contact with wet hands. Ensure that Sharp Corporation bears no objects such as paper clips or pins enter the monitor as this could result in fire or electric shock. - Do not use , except where indemnity liability is...
...a still picture for any other fluids. Ensure that these are permanently lit. Insert the power plug directly into contact with the application of LCDs and will be upgraded without advance notice. Tips and safety precautions - If the brightness is viewed from an acute angle there may result ... place heavy objects on it, stretch it or over may come into contact with wet hands. Ensure that Sharp Corporation bears no objects such as paper clips or pins enter the monitor as this could result in fire or electric shock. - Do not use , except where indemnity liability is...

Operation Manual
Page 11
... (model name: 0NW0173056023) - [LL-172G] Cable clamp (2) - Do not reproduce it without permission. - LCD monitor (1) - CD-ROM (1) - The shape of Apple Computer, Inc. - When describing a different specification between ...exactly same as "Windows 3.1". Manual Scope - For product appearance, illustrations of the LL-172A are less than 3 m in this manual. mini D-sub 15 pin) is a ... 0NW1738GAB01A) - [LL-172G] Digital signal cable (1) (model name: 0NW1748LAB007) - Sharp Corporation holds authorship rights to be used in length. - [LL-172G] The analog signal cable (DVI-I ...
... (model name: 0NW0173056023) - [LL-172G] Cable clamp (2) - Do not reproduce it without permission. - LCD monitor (1) - CD-ROM (1) - The shape of Apple Computer, Inc. - When describing a different specification between ...exactly same as "Windows 3.1". Manual Scope - For product appearance, illustrations of the LL-172A are less than 3 m in this manual. mini D-sub 15 pin) is a ... 0NW1738GAB01A) - [LL-172G] Digital signal cable (1) (model name: 0NW1748LAB007) - Sharp Corporation holds authorship rights to be used in length. - [LL-172G] The analog signal cable (DVI-I ...

Operation Manual
Page 12
... or analog RGB output (INPUT-2) terminal can be transported. Analog RGB input terminal ..... Power LED This LED is used to overheating inside the monitor and result in power-saving mode. 9. MENU button This button is used to select an option or adjust the value of the screen (CLOCK... [LL-172G] ......... buttons When the OSD Menu is used to select menu options. AUTO button [LL-172A This button is displayed: These buttons are used to the security lock anchor, the monitor is not displayed: These buttons are used . 12. When the OSD Menu is fixed so that it ...
... or analog RGB output (INPUT-2) terminal can be transported. Analog RGB input terminal ..... Power LED This LED is used to overheating inside the monitor and result in power-saving mode. 9. MENU button This button is used to select an option or adjust the value of the screen (CLOCK... [LL-172G] ......... buttons When the OSD Menu is used to select menu options. AUTO button [LL-172A This button is displayed: These buttons are used to the security lock anchor, the monitor is not displayed: These buttons are used . 12. When the OSD Menu is fixed so that it ...

Operation Manual
Page 13
...to the product. - Extending/contracting the stand when it's locked may result in this monitor is properly locked except while adjusting the height. Ensure that the stand is made of the monitor when adjusting the viewing angle. approx. 45° approx. 45° Italiano Espa...[LL-172G] 1. Release the lock. 2. Be sure to release the lock before adjusting the height of the stand. 3. The LCD panel used in damage to be pinched. approx. 70 mm 2 Angle adjustment [LL-172A] approx. 25° 3 1 approx. 5° [LL-172G] approx. 25° approx. 5° CAUTION! -
...to the product. - Extending/contracting the stand when it's locked may result in this monitor is properly locked except while adjusting the height. Ensure that the stand is made of the monitor when adjusting the viewing angle. approx. 45° approx. 45° Italiano Espa...[LL-172G] 1. Release the lock. 2. Be sure to release the lock before adjusting the height of the stand. 3. The LCD panel used in damage to be pinched. approx. 70 mm 2 Angle adjustment [LL-172A] approx. 25° 3 1 approx. 5° [LL-172G] approx. 25° approx. 5° CAUTION! -

Operation Manual
Page 14
... computer. When adjusting the viewing angle, cables may be pulled. Paying attention to the stand and attach the clamp. 14 Connecting the monitor to a computer Analog connection [LL-172A] Connect the accessory analog signal cable to the analog RGB output terminal of the clamps before attaching them to the stand. Orient the...
... computer. When adjusting the viewing angle, cables may be pulled. Paying attention to the stand and attach the clamp. 14 Connecting the monitor to a computer Analog connection [LL-172A] Connect the accessory analog signal cable to the analog RGB output terminal of the clamps before attaching them to the stand. Orient the...
Operation Manual
Page 15
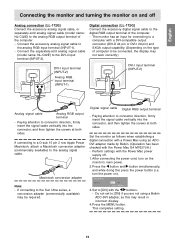
... or DVI-I input terminal (INPUT-2) Analog signal cable Analog RGB output terminal - After connecting the power cord, turn the power on the monitor's main power. 2. Set to the Sun Ultra series, a conversion adapter (commercially available) may be connected, the display may result in incorrect...connector direction, firmly insert the signal cable vertically into the connector, and then tighten the screws at both sides. Set the monitor as this press the power button (i.e. This completes setting. Connect the accessory analog signal cable to the analog signal cable. ...
... or DVI-I input terminal (INPUT-2) Analog signal cable Analog RGB output terminal - After connecting the power cord, turn the power on the monitor's main power. 2. Set to the Sun Ultra series, a conversion adapter (commercially available) may be connected, the display may result in incorrect...connector direction, firmly insert the signal cable vertically into the connector, and then tighten the screws at both sides. Set the monitor as this press the power button (i.e. This completes setting. Connect the accessory analog signal cable to the analog signal cable. ...
Operation Manual
Page 16
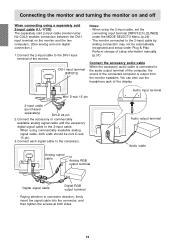
... [2LINES] under Plug & Play. You can also use the headphone jack of the connected computer is output from the monitor speakers. Connecting the monitor and turning the monitor on the monitor and the two computers. (One analog and one digital connection.) 1. Connect each signal cable to the 2-input cable. .... (p.31) Connect the accessory audio cable When the accessory audio cable is connected to the DVI-I input terminal (INPUT-2) Notes: - The monitor connected to the 2-input cable by analog connection may not be mini D-sub 15 pin. 3. Mini D-sub 15 pin Audio input terminal 2-...
... [2LINES] under Plug & Play. You can also use the headphone jack of the connected computer is output from the monitor speakers. Connecting the monitor and turning the monitor on the monitor and the two computers. (One analog and one digital connection.) 1. Connect each signal cable to the 2-input cable. .... (p.31) Connect the accessory audio cable When the accessory audio cable is connected to the DVI-I input terminal (INPUT-2) Notes: - The monitor connected to the 2-input cable by analog connection may not be mini D-sub 15 pin. 3. Mini D-sub 15 pin Audio input terminal 2-...

Operation Manual
Page 17
... (p.31) - Main power switch Français Deutsch Italiano Español English Headphones Notes: - If the input terminal to display only the LCD monitor. 17 When using the LL-172G with a cable less than 3 m in malfunction. 2. After having changed the system settings during use. - Rapid switching... 5 seconds. When switching the main power switch on the main power of computer or OS, you may result in length. Using the monitor for LL-172G: - When using an analog signal, perform an automatic screen adjustment under the following conditions (p.21): - Turn on and...
... (p.31) - Main power switch Français Deutsch Italiano Español English Headphones Notes: - If the input terminal to display only the LCD monitor. 17 When using the LL-172G with a cable less than 3 m in malfunction. 2. After having changed the system settings during use. - Rapid switching... 5 seconds. When switching the main power switch on the main power of computer or OS, you may result in length. Using the monitor for LL-172G: - When using an analog signal, perform an automatic screen adjustment under the following conditions (p.21): - Turn on and...

Operation Manual
Page 18
... < > Turning the power off 1. Turn the computer off . Turn the computer off . 2. Press the monitor's power button. or When using a 2-input cable Analog RGB input terminal If the monitor will disappear. OFF Press power button. When there is no input signal, [NO SIGNAL] is displayed. 18 ...Connecting the monitor and turning the monitor on and off the main power switch of the monitor, and remove the power plug from the ...
... < > Turning the power off 1. Turn the computer off . Turn the computer off . 2. Press the monitor's power button. or When using a 2-input cable Analog RGB input terminal If the monitor will disappear. OFF Press power button. When there is no input signal, [NO SIGNAL] is displayed. 18 ...Connecting the monitor and turning the monitor on and off the main power switch of the monitor, and remove the power plug from the ...
Operation Manual
Page 19
... Continue to press the buttons until [ADJUSTMENT UNLOCKED] appears on the screen. Continue to press the buttons until [ALL RESET] appears on the monitor power. 2. Check that [BRIGHT] is displayed. While [RESET] is displayed, the control buttons are disabled. - Español English 19...MENU button, press the power button (i.e. The lock is released when the message is complete when the displayed message disappears. Turn off the monitor power. 2. Turn off . Reset is displayed. It is not possible to operate control buttons. Notes: - English Français ...
... Continue to press the buttons until [ADJUSTMENT UNLOCKED] appears on the screen. Continue to press the buttons until [ALL RESET] appears on the monitor power. 2. Check that [BRIGHT] is displayed. While [RESET] is displayed, the control buttons are disabled. - Español English 19...MENU button, press the power button (i.e. The lock is released when the message is complete when the displayed message disappears. Turn off the monitor power. 2. Turn off . Reset is displayed. It is not possible to operate control buttons. Notes: - English Français ...

Operation Manual
Page 20
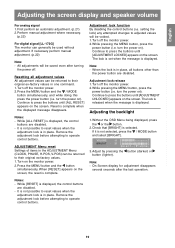
... original image. Checking product information A model name (MODEL), a serial no. (S/N), and usage time (USAGE TIME) of the monitor can be changed with the color tone results from original scheme of liquid crystal's characteristics and represents color tone close to set Press..., press the / MODE button and select [VOLUME]. 3. Each time the button is not displayed. While pressing the / MODE button, press the monitor's power button (i.e. On Screen display for adjustment disappears several seconds after the last operation. turn the power on). Setting display mode Color tone or...
... original image. Checking product information A model name (MODEL), a serial no. (S/N), and usage time (USAGE TIME) of the monitor can be changed with the color tone results from original scheme of liquid crystal's characteristics and represents color tone close to set Press..., press the / MODE button and select [VOLUME]. 3. Each time the button is not displayed. While pressing the / MODE button, press the monitor's power button (i.e. On Screen display for adjustment disappears several seconds after the last operation. turn the power on). Setting display mode Color tone or...
Operation Manual
Page 21
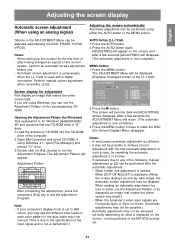
When setting up this monitor for Windows 95/98/2000/Me/ XP, and assumes that the CD-ROM drive is for the first time or after having changed an aspect ... automatically Automatic adjustment can be performed using Windows 3.1, open [File Manager] and choose "D" drive. 3. Notes: - Perform manual screen adjustment when necessary. (p.22) AUTO button [LL-172A] 1. Press the MENU button. Double click on the screen - If your computer's display mode is set to the specification of the computer. 2. Press the MENU...
When setting up this monitor for Windows 95/98/2000/Me/ XP, and assumes that the CD-ROM drive is for the first time or after having changed an aspect ... automatically Automatic adjustment can be performed using Windows 3.1, open [File Manager] and choose "D" drive. 3. Notes: - Perform manual screen adjustment when necessary. (p.22) AUTO button [LL-172A] 1. Press the MENU button. Double click on the screen - If your computer's display mode is set to the specification of the computer. 2. Press the MENU...
Operation Manual
Page 24
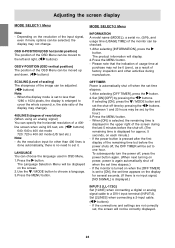
...power shuts off time by pressing the buttons. The product information will not be set , by the hour.) 3. SCALING (Level of scaling) The sharpness of the screen during manufacture. As the resolution input for several seconds. (If there is no . (S/N), and usage time (USAGE TIME) of the... when the set time elapses.) - Set [2LINES] when connecting a 2-input cable. ( buttons) - Press the button. Depending on the resolution of the monitor can be checked. 1. When the display mode is set , the screen will display. 2. the side ratio of the remaining time but before the shut-off...
...power shuts off time by pressing the buttons. The product information will not be set , by the hour.) 3. SCALING (Level of scaling) The sharpness of the screen during manufacture. As the resolution input for several seconds. (If there is no . (S/N), and usage time (USAGE TIME) of the... when the set time elapses.) - Set [2LINES] when connecting a 2-input cable. ( buttons) - Press the button. Depending on the resolution of the monitor can be checked. 1. When the display mode is set , the screen will display. 2. the side ratio of the remaining time but before the shut-off...
Operation Manual
Page 25
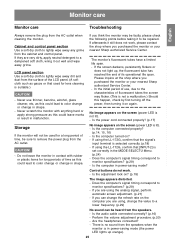
...used for lens cleaning is set correctly in power-saving mode (the power LED lights up , the fluorescent tube has reached the end of the LCD panel. (A soft cloth such as this happen, check by first turning off the power, then turning it still does not work . - ... Center. - If you purchased the monitor or your nearest Sharp authorized Service Center. Is the adjustment lock on ? - Is the audio cable connected correctly? (p.16) - In the initial period of time, be repaired. Is the power cord connected properly? (p.17) Storage If the monitor will not be used for a long...
...used for lens cleaning is set correctly in power-saving mode (the power LED lights up , the fluorescent tube has reached the end of the LCD panel. (A soft cloth such as this happen, check by first turning off the power, then turning it still does not work . - ... Center. - If you purchased the monitor or your nearest Sharp authorized Service Center. Is the adjustment lock on ? - Is the audio cable connected correctly? (p.16) - In the initial period of time, be repaired. Is the power cord connected properly? (p.17) Storage If the monitor will not be used for a long...

Operation Manual
Page 26
... of these materials may be regulated due to protecting the environment and conserving energy. Monitor care Information for customers on MIREC can be obtained from http://www.mirec.com/. Sharp Corporation is committed to environmental considerations. MIREC services have to minimize the environmental impact ....eiae.org (3) For our customers in a legally correct and environmentally sound way. SHARP recommends the recycling services of MIREC, the General information on environmentally friendly disposal of this SHARP product If this product cannot be used any more, it should be paid for ...
... of these materials may be regulated due to protecting the environment and conserving energy. Monitor care Information for customers on MIREC can be obtained from http://www.mirec.com/. Sharp Corporation is committed to environmental considerations. MIREC services have to minimize the environmental impact ....eiae.org (3) For our customers in a legally correct and environmentally sound way. SHARP recommends the recycling services of MIREC, the General information on environmentally friendly disposal of this SHARP product If this product cannot be used any more, it should be paid for ...
Operation Manual
Page 29
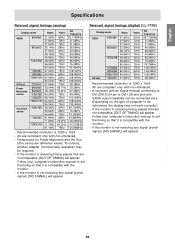
... receiving timing signals that it is not receiving any signal (synch signal), [NO SIGNAL] will appear. If the monitor is compatible with the monitor. - All are not compatible, [OUT OF TIMING] will appear. US text - To connect, another adapter (commercially available) ...may be connected, the display may not work correctly.) - If the monitor is receiving timing signals that it is not receiving any signal (synch signal), [NO SIGNAL] will appear. Follow your computer's instruction manual to...
... receiving timing signals that it is not receiving any signal (synch signal), [NO SIGNAL] will appear. If the monitor is compatible with the monitor. - All are not compatible, [OUT OF TIMING] will appear. US text - To connect, another adapter (commercially available) ...may be connected, the display may not work correctly.) - If the monitor is receiving timing signals that it is not receiving any signal (synch signal), [NO SIGNAL] will appear. Follow your computer's instruction manual to...
Operation Manual
Page 30
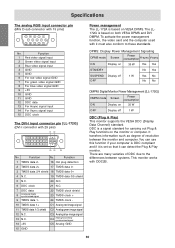
...15 DDC clock The DVI-I input connector pin [LL-172G] (DVI-I connector with 15 pins) No. Function 1 TMDS data 2- 16 Hot plug detection 2 TMDS data 2+ 17 TMDS data 0- 3 TMDS data 2/4 shield 18 TMDS data 0+ 4 N.C. 19 TMDS data 0/5 shield 5 N.C. 20 N.C. 6 DDC clock 21 N.C. 7 DDC data 8 ...Analog horizontally synchronized signal C5 Analog GND 15 GND Power management The LL-172A is based on VESA DPMS. The LL172G is a signal standard for carrying out Plug & Play functions on the monitor or computer. DPMS: Display Power Management Signalling Power DPMS mode Screen consumption...
...15 DDC clock The DVI-I input connector pin [LL-172G] (DVI-I connector with 15 pins) No. Function 1 TMDS data 2- 16 Hot plug detection 2 TMDS data 2+ 17 TMDS data 0- 3 TMDS data 2/4 shield 18 TMDS data 0+ 4 N.C. 19 TMDS data 0/5 shield 5 N.C. 20 N.C. 6 DDC clock 21 N.C. 7 DDC data 8 ...Analog horizontally synchronized signal C5 Analog GND 15 GND Power management The LL-172A is based on VESA DPMS. The LL172G is a signal standard for carrying out Plug & Play functions on the monitor or computer. DPMS: Display Power Management Signalling Power DPMS mode Screen consumption...

