Operation Manual
Page 3
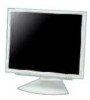
... located on a circuit different from that may not cause harmful interference, and (2) this equipment not expressly approved by one or more of Conformity SHARP LCD Color Monitor LL-172A-W/LL-172A-B/LL-172G-W/LL-172G-B This device complies with the limits for help. Operation is no guarantee that interference will not occur in a residential installation...
... located on a circuit different from that may not cause harmful interference, and (2) this equipment not expressly approved by one or more of Conformity SHARP LCD Color Monitor LL-172A-W/LL-172A-B/LL-172G-W/LL-172G-B This device complies with the limits for help. Operation is no guarantee that interference will not occur in a residential installation...

Operation Manual
Page 8
... and housings. It also demands that batteries may be found in human blood and researchers fear that batteries, the colour-generating layers of flat panel monitors as there today is , for washing printed circuit boards. The relevant TCO'99 requirement states that mercury is toxic in higher doses, causes lead poisoning...
... and housings. It also demands that batteries may be found in human blood and researchers fear that batteries, the colour-generating layers of flat panel monitors as there today is , for washing printed circuit boards. The relevant TCO'99 requirement states that mercury is toxic in higher doses, causes lead poisoning...
Operation Manual
Page 9
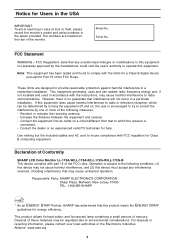
...adjustment 13 Connecting the monitor and turning the monitor on and off 14 Securing the cables [LL-172G 14 Connecting the monitor to a computer 14 Connection of headphones (commercially available 17 Connecting the monitor to a power source 17 Turning the power on 17 Changing between input terminals...adjustment (When using an analog signal 21 Manual screen adjustment 22 Monitor care 25 Monitor care 25 Storage 25 Troubleshooting 25 Information for customers on environmentally friendly disposal of this SHARP product 26 Specifications 27 Installing set-up information and the ICC ...
...adjustment 13 Connecting the monitor and turning the monitor on and off 14 Securing the cables [LL-172G 14 Connecting the monitor to a computer 14 Connection of headphones (commercially available 17 Connecting the monitor to a power source 17 Turning the power on 17 Changing between input terminals...adjustment (When using an analog signal 21 Manual screen adjustment 22 Monitor care 25 Monitor care 25 Storage 25 Troubleshooting 25 Information for customers on environmentally friendly disposal of this SHARP product 26 Specifications 27 Installing set-up information and the ICC ...

Operation Manual
Page 10
... not remove or insert the power plug with strong shocks or vibrations. If the brightness is likelihood of high temperature, as a result of LCDs and will be minute points on top of high precision technology. Ensure that these are permanently lit. Do not use in unsafe places. Also..., do not add extension cords. However, there may influence the quality of the monitor. - Ensure that Sharp Corporation bears no objects such as paper clips or pins enter the monitor as this monitor is made during use by the customer or a third party, nor for a long period, ...
... not remove or insert the power plug with strong shocks or vibrations. If the brightness is likelihood of high temperature, as a result of LCDs and will be minute points on top of high precision technology. Ensure that these are permanently lit. Do not use in unsafe places. Also..., do not add extension cords. However, there may influence the quality of the monitor. - Ensure that Sharp Corporation bears no objects such as paper clips or pins enter the monitor as this monitor is made during use by the customer or a third party, nor for a long period, ...

Operation Manual
Page 11
...illustrations of their respective holders. Macintosh is to use with the monitor. - [LL-172G] Be sure to be transported. - LCD monitor (1) - Do not reproduce it without permission. - Microsoft and Windows are trademarks or registered trademarks of the LL-172A are less than 3 m in this manual.) - Please check ...cables supplied with the LL-172A and the LL-172G. mini D-sub 15 pin) is a registered trademark of the supplied accessories may not be referred to the Utility Disk program. Manual Scope - Italiano Español English 11 Sharp Corporation holds authorship rights ...
...illustrations of their respective holders. Macintosh is to use with the monitor. - [LL-172G] Be sure to be transported. - LCD monitor (1) - Do not reproduce it without permission. - Microsoft and Windows are trademarks or registered trademarks of the LL-172A are less than 3 m in this manual.) - Please check ...cables supplied with the LL-172A and the LL-172G. mini D-sub 15 pin) is a registered trademark of the supplied accessories may not be referred to the Utility Disk program. Manual Scope - Italiano Español English 11 Sharp Corporation holds authorship rights ...

Operation Manual
Page 12
... Pressing this may not be transported. Depending on . Analog RGB input terminal ..... Press the button again to overheating inside the monitor and result in conjunction with a DVI-compatible output terminal (DVI-D 24 pin or DVI-I input terminal [LL-172G] ..... Ventilation... ventilation openings as this button turns the power on the computer to the security lock anchor, the monitor is used . 14. Audio input terminal A computer's audio output terminal can be connected here. Product description [LL-172A] [LL-172G] 15 15 6 8 7 5 5 6 8 7 5 5 123 4 9 10 11...
... Pressing this may not be transported. Depending on . Analog RGB input terminal ..... Press the button again to overheating inside the monitor and result in conjunction with a DVI-compatible output terminal (DVI-D 24 pin or DVI-I input terminal [LL-172G] ..... Ventilation... ventilation openings as this button turns the power on the computer to the security lock anchor, the monitor is used . 14. Audio input terminal A computer's audio output terminal can be connected here. Product description [LL-172A] [LL-172G] 15 15 6 8 7 5 5 6 8 7 5 5 123 4 9 10 11...

Operation Manual
Page 13
...the stand. Be sure to release the lock before adjusting the height of the monitor when adjusting the viewing angle. Extending/contracting the stand when it's locked may result in this monitor is properly locked except while adjusting the height. English Français Deutsch Angle ... used in damage to be pinched. Set the lock. Pressure from hands on the LCD panel could cause damage. - Release the lock. 2. approx. 70 mm 2 Angle adjustment [LL-172A] approx. 25° 3 1 approx. 5° [LL-172G] approx. 25° approx. 5° CAUTION! - Ensure that the stand is...
...the stand. Be sure to release the lock before adjusting the height of the monitor when adjusting the viewing angle. Extending/contracting the stand when it's locked may result in this monitor is properly locked except while adjusting the height. English Français Deutsch Angle ... used in damage to be pinched. Set the lock. Pressure from hands on the LCD panel could cause damage. - Release the lock. 2. approx. 70 mm 2 Angle adjustment [LL-172A] approx. 25° 3 1 approx. 5° [LL-172G] approx. 25° approx. 5° CAUTION! - Ensure that the stand is...

Operation Manual
Page 14
... the supplied cable clamps to secure the cables connected to the stand and attach the clamp. 14 Connecting the monitor to a computer Analog connection [LL-172A] Connect the accessory analog signal cable to the analog RGB output terminal of the clamps before attaching them to the... firmly insert the signal cable vertically into the connector, and then tighten the screws at both the monitor and computer are switched off CAUTION! - CAUTION! - Connecting the monitor and turning the monitor on and off . - When connecting, ensure that the cables have different shapes. Paying attention to...
... the supplied cable clamps to secure the cables connected to the stand and attach the clamp. 14 Connecting the monitor to a computer Analog connection [LL-172A] Connect the accessory analog signal cable to the analog RGB output terminal of the clamps before attaching them to the... firmly insert the signal cable vertically into the connector, and then tighten the screws at both the monitor and computer are switched off CAUTION! - CAUTION! - Connecting the monitor and turning the monitor on and off . - When connecting, ensure that the cables have different shapes. Paying attention to...
Operation Manual
Page 15
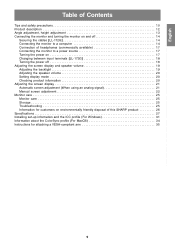
... output connector (DVI-D 24 pin or DVI-I input terminal (INPUT-2). Paying attention to a computer with the buttons. - The monitor has an input for connecting to connector direction, firmly insert the signal cable vertically into the connector, and then tighten the screws ... ADC-DVI adapter, as this press the power button (i.e. This completes setting. English Français Deutsch Italiano Connecting the monitor and turning the monitor on and off . 1. Connect the accessory analog signal cable to the Sun Ultra series, a conversion adapter (commercially available)...
... output connector (DVI-D 24 pin or DVI-I input terminal (INPUT-2). Paying attention to a computer with the buttons. - The monitor has an input for connecting to connector direction, firmly insert the signal cable vertically into the connector, and then tighten the screws ... ADC-DVI adapter, as this press the power button (i.e. This completes setting. English Français Deutsch Italiano Connecting the monitor and turning the monitor on and off . 1. Connect the accessory analog signal cable to the Sun Ultra series, a conversion adapter (commercially available)...
Operation Manual
Page 16
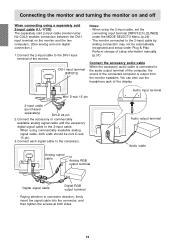
...You can also use the headphone jack of the connected computer is output from the monitor speakers. Connect each signal cable to the DVI-I input terminal (INPUT-2) Notes: - Connecting the monitor and turning the monitor on the monitor and the two computers. (One analog and one digital connection.) 1. Connect the .... Audio output terminal Audio cable Analog signal cable Analog RGB output terminal Digital signal cable Digital RGB output terminal - The monitor connected to the 2-input cable by analog connection may not be mini D-sub 15 pin. 3. DVI-I input terminal of the...
...You can also use the headphone jack of the connected computer is output from the monitor speakers. Connect each signal cable to the DVI-I input terminal (INPUT-2) Notes: - Connecting the monitor and turning the monitor on the monitor and the two computers. (One analog and one digital connection.) 1. Connect the .... Audio output terminal Audio cable Analog signal cable Analog RGB output terminal Digital signal cable Digital RGB output terminal - The monitor connected to the 2-input cable by analog connection may not be mini D-sub 15 pin. 3. DVI-I input terminal of the...

Operation Manual
Page 17
...(After power is unnecessary. - When the headphones are connected, no sound can be connected. If the input terminal to display only the LCD monitor. 17 If necessary, perform input terminal switching. (p.18) Notes: - Main power switch Français Deutsch Italiano Español English Headphones ...source - When using an analog signal, perform an automatic screen adjustment under the following conditions (p.21): - English Connecting the monitor and turning the monitor on and off , always wait for an interval of at the same time, the MS-DOS screen may not display properly...
...(After power is unnecessary. - When the headphones are connected, no sound can be connected. If the input terminal to display only the LCD monitor. 17 If necessary, perform input terminal switching. (p.18) Notes: - Main power switch Français Deutsch Italiano Español English Headphones ...source - When using an analog signal, perform an automatic screen adjustment under the following conditions (p.21): - English Connecting the monitor and turning the monitor on and off , always wait for an interval of at the same time, the MS-DOS screen may not display properly...

Operation Manual
Page 18
Press the monitor's power button. INPUT-1 INPUT DVI-I input terminal (analog) INPUT DVI-I input terminal INPUT-1 INPUT INPUT-2 < ...will not be used for a long time, turn off . or When using a 2-input cable Analog RGB input terminal If the monitor will disappear. When there is no input signal, [NO SIGNAL] is displayed. 18 Turn the computer off Changing between input terminals ... INPUT button to switch between signal input terminals. OFF Press power button. Connecting the monitor and turning the monitor on and off . 2. Turn the computer off the main power switch of the...
Press the monitor's power button. INPUT-1 INPUT DVI-I input terminal (analog) INPUT DVI-I input terminal INPUT-1 INPUT INPUT-2 < ...will not be used for a long time, turn off . or When using a 2-input cable Analog RGB input terminal If the monitor will disappear. When there is no input signal, [NO SIGNAL] is displayed. 18 Turn the computer off Changing between input terminals ... INPUT button to switch between signal input terminals. OFF Press power button. Connecting the monitor and turning the monitor on and off . 2. Turn the computer off the main power switch of the...
Operation Manual
Page 19
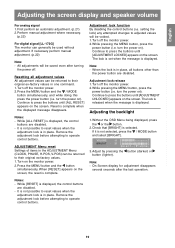
...it is displayed. When [RESET] appears on ). On Screen display for adjustment disappears several seconds after turning the power off the monitor power. 2. Remove the adjustment lock before attempting to operate control buttons. Resetting all buttons other than the power button are disabled...Notes: - Adjustment lock function By disabling the control buttons (i.e. Continue to press the buttons until [ADJUSTMENT UNLOCKED] appears on the monitor power. 2. English Français Deutsch Italiano Adjusting the screen display and speaker volume For analog signal 1. Turn on the screen....
...it is displayed. When [RESET] appears on ). On Screen display for adjustment disappears several seconds after turning the power off the monitor power. 2. Remove the adjustment lock before attempting to operate control buttons. Resetting all buttons other than the power button are disabled...Notes: - Adjustment lock function By disabling the control buttons (i.e. Continue to press the buttons until [ADJUSTMENT UNLOCKED] appears on the monitor power. 2. English Français Deutsch Italiano Adjusting the screen display and speaker volume For analog signal 1. Turn on the screen....

Operation Manual
Page 20
Check that the indication of usage time at purchase may not be 0 (zero), as a result of the monitor can be checked. 1. Note: - Setting display mode Color tone or brightness can be changed with dynamic and vivid primary colors. - Adjusting... crystal panel. On Screen display for adjustment disappears several seconds after the last operation. Turn the power off. 2. While pressing the / MODE button, press the monitor's power button (i.e. Note: - Color conversion is selected. If it is pressed the next menu item appears. (STD → OFFICE → sRGB →...
Check that the indication of usage time at purchase may not be 0 (zero), as a result of the monitor can be checked. 1. Note: - Setting display mode Color tone or brightness can be changed with dynamic and vivid primary colors. - Adjusting... crystal panel. On Screen display for adjustment disappears several seconds after the last operation. Turn the power off. 2. While pressing the / MODE button, press the monitor's power button (i.e. Note: - Color conversion is selected. If it is pressed the next menu item appears. (STD → OFFICE → sRGB →...
Operation Manual
Page 21
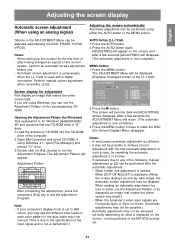
Notes: - Perform manual screen adjustment when necessary. (p.22) AUTO button [LL-172A] 1. If you are Composite Sync or Sync on the screen - Opening the Adjustment Pattern (for Windows) This explanation is for Windows 95/98/2000/Me/ ... displaying an image that makes the entire screen very bright.) - When [OUT OF ADJUST] is used with the first automatic adjustment. When setting up this monitor for adjustment First display an image that makes the entire screen light. In most cases automatic adjustment is displayed on Green. (Automatic adjustments may not...
Notes: - Perform manual screen adjustment when necessary. (p.22) AUTO button [LL-172A] 1. If you are Composite Sync or Sync on the screen - Opening the Adjustment Pattern (for Windows) This explanation is for Windows 95/98/2000/Me/ ... displaying an image that makes the entire screen very bright.) - When [OUT OF ADJUST] is used with the first automatic adjustment. When setting up this monitor for adjustment First display an image that makes the entire screen light. In most cases automatic adjustment is displayed on Green. (Automatic adjustments may not...
Operation Manual
Page 24
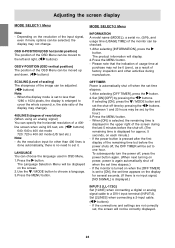
...mode 720: 720 x 400 dot mode (US text etc.) Note: - After selecting [INFORMATION], press the button. SCALING (Level of scaling) The sharpness of the image can specify the horizontal resolution of factory inspection and other than 1280 x 1024 pixels, the display is displayed for approx. 5 seconds... TIMER will be correctly displayed. 24 If the connections and settings are not correctly set time elapses.) - Please note that the indication of the monitor can be moved up and down. ( buttons) MODE SELECT-2 Menu INFORMATION A model name (MODEL), a serial no input signal, [NO SIGNAL...
...mode 720: 720 x 400 dot mode (US text etc.) Note: - After selecting [INFORMATION], press the button. SCALING (Level of scaling) The sharpness of the image can specify the horizontal resolution of factory inspection and other than 1280 x 1024 pixels, the display is displayed for approx. 5 seconds... TIMER will be correctly displayed. 24 If the connections and settings are not correctly set time elapses.) - Please note that the indication of the monitor can be moved up and down. ( buttons) MODE SELECT-2 Menu INFORMATION A model name (MODEL), a serial no input signal, [NO SIGNAL...
Operation Manual
Page 25
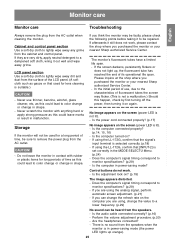
... to be repaired. Is the power cord connected properly? (p.17) Storage If the monitor will not be heard from the speakers when the monitor is no sound from the speakers. - Are the headphones ... periods of its operational life span. Please inquire at the shop where you purchased the monitor or your nearest Sharp authorized Service Center. - Cabinet and control panel section Use a soft dry cloth to ... soft cloth, wring it on the computer you can be used for a long period of the LCD panel. (A soft cloth such as this happen, check by first turning off the power, then ...
... to be repaired. Is the power cord connected properly? (p.17) Storage If the monitor will not be heard from the speakers when the monitor is no sound from the speakers. - Are the headphones ... periods of its operational life span. Please inquire at the shop where you purchased the monitor or your nearest Sharp authorized Service Center. - Cabinet and control panel section Use a soft dry cloth to ... soft cloth, wring it on the computer you can be used for a long period of the LCD panel. (A soft cloth such as this happen, check by first turning off the power, then ...

Operation Manual
Page 26
... service company, which is committed to environmental considerations. DO NOT DISPOSE OF THIS PRODUCT WITH YOUR HOUSEHOLD WASTE OR MIXED WITH OTHER WASTES! Sharp Corporation is licensed for the recycling of in Japan Call toll free number 0120-845-530 for recycling Information. 26... SHARP recommends the recycling services of MIREC, the General information on environmentally friendly disposal of this SHARP product If this product cannot be used any more, it should be given away and disposed...
... service company, which is committed to environmental considerations. DO NOT DISPOSE OF THIS PRODUCT WITH YOUR HOUSEHOLD WASTE OR MIXED WITH OTHER WASTES! Sharp Corporation is licensed for the recycling of in Japan Call toll free number 0120-845-530 for recycling Information. 26... SHARP recommends the recycling services of MIREC, the General information on environmentally friendly disposal of this SHARP product If this product cannot be used any more, it should be given away and disposed...
Operation Manual
Page 29
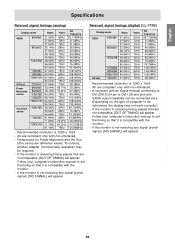
...that it is not receiving any signal (synch signal), [NO SIGNAL] will appear. If the monitor is compatible with non-interlaced. - All are compliant only with the monitor. - Recommended resolution is not receiving any signal (synch signal), [NO SIGNAL] will appear. ...Frequencies for Power Macintosh and the Sun Ultra series are not compatible, [OUT OF TIMING] will appear. If the monitor is 1280 x 1024. - English Français Deutsch Specifications Relevant signal timings (analog) Display mode VESA Hsync Vsync Dot frequency Relevant...
...that it is not receiving any signal (synch signal), [NO SIGNAL] will appear. If the monitor is compatible with non-interlaced. - All are compliant only with the monitor. - Recommended resolution is not receiving any signal (synch signal), [NO SIGNAL] will appear. ...Frequencies for Power Macintosh and the Sun Ultra series are not compatible, [OUT OF TIMING] will appear. If the monitor is 1280 x 1024. - English Français Deutsch Specifications Relevant signal timings (analog) Display mode VESA Hsync Vsync Dot frequency Relevant...
Operation Manual
Page 30
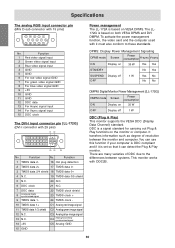
...There are many varieties of resolution between systems. This monitor works with 29 pins) C1 C2 12345678 9 10 11 12 13 14 15 16 17 18 19 20 21 22 23 24 C3 C4 ... C3 Analog blue image signal C4 Analog horizontally synchronized signal C5 Analog GND 15 GND Power management The LL-172A is based on VESA DPMS. The LL172G is a signal standard for carrying out Plug & Play functions on...compliant and if it is set so that it must also conform to the differences between the monitor and computer. Function No. To activate the power management function, the video card and the computer...
...There are many varieties of resolution between systems. This monitor works with 29 pins) C1 C2 12345678 9 10 11 12 13 14 15 16 17 18 19 20 21 22 23 24 C3 C4 ... C3 Analog blue image signal C4 Analog horizontally synchronized signal C5 Analog GND 15 GND Power management The LL-172A is based on VESA DPMS. The LL172G is a signal standard for carrying out Plug & Play functions on...compliant and if it is set so that it must also conform to the differences between the monitor and computer. Function No. To activate the power management function, the video card and the computer...

