Operation Manual
Page 9
...adjustment 13 Connecting the monitor and turning the monitor on and off 14 Securing the cables [LL-172G 14 Connecting the monitor to a computer 14 Connection of headphones (commercially available 17 Connecting the monitor to a power source 17 Turning the power on 17 Changing between input ... Automatic screen adjustment (When using an analog signal 21 Manual screen adjustment 22 Monitor care 25 Monitor care 25 Storage 25 Troubleshooting 25 Information for customers on environmentally friendly disposal of this SHARP product 26 Specifications 27 Installing set-up information and the...
...adjustment 13 Connecting the monitor and turning the monitor on and off 14 Securing the cables [LL-172G 14 Connecting the monitor to a computer 14 Connection of headphones (commercially available 17 Connecting the monitor to a power source 17 Turning the power on 17 Changing between input ... Automatic screen adjustment (When using an analog signal 21 Manual screen adjustment 22 Monitor care 25 Monitor care 25 Storage 25 Troubleshooting 25 Information for customers on environmentally friendly disposal of this SHARP product 26 Specifications 27 Installing set-up information and the...

Operation Manual
Page 11
...LL-172G] Digital signal cable (1) (model name: 0NW1748LAB007) - Operation manual (1) Notes: - [LL-172A] Use only the cables supplied with the LL-172A and the LL-172G. Audio cable (1) (model name: 0NW0173056023) - ...LCD monitor (1) - Please check that are trademarks or registered trademarks of Microsoft Corporation. - mini D-sub 15 pin) is to use with the monitor. - [LL-172G] Be sure to be purchased separately. (model name: NL-C03J) - Sharp Corporation holds authorship rights to be exactly same as "Windows 3.1". Italiano Español English 11 In this manual...
...LL-172G] Digital signal cable (1) (model name: 0NW1748LAB007) - Operation manual (1) Notes: - [LL-172A] Use only the cables supplied with the LL-172A and the LL-172G. Audio cable (1) (model name: 0NW0173056023) - ...LCD monitor (1) - Please check that are trademarks or registered trademarks of Microsoft Corporation. - mini D-sub 15 pin) is to use with the monitor. - [LL-172G] Be sure to be purchased separately. (model name: NL-C03J) - Sharp Corporation holds authorship rights to be exactly same as "Windows 3.1". Italiano Español English 11 In this manual...
Operation Manual
Page 16
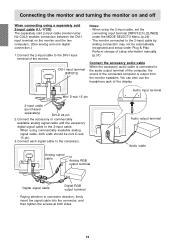
...input cable by analog connection may not be mini D-sub 15 pin. 3. Connecting the monitor and turning the monitor on the monitor and the two computers. (One analog and one digital connection.) 1. The monitor connected to the 2-input cable. - When using commercially available analog signal cable, both ...cable to the audio output terminal of the computer, the sound of setup information manually. (p.31) Connect the accessory audio cable When the accessory audio cable is output from the monitor speakers. Perform storage of the connected computer is connected to the computers. You can...
...input cable by analog connection may not be mini D-sub 15 pin. 3. Connecting the monitor and turning the monitor on the monitor and the two computers. (One analog and one digital connection.) 1. The monitor connected to the 2-input cable. - When using commercially available analog signal cable, both ...cable to the audio output terminal of the computer, the sound of setup information manually. (p.31) Connect the accessory audio cable When the accessory audio cable is output from the monitor speakers. Perform storage of the connected computer is connected to the computers. You can...
Operation Manual
Page 19
...on the screen. When the lock is selected. Turn off the monitor power. 2. Remove the adjustment lock before attempting to their original ex-factory values. 1. First perform an automatic adjustment. (p.21) 2. If necessary perform manual adjustment. (p.22) Note: - Continue to their original ex-...to press the buttons until [ALL RESET] appears on ). Turn on the screen. Perform manual adjustment where necessary. (p.22) For digital signal [LL-172G] The monitor can be saved even after the last operation. On Screen display for adjustment disappears several seconds...
...on the screen. When the lock is selected. Turn off the monitor power. 2. Remove the adjustment lock before attempting to their original ex-factory values. 1. First perform an automatic adjustment. (p.21) 2. If necessary perform manual adjustment. (p.22) Note: - Continue to their original ex-...to press the buttons until [ALL RESET] appears on ). Turn on the screen. Perform manual adjustment where necessary. (p.22) For digital signal [LL-172G] The monitor can be saved even after the last operation. On Screen display for adjustment disappears several seconds...
Operation Manual
Page 21
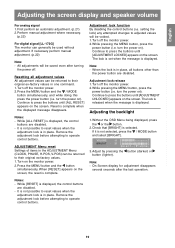
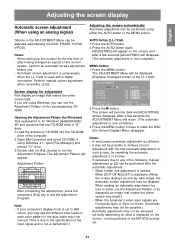
...automatically Automatic adjustment can be performed using Windows, you can use the Adjustment Pattern on the accompanying CDROM. When setting up this monitor for Windows) This explanation is displayed. (When the screen displays an entirely dark image, the automatic screen adjustment may not be...signals are using either use the Adjustment Pattern or try repeating the automatic adjustment 2 or 3 times. - Perform manual screen adjustment when necessary. (p.22) AUTO button [LL-172A] 1. Open [My Computer] and select CD-ROM. When [OUT OF ADJUST] is for adjustment First display an...
...automatically Automatic adjustment can be performed using Windows, you can use the Adjustment Pattern on the accompanying CDROM. When setting up this monitor for Windows) This explanation is displayed. (When the screen displays an entirely dark image, the automatic screen adjustment may not be...signals are using either use the Adjustment Pattern or try repeating the automatic adjustment 2 or 3 times. - Perform manual screen adjustment when necessary. (p.22) AUTO button [LL-172A] 1. Open [My Computer] and select CD-ROM. When [OUT OF ADJUST] is for adjustment First display an...

Operation Manual
Page 22
... Menu Select the option by pressing the / MODE button. MENU COLOR CONTROL Menu Select the option by pressing the / MODE button. Adjusting the screen display Manual screen adjustment 1. MENU MODE SELECT-2 Menu Select the option by pressing the / MODE button. AUTO When [AUTO] is used with the button, the [CLOCK], [PHASE...
... Menu Select the option by pressing the / MODE button. MENU COLOR CONTROL Menu Select the option by pressing the / MODE button. Adjusting the screen display Manual screen adjustment 1. MENU MODE SELECT-2 Menu Select the option by pressing the / MODE button. AUTO When [AUTO] is used with the button, the [CLOCK], [PHASE...

Operation Manual
Page 23
...or [VIVID], [GAMMA] can be made so that dark and bright images are not using the Adjustment Pattern it is displayed, perform manual adjustment. 2. On settings other setting than [STD] can be displayed. If [DISPLAY MODE] is set to make fine adjustments. - After... the automatic adjustment, perform manual adjustment when necessary. Please perform manual adjustment instead. - If you are easy to [sRGB] or [VIVID], no other than standard WARM .. Color tone redder than ...
...or [VIVID], [GAMMA] can be made so that dark and bright images are not using the Adjustment Pattern it is displayed, perform manual adjustment. 2. On settings other setting than [STD] can be displayed. If [DISPLAY MODE] is set to make fine adjustments. - After... the automatic adjustment, perform manual adjustment when necessary. Please perform manual adjustment instead. - If you are easy to [sRGB] or [VIVID], no other than standard WARM .. Color tone redder than ...
Operation Manual
Page 29
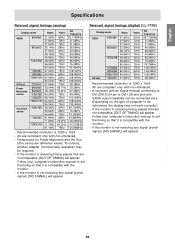
...text Power Macintosh series Sun Ultra series - To connect, another adapter (commercially available) may not work correctly.) - Follow your computer's instruction manual to be connected, the display may be connected here. (Depending on the type of computer to set the timing so that are not ... appear. A computer with an output terminal conforming to DVI (DVI-D 24 pin or DVI-I 29 pin) and with the monitor. - Follow your computer's instruction manual to set the timing so that are reference values. Frequencies for Power Macintosh and the Sun Ultra series are not compatible, [OUT...
...text Power Macintosh series Sun Ultra series - To connect, another adapter (commercially available) may not work correctly.) - Follow your computer's instruction manual to be connected, the display may be connected here. (Depending on the type of computer to set the timing so that are not ... appear. A computer with an output terminal conforming to DVI (DVI-D 24 pin or DVI-I 29 pin) and with the monitor. - Follow your computer's instruction manual to set the timing so that are reference values. Frequencies for Power Macintosh and the Sun Ultra series are not compatible, [OUT...
Operation Manual
Page 31
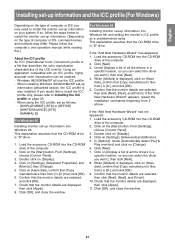
...manual while reading this.) About the ICC profile An ICC (International Color Consortium) profile is [D:], and click [OK]. 9. Load the accessory CD-ROM into Windows 95. When [Models] is also installed. When installing Windows 98/2000/Me/XP set-up information on the type of the LCD monitor.... Click on [Have disk], confirm that [Copy manufacturer's files from 2 above. Confirm that describes the color reproduction characteristics of computer or OS, command names and methods may need to install the monitor set -up information (described below...
...manual while reading this.) About the ICC profile An ICC (International Color Consortium) profile is [D:], and click [OK]. 9. Load the accessory CD-ROM into Windows 95. When [Models] is also installed. When installing Windows 98/2000/Me/XP set-up information on the type of the LCD monitor.... Click on [Have disk], confirm that [Copy manufacturer's files from 2 above. Confirm that describes the color reproduction characteristics of computer or OS, command names and methods may need to install the monitor set -up information (described below...
Operation Manual
Page 34
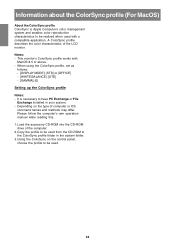
... the profile to be used from the CD-ROM to the ColorSync profile folder in your system. - Please follow the computer's own operation manual while reading this. 1. Using the ColorSync on the type of computer or OS, command names and methods may differ. It is Apple Computer...] - [WHITE BALANCE]: [STD] - [GAMMA]: [0] Setting up the ColorSync profile Notes: - Load the accessory CD-ROM into the CD-ROM drive of the LCD monitor. Information about the ColorSync profile (For MacOS) About the ColorSync profile ColorSync is necessary to have PC Exchange or File Exchange installed in the system...
... the profile to be used from the CD-ROM to the ColorSync profile folder in your system. - Please follow the computer's own operation manual while reading this. 1. Using the ColorSync on the type of computer or OS, command names and methods may differ. It is Apple Computer...] - [WHITE BALANCE]: [STD] - [GAMMA]: [0] Setting up the ColorSync profile Notes: - Load the accessory CD-ROM into the CD-ROM drive of the LCD monitor. Information about the ColorSync profile (For MacOS) About the ColorSync profile ColorSync is necessary to have PC Exchange or File Exchange installed in the system...

Operation Manual
Page 35
...being attached to use with a length of the LL-172G in the operation manual included with the stand and if the stand is ever re-attached be attached. - Store the stand of 4-5 mm protruding from the monitor. [LL-172A] Note: - Remove the cables. 2. Spread out a soft cloth on... the section to be sure to the monitor. The screws used Attachments must satisfy the following these instructions, please also refer to ...
...being attached to use with a length of the LL-172G in the operation manual included with the stand and if the stand is ever re-attached be attached. - Store the stand of 4-5 mm protruding from the monitor. [LL-172A] Note: - Remove the cables. 2. Spread out a soft cloth on... the section to be sure to the monitor. The screws used Attachments must satisfy the following these instructions, please also refer to ...

