User Guide
Page 2
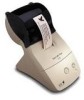
... Torrance, CA 90505 Manual Part Number: 22-84010-01 Printed in any liability assumed for damages resulting from that to which the receiver is no responsibility for help. These limits are subject to change without the prior written permission of Seiko Instruments USA Inc. .... • Increase the separation between the equipment and receiver. • Connect the equipment into an outlet on a circuit different from the use of information contained herein. Smart Label Printer 100/200/240 User Guide by Seiko Instruments could void the user's authority to operate the equipment....
... Torrance, CA 90505 Manual Part Number: 22-84010-01 Printed in any liability assumed for damages resulting from that to which the receiver is no responsibility for help. These limits are subject to change without the prior written permission of Seiko Instruments USA Inc. .... • Increase the separation between the equipment and receiver. • Connect the equipment into an outlet on a circuit different from the use of information contained herein. Smart Label Printer 100/200/240 User Guide by Seiko Instruments could void the user's authority to operate the equipment....
User Guide
Page 4
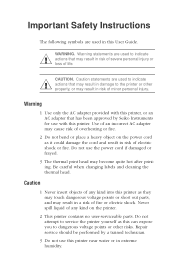
... may become quite hot after printing. Be careful when changing labels and cleaning the thermal head. CAUTION. Do not use with this printer, or an AC adapter that may cause risk of overheating or fire. 2 Do not bend or place a heavy object on the printer. 2 This printer contains no user-serviceable parts. Important Safety Instructions The following symbols are used in risk of electric shock or...
... may become quite hot after printing. Be careful when changing labels and cleaning the thermal head. CAUTION. Do not use with this printer, or an AC adapter that may cause risk of overheating or fire. 2 Do not bend or place a heavy object on the printer. 2 This printer contains no user-serviceable parts. Important Safety Instructions The following symbols are used in risk of electric shock or...

User Guide
Page 5
... interface cable when disconnecting. 4 Be sure to rain or water. Repeated pulling on a flat surface in performance, such as emitting a strange noise, odor or smoke. Installation For best performance, we recommend that satisfies the following conditions occur, turn off the printer and unplug the power cord from an error or the printer does not operate normally when the operating instructions...
... interface cable when disconnecting. 4 Be sure to rain or water. Repeated pulling on a flat surface in performance, such as emitting a strange noise, odor or smoke. Installation For best performance, we recommend that satisfies the following conditions occur, turn off the printer and unplug the power cord from an error or the printer does not operate normally when the operating instructions...
User Guide
Page 6
.... This guide will help you are familiar with initial capital letters. In writing this guide: s Commands you choose from the File menu. About This Guide As you'll soon realize, the Smart Label Printer® is easy to type appears in bold. Example: Type A:\SETUP. s Text we assume that you set up your SLP 100, 200 or 240 install the software, and use your SLP. User Guide i The...
.... This guide will help you are familiar with initial capital letters. In writing this guide: s Commands you choose from the File menu. About This Guide As you'll soon realize, the Smart Label Printer® is easy to type appears in bold. Example: Type A:\SETUP. s Text we assume that you set up your SLP 100, 200 or 240 install the software, and use your SLP. User Guide i The...

User Guide
Page 7
... for replacing a label roll and taking care of questions and answers that can help . s Appendix B, Commonly Asked Questions and Answers, provides a list of your SLP. ii Smart Label Printer Models 100, 200 and 240 s Chapter 2, Getting Started, provides instructions for connecting the SLP 100/200/240 to use on-line help you resolve problems. s Appendix C, Technical Support and Service, provides technical support and service information...
... for replacing a label roll and taking care of questions and answers that can help . s Appendix B, Commonly Asked Questions and Answers, provides a list of your SLP. ii Smart Label Printer Models 100, 200 and 240 s Chapter 2, Getting Started, provides instructions for connecting the SLP 100/200/240 to use on-line help you resolve problems. s Appendix C, Technical Support and Service, provides technical support and service information...
User Guide
Page 8
... PC 2-6 Loading a Roll of Labels 2-7 Testing the Printer 2-9 Installing the Smart Label Software 2-10 Using On-Line Help 2-11 Chapter 3 Changing Labels and Printer Care Overview 3-2 Caring for Your Printer 3-2 Off Line and On Line Mode 3-3 Changing a Label Roll 3-3 Removing the Old Roll 3-3 Loading the New Roll 3-3 Adjusting the Position of Labels 3-4 Removing Stuck Labels 3-5 Appendix A Specifications Smart Label Printer 100/200/240 Specifications A-2 Status Light Indicators A-3 Appendix B Commonly Asked Questions and Answers B-1 Appendix C Technical Support and Service C-1 User Guide iii
... PC 2-6 Loading a Roll of Labels 2-7 Testing the Printer 2-9 Installing the Smart Label Software 2-10 Using On-Line Help 2-11 Chapter 3 Changing Labels and Printer Care Overview 3-2 Caring for Your Printer 3-2 Off Line and On Line Mode 3-3 Changing a Label Roll 3-3 Removing the Old Roll 3-3 Loading the New Roll 3-3 Adjusting the Position of Labels 3-4 Removing Stuck Labels 3-5 Appendix A Specifications Smart Label Printer 100/200/240 Specifications A-2 Status Light Indicators A-3 Appendix B Commonly Asked Questions and Answers B-1 Appendix C Technical Support and Service C-1 User Guide iii
User Guide
Page 11
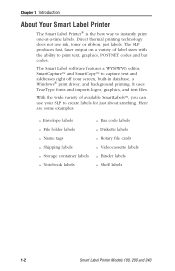
... of label sizes with the ability to print text, graphics, POSTNET codes and bar codes. The SLP produces fast, laser output on a variety of available SmartLabels™, you can use ink, toner or ribbon, just labels. Direct thermal printing technology does not use your screen, built-in database, a Windows® print driver, and background printing. The Smart Label software features a WYSIWYG editor, SmartCapture™ and SmartCopy™ to capture text and addresses...
... of label sizes with the ability to print text, graphics, POSTNET codes and bar codes. The SLP produces fast, laser output on a variety of available SmartLabels™, you can use ink, toner or ribbon, just labels. Direct thermal printing technology does not use your screen, built-in database, a Windows® print driver, and background printing. The Smart Label software features a WYSIWYG editor, SmartCapture™ and SmartCopy™ to capture text and addresses...

User Guide
Page 12
...-fit and word wrap ensure that addresses and other applications while labels are printing. n Multiple user feature allows each text object-different font types, sizes and styles (bold/italic/underline) can work in background so you can be included on your labeling needs. Print labels one at a time or whole mailing lists. n Contact-based records updated automatically from Windows applications, saving time and eliminating retyping. User Guide 1-3 n Find feature makes...
...-fit and word wrap ensure that addresses and other applications while labels are printing. n Multiple user feature allows each text object-different font types, sizes and styles (bold/italic/underline) can work in background so you can be included on your labeling needs. Print labels one at a time or whole mailing lists. n Contact-based records updated automatically from Windows applications, saving time and eliminating retyping. User Guide 1-3 n Find feature makes...

User Guide
Page 13
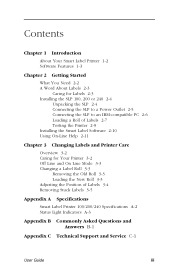
Chapter 2 Getting Started What You Need 2-2 A Word About Labels 2-3 Installing the SLP 100, 200 or 240 2-4 Installing the Smart Label Software 2-10 Using On-Line Help 2-11 User Guide 2-1
Chapter 2 Getting Started What You Need 2-2 A Word About Labels 2-3 Installing the SLP 100, 200 or 240 2-4 Installing the Smart Label Software 2-10 Using On-Line Help 2-11 User Guide 2-1
User Guide
Page 16
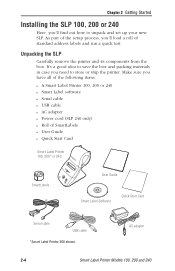
... or ship the printer. Make sure you 'll load a roll of SmartLabels n User Guide n Quick Start Card Smart Label Printer 100, 200* or 240 SmartLabels User Guide Smart Label Software Quick Start Card Serial cable USB cable *Smart Label Printer 200 shown. As part of the setup process, you have all of the following items. n A Smart Label Printer 100, 200 or 240 n Smart Label software n Serial cable n USB cable n AC adapter n Power cord (SLP 240 only) n Roll of standard address labels and...
... or ship the printer. Make sure you 'll load a roll of SmartLabels n User Guide n Quick Start Card Smart Label Printer 100, 200* or 240 SmartLabels User Guide Smart Label Software Quick Start Card Serial cable USB cable *Smart Label Printer 200 shown. As part of the setup process, you have all of the following items. n A Smart Label Printer 100, 200 or 240 n Smart Label software n Serial cable n USB cable n AC adapter n Power cord (SLP 240 only) n Roll of standard address labels and...

User Guide
Page 19
... roll is turned on the end of the roll to create a "leader." Load the roll of the clear plastic label cover and rotate it open. Prepare the roll of labels 1 Remove the sticker from the beginning of the roll of standard address labels. Check to be flashing. 2 Lift the base of labels 1 Make sure the power cord is connected and that the printer is not...
... roll is turned on the end of the roll to create a "leader." Load the roll of the clear plastic label cover and rotate it open. Prepare the roll of labels 1 Remove the sticker from the beginning of the roll of standard address labels. Check to be flashing. 2 Lift the base of labels 1 Make sure the power cord is connected and that the printer is not...
User Guide
Page 22
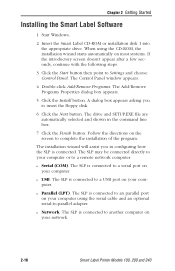
... to -parallel adapter. The SLP is connected. n Network. The Control Panel window appears. 4 Double-click Add/Remove Programs. The Add/Remove Programs Properties dialog box appears. 5 Click the Install button. n USB. Follow the directions on your computer. n Serial (COM). A dialog box appears asking you in the command line box. 7 Click the Finish button. When using the serial cable and an optional serial-to complete the installation of the program...
... to -parallel adapter. The SLP is connected. n Network. The Control Panel window appears. 4 Double-click Add/Remove Programs. The Add/Remove Programs Properties dialog box appears. 5 Click the Install button. n USB. Follow the directions on your computer. n Serial (COM). A dialog box appears asking you in the command line box. 7 Click the Finish button. When using the serial cable and an optional serial-to complete the installation of the program...

User Guide
Page 23
.... Use the Help Topics screen to jump to other reference topics. Double-click a book icon to the Contents. Double-click a topic with a question mark icon to view the help text, click Help Topics to return to view the contents for creating labels, customizing format, SmartCopy or SmartCapture, printing, and label database functions. User Guide 2-11 You access Help through the Help Topics command on -line help provides detailed instructions...
.... Use the Help Topics screen to jump to other reference topics. Double-click a book icon to the Contents. Double-click a topic with a question mark icon to view the help text, click Help Topics to return to view the contents for creating labels, customizing format, SmartCopy or SmartCapture, printing, and label database functions. User Guide 2-11 You access Help through the Help Topics command on -line help provides detailed instructions...

User Guide
Page 25
Chapter 3 Changing Labels and Printer Care Overview 3-2 Caring for Your Printer 3-2 Off Line and On Line Mode 3-3 Changing a Label Roll 3-3 Adjusting the Position of Labels 3-4 Removing Stuck Labels 3-5 User Guide 3-1
Chapter 3 Changing Labels and Printer Care Overview 3-2 Caring for Your Printer 3-2 Off Line and On Line Mode 3-3 Changing a Label Roll 3-3 Adjusting the Position of Labels 3-4 Removing Stuck Labels 3-5 User Guide 3-1
User Guide
Page 26
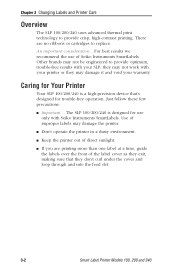
... trouble-free operation. s Keep the printer out of the label cover as they don't curl under the cover and loop through and into the feed slot. 3-2 Smart Label Printer Models 100, 200 and 240 The SLP 100/200/240 is a high-precision device that they exit, making sure that 's designed for use of improper labels may damage the printer. s If you are no ribbons or cartridges...
... trouble-free operation. s Keep the printer out of the label cover as they don't curl under the cover and loop through and into the feed slot. 3-2 Smart Label Printer Models 100, 200 and 240 The SLP 100/200/240 is a high-precision device that they exit, making sure that 's designed for use of improper labels may damage the printer. s If you are no ribbons or cartridges...

User Guide
Page 27
... any printed labels. User Guide 3-3 An amber status light indicates that the printer is out of labels. This feature is in "Loading a Roll of Labels" on the labels to remove them from the print queue. Chapter 3 Changing Labels and Printer Care Off Line and On Line Mode Pressing and releasing the power button toggles the printer between off line and on the front of the SLP flashes. If printing is a handy way to get jammed...
... any printed labels. User Guide 3-3 An amber status light indicates that the printer is out of labels. This feature is in "Loading a Roll of Labels" on the labels to remove them from the print queue. Chapter 3 Changing Labels and Printer Care Off Line and On Line Mode Pressing and releasing the power button toggles the printer between off line and on the front of the SLP flashes. If printing is a handy way to get jammed...

User Guide
Page 28
...Changing Labels and Printer Care Adjusting the Position of the print engine cover into the slots on the tabs at an angle, it's easy to the locked position. 5 Make sure the labels feed through the slot. 6 Insert the tabs on the lower edge of Labels If you find the labels are advancing at the top of the cover. 2 Release the pressure on the label...push the top edge forward until the cover snaps into place. 3-4 Smart Label Printer Models 100, 200 and 240 Remove the print engine cover Release the platen lever 3 Realign the label stock so it is straight. 4 Return the platen release lever to ...
...Changing Labels and Printer Care Adjusting the Position of the print engine cover into the slots on the tabs at an angle, it's easy to the locked position. 5 Make sure the labels feed through the slot. 6 Insert the tabs on the lower edge of Labels If you find the labels are advancing at the top of the cover. 2 Release the pressure on the label...push the top edge forward until the cover snaps into place. 3-4 Smart Label Printer Models 100, 200 and 240 Remove the print engine cover Release the platen lever 3 Realign the label stock so it is straight. 4 Return the platen release lever to ...

User Guide
Page 29
... the cover snaps into place. User Guide 3-5 stick to the platen, use a small amount of isopropyl rubbing alcohol on a cotton swab to the locked position. 7 Insert the tabs on the lower edge of the label - or pieces of the print engine cover into the slots on the label stock by moving the platen release lever forward. 4 Remove the stuck label. 5 If the...
... the cover snaps into place. User Guide 3-5 stick to the platen, use a small amount of isopropyl rubbing alcohol on a cotton swab to the locked position. 7 Insert the tabs on the lower edge of the label - or pieces of the print engine cover into the slots on the label stock by moving the platen release lever forward. 4 Remove the stuck label. 5 If the...
User Guide
Page 39
... new roll, 2-7 removing the old roll, 3-3 M Multiple users also see on-line Help, 1-3 P Package contents, 2-4 Printing labels out of labels, 3-3 stop printing, 3-3 S Serial cable, 2-4, 2-6 SLP adjusting labels, 3-4 caring for, 3-2 form feed button, 2-5 installation, 2-4 off-line mode, 3-3 on-line mode, 3-3 power button, 2-5, 3-3 removing stuck labels, 3-5 status light, 2-5, 2-7, 3-3 testing printer, 2-9 thermal print engine, 3-2 Smart Label software installing, 2-10 SmartLabels, 2-3, 3-2, D-2 Specifications, A-2 System requirements, 2-2 T Technical support, C-2 U USB cable, 2-4, 2-6 W Windows...
... new roll, 2-7 removing the old roll, 3-3 M Multiple users also see on-line Help, 1-3 P Package contents, 2-4 Printing labels out of labels, 3-3 stop printing, 3-3 S Serial cable, 2-4, 2-6 SLP adjusting labels, 3-4 caring for, 3-2 form feed button, 2-5 installation, 2-4 off-line mode, 3-3 on-line mode, 3-3 power button, 2-5, 3-3 removing stuck labels, 3-5 status light, 2-5, 2-7, 3-3 testing printer, 2-9 thermal print engine, 3-2 Smart Label software installing, 2-10 SmartLabels, 2-3, 3-2, D-2 Specifications, A-2 System requirements, 2-2 T Technical support, C-2 U USB cable, 2-4, 2-6 W Windows...

User Guide
Page 40
... Inc. be returned to you can make backup copies for a particular purpose. unauthorized modifications or misuse; will Seiko Instruments USA Inc. has tested the software and reviewed the documentation, Seiko Instruments USA Inc. If Seiko Instruments USA Inc. Seiko Instruments USA Inc. warrants this user guide for the product; Obtaining Warranty Service To obtain warranty service, products must be liable for...
... Inc. be returned to you can make backup copies for a particular purpose. unauthorized modifications or misuse; will Seiko Instruments USA Inc. has tested the software and reviewed the documentation, Seiko Instruments USA Inc. If Seiko Instruments USA Inc. Seiko Instruments USA Inc. warrants this user guide for the product; Obtaining Warranty Service To obtain warranty service, products must be liable for...


