Installation Guide
Page 2
... Changing Sync Mode and Add and Replace Rules 25 Selecting "Ask First" for Add and Replace Rules 26 Synchronizing Now Manually 28 Viewing Sync Status 28 Accessing your Synchronized Folders 29 Using Ceedo ...33 Using Ceedo for the First Time 33 Using the Ceedo Application 37 Using the Ceedo Compact Bar 37 Using the Ceedo System Tray Icon 38 Distinguishing a Ceedo Window 40 Utilities ...41 Running Drive Diagnostics 41 FreeAgent Go Data...
... Changing Sync Mode and Add and Replace Rules 25 Selecting "Ask First" for Add and Replace Rules 26 Synchronizing Now Manually 28 Viewing Sync Status 28 Accessing your Synchronized Folders 29 Using Ceedo ...33 Using Ceedo for the First Time 33 Using the Ceedo Application 37 Using the Ceedo Compact Bar 37 Using the Ceedo System Tray Icon 38 Distinguishing a Ceedo Window 40 Utilities ...41 Running Drive Diagnostics 41 FreeAgent Go Data...
Installation Guide
Page 4
... computer. Installing the FreeAgent Tools Step 1: Connect your FreeAgent drive to the Encryption feature. Figure 1: AutoStart Window in Windows XP Note: Remember that drive letters, available AutoStart options, and AutoStart windows differ depending on any computer. However, before you can use Ceedo to do this manual apply to your operating system. If your product does not offer Encryption, the Encryption sections of this . FreeAgent Go Data Mover 1 Getting Started When...
... computer. Installing the FreeAgent Tools Step 1: Connect your FreeAgent drive to the Encryption feature. Figure 1: AutoStart Window in Windows XP Note: Remember that drive letters, available AutoStart options, and AutoStart windows differ depending on any computer. However, before you can use Ceedo to do this manual apply to your operating system. If your product does not offer Encryption, the Encryption sections of this . FreeAgent Go Data Mover 1 Getting Started When...
Installation Guide
Page 7
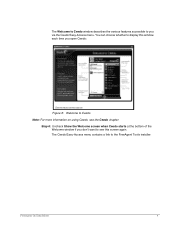
The Welcome to Ceedo window describes the various features accessible to see the Ceedo chapter. Step 6: Uncheck Show the Welcome screen when Ceedo starts at the bottom of the Welcome window if you don't want to you open Ceedo: Figure 8: Welcome to the FreeAgent Tools installer: FreeAgent Go Data Mover 4 The Ceedo Easy-Access menu contains a link to Ceedo Note: For more information on using Ceedo, see this window each time you via the Ceedo Easy-Access menu. You can choose whether to display this screen again.
The Welcome to Ceedo window describes the various features accessible to see the Ceedo chapter. Step 6: Uncheck Show the Welcome screen when Ceedo starts at the bottom of the Welcome window if you don't want to you open Ceedo: Figure 8: Welcome to the FreeAgent Tools installer: FreeAgent Go Data Mover 4 The Ceedo Easy-Access menu contains a link to Ceedo Note: For more information on using Ceedo, see this window each time you via the Ceedo Easy-Access menu. You can choose whether to display this screen again.

Installation Guide
Page 10
OR - Click Browse to accept the default installation folder - Figure 13: Choose Installation Folder Step 11: Click Next to select a different installation folder. The Setup Status window opens: FreeAgent Go Data Mover 7 If you click Browse, a Choose Folder window opens: Figure 14: Change Installation Folder Browse to the desired folder and click OK in the Choose Folder window, then Next in the Choose Destination Location window.
OR - Click Browse to accept the default installation folder - Figure 13: Choose Installation Folder Step 11: Click Next to select a different installation folder. The Setup Status window opens: FreeAgent Go Data Mover 7 If you click Browse, a Choose Folder window opens: Figure 14: Change Installation Folder Browse to the desired folder and click OK in the Choose Folder window, then Next in the Choose Destination Location window.
Installation Guide
Page 13
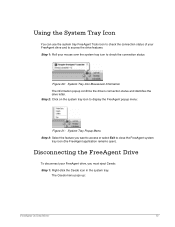
... drive's connection status and identifies the drive letter. Step 2: Click on the system tray icon to display the FreeAgent popup menu: Figure 21: System Tray Popup Menu Step 3: Select the feature you must eject Ceedo: Step 1: Right-click the Ceedo icon in the system tray. The Ceedo menu pops up: FreeAgent Go Data Mover 10 Disconnecting the FreeAgent Drive To disconnect your FreeAgent drive...
... drive's connection status and identifies the drive letter. Step 2: Click on the system tray icon to display the FreeAgent popup menu: Figure 21: System Tray Popup Menu Step 3: Select the feature you must eject Ceedo: Step 1: Right-click the Ceedo icon in the system tray. The Ceedo menu pops up: FreeAgent Go Data Mover 10 Disconnecting the FreeAgent Drive To disconnect your FreeAgent drive...
Installation Guide
Page 15
... section of the FreeAgent application. File encryption prevents others from an Explorer window; Encryption uses a password you create to modify a file so that does not meet these criteria, a window opens to the Encryption feature. If your approval. You cannot encrypt folders, nor can encrypt a file directly from your desktop or from accessing your data without being decrypted is produced in a folder within Ceedo (for example, My Documents). However, you : FreeAgent Go Data Mover 12
... section of the FreeAgent application. File encryption prevents others from an Explorer window; Encryption uses a password you create to modify a file so that does not meet these criteria, a window opens to the Encryption feature. If your approval. You cannot encrypt folders, nor can encrypt a file directly from your desktop or from accessing your data without being decrypted is produced in a folder within Ceedo (for example, My Documents). However, you : FreeAgent Go Data Mover 12
Installation Guide
Page 19
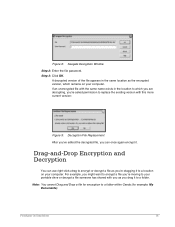
... edited the decrypted file, you can use right-click+drag to encrypt or decrypt a file as the encrypted version, which you are decrypting, you're asked permission to replace the existing version with you as you 're moving to which remains on your computer. Step 3: Click OK. Figure 8: Seagate Decryption Window Step 2: Enter the file password. For example, you might want to a folder...
... edited the decrypted file, you can use right-click+drag to encrypt or decrypt a file as the encrypted version, which you are decrypting, you're asked permission to replace the existing version with you as you 're moving to which remains on your computer. Step 3: Click OK. Figure 8: Seagate Decryption Window Step 2: Enter the file password. For example, you might want to a folder...
Installation Guide
Page 20
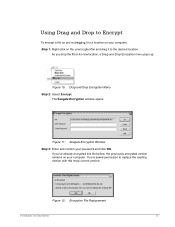
... permission to the desired location. As you drop the file in its new location, a Drag-and-Drop Encryption menu pops up: Figure 10: Drag-and-Drop Encryption Menu Step 2: Select Encrypt. The Seagate Encryption window opens: Figure 11: Seagate Encryption Window Step 3: Enter and confirm your computer. If you've already encrypted this more current version: Figure 12: Encryption File Replacement FreeAgent Go Data Mover 17 Using Drag and Drop to Encrypt...
... permission to the desired location. As you drop the file in its new location, a Drag-and-Drop Encryption menu pops up: Figure 10: Drag-and-Drop Encryption Menu Step 2: Select Encrypt. The Seagate Encryption window opens: Figure 11: Seagate Encryption Window Step 3: Enter and confirm your computer. If you've already encrypted this more current version: Figure 12: Encryption File Replacement FreeAgent Go Data Mover 17 Using Drag and Drop to Encrypt...
Installation Guide
Page 21
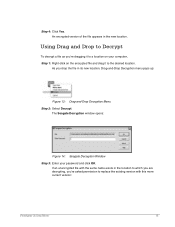
..., you drop the file in the new location. Step 4: Click Yes. The Seagate Decryption window opens: Figure 14: Seagate Decryption Window Step 3: Enter your computer, Step 1: Right-click on the encrypted file and drag it to a location on your password and click OK. As you 're asked permission to the desired location. An encrypted version of the file appears in its new location, Drag...
..., you drop the file in the new location. Step 4: Click Yes. The Seagate Decryption window opens: Figure 14: Seagate Decryption Window Step 3: Enter your computer, Step 1: Right-click on the encrypted file and drag it to a location on your password and click OK. As you 're asked permission to the desired location. An encrypted version of the file appears in its new location, Drag...
Installation Guide
Page 23
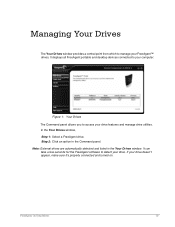
Note: External drives are automatically detected and listed in the Command panel. It displays all FreeAgent portable and desktop devices connected to your computer: Figure 1: Your Drives The Command panel allows you to access your drive doesn't appear, make sure it's properly connected and turned on. If your drive features and manage drive utilities. FreeAgent Go Data Mover 19 Managing Your Drives The Your Drives window provides a central point from which to manage your drive. Step 2: Click...
Note: External drives are automatically detected and listed in the Command panel. It displays all FreeAgent portable and desktop devices connected to your computer: Figure 1: Your Drives The Command panel allows you to access your drive doesn't appear, make sure it's properly connected and turned on. If your drive features and manage drive utilities. FreeAgent Go Data Mover 19 Managing Your Drives The Your Drives window provides a central point from which to manage your drive. Step 2: Click...
Installation Guide
Page 24
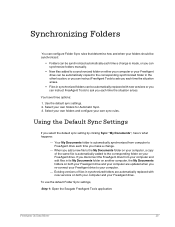
... Documents folder on your computer, a copy of files in synchronized folders are updated when you re-connect your FreeAgent drive to your computer. - To use the default Folder Sync settings, Step 1: Open the Seagate FreeAgent Tools application: FreeAgent Go Data Mover 20 Select your own folders and configure your own folders for Automatic Sync. 3. Select your own sync rules. Existing versions of the same file is made, or you can synchronize folders manually. • New files...
... Documents folder on your computer, a copy of files in synchronized folders are updated when you re-connect your FreeAgent drive to your computer. - To use the default Folder Sync settings, Step 1: Open the Seagate FreeAgent Tools application: FreeAgent Go Data Mover 20 Select your own folders and configure your own folders for Automatic Sync. 3. Select your own sync rules. Existing versions of the same file is made, or you can synchronize folders manually. • New files...
Installation Guide
Page 28
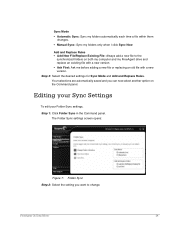
FreeAgent Go Data Mover 24 Sync Mode • Automatic Sync: Sync my folders automatically each time a file within them changes. • Manual Sync: Sync my folders only when I click Sync Now. The Folder Sync settings screen opens: Figure 7: Folder Sync Step 2: Select the setting you can now select another option on both my computer and my FreeAgent drive and replace an existing file with a new version. • Ask First: Ask me...
FreeAgent Go Data Mover 24 Sync Mode • Automatic Sync: Sync my folders automatically each time a file within them changes. • Manual Sync: Sync my folders only when I click Sync Now. The Folder Sync settings screen opens: Figure 7: Folder Sync Step 2: Select the setting you can now select another option on both my computer and my FreeAgent drive and replace an existing file with a new version. • Ask First: Ask me...
Installation Guide
Page 30
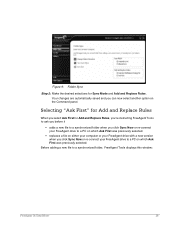
... select another option on the Command panel. Selecting "Ask First" for Add and Replace Rules When you select Ask First for Sync Mode and Add and Replace Rules. Before adding a new file to a PC on which Ask First was previously selected. • replaces a file on either your computer or your FreeAgent drive to a synchronized folder, FreeAgent Tools displays this window: FreeAgent Go Data Mover 26
... select another option on the Command panel. Selecting "Ask First" for Add and Replace Rules When you select Ask First for Sync Mode and Add and Replace Rules. Before adding a new file to a PC on which Ask First was previously selected. • replaces a file on either your computer or your FreeAgent drive to a synchronized folder, FreeAgent Tools displays this window: FreeAgent Go Data Mover 26
Installation Guide
Page 37
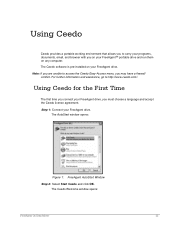
... FreeAgent drive, you are unable to http://www.ceedo.com/. For further information and assistance, go to access the Ceedo Easy-Access menu, you may have a firewall conflict. The AutoStart window opens: Figure 1: FreeAgent AutoStart Window Step 2: Select Start Ceedo and click OK. The Ceedo Welcome window opens: FreeAgent Go Data Mover 33 Step 1: Connect your FreeAgent drive. Using Ceedo Ceedo provides a portable working environment that allows you to carry your programs, documents...
... FreeAgent drive, you are unable to http://www.ceedo.com/. For further information and assistance, go to access the Ceedo Easy-Access menu, you may have a firewall conflict. The AutoStart window opens: Figure 1: FreeAgent AutoStart Window Step 2: Select Start Ceedo and click OK. The Ceedo Welcome window opens: FreeAgent Go Data Mover 33 Step 1: Connect your FreeAgent drive. Using Ceedo Ceedo provides a portable working environment that allows you to carry your programs, documents...
Installation Guide
Page 42
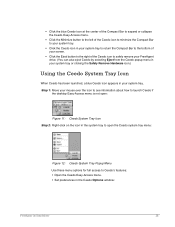
... desktop Easy-Access menu is not open: Figure 11: Ceedo System Tray Icon Step 2: Right-click on the icon in the system tray to open the Ceedo system tray menu: Figure 12: Ceedo System Tray Popup Menu Use these menu options for full access to Ceedo's features: • Open the Ceedo Easy-Access menu. • Set preferences in the Ceedo Options window: FreeAgent Go Data...
... desktop Easy-Access menu is not open: Figure 11: Ceedo System Tray Icon Step 2: Right-click on the icon in the system tray to open the Ceedo system tray menu: Figure 12: Ceedo System Tray Popup Menu Use these menu options for full access to Ceedo's features: • Open the Ceedo Easy-Access menu. • Set preferences in the Ceedo Options window: FreeAgent Go Data...
Installation Guide
Page 45
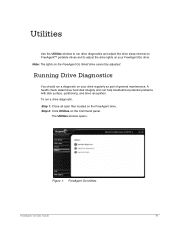
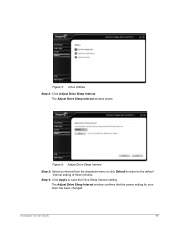
... your FreeAgent Go drive. Running Drive Diagnostics You should run a diagnostic on the FreeAgent drive. The Utilities window opens: Figure 1: FreeAgent Go Utilities FreeAgent Go User Guide 41 A health check determines hard disk integrity and can help troubleshoot potential problems with disk surface, partitioning, and drive recognition. Utilities Use the Utilities window to run drive diagnostics and adjust the drive sleep interval on FreeAgent™ portable drives and to adjust the drive lights on the Command panel. Step 2: Click Utilities on your drive regularly as part of...
... your FreeAgent Go drive. Running Drive Diagnostics You should run a diagnostic on the FreeAgent drive. The Utilities window opens: Figure 1: FreeAgent Go Utilities FreeAgent Go User Guide 41 A health check determines hard disk integrity and can help troubleshoot potential problems with disk surface, partitioning, and drive recognition. Utilities Use the Utilities window to run drive diagnostics and adjust the drive sleep interval on FreeAgent™ portable drives and to adjust the drive lights on the Command panel. Step 2: Click Utilities on your drive regularly as part of...
Installation Guide
Page 48
Step 4: Click Apply to the default interval setting of three minutes. The Adjust Drive Sleep Interval window opens: Figure 6: Adjust Drive Sleep Interval Step 3: Select an interval from the dropdown menu or click Default to return to save the Drive Sleep Interval setting. The Adjust Drive Sleep Interval window confirms that the power setting for your drive has been changed: FreeAgent Go User Guide 44 Figure 5: Drive Utilities Step 2: Click Adjust Drive Sleep Interval.
Step 4: Click Apply to the default interval setting of three minutes. The Adjust Drive Sleep Interval window opens: Figure 6: Adjust Drive Sleep Interval Step 3: Select an interval from the dropdown menu or click Default to return to save the Drive Sleep Interval setting. The Adjust Drive Sleep Interval window confirms that the power setting for your drive has been changed: FreeAgent Go User Guide 44 Figure 5: Drive Utilities Step 2: Click Adjust Drive Sleep Interval.
Installation Guide
Page 51
... the Drive Sleep Interval 43 C Ceedo Using the Ceedo Application 37 Ceedo Application 37 Distinguishing a Ceedo Window 40 Using the Ceedo Compact Bar 37 Using the Ceedo System Tray Icon 38 Ceedo Compact Bar 37 Ceedo Easy-Access Menu 5 Ceedo System Tray Icon 38 Ceedo Welcome Window 3 Changing Folder Selection 25 Changing Sync Mode and Add and Replace Rules 25 Creating a Password 12 D Decrypting a File 15 Default Sync Settings 20...
... the Drive Sleep Interval 43 C Ceedo Using the Ceedo Application 37 Ceedo Application 37 Distinguishing a Ceedo Window 40 Using the Ceedo Compact Bar 37 Using the Ceedo System Tray Icon 38 Ceedo Compact Bar 37 Ceedo Easy-Access Menu 5 Ceedo System Tray Icon 38 Ceedo Welcome Window 3 Changing Folder Selection 25 Changing Sync Mode and Add and Replace Rules 25 Creating a Password 12 D Decrypting a File 15 Default Sync Settings 20...
Installation Guide
Page 52
... Synchronizing 20 Synchronizing Folders 20 Accessing your Synchronized Folders 29 Editing your Sync Settings 24 Selecting Your Own Folders for Sync 22 Synchronizing Now Manually 28 Using the Default Sync Settings 20 Viewing Sync Status 28 Synchronizing Now Manually 28 U Using Ceedo 33 Using Ceedo for the First Time 33 Utilities and Diagnostics 41 Adjusting the Drive Lights 45 Adjusting the Drive Sleep Interval 43 Running Drive Diagnostics 41 FreeAgent Go Data Mover Index ii
... Synchronizing 20 Synchronizing Folders 20 Accessing your Synchronized Folders 29 Editing your Sync Settings 24 Selecting Your Own Folders for Sync 22 Synchronizing Now Manually 28 Using the Default Sync Settings 20 Viewing Sync Status 28 Synchronizing Now Manually 28 U Using Ceedo 33 Using Ceedo for the First Time 33 Utilities and Diagnostics 41 Adjusting the Drive Lights 45 Adjusting the Drive Sleep Interval 43 Running Drive Diagnostics 41 FreeAgent Go Data Mover Index ii
Setup Guide
Page 1
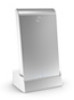
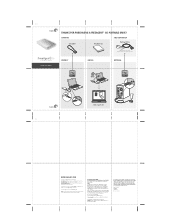
.... FRONT QUICK START GUIDE THANKS FOR PURCHASING A FREEAGENT™ GO PORTABLE DRIVE! If this device must accept any interference received, including interference that to Part 15 of the listed capacity is included with the instructions, may cause undesired operation. Seagate, Seagate Technology, the Wave logo, and FreeAgent are designed to operate this equipment may use this product • Download Center: Installation software, utilities and diagnostics • Warranty Information • And all of your data...
.... FRONT QUICK START GUIDE THANKS FOR PURCHASING A FREEAGENT™ GO PORTABLE DRIVE! If this device must accept any interference received, including interference that to Part 15 of the listed capacity is included with the instructions, may cause undesired operation. Seagate, Seagate Technology, the Wave logo, and FreeAgent are designed to operate this equipment may use this product • Download Center: Installation software, utilities and diagnostics • Warranty Information • And all of your data...


