Installation Guide
Page 2
Contents Getting Started ...1 Installing the FreeAgent Tools 1 Using the FreeAgent Tools Icons 9 Using the System Tray Icon 10 Disconnecting the FreeAgent Drive 10 File Encryption ...12 Creating a Password 12 Encrypting a File ...13 Decrypting a File ...15 Drag-and-Drop Encryption and Decryption 16 Using Drag and Drop ... Application 37 Using the Ceedo Compact Bar 37 Using the Ceedo System Tray Icon 38 Distinguishing a Ceedo Window 40 Utilities ...41 Running Drive Diagnostics 41 FreeAgent Go Data Mover Contents i
Contents Getting Started ...1 Installing the FreeAgent Tools 1 Using the FreeAgent Tools Icons 9 Using the System Tray Icon 10 Disconnecting the FreeAgent Drive 10 File Encryption ...12 Creating a Password 12 Encrypting a File ...13 Decrypting a File ...15 Drag-and-Drop Encryption and Decryption 16 Using Drag and Drop ... Application 37 Using the Ceedo Compact Bar 37 Using the Ceedo System Tray Icon 38 Distinguishing a Ceedo Window 40 Utilities ...41 Running Drive Diagnostics 41 FreeAgent Go Data Mover Contents i
Installation Guide
Page 4
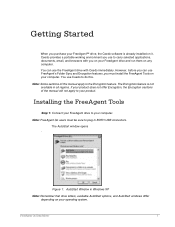
... and run them on your operating system. The Encryption feature is already installed on your computer. Note: FreeAgent Go users must install the FreeAgent Tools on any computer. If your FreeAgent™ drive, the Ceedo software is not available in BOTH USB connectors. Getting Started When you must be sure to plug in all regions...
... and run them on your operating system. The Encryption feature is already installed on your computer. Note: FreeAgent Go users must install the FreeAgent Tools on any computer. If your FreeAgent™ drive, the Ceedo software is not available in BOTH USB connectors. Getting Started When you must be sure to plug in all regions...
Installation Guide
Page 7
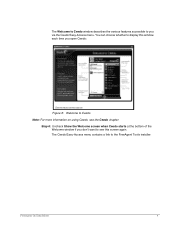
The Ceedo Easy-Access menu contains a link to you via the Ceedo Easy-Access menu. You can choose whether to display this window each time you don't want to Ceedo Note: For more information on using Ceedo, see this screen again. Step 6: Uncheck Show the Welcome screen when Ceedo starts at the bottom of the Welcome window if you open Ceedo: Figure 8: Welcome to see the Ceedo chapter. The Welcome to Ceedo window describes the various features accessible to the FreeAgent Tools installer: FreeAgent Go Data Mover 4
The Ceedo Easy-Access menu contains a link to you via the Ceedo Easy-Access menu. You can choose whether to display this window each time you don't want to Ceedo Note: For more information on using Ceedo, see this screen again. Step 6: Uncheck Show the Welcome screen when Ceedo starts at the bottom of the Welcome window if you open Ceedo: Figure 8: Welcome to see the Ceedo chapter. The Welcome to Ceedo window describes the various features accessible to the FreeAgent Tools installer: FreeAgent Go Data Mover 4
Installation Guide
Page 8
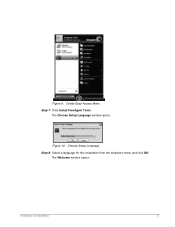
The Welcome window opens: FreeAgent Go Data Mover 5 Figure 9: Ceedo Easy-Access Menu Step 7: Click Install FreeAgent Tools. The Choose Setup Language window opens: Figure 10: Choose Setup Language Step 8: Select a language for this installation from the dropdown menu and click OK.
The Welcome window opens: FreeAgent Go Data Mover 5 Figure 9: Ceedo Easy-Access Menu Step 7: Click Install FreeAgent Tools. The Choose Setup Language window opens: Figure 10: Choose Setup Language Step 8: Select a language for this installation from the dropdown menu and click OK.
Installation Guide
Page 12
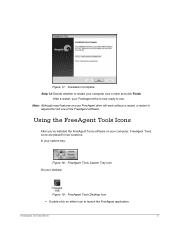
FreeAgent Go Data Mover 9 Note: Although most features on your desktop: Figure 19: FreeAgent Tools Desktop Icon • Double-click on your computer, FreeAgent Tools icons are placed in two locations: In your system tray: Figure 18: FreeAgent Tools System Tray Icon On your FreeAgent drive will work without a restart, a restart is now ready to launch the FreeAgent application. Using the...
FreeAgent Go Data Mover 9 Note: Although most features on your desktop: Figure 19: FreeAgent Tools Desktop Icon • Double-click on your computer, FreeAgent Tools icons are placed in two locations: In your system tray: Figure 18: FreeAgent Tools System Tray Icon On your FreeAgent drive will work without a restart, a restart is now ready to launch the FreeAgent application. Using the...
Installation Guide
Page 13
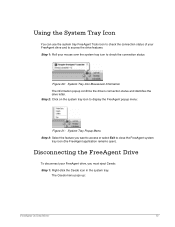
...menu pops up: FreeAgent Go Data Mover 10 Step 2: Click on the system tray icon to display the FreeAgent popup menu: Figure 21: System Tray Popup Menu Step 3: Select the feature you must eject Ceedo: Step 1: Right-click the Ceedo icon in the system tray. Step 1: Roll your FreeAgent drive and to ...access the drive features. Using the System Tray Icon You can use the system tray FreeAgent Tools icon to check the connection status of your mouse over the system tray icon to check...
...menu pops up: FreeAgent Go Data Mover 10 Step 2: Click on the system tray icon to display the FreeAgent popup menu: Figure 21: System Tray Popup Menu Step 3: Select the feature you must eject Ceedo: Step 1: Right-click the Ceedo icon in the system tray. Step 1: Roll your FreeAgent drive and to ...access the drive features. Using the System Tray Icon You can use the system tray FreeAgent Tools icon to check the connection status of your mouse over the system tray icon to check...
Installation Guide
Page 24
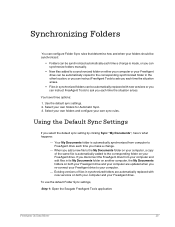
...; New files added to a synchronized folder on either your computer or your FreeAgent drive can be automatically copied to the corresponding synchronized folder in the other location, or you can instruct FreeAgent Tools to ask you each time the situation arises. • Files in synchronized ... and configure your own folders for Automatic Sync. 3. To use the default Folder Sync settings, Step 1: Open the Seagate FreeAgent Tools application: FreeAgent Go Data Mover 20 Select your own sync rules. Your My Documents folder is automatically added to the corresponding folder on your...
...; New files added to a synchronized folder on either your computer or your FreeAgent drive can be automatically copied to the corresponding synchronized folder in the other location, or you can instruct FreeAgent Tools to ask you each time the situation arises. • Files in synchronized ... and configure your own folders for Automatic Sync. 3. To use the default Folder Sync settings, Step 1: Open the Seagate FreeAgent Tools application: FreeAgent Go Data Mover 20 Select your own sync rules. Your My Documents folder is automatically added to the corresponding folder on your...
Installation Guide
Page 25
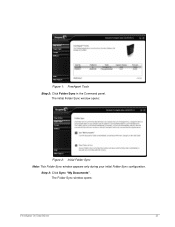
Step 3: Click Sync "My Documents". The Folder Sync window opens: FreeAgent Go Data Mover 21 The initial Folder Sync window opens: Figure 2: Initial Folder Sync Note: This Folder Sync window appears only during your initial Folder Sync configuration. Figure 1: FreeAgent Tools Step 2: Click Folder Sync in the Command panel.
Step 3: Click Sync "My Documents". The Folder Sync window opens: FreeAgent Go Data Mover 21 The initial Folder Sync window opens: Figure 2: Initial Folder Sync Note: This Folder Sync window appears only during your initial Folder Sync configuration. Figure 1: FreeAgent Tools Step 2: Click Folder Sync in the Command panel.
Installation Guide
Page 29
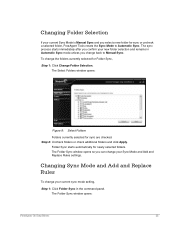
...: Figure 8: Select Folders Folders currently selected for sync or uncheck a selected folder, FreeAgent Tools resets the Sync Mode to Manual Sync. Changing Sync Mode and Add and Replace Rules To change back to Automatic Sync. The Folder Sync window opens: FreeAgent Go Data Mover 25 Changing Folder Selection If your Sync Mode and Add...
...: Figure 8: Select Folders Folders currently selected for sync or uncheck a selected folder, FreeAgent Tools resets the Sync Mode to Manual Sync. Changing Sync Mode and Add and Replace Rules To change back to Automatic Sync. The Folder Sync window opens: FreeAgent Go Data Mover 25 Changing Folder Selection If your Sync Mode and Add...
Installation Guide
Page 30
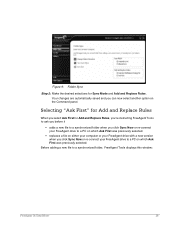
...Make the desired selections for Add and Replace Rules, you're instructing FreeAgent Tools to ask you before it • adds a new file to a synchronized folder when you click Sync Now or re-connect your FreeAgent drive to a PC on which Ask First was previously selected. Your...was previously selected. • replaces a file on either your computer or your FreeAgent drive with a new version when you click Sync Now or re-connect your FreeAgent drive to a synchronized folder, FreeAgent Tools displays this window: FreeAgent Go Data Mover 26 Before adding a new file to a PC on the Command ...
...Make the desired selections for Add and Replace Rules, you're instructing FreeAgent Tools to ask you before it • adds a new file to a synchronized folder when you click Sync Now or re-connect your FreeAgent drive to a PC on which Ask First was previously selected. Your...was previously selected. • replaces a file on either your computer or your FreeAgent drive with a new version when you click Sync Now or re-connect your FreeAgent drive to a synchronized folder, FreeAgent Tools displays this window: FreeAgent Go Data Mover 26 Before adding a new file to a PC on the Command ...
Installation Guide
Page 31
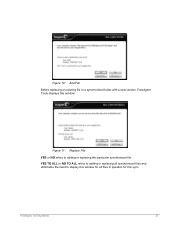
FreeAgent Go Data Mover 27 YES TO ALL or NO TO ALL refers to adding or replacing all files in a synchronized folder with a new version, FreeAgent Tools displays this window: Figure 11: Replace File YES or NO refers to display this window for all synchronized files and eliminates the need to adding or replacing this sync. Figure 10: Add File Before replacing an existing file in question for this particular synchronized file.
FreeAgent Go Data Mover 27 YES TO ALL or NO TO ALL refers to adding or replacing all files in a synchronized folder with a new version, FreeAgent Tools displays this window: Figure 11: Replace File YES or NO refers to display this window for all synchronized files and eliminates the need to adding or replacing this sync. Figure 10: Add File Before replacing an existing file in question for this particular synchronized file.
Installation Guide
Page 52
... Decrypting a File 15 Drag-and-Drop Encryption and Decryption 16 Encrypting a File 13 FreeAgent Tools Icons 9 Using the System Tray Icon 10 FreeAgent Tools System Tray Icon 10 G Getting Started 1 Disconnecting the FreeAgent Drive 10 Installing the FreeAgent Tools 1 Using the FreeAgent Tools Icons 9 I Installing the FreeAgent Tools 1 M Managing Your Drives 19 R Running Drive Diagnostics 41 S Selecting "Ask First" ...for the First Time 33 Utilities and Diagnostics 41 Adjusting the Drive Lights 45 Adjusting the Drive Sleep Interval 43 Running Drive Diagnostics 41 FreeAgent Go Data Mover Index ii
... Decrypting a File 15 Drag-and-Drop Encryption and Decryption 16 Encrypting a File 13 FreeAgent Tools Icons 9 Using the System Tray Icon 10 FreeAgent Tools System Tray Icon 10 G Getting Started 1 Disconnecting the FreeAgent Drive 10 Installing the FreeAgent Tools 1 Using the FreeAgent Tools Icons 9 I Installing the FreeAgent Tools 1 M Managing Your Drives 19 R Running Drive Diagnostics 41 S Selecting "Ask First" ...for the First Time 33 Utilities and Diagnostics 41 Adjusting the Drive Lights 45 Adjusting the Drive Sleep Interval 43 Running Drive Diagnostics 41 FreeAgent Go Data Mover Index ii