
User Guide
Page 3
... to the Server 17 Completing the Initial Setup 18 Creating Custom Shares 18 Creating User Accounts 19 Distributing BlackArmor User Information 20 Making BlackArmor Accessible Using Seagate Global Access 21 Connecting a USB Printer to Get Started 13 BlackArmor Administrators Start Here 13 BlackArmor Users Start Here 14 3. All About the Seagate BlackArmor® NAS 440/420 9 Introduction 9 About the...
... to the Server 17 Completing the Initial Setup 18 Creating Custom Shares 18 Creating User Accounts 19 Distributing BlackArmor User Information 20 Making BlackArmor Accessible Using Seagate Global Access 21 Connecting a USB Printer to Get Started 13 BlackArmor Administrators Start Here 13 BlackArmor Users Start Here 14 3. All About the Seagate BlackArmor® NAS 440/420 9 Introduction 9 About the...

User Guide
Page 6
...with the software. This guide contains complete setup instructions, as well as your BlackArmor server. Note: Step-by-step instructions for using the BlackArmor software tools are included in this guide apply to BlackArmor administrators only-users that have access to ... provides all the information you can get the most out of your Seagate BlackArmor® NAS 440/420 (BlackArmor server). Administrators-only information is clearly identified. Kit Contents Your BlackArmor server kit includes: • BlackArmor server • Power adapter • Ethernet cable • Installation CD...
...with the software. This guide contains complete setup instructions, as well as your BlackArmor server. Note: Step-by-step instructions for using the BlackArmor software tools are included in this guide apply to BlackArmor administrators only-users that have access to ... provides all the information you can get the most out of your Seagate BlackArmor® NAS 440/420 (BlackArmor server). Administrators-only information is clearly identified. Kit Contents Your BlackArmor server kit includes: • BlackArmor server • Power adapter • Ethernet cable • Installation CD...

User Guide
Page 12
.... BlackArmor® NAS 440/420 User Guide (Version 3) 13 Connect to Get Started This section describes the getting-started with your BlackArmor server and assign each BlackArmor user (see page 20). 7. (Optional) Make your BlackArmor server accessible over the Web, using Seagate Global...printer that has administrative privileges. Complete the initial setup of a power failure. (see page 43). How to Get Started • Reset the server's name and password to the original settings About BlackArmor Users All BlackArmor users, including administrators, can also create a user...
.... BlackArmor® NAS 440/420 User Guide (Version 3) 13 Connect to Get Started This section describes the getting-started with your BlackArmor server and assign each BlackArmor user (see page 20). 7. (Optional) Make your BlackArmor server accessible over the Web, using Seagate Global...printer that has administrative privileges. Complete the initial setup of a power failure. (see page 43). How to Get Started • Reset the server's name and password to the original settings About BlackArmor Users All BlackArmor users, including administrators, can also create a user...

User Guide
Page 14
.... If you are not a BlackArmor administrator, skip to Get Started" on the server (accessible using Web browser) Figure 3: Typical BlackArmor Setup and Installation BlackArmor® NAS 440/420 User Guide (Version 3) 15 Administrator Installs: BlackArmor Discovery BlackArmor Backup (optional) Users LAN Users Install: BlackArmor Discovery BlackArmor Backup (optional) USB Printer (Optional) BlackArmor Server Switch or Router BlackArmor Manager embedded on page...
.... If you are not a BlackArmor administrator, skip to Get Started" on the server (accessible using Web browser) Figure 3: Typical BlackArmor Setup and Installation BlackArmor® NAS 440/420 User Guide (Version 3) 15 Administrator Installs: BlackArmor Discovery BlackArmor Backup (optional) Users LAN Users Install: BlackArmor Discovery BlackArmor Backup (optional) USB Printer (Optional) BlackArmor Server Switch or Router BlackArmor Manager embedded on page...
User Guide
Page 15
...LED lights on page 8. • Ensure that you have help lifting the server if you are uncomfortable lifting objects of the server illuminate. BlackArmor® NAS 440/420 User Guide (Version 3) 16 Ensure that the server won't be in an area with reliable ventilation. Use the power adapter ... and network cables If you have a solid, flat, stable surface for the server to sit on it now. Setup Steps for Administrators Setup Steps for Administrators If you are not a BlackArmor administrator, skip to page 24. Ensure that the server's vents will not be spilled on in an area where...
...LED lights on page 8. • Ensure that you have help lifting the server if you are uncomfortable lifting objects of the server illuminate. BlackArmor® NAS 440/420 User Guide (Version 3) 16 Ensure that the server won't be in an area with reliable ventilation. Use the power adapter ... and network cables If you have a solid, flat, stable surface for the server to sit on it now. Setup Steps for Administrators Setup Steps for Administrators If you are not a BlackArmor administrator, skip to page 24. Ensure that the server's vents will not be spilled on in an area where...
User Guide
Page 16
Setup Steps for all BlackArmor servers on your network and displays them in a list. 2. Click Next to accept the default program folder name; Click Next to accept the default installation location; If you do close it. Install both BlackArmor Discovery and BlackArmor Backup...then click Next. 6. For more information, see page 29. BlackArmor Discovery is installed. 7. Log in your Applications folder (Mac). 4. Click Next. 5. BlackArmor® NAS 440/420 User Guide (Version 3) 17 Double-click the BlackArmor Discovery icon on your desktop (Windows) or in your Applications ...
Setup Steps for all BlackArmor servers on your network and displays them in a list. 2. Click Next to accept the default program folder name; Click Next to accept the default installation location; If you do close it. Install both BlackArmor Discovery and BlackArmor Backup...then click Next. 6. For more information, see page 29. BlackArmor Discovery is installed. 7. Log in your Applications folder (Mac). 4. Click Next. 5. BlackArmor® NAS 440/420 User Guide (Version 3) 17 Double-click the BlackArmor Discovery icon on your desktop (Windows) or in your Applications ...

User Guide
Page 17
... your local network, give it from other feature of the server that represents the location of the BlackArmor server. 2. Setup Steps for Administrators Completing the Initial Setup The first time you log in to store files by category, such as marketing, accounting, or ...new administrator password, then click Next. Creating Custom Shares Your BlackArmor server comes with an IT department, Seagate highly recommends using the DHCP network mode. 8. or if you differentiate it a unique and easy-to DHCP. BlackArmor® NAS 440/420 User Guide (Version 3) 18 Customize your server...
... your local network, give it from other feature of the server that represents the location of the BlackArmor server. 2. Setup Steps for Administrators Completing the Initial Setup The first time you log in to store files by category, such as marketing, accounting, or ...new administrator password, then click Next. Creating Custom Shares Your BlackArmor server comes with an IT department, Seagate highly recommends using the DHCP network mode. 8. or if you differentiate it a unique and easy-to DHCP. BlackArmor® NAS 440/420 User Guide (Version 3) 18 Customize your server...
User Guide
Page 18
... Enable. You can be recovered from the drop-down list of creating user accounts is assigning each user access to support (see page 34). 6. BlackArmor® NAS 440/420 User Guide (Version 3) 19 Click Submit. To add a recycle bin, beside Recycle Bin Service, click Enable. 8. Enter a name ...which to create the share, if there is created. Select the volume in which you create. Click the check box for the new share. Setup Steps for instance, all user accounts. (See Creating User Accounts to create individual user accounts.) 5. In the menu bar, select Storage, click...
... Enable. You can be recovered from the drop-down list of creating user accounts is assigning each user access to support (see page 34). 6. BlackArmor® NAS 440/420 User Guide (Version 3) 19 Click Submit. To add a recycle bin, beside Recycle Bin Service, click Enable. 8. Enter a name ...which to create the share, if there is created. Select the volume in which you create. Click the check box for the new share. Setup Steps for instance, all user accounts. (See Creating User Accounts to create individual user accounts.) 5. In the menu bar, select Storage, click...

User Guide
Page 19
... user has access to, and the limitations of user accounts. Setup Steps for individuals or entire groups from www.seagate.com/support BlackArmor® NAS 440/420 User Guide (Version 3) 20 User groups allow you to each BlackArmor user from the supplied CD or download what you have created ... Services: Which type(s) of file service should read -only, for instance-if any • Create User Private Share: Whether or not BlackArmor Manager should create a new private share for this guide and the section the user should be supported by sorting users into user groups. Customize...
... user has access to, and the limitations of user accounts. Setup Steps for individuals or entire groups from www.seagate.com/support BlackArmor® NAS 440/420 User Guide (Version 3) 20 User groups allow you to each BlackArmor user from the supplied CD or download what you have created ... Services: Which type(s) of file service should read -only, for instance-if any • Create User Private Share: Whether or not BlackArmor Manager should create a new private share for this guide and the section the user should be supported by sorting users into user groups. Customize...
User Guide
Page 20
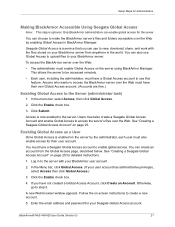
...Account, click Create an Account. See "Creating a Seagate Global Access Account" on page 25 for your BlackArmor server from the Global Access page, described below. Setup Steps for Administrators Making BlackArmor Accessible Using Seagate Global Access Note: This step is enabled on ...the server by enabling Global Access in BlackArmor Manager. Click the Enable check box. 4. A new Web browser window appears. Otherwise, go to enable global access. BlackArmor® NAS...
...Account, click Create an Account. See "Creating a Seagate Global Access Account" on page 25 for your BlackArmor server from the Global Access page, described below. Setup Steps for Administrators Making BlackArmor Accessible Using Seagate Global Access Note: This step is enabled on ...the server by enabling Global Access in BlackArmor Manager. Click the Enable check box. 4. A new Web browser window appears. Otherwise, go to enable global access. BlackArmor® NAS...

User Guide
Page 21
... your local network by connecting it to Your Seagate Global Access Account 1. Setup Steps for more information. Click Submit. Connecting a USB Printer to their operating system. Setting Your BlackArmor as a media server: 1. See the BlackArmor Manager online help granting other people access to...6. To connect a printer: 1. In the menu bar, select Media, then click Media Service. 2. Signing in to your server. BlackArmor® NAS 440/420 User Guide (Version 3) 22 See the Global Access user documentation for help for more information. You can set up a printer...
... your local network by connecting it to Your Seagate Global Access Account 1. Setup Steps for more information. Click Submit. Connecting a USB Printer to their operating system. Setting Your BlackArmor as a media server: 1. See the BlackArmor Manager online help granting other people access to...6. To connect a printer: 1. In the menu bar, select Media, then click Media Service. 2. Signing in to your server. BlackArmor® NAS 440/420 User Guide (Version 3) 22 See the Global Access user documentation for help for more information. You can set up a printer...

User Guide
Page 22
... the features of the Discovery window and then click Mount Share with iTunes installed, or to an iPod® connected to a network computer. 4. Setup Steps for Administrators Your BlackArmor server can also function as an iTunes server so that you need to create the Media Server folders: 1. Start...for typical use it as a media server so that media players on your network can access your files to share in the lower table. 3. BlackArmor® NAS 440/420 User Guide (Version 3) 23 You can set the time from every five minutes to a network computer with the Public share selected in...
... the features of the Discovery window and then click Mount Share with iTunes installed, or to an iPod® connected to a network computer. 4. Setup Steps for Administrators Your BlackArmor server can also function as an iTunes server so that you need to create the Media Server folders: 1. Start...for typical use it as a media server so that media players on your network can access your files to share in the lower table. 3. BlackArmor® NAS 440/420 User Guide (Version 3) 23 You can set the time from every five minutes to a network computer with the Public share selected in...
User Guide
Page 28
... the administrator, which can change the administrator password by selecting Admin Password from disk drive failures and other catastrophes. BlackArmor® NAS 440/420 User Guide (Version 3) 29 RAID 5 stands for Dynamic Host Configuration Protocol, and is basically a ...with an IT department, Seagate highly recommends using BlackArmor Manager (see page 38. Your BlackArmor Server's Default Settings Your BlackArmor Server's Default Settings Your BlackArmor server is preconfigured with settings that are prompted to change the administrator password during the initial setup (see page 17)....
... the administrator, which can change the administrator password by selecting Admin Password from disk drive failures and other catastrophes. BlackArmor® NAS 440/420 User Guide (Version 3) 29 RAID 5 stands for Dynamic Host Configuration Protocol, and is basically a ...with an IT department, Seagate highly recommends using BlackArmor Manager (see page 38. Your BlackArmor Server's Default Settings Your BlackArmor Server's Default Settings Your BlackArmor server is preconfigured with settings that are prompted to change the administrator password during the initial setup (see page 17)....
User Guide
Page 41
... type of the DNS service providers, then set up DDNS, open BlackArmor Manager and then select General Setup from the System menu's Advanced page. Enable power save from the System...of keys, like www.seagate.com) and the constantly changing IP address of a computer that uses DHCP instead of maintaining the link between computers on ; Changing the BlackArmor Server's Advanced Settings Dynamic ... with Dynamic DNS should try changing these settings. BlackArmor® NAS 440/420 User Guide (Version 3) 42 Dynamic DNS is in BlackArmor Manager. You can enable NTP service on page 34...
... type of the DNS service providers, then set up DDNS, open BlackArmor Manager and then select General Setup from the System menu's Advanced page. Enable power save from the System...of keys, like www.seagate.com) and the constantly changing IP address of a computer that uses DHCP instead of maintaining the link between computers on ; Changing the BlackArmor Server's Advanced Settings Dynamic ... with Dynamic DNS should try changing these settings. BlackArmor® NAS 440/420 User Guide (Version 3) 42 Dynamic DNS is in BlackArmor Manager. You can enable NTP service on page 34...
User Guide
Page 52
... Solutions Enable Email Setup in degraded mode. I can 't access a share. I can 't open BlackArmor Manager. The volume that the server is powered on a share because its volume is in BlackArmor Manager and then send a test email. I can 't log in to the network. For further assistance, contact Seagate Support at www.seagate.com/support BlackArmor® NAS 440/420...
... Solutions Enable Email Setup in degraded mode. I can 't access a share. I can 't open BlackArmor Manager. The volume that the server is powered on a share because its volume is in BlackArmor Manager and then send a test email. I can 't log in to the network. For further assistance, contact Seagate Support at www.seagate.com/support BlackArmor® NAS 440/420...
User Guide
Page 62
... 34 setting time limits 49 time limits for storage 49 tips for getting started 13 alerts 40 automatic firmware updates 44 B BlackArmor components 9 default settings 29 description 9 email alerts 40 features 10 initial connections 17 LCD screen 39 LEDs 39 maintenance 44... saving 42 RAID 31 resetting the server 45 safety 44 setup wizard 18 SMART diagnosis 41 specifications 59 troubleshooting 53 updating the firmware 44 BlackArmor Backup 10 BlackArmor Discovery 9 BlackArmor Manager 10 C connecting to server 17 BlackArmor® NAS 440/420 User Guide (Version 3) D default administrator password...
... 34 setting time limits 49 time limits for storage 49 tips for getting started 13 alerts 40 automatic firmware updates 44 B BlackArmor components 9 default settings 29 description 9 email alerts 40 features 10 initial connections 17 LCD screen 39 LEDs 39 maintenance 44... saving 42 RAID 31 resetting the server 45 safety 44 setup wizard 18 SMART diagnosis 41 specifications 59 troubleshooting 53 updating the firmware 44 BlackArmor Backup 10 BlackArmor Discovery 9 BlackArmor Manager 10 C connecting to server 17 BlackArmor® NAS 440/420 User Guide (Version 3) D default administrator password...
User Guide
Page 63
... 34 requirements 8 Reset button 11 resetting the server 45 S safety 44 SATA 10 saving power 42 server default settings 29 disk drives 10 door 11 BlackArmor® NAS 440/420 User Guide (Version 3) email alerts 40 initial connections 17 LAN ports 10, 11 LCD screen 10, 11, 39 LEDs 10, 39 maintenance... 18 SMART diagnosis 41 specifications 59 System Status LED 11 troubleshooting 53 updating the firmware 44 USB ports 10, 11 setup wizard 18 shares default settings 29 drag&sort service 34 file service support 34 limiting storage space 34 recycle bin service 34 time limits 49 ...
... 34 requirements 8 Reset button 11 resetting the server 45 S safety 44 SATA 10 saving power 42 server default settings 29 disk drives 10 door 11 BlackArmor® NAS 440/420 User Guide (Version 3) email alerts 40 initial connections 17 LAN ports 10, 11 LCD screen 10, 11, 39 LEDs 10, 39 maintenance... 18 SMART diagnosis 41 specifications 59 System Status LED 11 troubleshooting 53 updating the firmware 44 USB ports 10, 11 setup wizard 18 shares default settings 29 drag&sort service 34 file service support 34 limiting storage space 34 recycle bin service 34 time limits 49 ...

Seagate Global Access User Guide
Page 6
The Seagate Web Access page opens: Using the Sign In Page 4 Step 4: Enter and re-enter a password for your Global Access account and click Sign In. The Seagate Global Access Account Setup page opens: Figure 6: Seagate Global Access Account Setup Your username is the email address you used to register for your Global Access account. Seagate Global Access Figure 5: Create Global Access Account Email Step 3: Click the link in the Seagate email.
The Seagate Web Access page opens: Using the Sign In Page 4 Step 4: Enter and re-enter a password for your Global Access account and click Sign In. The Seagate Global Access Account Setup page opens: Figure 6: Seagate Global Access Account Setup Your username is the email address you used to register for your Global Access account. Seagate Global Access Figure 5: Create Global Access Account Email Step 3: Click the link in the Seagate email.
BlackArmor NAS Time Machine MAC
Page 1
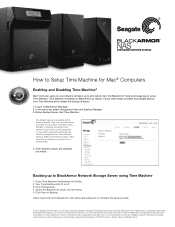
...apply any changes you select is in to BlackArmor Manager. 2. Open Time Machine Preferences on BlackArmor by default. Seagate, Seagate Technology, the Wave logo and BlackArmor are trademarks or registered trademarks of Seagate Technology LLC or one of its affiliated companies... in the United States and/or other trademarks or registered trademarks are the property of the user. All other countries. How to Setup...
...apply any changes you select is in to BlackArmor Manager. 2. Open Time Machine Preferences on BlackArmor by default. Seagate, Seagate Technology, the Wave logo and BlackArmor are trademarks or registered trademarks of Seagate Technology LLC or one of its affiliated companies... in the United States and/or other trademarks or registered trademarks are the property of the user. All other countries. How to Setup...


