Schwinn A40 Elliptical 2013 model Support and Manuals
Get Help and Manuals for this Schwinn item

View All Support Options Below
Free Schwinn A40 Elliptical 2013 model manuals!
Problems with Schwinn A40 Elliptical 2013 model?
Ask a Question
Free Schwinn A40 Elliptical 2013 model manuals!
Problems with Schwinn A40 Elliptical 2013 model?
Ask a Question
Popular Schwinn A40 Elliptical 2013 model Manual Pages
Assembly and Owner's Manual - Page 2

...
Important Safety Instructions - Owner's 17
Features
18
Console Features
19
Contact Heart Rate (CHR)
20
Operations
22
Mounting and Dismounting
22
Quick Start / Manual Program
22
Profile Programs
23
Pausing or Stopping
23
Results
23
Changing Unit Measures
(English Imperial/Metric)
23
Maintenance
24
Troubleshooting
27
Warranty
29
To validate warranty support, keep the...
Assembly and Owner's Manual - Page 3

... result in the sequence given. Keep the Manual for correct performance in the assembly, maintenance, and/or use only genuine Nautilus® replacement parts and hardware. Please consult the "Safety Warning Labels and Serial Number" section to change the design or functionality of this product.
3 Important Safety Instructions
- Use a second person when doing the...
Assembly and Owner's Manual - Page 5

Read and understand the "Important Safety Instructions" before assembly. 2.
This Notice is provided in accordance with California's Proposition 65. SPECIFICATIONS
56" (142 cm)
64.5" (164 ..., and the left (counter- This product, its packaging, and components contain chemicals known to set up and operate your machine: 1.
Note: Some axles contain oil. Collect all the pieces ...
Assembly and Owner's Manual - Page 13

... the switch (4a) on the Media Tray snap into the Console.
Attach Media Tray to Console and Install the Console to the Console Mast
Note: B efore you connect the cables. NOTICE: D o not .... Attach Upper Handlebar Arms to E (elliptical). 4
4a 17
4
X4
#2
13 Remove the pre-installed screws from the back of the Console before you attach the Media Tray, remove the protective plastic film ...
Assembly and Owner's Manual - Page 15

....
15. indicators in the direction of this manual. If batteries and the Power Adapter are properly assembled. After the machine is tight and components are installed, the console will not recharge the batteries. ... rechargeable batteries, the optional Power Adapter will use or put the machine into service until the machine has been fully assembled and inspected for your machine can operate...
Assembly and Owner's Manual - Page 17
...Set up and operate this machine for access and passage around and emergency dismounts from the machine. Before using this machine requires coordination and balance. Keep the Owner's Manual for replacement...parts of the machine clear. Be sure to this machine. This is in speed and resistance level can be let on them. IMPORTANT SAFETY INSTRUCTIONS... Service for repair information....
Assembly and Owner's Manual - Page 18
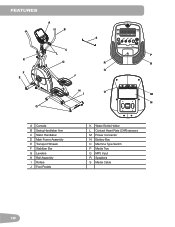
Features
A B
K
F E
C L
D
J
S
FUN RIDES ROLLING HILLS RIDE IN THE PARK
MOUNTAINS PIKES PEAK PYRAMIDS
QUICK START
START STOP
CHALLENGES UPHILL FINISH
CROSS-TRAINING
FUN RIDES
MOUNTAINS
CHALLENGES
ENTER
R Q
P R
H I
O
M
N G
A Console B Swing Handlebar Arm C Static Handlebar D Main Frame Assembly E Transport Wheels F Stabilizer Bar G Levelers H Rail Assembly I Rollers J Foot Pedals
K ...
Assembly and Owner's Manual - Page 19

...
Program Display The Program Display shows the name of the program selection and the grid area shows the course profile for the workout.
19 Maximum time is set up for the current workout ... IN THE PARK
MOUNTAINS PIKES PEAK PYRAMIDS
QUICK START
START STOP
CHALLENGES UPHILL FINISH
CROSS-TRAINING
FUN RIDES
MOUNTAINS
CHALLENGES
ENTER
Note: The Console keypad will not adjust the sound output...
Assembly and Owner's Manual - Page 20

... (EKG) signals generated by individuals are the stainless steel parts of 40 BPM or lower.
There is an estimate of... may act as an insulating layer to find this manual. Both hands must make contact with the sensors for...display field shows the machine revolutions per minute (RPM) for 6 seconds, then the KCAL display shows the estimated calories that training influences the ...
Assembly and Owner's Manual - Page 22
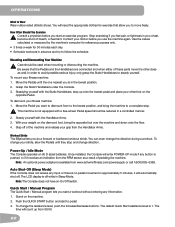
...the Handlebars are connected and when either of these parts move freely. Pedal speed should be reduced in Sleep Mode...push the Increase/Decrease buttons. Quick Start / Manual Program The Quick Start / Manual program lets you want to dismount from 00:... receives an indication from the RPM sensor as well.
Once installed, the Console will need the appropriate clothes for 30 minutes ...
Assembly and Owner's Manual - Page 23

... Park
Mountains Pike's Peak Pyramids
Challenges Uphill Finish Cross-Training
To start the Profile workout. Push the START/STOP ...3 seconds to go to Engineering Mode. 2. The display shows the current unit of the workout, push ENTER.
Changing Resistance ...Imperial (MILES) or Metric (KM) units. 3. Push ENTER to set your workout. 2. Push START / STOP to continue the workout, or...
Assembly and Owner's Manual - Page 26

... the Battery Indicator comes on to start the new mode of the console with fresh batteries. If you replace the console, it back on , replace the batteries in the back of operation.
After you set the switch, it is necessary to turn the power off and then turn it will not recharge the...
Assembly and Owner's Manual - Page 27
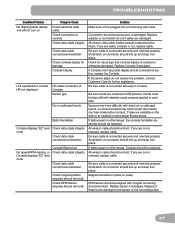
...and snap into place. Magnet should be intact. Troubleshooting
Condition/Problem
No display/partial display/ unit will not turn ...Handlebar
Console displays "E2" error Check data cable integrity code
Check data cable connections/orientation
Console Electronics... are cut , replace cable. If tests reveal no other issues, the console handlebar assembly should be replaced. Replace if there is ...
Assembly and Owner's Manual - Page 28

...Check surface under unit
Resistance does not change
Drive train click/tick noise once per full crank revolution
...Disconnect left and right foot assemblies and rotate crank. Replace part making sound. Small latch on connector should be intact....assemblies and upper/lower handlebars. If sound persists, replace crank/pulley assembly. Manually move foot, leg, and handlebar assemblies to outlet....
Assembly and Owner's Manual - Page 29

...; Wear items
60 days
• Labor
60 days
(Labor support does not include the installation of service under this warranty. brand Product, at the time of replacement parts involved in a commercial or institutional setting. Nautilus, Inc reserves the right to charge the consumer for these areas. Any replacement of the product under normal conditions, and provided it...
Schwinn A40 Elliptical 2013 model Reviews
We have not received any reviews for Schwinn yet.