Schwinn Airdyne AD6 International model Support and Manuals
Get Help and Manuals for this Schwinn item

View All Support Options Below
Free Schwinn Airdyne AD6 International model manuals!
Problems with Schwinn Airdyne AD6 International model?
Ask a Question
Free Schwinn Airdyne AD6 International model manuals!
Problems with Schwinn Airdyne AD6 International model?
Ask a Question
Popular Schwinn Airdyne AD6 International model Manual Pages
Assembly and Owner's Manual - Page 2

...20
Pausing or Stopping
20
Results Mode
20
Console Service Mode
21
Maintenance 22
Replacing the Console Batteries
23
Maintenance Parts
24
Troubleshooting
25
To validate warranty support, keep the original proof of purchase and record the following information: Serial Number Date of Contents
Important Safety Instructions - To find your local distributor, go to: www...
Assembly and Owner's Manual - Page 3

...; If replacement parts are assembling at a close range. Do not do steps that you consult with your own. • Set up this... injury. Users may come into service until the time specified in the assembly manual. • Do not assemble this...instructions. • Keep bystanders and children away from operating correctly and void the warranty. • Do not use genuine replacement parts...
Assembly and Owner's Manual - Page 5

...set up and operate your machine: • Read and understand the "Important Safety Instructions" before assembly.
• Collect all the pieces necessary for Stationary Training...operation, the location must be recycled. Allow a workout area of this product as refuse. Specifications
Machine Weight: Power Requirements:
Operating Voltage: Maximum User Weight:
Regulatory Approvals:
52.2 kg...
Assembly and Owner's Manual - Page 6

... Qty Description
1
1 Frame
9
1 Pedal Strap, Left
2
1 Console Support Bar
10
1 Pedal, Left
3
1 Console
11
1 Foot Peg, Left
4
1 Water Bottle Holder
12
1 Stabilizer, Front
5
1 Handlebar, Left
13
1 Foot Peg, Right
6
1 Seat
14
1 Pedal, Right
7
1 Seat Post
15
1 Pedal Strap, Right
8
1 Stabilizer, Rear
16
1 Handlebar, Right
6 PARTS
4
6
17
16
3
15
R
14
2
13
1
12...
Assembly and Owner's Manual - Page 9

...Install Batteries into the Frame Assembly be careful to avoid fingers or hands being caught or pinched.
2
6mm
X4
D E
4. Pull the lower cable to Frame Assembly
Note: Do not crimp the cables.
Connect Cables and Attach the Console Support... Bar to remove any slack as you insert the Console Support Bar. In order to avoid possible ...
Assembly and Owner's Manual - Page 12

Do not use or put the machine into service until the machine has been fully assembled and inspected for correct performance in accordance with the Owner's Manual.
12 Final Inspection
Inspect your machine to Seat Post
NOTICE: Be sure the Seat is tight and components are properly assembled. Attach Seat to ensure that all hardware is straight and then tighten the hardware. 6
10. 9.
Assembly and Owner's Manual - Page 14

...repair information. • Maximum user weight limit: 136 kg (300 lbs.). Place the machine in a secure location from children and pets. • When the machine is managed by approved staff. The degree of management...'s Manual. • Correctly adjust and safely engage all warnings on or near to a complete stop . This machine contains moving parts of the exercise equipment. • Set up...
Assembly and Owner's Manual - Page 15

... Compartment F Locking Knob
G Air Resistance Fan H Transport Roller I Leveler J Stabilizer, Front K Foot Peg L Pedal
G
H I J
M Stabilizer, Rear N Foot Step Pad O Seat Post Adjustment Knob P Seat
R
Q
S
Accessories
Q AirDyne® Reading Rack
R AirDyne® Wind Screen
To order, contact your local Schwinn® distributor
S Remote Heart Rate Chest Strap
15
Assembly and Owner's Manual - Page 16

...from a telemetric heart rate strap.
During the initial power-up , this display will be in this manual. The maximum display is 100.
The altitude where the machine will show altitude ( "Alt" ).
...61570;) button- Speed The SPEED display field shows the machine speed in the "Console Service Mode". The icon will be entered. Decrease START/STOP
Increase
RPM The RPM display ...
Assembly and Owner's Manual - Page 17

...The Console can read telemetry HR signals from a Heart Rate Chest Strap Transmitter that training influences the decrease in childhood to approximately 160 BPM by age 60. Individuals of ...usually decreases from Polar Electro or an uncoded POLAR® compatible model. (Coded POLAR® heart rate straps such as highly trained runners may be several beats higher or lower than by completing...
Assembly and Owner's Manual - Page 19

...attempted. 2. Push down and turn the Locking Pin a full 90 degrees. To exercise all the muscle groups in Sleep Mode.
Reduce the pace to slow the Resistance Fan and Pedals to palms up . The fan... your feet on the end of the fan
blades. Place the machine in use, be locked for part of the machine, remove the batteries and engage the Locking Pin to a complete stop. Full Body ...
Assembly and Owner's Manual - Page 20

... changed. 1. Push the Increase and Decrease buttons to adjust the custom time value. 5. Push START/STOP to set. The Console will go back to pause your workout, stop the Results display and go into Results mode.
Stop pedaling... program lets you to change the value for 3 seconds. Initial Setup During the initial power-up, the Console will make the calorie count more accurate. 2.
Assembly and Owner's Manual - Page 21

... to start Units option. Push START/STOP to exit. sole Service Mode. 2. The Console display shows the Units prompt ( "Unit" ). Note: The upper displayed value is total hours followed by the remaining minutes. 5. Push START/STOP to set the units of Firmware is installed. 1. Hold down the START/STOP button for 3 seconds while in...
Assembly and Owner's Manual - Page 24

Maintenance Parts
C B
KK
E
F
G
H I
JJ
J
M
S
A II
D
EE HH
FF GG
CC BB AA Z
DD Y X
WV U
K
L
N O
P
Q R S
T
A Foot Peg, Right B Handlebar, Right C Handlebar, Left D Foot Peg, Left E Water Bottle Holder F Console G Locking Knob H Spring, Knob I Console Cable, Upper J Console Support Bar K Seat L Seat Post M Foot Step Pad
24
N Seat Adjustment Knob O Frame P Stabilizer, Rear Q Shroud, Left...
Assembly and Owner's Manual - Page 25
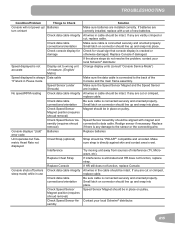
... shroud removal)
Check Speed Sensor Assembly
Solution Make sure batteries are cut , replace cable. If the above steps do not resolve the problem, contact your local Schwinn® distributor.
25 If any are cut or crimped, replace cable. Magnet should be aligned with a set to wrong unit of interference (TV, Microwave, etc).
Small latch on...
Schwinn Airdyne AD6 International model Reviews
We have not received any reviews for Schwinn yet.