
Owner's Manual
Page 2
... trademark. Table of their respective owners. Other trademarks are the property of Contents Important Safety Instructions 3 Operations 9 Safety Warning Labels and Serial Number 3 Changing Unit Measures 10 Specifications 4 Maintenance 11 Features 4 Leveling Your Bike 13 Console Features 5 Moving Your Bike 13 Contact Heart Rate Sensors 6 Troubleshooting 13 2 To validate warranty support, keep the original proof of purchase and record the following information: Serial Number Date of Purchase To register your...
... trademark. Table of their respective owners. Other trademarks are the property of Contents Important Safety Instructions 3 Operations 9 Safety Warning Labels and Serial Number 3 Changing Unit Measures 10 Specifications 4 Maintenance 11 Features 4 Leveling Your Bike 13 Console Features 5 Moving Your Bike 13 Contact Heart Rate Sensors 6 Troubleshooting 13 2 To validate warranty support, keep the original proof of purchase and record the following information: Serial Number Date of Purchase To register your...
Owner's Manual
Page 3
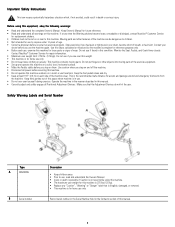
... of wear. Contact your doctor before you use if you step on and off the machine. • Disconnect all Positional Adjustment Devices. Before using this machine. Monitor the Seat, Pedals, and Crank Arms closely. Stop exercising if you start an exercise program. Keep third parties out of this manual. • Correctly adjust and safely engage all power before you feel faint. Keep Owner's Manual for repair information. • Maximum user weight limit: 275 lbs. (125 kgs).
... of wear. Contact your doctor before you use if you step on and off the machine. • Disconnect all Positional Adjustment Devices. Before using this machine. Monitor the Seat, Pedals, and Crank Arms closely. Stop exercising if you start an exercise program. Keep third parties out of this manual. • Correctly adjust and safely engage all power before you feel faint. Keep Owner's Manual for repair information. • Maximum user weight limit: 275 lbs. (125 kgs).
Owner's Manual
Page 5
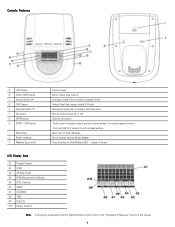
...SPEED A7 DISTANCE A8 TIME A9 RESULTS A10 Battery Indicator Note: To change the measurement units to English Imperial or metric, refer to install batteries. Console Features A LCD Display B QUICK START button C Increase button (▲) D CHR Sensors E Decrease button (▼) F Fan button G ENTER button H START / STOP button I Battery Bay J Power Connector K Machine Type switch Console screen Starts a Quick Start workout Increases a value (time or workout resistance level) Contact Heart Rate sensors (model A10 only) Decreases a value (time or workout resistance level) Push to control...
...SPEED A7 DISTANCE A8 TIME A9 RESULTS A10 Battery Indicator Note: To change the measurement units to English Imperial or metric, refer to install batteries. Console Features A LCD Display B QUICK START button C Increase button (▲) D CHR Sensors E Decrease button (▼) F Fan button G ENTER button H START / STOP button I Battery Bay J Power Connector K Machine Type switch Console screen Starts a Quick Start workout Increases a value (time or workout resistance level) Contact Heart Rate sensors (model A10 only) Decreases a value (time or workout resistance level) Push to control...

Owner's Manual
Page 6
... sensors on the handlebars. The A20 bike has the CHR sensors on the Console. Once the Console has your initial heart rate, do not move or shift your hands and the sensors and try again. Distance The DISTANCE display field shows the distance count (miles or km) in the workout. Time The Time display field shows the time count in the workout. If the workout has a preset time, the display starts...
... sensors on the handlebars. The A20 bike has the CHR sensors on the Console. Once the Console has your initial heart rate, do not move or shift your hands and the sensors and try again. Distance The DISTANCE display field shows the distance count (miles or km) in the workout. Time The Time display field shows the time count in the workout. If the workout has a preset time, the display starts...
Owner's Manual
Page 7
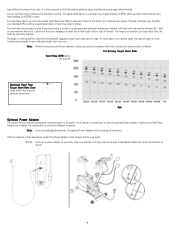
... fitness regimens, always use your target heart rate, the more accurate to the console and the wall outlet. As noted above, your bike, make sure that target zone for over 20 minutes. After the machine is more fat your body will use a power adapter for your optimal target rate may have different maximum heart rates. have readings of 40 BPM or lower. It is fully assembled, connect...
... fitness regimens, always use your target heart rate, the more accurate to the console and the wall outlet. As noted above, your bike, make sure that target zone for over 20 minutes. After the machine is more fat your body will use a power adapter for your optimal target rate may have different maximum heart rates. have readings of 40 BPM or lower. It is fully assembled, connect...

Owner's Manual
Page 8
... battery corrosion. This equipment generates, uses and can be determined by turning the equipment off and on, the user is encouraged to try to correct the interference by the party responsible for help. 8 NOTICE: It is recommended to remove batteries when they are designed to provide reasonable protection against harmful interference in a residential installation. However, there is connected...
... battery corrosion. This equipment generates, uses and can be determined by turning the equipment off and on, the user is encouraged to try to correct the interference by the party responsible for help. 8 NOTICE: It is recommended to remove batteries when they are designed to provide reasonable protection against harmful interference in a residential installation. However, there is connected...
Owner's Manual
Page 9
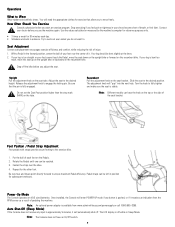
... have an On/Off switch. 9 Note: The Console does not have the knob on the seat tube. Contact your foot cannot touch the Pedal, move the seat down on the upright bike or forward on (4) D sized batteries. Adjust the seat to the exercise bike. 1. Do not set the Seat Post position higher than the stop mark (MAX) on the Pedals. 2. Note: An optional power adapter is stable. The LCD display is pushed, or...
... have an On/Off switch. 9 Note: The Console does not have the knob on the seat tube. Contact your foot cannot touch the Pedal, move the seat down on the upright bike or forward on (4) D sized batteries. Adjust the seat to the exercise bike. 1. Do not set the Seat Post position higher than the stop mark (MAX) on the Pedals. 2. Note: An optional power adapter is stable. The LCD display is pushed, or...
Owner's Manual
Page 10
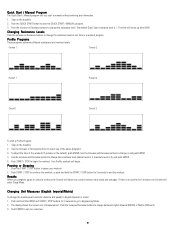
... QUICK START button to change the resistance level. Step on the machine. 2. Use the Increase and Decrease buttons to start a Profile Program: 1. Use the Increase and Decrease buttons to pause your selection. 10 Push the START / STOP button to change the resistance level at any information. 1. Push the Increase or Decrease buttons to set your workout. 2. Your Profile workout will enter Sleep Mode. Results When you start a workout without entering any time in a workout program. The display shows...
... QUICK START button to change the resistance level. Step on the machine. 2. Use the Increase and Decrease buttons to start a Profile Program: 1. Use the Increase and Decrease buttons to pause your selection. 10 Push the START / STOP button to change the resistance level at any information. 1. Push the Increase or Decrease buttons to set your workout. 2. Your Profile workout will enter Sleep Mode. Results When you start a workout without entering any time in a workout program. The display shows...
Owner's Manual
Page 11
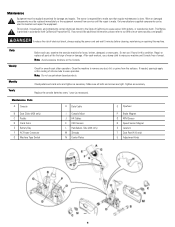
... the power cord and wait 5 minutes before cleaning, maintaining or repairing this condition. Note: Do not use , examine the exercise machine for smooth seat slider operation. Maintenance Parts A Console H Data Cable O Flywheel B Seat Slider (A20 only) C Pedals D Crank Arms E Battery Bay F AC Power Connector G Machine Type Switch I Console Mast J HR Cables K CHR Sensors L Handlebars, Side (A20 only) M Shrouds N Center Plates P Brake Magnet Q RPM Sensor R Speed Sensor Magnet S Levelers T Seat Post (A10 only) U Adjustment Knob 11 The owner is responsible to remove any...
... the power cord and wait 5 minutes before cleaning, maintaining or repairing this condition. Note: Do not use , examine the exercise machine for smooth seat slider operation. Maintenance Parts A Console H Data Cable O Flywheel B Seat Slider (A20 only) C Pedals D Crank Arms E Battery Bay F AC Power Connector G Machine Type Switch I Console Mast J HR Cables K CHR Sensors L Handlebars, Side (A20 only) M Shrouds N Center Plates P Brake Magnet Q RPM Sensor R Speed Sensor Magnet S Levelers T Seat Post (A10 only) U Adjustment Knob 11 The owner is responsible to remove any...
Owner's Manual
Page 12
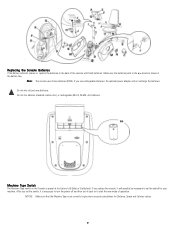
...-MH, etc) batteries. Replacing the Console Batteries If the Battery Indicator comes on to start the new mode of the console with fresh batteries. Machine Type Switch The Machine Type switch on the Console is necessary to give more accurate calculations for your machine. NOTICE: Make sure that the Machine Type is set the switch for Distance, Speed and Calories values. 12 If you use rechargeable batteries, the optional power adapter will possibly be...
...-MH, etc) batteries. Replacing the Console Batteries If the Battery Indicator comes on to start the new mode of the console with fresh batteries. Machine Type Switch The Machine Type switch on the Console is necessary to give more accurate calculations for your machine. NOTICE: Make sure that the Machine Type is set the switch for Distance, Speed and Calories values. 12 If you use rechargeable batteries, the optional power adapter will possibly be...
Owner's Manual
Page 13
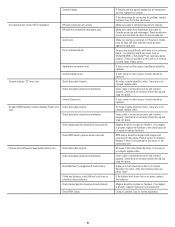
... adjust the level. Small latch on . If bike has AC adapter, check connection at unit if either are the polygonal end caps on the Rear Stabilizer. NOTICE: Be careful when you while pushing the front of the bike and slowly push the bike to the desired location. Troubleshooting Problem No display/partial display/unit will not turn on console Replace the batteries. Check data cable connections/orientation Make sure cable...
... adjust the level. Small latch on . If bike has AC adapter, check connection at unit if either are the polygonal end caps on the Rear Stabilizer. NOTICE: Be careful when you while pushing the front of the bike and slowly push the bike to the desired location. Troubleshooting Problem No display/partial display/unit will not turn on console Replace the batteries. Check data cable connections/orientation Make sure cable...
Owner's Manual
Page 14
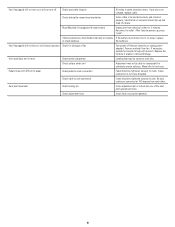
... require the seat back be intact. If any damage to outlet. Replace if there is any are available on the web or at Console HR cable box connection (recumbent only) Sensor grip Dry or calloused hands Console displays "E2" error code Handlebars (recumbent only) Console (upright only) Check data cable integrity Check data cable connections/orientation Console Electronics No speed/RPM reading, Console displays "Pedal" error Check data cable integrity code Check data cable connections/orientation Check...
... require the seat back be intact. If any damage to outlet. Replace if there is any are available on the web or at Console HR cable box connection (recumbent only) Sensor grip Dry or calloused hands Console displays "E2" error code Handlebars (recumbent only) Console (upright only) Check data cable integrity Check data cable connections/orientation Console Electronics No speed/RPM reading, Console displays "Pedal" error Check data cable integrity code Check data cable connections/orientation Check...
Owner's Manual
Page 15
Small latch on connector should be intact. Reset Machine (if equipped with removal. Fan (if equipped) will not turn on, but Console operates Check for 3 minutes. Replace the Console if unable to outlet. Be sure cranks are cut or crimped, replace cable. Reconnect to remove blockage. the batteries. Move bike to compensate for extremely uneven surfaces. Pedals loose/unit difficult to pedal Check pedal to crank connection Pedal should be tightened securely to...
Small latch on connector should be intact. Reset Machine (if equipped with removal. Fan (if equipped) will not turn on, but Console operates Check for 3 minutes. Replace the Console if unable to outlet. Be sure cranks are cut or crimped, replace cable. Reconnect to remove blockage. the batteries. Move bike to compensate for extremely uneven surfaces. Pedals loose/unit difficult to pedal Check pedal to crank connection Pedal should be tightened securely to...
Warranty
Page 1
...'s physical location, misuse, mishandling, accident, natural disasters, power surges. • A machine placed or used in the Product's Assembly and Owner's manual. Exclusions The preceding warranties are limited in materials or workmanship. Any implied warranties, including the WARRANTY OF MERCHANTABILITY and any WARRANTY OF FITNESS FOR A PARTICULAR PURPOSE, are the sole and exclusive express warranties made by exceeding maximum user weights as defined in Products Owner's Manual or on...
...'s physical location, misuse, mishandling, accident, natural disasters, power surges. • A machine placed or used in the Product's Assembly and Owner's manual. Exclusions The preceding warranties are limited in materials or workmanship. Any implied warranties, including the WARRANTY OF MERCHANTABILITY and any WARRANTY OF FITNESS FOR A PARTICULAR PURPOSE, are the sole and exclusive express warranties made by exceeding maximum user weights as defined in Products Owner's Manual or on...
Assembly Manual
Page 2
... work space away from operating correctly and void the warranty. • Do not use or put the machine into service until instructed to use genuine replacement parts can be covered by US and Foreign Patents and Patents Pending. Do not do so. • Do not assemble this machine outdoors or in a wet or moist location. • Make sure assembly is done in accordance with the Owner's Manual...
... work space away from operating correctly and void the warranty. • Do not use or put the machine into service until instructed to use genuine replacement parts can be covered by US and Foreign Patents and Patents Pending. Do not do so. • Do not assemble this machine outdoors or in a wet or moist location. • Make sure assembly is done in accordance with the Owner's Manual...

Assembly Manual
Page 3
Parts Item Qty Description 1 1 Main Unit 2 1 Front Stabilizer 3 1 Rear Stabilizer 4 1 Seat Rail 5 1 Seat Bracket Assembly 6 1 Seat Bottom 7 1 Seat Back Hardware Item Qty Description 8 1 Side Handlebars 9 1 Console Mast 10 1 Console 11 1 Pedal, Left (L) 12 1 Pedal, Right (R) 13 1 Water Bottle Holder Item Qty Description A 4 Carriage Bolt M8 x 65 B 5 Arc Washer C 4 Acorn Nut D 15 Hex Screw M8 x 15 Item E F G H 3 Qty Description 12 Flat Washer 2 Rubber Limit Pad 8 Phillips Head Screw M6 x 35 1 Adjustment Knob
Parts Item Qty Description 1 1 Main Unit 2 1 Front Stabilizer 3 1 Rear Stabilizer 4 1 Seat Rail 5 1 Seat Bracket Assembly 6 1 Seat Bottom 7 1 Seat Back Hardware Item Qty Description 8 1 Side Handlebars 9 1 Console Mast 10 1 Console 11 1 Pedal, Left (L) 12 1 Pedal, Right (R) 13 1 Water Bottle Holder Item Qty Description A 4 Carriage Bolt M8 x 65 B 5 Arc Washer C 4 Acorn Nut D 15 Hex Screw M8 x 15 Item E F G H 3 Qty Description 12 Flat Washer 2 Rubber Limit Pad 8 Phillips Head Screw M6 x 35 1 Adjustment Knob

Assembly Manual
Page 4
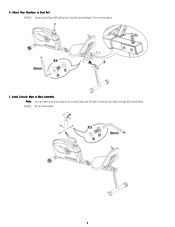
Attach Front Stabilizer to Seat Bracket NOTICE: Do not crimp cable from Handlebar. 4 Install Handlebar to Main Unit 2. Assembly 1.
Attach Front Stabilizer to Seat Bracket NOTICE: Do not crimp cable from Handlebar. 4 Install Handlebar to Main Unit 2. Assembly 1.
Assembly Manual
Page 6
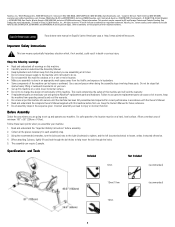
Install Console Mast to Main Assembly Note: You can attach a wire (or string) to the Console Cable and HR Cable to Seat Rail NOTICE: Connect Heart Rate (HR) cables from Seat Rail and Handlebar. NOTICE: Do not crimp cables. 6 6. Attach Rear Stabilizer to help pull the cables through the Console Mast. Do not crimp cables. 7.
Install Console Mast to Main Assembly Note: You can attach a wire (or string) to the Console Cable and HR Cable to Seat Rail NOTICE: Connect Heart Rate (HR) cables from Seat Rail and Handlebar. NOTICE: Do not crimp cables. 6 6. Attach Rear Stabilizer to help pull the cables through the Console Mast. Do not crimp cables. 7.
Assembly Manual
Page 8
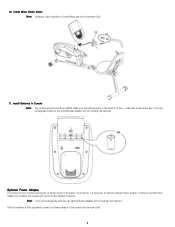
... Power Adapter The console for your machine can operate on Hardware Card. 11. indicators in Console Note: The console uses D size batteries (LR20). For AC power, it is fully assembled, connect the Power Adaptor to the console and the wall outlet. 8 If batteries and the Power Adapter are installed, the console will not recharge the batteries. Note: If you use the Power Adapter to order the optional Power Adapter. Make sure the batteries point in the direction of...
... Power Adapter The console for your machine can operate on Hardware Card. 11. indicators in Console Note: The console uses D size batteries (LR20). For AC power, it is fully assembled, connect the Power Adaptor to the console and the wall outlet. 8 If batteries and the Power Adapter are installed, the console will not recharge the batteries. Note: If you use the Power Adapter to order the optional Power Adapter. Make sure the batteries point in the direction of...
Assembly Manual
Page 9
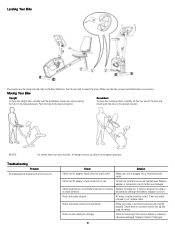
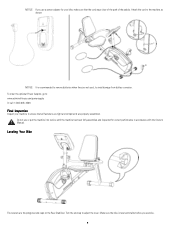
... use a power adapter for correct performance in accordance with the Owner's Manual. Make sure the bike is recommended to remove batteries when they are not used, to ensure that the cord stays clear of the path of the pedals. Leveling Your Bike The levelers are properly assembled. Attach the cord to the machine as shown: NOTICE: It is level and stable before you use or put the machine...
... use a power adapter for correct performance in accordance with the Owner's Manual. Make sure the bike is recommended to remove batteries when they are not used, to ensure that the cord stays clear of the path of the pedals. Leveling Your Bike The levelers are properly assembled. Attach the cord to the machine as shown: NOTICE: It is level and stable before you use or put the machine...

