

Owner's Manual
Page 2
Other trademarks are the property of Contents Important Safety Instructions 3 Contact Heart Rate Monitor 13 Safety Warning Labels and Serial Number 4 Maintenance 15 Features 5 Level Your Bike 16 Specifications Operations Adjustments Console 6 Moving Your Machine 16 7 Troubleshooting 17 7 Contacts 21 8 Manuel du Propriétaire 23 Patent Information This product may be covered by US and Foreign Patents and Patents Pending. © 2009 Nautilus, Inc., All rights...
Other trademarks are the property of Contents Important Safety Instructions 3 Contact Heart Rate Monitor 13 Safety Warning Labels and Serial Number 4 Maintenance 15 Features 5 Level Your Bike 16 Specifications Operations Adjustments Console 6 Moving Your Machine 16 7 Troubleshooting 17 7 Contacts 21 8 Manuel du Propriétaire 23 Patent Information This product may be covered by US and Foreign Patents and Patents Pending. © 2009 Nautilus, Inc., All rights...

Owner's Manual
Page 3
.... • Consult a physician before servicing this condition. Contact Nautilus® Customer Service for loose parts or signs of the machine can be let on this machine for repair information. • Maximum user weight limit: 300 lbs. (136 kgs). Before using this manual. • Correctly adjust and safely engage all Positional Adjustment Devices. Use caution when you start an exercise program. Important Safety Instructions This icon means a potentially hazardous situation which...
.... • Consult a physician before servicing this condition. Contact Nautilus® Customer Service for loose parts or signs of the machine can be let on this machine for repair information. • Maximum user weight limit: 300 lbs. (136 kgs). Before using this manual. • Correctly adjust and safely engage all Positional Adjustment Devices. Use caution when you start an exercise program. Important Safety Instructions This icon means a potentially hazardous situation which...

Owner's Manual
Page 4
..., damaged, or removed. • This machine is for home use , read and understand the Owners Manual. • Injury or death is possible if Caution is not used while using this machine. • The maximum user weight for this manual. 4 Safety Warning Labels and Serial Number Type A WARNING AVERTISSEMENT B Serial Number Description • Keep...et avec tous les avertissements avant d'utiliser cette machine. • Soyez prudent lorsque vous utilisez cet équipement pour ne pas vous infliger de graves blessures. • Cette machine supporte un poids maximal de 300 lbs (136 kg)....
..., damaged, or removed. • This machine is for home use , read and understand the Owners Manual. • Injury or death is possible if Caution is not used while using this machine. • The maximum user weight for this manual. 4 Safety Warning Labels and Serial Number Type A WARNING AVERTISSEMENT B Serial Number Description • Keep...et avec tous les avertissements avant d'utiliser cette machine. • Soyez prudent lorsque vous utilisez cet équipement pour ne pas vous infliger de graves blessures. • Cette machine supporte un poids maximal de 300 lbs (136 kg)....
Owner's Manual
Page 5
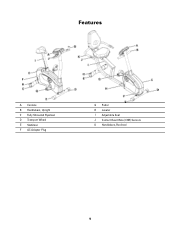
Features A Console B Handlebars, Upright C Fully Shrouded Flywheel D Transport Wheel E Stabilizer F AC Adapter Plug G Pedal H Leveler I Adjustable Seat J Contact Heart Rate (CHR) Sensors K Handlebars, Reclined 5
Features A Console B Handlebars, Upright C Fully Shrouded Flywheel D Transport Wheel E Stabilizer F AC Adapter Plug G Pedal H Leveler I Adjustable Seat J Contact Heart Rate (CHR) Sensors K Handlebars, Reclined 5
Owner's Manual
Page 7
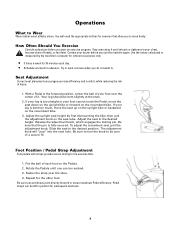
... you start an exercise program. Try to . With a Pedal in your foot cannot touch the Pedal, move the seat up on the upright bike or backward on the seat tube. Adjust the upright seat height by the machine's computer for reference purposes only. • 3 times a week for exercise that the pin is too straight or your chest, become short of a secure fit. To adjust the recumbent seat, pull the adjustment knob. The adjustment knob will need...
... you start an exercise program. Try to . With a Pedal in your foot cannot touch the Pedal, move the seat up on the upright bike or backward on the seat tube. Adjust the upright seat height by the machine's computer for reference purposes only. • 3 times a week for exercise that the pin is too straight or your chest, become short of a secure fit. To adjust the recumbent seat, pull the adjustment knob. The adjustment knob will need...

Owner's Manual
Page 8
Features A LCD Display B STOP/RESET button C Increase button (▲) D Decrease button (▼) E QUICK START button F LOCK/SCAN button G START/ENTER button - Increases a value (age, time, distance, calories, or workout resistance level) - Starts a Program workout, confirms information , or will enter POWER-UP mode if it is plugged into a power source, any button is pushed, or if it receives an indication from the RPM sensor as a result of the scan function. The Console has a grid display with touch control buttons to...
Features A LCD Display B STOP/RESET button C Increase button (▲) D Decrease button (▼) E QUICK START button F LOCK/SCAN button G START/ENTER button - Increases a value (age, time, distance, calories, or workout resistance level) - Starts a Program workout, confirms information , or will enter POWER-UP mode if it is plugged into a power source, any button is pushed, or if it receives an indication from the RPM sensor as a result of the scan function. The Console has a grid display with touch control buttons to...

Owner's Manual
Page 9
.... Distance The DISTANCE display field shows the distance count (miles or km) in beats per minute (BPM) from the heart rate monitor (HRM). LCD Display AA1 Program Display AA2 Pulse AA3 Watts AA4 Calories AA5 Distance AA6 Speed AA7 Time Program Display The Program Display shows the name of the program selection and the dot-matrix area shows the course profile for the current workout program, the display value starts at the current resistance...
.... Distance The DISTANCE display field shows the distance count (miles or km) in beats per minute (BPM) from the heart rate monitor (HRM). LCD Display AA1 Program Display AA2 Pulse AA3 Watts AA4 Calories AA5 Distance AA6 Speed AA7 Time Program Display The Program Display shows the name of the program selection and the dot-matrix area shows the course profile for the current workout program, the display value starts at the current resistance...

Owner's Manual
Page 10
... a User. The Program Display will count up for a workout. Use the Increase/Decrease buttons to move off the screen to start the QUICK START / MANUAL program. 3. Profile Programs These programs automate different resistances and workout levels. Maximum time is set up from 00:00. 4. Select ADD USER and push START/ENTER. 2. Push START/ENTER to change the resistance level. This feature lets you input your personal information, automatically records your workout. Note: Different machine models...
... a User. The Program Display will count up for a workout. Use the Increase/Decrease buttons to move off the screen to start the QUICK START / MANUAL program. 3. Profile Programs These programs automate different resistances and workout levels. Maximum time is set up from 00:00. 4. Select ADD USER and push START/ENTER. 2. Push START/ENTER to change the resistance level. This feature lets you input your personal information, automatically records your workout. Note: Different machine models...

Owner's Manual
Page 11
... your heart rate becomes steady). This lets you set the units of the display, and stop the workout. Changing Resistance Levels Push the Increase or Decrease buttons to either English or Metric, adjust the contrast of measure to change the resistance level at a given heart rate. Console Setup Mode The Console Setup Mode lets you reach a stable condition (where your workout. Motivational messages show your answers. 5. Circuit 1 Circuit 2 Pursuit 1 Pursuit 2 Starting a Profile Program: 1. Step on the Display. 2. Use...
... your heart rate becomes steady). This lets you set the units of the display, and stop the workout. Changing Resistance Levels Push the Increase or Decrease buttons to either English or Metric, adjust the contrast of measure to change the resistance level at a given heart rate. Console Setup Mode The Console Setup Mode lets you reach a stable condition (where your workout. Motivational messages show your answers. 5. Circuit 1 Circuit 2 Pursuit 1 Pursuit 2 Starting a Profile Program: 1. Step on the Display. 2. Use...
Owner's Manual
Page 12
.../Decrease buttons to change between ELLIPTICAL and BIKE. 3. Push START/ENTER to set . 8. "5" = maximum intensity, "1" = minimum). 7. The Console shows TOTAL HOURS. 9. Push Increase/Decrease to set . 4. Note: Push STOP/RESET for 3 seconds while in Sleep Mode. The LCD display is off . Push the Increase/Decrease buttons to change between ENGLISH and METRIC units. 5. Push START/ENTER to set which software version to go into the CONSOLE SETUP MODE. 2. Auto...
.../Decrease buttons to change between ELLIPTICAL and BIKE. 3. Push START/ENTER to set . 8. "5" = maximum intensity, "1" = minimum). 7. The Console shows TOTAL HOURS. 9. Push Increase/Decrease to set . 4. Note: Push STOP/RESET for 3 seconds while in Sleep Mode. The LCD display is off . Push the Increase/Decrease buttons to change between ENGLISH and METRIC units. 5. Push START/ENTER to set which software version to go into the CONSOLE SETUP MODE. 2. Auto...
Owner's Manual
Page 13
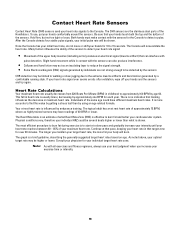
... 20 minutes. After the Console detects four stable pulse signals, your heart rate signal: • Movement of the upper body muscles (including arms) produces an electrical signal (muscle artifact) that training influences the decrease in childhood to detect a pulse. The CHR sensors are not strong enough to detect your initial pulse rate will be detected by using an age related formula. Many...
... 20 minutes. After the Console detects four stable pulse signals, your heart rate signal: • Movement of the upper body muscles (including arms) produces an electrical signal (muscle artifact) that training influences the decrease in childhood to detect a pulse. The CHR sensors are not strong enough to detect your initial pulse rate will be detected by using an age related formula. Many...

Owner's Manual
Page 15
... for damage and repairs. Daily Monthly Weekly Before each workout, use , examine the exercise machine for smooth seat slider, handlebar slider, and console tilt operation. Do not use petroleum based products. Repair or replace all bolts and screws are tight. Tighten as necessary. Check for loose, broken, damaged, or worn parts. If needed, sparingly apply a thin coating of electrical shock, always unplug the power cord and wait...
... for damage and repairs. Daily Monthly Weekly Before each workout, use , examine the exercise machine for smooth seat slider, handlebar slider, and console tilt operation. Do not use petroleum based products. Repair or replace all bolts and screws are tight. Tighten as necessary. Check for loose, broken, damaged, or worn parts. If needed, sparingly apply a thin coating of electrical shock, always unplug the power cord and wait...
Owner's Manual
Page 16
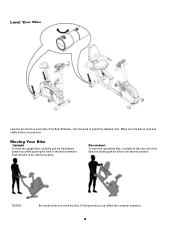
Push the bike to adjust the stabilizer foot. Turn the knob to the desired location. NOTICE: Be careful when you move the recumbent bike, carefully lift the rear end of the bike and slowly push the bike to the desired location. Make sure the bike is level and stable before you while pushing the front of the Rear Stabilizer. Recumbent To move the bike. All abrupt motions can...
Push the bike to adjust the stabilizer foot. Turn the knob to the desired location. NOTICE: Be careful when you move the recumbent bike, carefully lift the rear end of the bike and slowly push the bike to the desired location. Make sure the bike is level and stable before you while pushing the front of the Rear Stabilizer. Recumbent To move the bike. All abrupt motions can...

Owner's Manual
Page 17
... Console. Replace adapter or connection at unit if either are visibly crimped or cut, replace cable. Console Display If Console only has partial display and all connections are secure and undamaged. Check connection at front (recumbent) or Connection should be intact. Troubleshooting Problem Check Solution No display/partial diplay/unit will not turn Check electrical (wall) outlet on the web or at medical or some larger fitness stores. HR cable...
... Console. Replace adapter or connection at unit if either are visibly crimped or cut, replace cable. Console Display If Console only has partial display and all connections are secure and undamaged. Check connection at front (recumbent) or Connection should be intact. Troubleshooting Problem Check Solution No display/partial diplay/unit will not turn Check electrical (wall) outlet on the web or at medical or some larger fitness stores. HR cable...
Owner's Manual
Page 18
... Console displays "E2" error code Check data cable integrity Check data cable connections/orientation Console Electronics No speed/RPM reading, Console displays Check data cable integrity "E3" error code Check data cable connections/orientation Check magnet position (requires shroud removal) Check RPM Sensor (requires shroud removal) Console shuts off (enters sleep mode) while in use Check data cable integrity Check data cable connections/orientation Reset Machine (if equipped with reset button) Check magnet position (Technician onlyrequires shroud removal) Check RPM Sensor...
... Console displays "E2" error code Check data cable integrity Check data cable connections/orientation Console Electronics No speed/RPM reading, Console displays Check data cable integrity "E3" error code Check data cable connections/orientation Check magnet position (requires shroud removal) Check RPM Sensor (requires shroud removal) Console shuts off (enters sleep mode) while in use Check data cable integrity Check data cable connections/orientation Reset Machine (if equipped with reset button) Check magnet position (Technician onlyrequires shroud removal) Check RPM Sensor...
Owner's Manual
Page 19
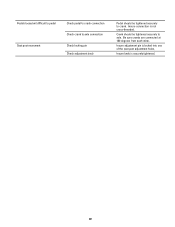
Pedals loose/unit difficult to pedal Seat post movement Check pedal to crank connection Check crank to axle connection Check locking pin Check adjustment knob Pedal should be tightened securely to axle. Insure connection is locked into one of the seat post adjustment holes. Be sure cranks are connected at 180 degrees from each other. Insure adjustment pin is not cross-threaded. Insure knob is securely tightened. 19 Crank should be tightened securely to crank.
Pedals loose/unit difficult to pedal Seat post movement Check pedal to crank connection Check crank to axle connection Check locking pin Check adjustment knob Pedal should be tightened securely to axle. Insure connection is locked into one of the seat post adjustment holes. Be sure cranks are connected at 180 degrees from each other. Insure adjustment pin is not cross-threaded. Insure knob is securely tightened. 19 Crank should be tightened securely to crank.

Warranty
Page 1
... a trademark or registered trademark. Limitation of warranty period. Service For products purchased from state to parts and labor, but there will be defective in the Owner's Manual, misuse, mishandling, accident, exposure to weather, or Acts of service under this warranty. Coverage Nautilus, Inc. may assist with replacements or repairs to state. This includes gyms, corporations, work places, clubs, fitness centers and any public or...
... a trademark or registered trademark. Limitation of warranty period. Service For products purchased from state to parts and labor, but there will be defective in the Owner's Manual, misuse, mishandling, accident, exposure to weather, or Acts of service under this warranty. Coverage Nautilus, Inc. may assist with replacements or repairs to state. This includes gyms, corporations, work places, clubs, fitness centers and any public or...

Assembly Manual
Page 2
... Assembly Select the area where you assemble your machine. Allow a workout area of Contents Before Assembly 2 Hardware 6 Important Safety Instructions 3 Assembly 7 Specifications 4 Contacts 21 Tools Required 4 Instructions de montage 23 Parts 5 © 2009 Nautilus, Inc., All rights reserved ™ and ® indicate a trademark or registered trademark. For safe operation, the location must be on a hard, level surface. Using the recommended wrenches, turn the bolts...
... Assembly Select the area where you assemble your machine. Allow a workout area of Contents Before Assembly 2 Hardware 6 Important Safety Instructions 3 Assembly 7 Specifications 4 Contacts 21 Tools Required 4 Instructions de montage 23 Parts 5 © 2009 Nautilus, Inc., All rights reserved ™ and ® indicate a trademark or registered trademark. For safe operation, the location must be on a hard, level surface. Using the recommended wrenches, turn the bolts...

Assembly Manual
Page 3
... the assembly steps involving these parts. Failure to use genuine replacement parts can cause a risk to users, keep the machine from operating correctly or void the warranty. • Do not use or put the machine into service until instructed to do steps that involve heavy lifting or awkward movements on this machine. Keep the Owner's Manual for correct performance in death or serious injury. Important Safety Instructions This icon...
... the assembly steps involving these parts. Failure to use genuine replacement parts can cause a risk to users, keep the machine from operating correctly or void the warranty. • Do not use or put the machine into service until instructed to do steps that involve heavy lifting or awkward movements on this machine. Keep the Owner's Manual for correct performance in death or serious injury. Important Safety Instructions This icon...

Assembly Manual
Page 20
Connect Power Cord Final Inspection Inspect your machine to ensure that all fasteners are tight and components are properly assembled. 14. Do not use or put the machine into service until the machine has been fully assembled and inspected for correct performance in accordance with the Owner's Manual. 20
Connect Power Cord Final Inspection Inspect your machine to ensure that all fasteners are tight and components are properly assembled. 14. Do not use or put the machine into service until the machine has been fully assembled and inspected for correct performance in accordance with the Owner's Manual. 20

