

Owners Manual
Page 2
...beam. - THIS SYMBOL INDICATES THAT THERE ARE IMPORTANT OPERATING AND MAINTENANCE INSTRUCTIONS IN THE OWNER'S MANUAL WITH THIS UNIT. If the projector is not to manage those features and maintains it may result in better condition for a considerable time. SIDE and TOP 20cm ...REAR 50cm 50cm 50cm - To the Owner Before operating this projector, read this manual again, check operations and cable connections and try the solutions in the "Troubleshooting" section at the end of this...
...beam. - THIS SYMBOL INDICATES THAT THERE ARE IMPORTANT OPERATING AND MAINTENANCE INSTRUCTIONS IN THE OWNER'S MANUAL WITH THIS UNIT. If the projector is not to manage those features and maintains it may result in better condition for a considerable time. SIDE and TOP 20cm ...REAR 50cm 50cm 50cm - To the Owner Before operating this projector, read this manual again, check operations and cable connections and try the solutions in the "Troubleshooting" section at the end of this...

Owners Manual
Page 3
... of airconditioning equipment. Use a damp cloth for later use. Do not use a mounting kit approved by a qualified technician to restore the projector to determine that could result in fire, electric shock, or injury to qualified service personnel under the following the operating instructions. Use only with... in damage and will prevent damage due to protect it from wall outlet and refer servicing to persons. Do not expose this projector, ask the service technician to perform routine safety checks to normal operation. For added protection to rain or use liquid or aerosol...
... of airconditioning equipment. Use a damp cloth for later use. Do not use a mounting kit approved by a qualified technician to restore the projector to determine that could result in fire, electric shock, or injury to qualified service personnel under the following the operating instructions. Use only with... in damage and will prevent damage due to protect it from wall outlet and refer servicing to persons. Do not expose this projector, ask the service technician to perform routine safety checks to normal operation. For added protection to rain or use liquid or aerosol...

Owners Manual
Page 4
...is intended for ventilation and to ensure reliable operation of a cabinet, and it into the case (carrying bag) supplied with this bag, otherwise the projector can be taken. - Do not touch a peripheral part of the cooling fans. NO DOWNWARD Do not put other things on either side. 20... - This may result. - Do not put anything on the surface of the product and to protect it to strong forces or put the projector on the cabinet. When using a courier or transport service in an unsuitable transport case. Safety Instruction Air Circulation Openings in the cabinet are provided...
...is intended for ventilation and to ensure reliable operation of a cabinet, and it into the case (carrying bag) supplied with this bag, otherwise the projector can be taken. - Do not touch a peripheral part of the cooling fans. NO DOWNWARD Do not put other things on either side. 20... - This may result. - Do not put anything on the surface of the product and to protect it to strong forces or put the projector on the cabinet. When using a courier or transport service in an unsuitable transport case. Safety Instruction Air Circulation Openings in the cabinet are provided...

Owners Manual
Page 5
...Trade Name Responsible party Address Telephone No. : PLC-SW30 : Sanyo : SANYO FISHER COMPANY : 21605 Plummer Street, Chatsworth, California 91311 : (818)998-7322 Model Number Trade Name Responsible Party Address Telephone No. : TGX0043-011010 (1AV4U20B69000) IR Presentation Remote Receiver for Projector : HOSIDEN : Hosiden America Corp. : ...markings identifying the terminals in your User Instructions. The wire which the receiver is a safety feature to defeat this projector meets the requirement for use the plug with the cover omitted. The end of the flexible cord should be ...
...Trade Name Responsible party Address Telephone No. : PLC-SW30 : Sanyo : SANYO FISHER COMPANY : 21605 Plummer Street, Chatsworth, California 91311 : (818)998-7322 Model Number Trade Name Responsible Party Address Telephone No. : TGX0043-011010 (1AV4U20B69000) IR Presentation Remote Receiver for Projector : HOSIDEN : Hosiden America Corp. : ...markings identifying the terminals in your User Instructions. The wire which the receiver is a safety feature to defeat this projector meets the requirement for use the plug with the cover omitted. The end of the flexible cord should be ...

Owners Manual
Page 6
... 8 Top panel 9 Terminals 10 Remote Control 11 Operating Range 11 Preparation 12 Connecting the AC Power Cord 12 Positioning the Projector 13 Adjustable Feet 13 Remote Control Battery Installation 14 Attaching the Lens Cover 14 Installation 15 Connecting to a Computer 15 Connecting ...Replace Counter 41 Warning Indicator 42 Air Filter 43 Cleaning the Projection Lens 43 Appendix 44 Troubleshooting 44 Indicators and Projector Condition 46 Menu Tree 47 Compatible Computer Specifications 49 Technical Specifications 50 Configuration of Terminals 51 Optional Parts 51 TRADEMARKS...
... 8 Top panel 9 Terminals 10 Remote Control 11 Operating Range 11 Preparation 12 Connecting the AC Power Cord 12 Positioning the Projector 13 Adjustable Feet 13 Remote Control Battery Installation 14 Attaching the Lens Cover 14 Installation 15 Connecting to a Computer 15 Connecting ...Replace Counter 41 Warning Indicator 42 Air Filter 43 Cleaning the Projection Lens 43 Appendix 44 Troubleshooting 44 Indicators and Projector Condition 46 Menu Tree 47 Compatible Computer Specifications 49 Technical Specifications 50 Configuration of Terminals 51 Optional Parts 51 TRADEMARKS...

Owners Manual
Page 7
... Design PLC-SW30 is designed with the most advanced technology for Computer) Digital Zoom function expands (to approx. 16 times of screen size) or compress the image size, allowing you wish to almost all computer output signals quickly. Outstanding Compatibility This projector widely ...used for the starting display of 16.77 million colors, and matrix liquid crystal display (LCD) technology. It is available with by Auto PC Adjustment. This function protects the projector from a computer between SVGA (800 x 600) and SXGA (1280 x 1024) is precisely compressed into progressive signal...
... Design PLC-SW30 is designed with the most advanced technology for Computer) Digital Zoom function expands (to approx. 16 times of screen size) or compress the image size, allowing you wish to almost all computer output signals quickly. Outstanding Compatibility This projector widely ...used for the starting display of 16.77 million colors, and matrix liquid crystal display (LCD) technology. It is available with by Auto PC Adjustment. This function protects the projector from a computer between SVGA (800 x 600) and SXGA (1280 x 1024) is precisely compressed into progressive signal...
Owners Manual
Page 8
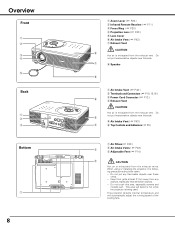
...-sensitive objects near this side. Do not put any objects, especially heat-sensitive objects. - When using or installing the projector, the following precautions should be taken. - Keep front grills at least 3'(1m) away from the exhaust vents. This ... is exhausted from the exhaust vent. Do not put heat-sensitive objects near this area, especially screws and metallic part. This projector detects internal temperature and will become hot while the projector is being used. Overview Front q w e r t Back q w e Bottom q 8 q Zoom Lever ( ☞ P20 ) w Infrared Remote Receiver ( ...
...-sensitive objects near this side. Do not put any objects, especially heat-sensitive objects. - When using or installing the projector, the following precautions should be taken. - Keep front grills at least 3'(1m) away from the exhaust vents. This ... is exhausted from the exhaust vent. Do not put heat-sensitive objects near this area, especially screws and metallic part. This projector detects internal temperature and will become hot while the projector is being used. Overview Front q w e r t Back q w e Bottom q 8 q Zoom Lever ( ☞ P20 ) w Infrared Remote Receiver ( ...

Owners Manual
Page 9
... image in the On-Screen Menu. ( ☞ P17 ) - It remains green while the projector is in the stand-by mode. This indicator also flashes red when the internal projector temperature goes up over the operating range. ( ☞ P42 ) i POWER indicator Flashes red...on or off. ( ☞ P19 ) w SELECT button - OFF SELECT INPUT MENU Overview t r q POWER ON-OFF button Turns the projector on . VOLUME+ i u y POWER WARNING LAMP REPLACE ON - It turns red when the projector is in Digital Zoom mode. ( ☞ P29 ) e Point ed7 8 ( VOLUME + / - ) buttons - Executes the selected ...
... image in the On-Screen Menu. ( ☞ P17 ) - It remains green while the projector is in the stand-by mode. This indicator also flashes red when the internal projector temperature goes up over the operating range. ( ☞ P42 ) i POWER indicator Flashes red...on or off. ( ☞ P19 ) w SELECT button - OFF SELECT INPUT MENU Overview t r q POWER ON-OFF button Turns the projector on . VOLUME+ i u y POWER WARNING LAMP REPLACE ON - It turns red when the projector is in Digital Zoom mode. ( ☞ P29 ) e Point ed7 8 ( VOLUME + / - ) buttons - Executes the selected ...

Owners Manual
Page 10
... Connect computer output, component output or RGB Scart 21-pin video output to this connector. ( ☞ P15, P16 ) ✽ RESET button A microprocessor included in the projector may occasionally malfunction and need to service this button with a sharp tool to restart the unit. If necessary, press this...
... Connect computer output, component output or RGB Scart 21-pin video output to this connector. ( ☞ P15, P16 ) ✽ RESET button A microprocessor included in the projector may occasionally malfunction and need to service this button with a sharp tool to restart the unit. If necessary, press this...

Owners Manual
Page 11
...a presentation. ( ☞ P10, P38 ) y D.ZOOM ed button Select the Digital zoom +/- Select an item or adjust value in front of the projector. 16.4' (5 m) 30° 30° 11 Executes the selected item. ( ☞ P17 ) - Do not bend, drop the remote control or... ☞ P17 ) - Expands / compresses the image in DIGITAL ZOOM +/- mode. ( ☞ P29) - Operating Range Point the remote control toward the projector (Receiver Window) when pressing any chemical material. mode and resize the image. ( ☞ P29 ) u AUTO PC button Automatically adjusts a computer image to ...
...a presentation. ( ☞ P10, P38 ) y D.ZOOM ed button Select the Digital zoom +/- Select an item or adjust value in front of the projector. 16.4' (5 m) 30° 30° 11 Executes the selected item. ( ☞ P17 ) - Do not bend, drop the remote control or... ☞ P17 ) - Expands / compresses the image in DIGITAL ZOOM +/- mode. ( ☞ P29) - Operating Range Point the remote control toward the projector (Receiver Window) when pressing any chemical material. mode and resize the image. ( ☞ P29 ) u AUTO PC button Automatically adjusts a computer image to ...

Owners Manual
Page 12
... accessible. and Canada Ground For Continental Europe For the U.K. If supplied AC Power Cord does not match your AC outlet, contact your projector. Connect a projector with single-phase power systems having a grounded neutral conductor. When this equipment and must meet requirement of the country where you are not... sure of the type of power supply being in Stand-by Mode and consumes a little electric power. Projector side AC Outlet side For the U.S.A. It is not used . To POWER CORD CONNECTOR on . (Refer to page 15 -16 for connection...
... accessible. and Canada Ground For Continental Europe For the U.K. If supplied AC Power Cord does not match your AC outlet, contact your projector. Connect a projector with single-phase power systems having a grounded neutral conductor. When this equipment and must meet requirement of the country where you are not... sure of the type of power supply being in Stand-by Mode and consumes a little electric power. Projector side AC Outlet side For the U.S.A. It is not used . To POWER CORD CONNECTOR on . (Refer to page 15 -16 for connection...

Owners Manual
Page 13
... in order to 21.3'(6.5m). - Projection angle can be adjusted at 8.0 degrees. 1 Lift the front of the projector and pull the feet lock latches on the both sides of the projector. 2 Release the feet lock latches to lock the adjustable feet and rotate them to adjust position and tilt. 3 ... front of the projected image can be focused from 4.3'(1.3m) to provide the best image. Keystone distortion of the projector and pull and undo the feet lock latches. This projector is recommended to limit ambient lighting in a room has a great influence on a flat projection surface. - Refer ...
... in order to 21.3'(6.5m). - Projection angle can be adjusted at 8.0 degrees. 1 Lift the front of the projector and pull the feet lock latches on the both sides of the projector. 2 Release the feet lock latches to lock the adjustable feet and rotate them to adjust position and tilt. 3 ... front of the projected image can be focused from 4.3'(1.3m) to provide the best image. Keystone distortion of the projector and pull and undo the feet lock latches. This projector is recommended to limit ambient lighting in a room has a great influence on a flat projection surface. - Refer ...

Owners Manual
Page 14
... batteries For correct polarity (+ and -), be sure battery terminals are in place. 2 Thread the other end of the string through the resulting loop of the projector. If a battery has leaked on the lens cover and then tie a knot in the string to secure it in contact with water or liquid. - Pull...
... batteries For correct polarity (+ and -), be sure battery terminals are in place. 2 Thread the other end of the string through the resulting loop of the projector. If a battery has leaked on the lens cover and then tie a knot in the string to secure it in contact with water or liquid. - Pull...

Owners Manual
Page 15
Set switches as shown in the table below depending on RESOLUTION MODE that you turn on . Turn the projector and peripheral equipment on before you want to the USB socket of the projector. ( ☞ P10, P38 ) RESET VIDEO S-VIDEO SERVICE PORT COMPUTER IN / COMPONENT IN/ AUDIO IN USB COMPUTER ... OFF 21" MODE (1152 x 870) ON OONN ON ON OFF OFF 15 Installation Connecting to a Computer IBM-compatible computer or Macintosh computer (VGA / SVGA / XGA / SXGA) Monitor Output Audio Output USB port VGA Cable Audio Cable (Stereo) ✽ USB Cable ✽ If you wish to use Page...
Set switches as shown in the table below depending on RESOLUTION MODE that you turn on . Turn the projector and peripheral equipment on before you want to the USB socket of the projector. ( ☞ P10, P38 ) RESET VIDEO S-VIDEO SERVICE PORT COMPUTER IN / COMPONENT IN/ AUDIO IN USB COMPUTER ... OFF 21" MODE (1152 x 870) ON OONN ON ON OFF OFF 15 Installation Connecting to a Computer IBM-compatible computer or Macintosh computer (VGA / SVGA / XGA / SXGA) Monitor Output Audio Output USB port VGA Cable Audio Cable (Stereo) ✽ USB Cable ✽ If you wish to use Page...

Owners Manual
Page 16
Note: When connecting the cable, the power cords of connecting both the projector and the external equipment should be disconnected from AC outlet. Installation Connecting to Video Equipment Video Source (example) Video Cassette Recorder Video Disc Player Component ... Cable ✽ • Audio Cables (Mini Plug) ✽ • Scart-VGA Cable ✽ • Component-VGA Cable ✽ ✽ Not supplied. 16 Terminals of the Projector Note : The S-VIDEO jack has priority over the VIDEO jack under the condition of both the S-VIDEO jack and the VIDEO jack when selecting AUTO...
Note: When connecting the cable, the power cords of connecting both the projector and the external equipment should be disconnected from AC outlet. Installation Connecting to Video Equipment Video Source (example) Video Cassette Recorder Video Disc Player Component ... Cable ✽ • Audio Cables (Mini Plug) ✽ • Scart-VGA Cable ✽ • Component-VGA Cable ✽ ✽ Not supplied. 16 Terminals of the Projector Note : The S-VIDEO jack has priority over the VIDEO jack under the condition of both the S-VIDEO jack and the VIDEO jack when selecting AUTO...
Owners Manual
Page 17
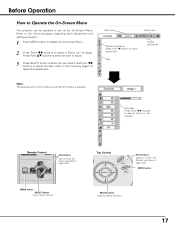
... to select an item to adjust. 3 Press SELECT button to select the item. MENU VOLUME- Before Operation How to Operate the On-Screen Menu The projector can be adjusted or set function. Refer to the following pages regarding each adjustment and setting procedure. 1 Press MENU button to display the On-Screen...
... to select an item to adjust. 3 Press SELECT button to select the item. MENU VOLUME- Before Operation How to Operate the On-Screen Menu The projector can be adjusted or set function. Refer to the following pages regarding each adjustment and setting procedure. 1 Press MENU button to display the On-Screen...
Owners Manual
Page 18
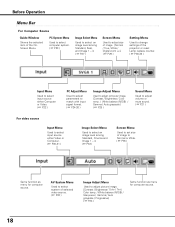
... 1 - 4. ( ☞ P27 ) Screen Menu Used to adjust size of image. [Normal / True / Wide / Digital zoom +/-] ( ☞ P29 ) Setting Menu Used to change settings of the projector or reset Lamp replace counter. ( ☞ P36-38 ) Input Menu Used to select input source either Computer or Video. ( ☞ P22 ) PC Adjust Menu Used...
... 1 - 4. ( ☞ P27 ) Screen Menu Used to adjust size of image. [Normal / True / Wide / Digital zoom +/-] ( ☞ P29 ) Setting Menu Used to change settings of the projector or reset Lamp replace counter. ( ☞ P36-38 ) Input Menu Used to select input source either Computer or Video. ( ☞ P22 ) PC Adjust Menu Used...

Owners Manual
Page 19
... source that was selected last and the Lamp mode status appear on the top control or the remote control, and the message " Power off the projector. The starting display can be changed. ( ☞ " Capture " P36 ) Selected Input Source and Lamp Mode Lamp mode ( ☞ " Lamp mode " P37 ) ...OFF button on again, the Power indicator turns red again. If the WARNING indicator flashes or lights red, see "Warning Indicator" on the projector. 2 Connect the projector's AC Power Cord into an AC outlet. The POWER indicator starts to be turned on the screen and the count-down starts. 4 After...
... source that was selected last and the Lamp mode status appear on the top control or the remote control, and the message " Power off the projector. The starting display can be changed. ( ☞ " Capture " P36 ) Selected Input Source and Lamp Mode Lamp mode ( ☞ " Lamp mode " P37 ) ...OFF button on again, the Power indicator turns red again. If the WARNING indicator flashes or lights red, see "Warning Indicator" on the projector. 2 Connect the projector's AC Power Cord into an AC outlet. The POWER indicator starts to be turned on the screen and the count-down starts. 4 After...

Owners Manual
Page 23
... set correctly. (☞ " Troubleshooting" P44 ) Mode 1 User preset adjustment in the projector. Adjustment data can be selected. SVGA 1 Computer systems provided in Computer Adjustment. SYSTEM Menu icon Displays system being selected. Custom Mode (1-5) set , and then press SELECT button.... detects the signal format and tunes to various types of computers based on VGA, SVGA, XGA or SXGA with its Multi-scan system and Auto PC Adjustment. Auto When projector cannot recognize connected signal as a signal source, this dialog box can be also selected manually. 1 Press MENU ...
... set correctly. (☞ " Troubleshooting" P44 ) Mode 1 User preset adjustment in the projector. Adjustment data can be selected. SVGA 1 Computer systems provided in Computer Adjustment. SYSTEM Menu icon Displays system being selected. Custom Mode (1-5) set , and then press SELECT button.... detects the signal format and tunes to various types of computers based on VGA, SVGA, XGA or SXGA with its Multi-scan system and Auto PC Adjustment. Auto When projector cannot recognize connected signal as a signal source, this dialog box can be also selected manually. 1 Press MENU ...

Owners Manual
Page 24
... PC Adjustment Auto PC Adjustment Auto PC Adjustment function is selected on the remote control. This Auto PC Adjustment can be fully adjusted with this projector. Note : - icon and then press the SELECT button twice. icon and press SELECT button. 24 This function can be done just by pressing the Auto...
... PC Adjustment Auto PC Adjustment Auto PC Adjustment function is selected on the remote control. This Auto PC Adjustment can be fully adjusted with this projector. Note : - icon and then press the SELECT button twice. icon and press SELECT button. 24 This function can be done just by pressing the Auto...


