
Instruction Manual, PLC-XW200 XW250
Page 1
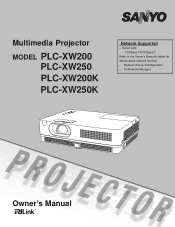
Multimedia Projector MODEL PLC-XW200 PLC-XW250 PLC-XW200K PLC-XW250K Network Supported □ Wired LAN 100-Base-TX/10-Base-T Refer to the Owner's Manuals below for details about network function. □ Network Set-up and Operation □ PJ Network Manager Owner's Manual
Multimedia Projector MODEL PLC-XW200 PLC-XW250 PLC-XW200K PLC-XW250K Network Supported □ Wired LAN 100-Base-TX/10-Base-T Refer to the Owner's Manuals below for details about network function. □ Network Set-up and Operation □ PJ Network Manager Owner's Manual
Instruction Manual, PLC-XW200 XW250
Page 2
... can turn on the colored wall, after turning off the projector without waiting for better and proper maintenance of 16.77 million colors, and matrix liquid crystal display (LCD) technology. ♦ Compact Design ♦ Security Function This projector is designed compact in this manual are subject to the color image termination of the projection...
... can turn on the colored wall, after turning off the projector without waiting for better and proper maintenance of 16.77 million colors, and matrix liquid crystal display (LCD) technology. ♦ Compact Design ♦ Security Function This projector is designed compact in this manual are subject to the color image termination of the projection...

Instruction Manual, PLC-XW200 XW250
Page 3
... Control Battery Installation 12 Remote Control Operating Range 12 Remote Control Code 12 Installation 13 Positioning the Projector 13 Adjustable Foot 13 Connecting to a Computer 14 Connecting to Video Equipment 15 Connecting to Component ...Projector 20 How to Operate the On-Screen Menu 21 Menu Bar 22 Zoom and Focus Adjustment 23 Auto Setup Function 23 Keystone Correction 23 Sound Adjustment 24 Remote Control Operation 25 Computer Input 27 Input Source Selection (RGB: Computer 1/Computer 2) 27 Computer System Selection 28 Auto PC Adjustment 29 Manual...
... Control Battery Installation 12 Remote Control Operating Range 12 Remote Control Code 12 Installation 13 Positioning the Projector 13 Adjustable Foot 13 Connecting to a Computer 14 Connecting to Video Equipment 15 Connecting to Component ...Projector 20 How to Operate the On-Screen Menu 21 Menu Bar 22 Zoom and Focus Adjustment 23 Auto Setup Function 23 Keystone Correction 23 Sound Adjustment 24 Remote Control Operation 25 Computer Input 27 Input Source Selection (RGB: Computer 1/Computer 2) 27 Computer System Selection 28 Auto PC Adjustment 29 Manual...
Instruction Manual, PLC-XW200 XW250
Page 4
... la norme ANSI/NFPA 75 Standard for a long time. READ AND KEEP THIS OWNER'S MANUAL FOR LATER USE. This will be dangerous. Do not stare directly into the beam. -Install the projector in the Standard for many convenient features and functions. CAUTION Not for use in good condition...and manufactured with oil or chemicals, IT may remain on the LCD panels by the characteristic of panel. 50cm 1m 1m CAUTION Do not set the projector in fire hazard. -Allowing the proper amount of space on the projector. The afterimage may become deteriorated. Your product is critical for...
... la norme ANSI/NFPA 75 Standard for a long time. READ AND KEEP THIS OWNER'S MANUAL FOR LATER USE. This will be dangerous. Do not stare directly into the beam. -Install the projector in the Standard for many convenient features and functions. CAUTION Not for use in good condition...and manufactured with oil or chemicals, IT may remain on the LCD panels by the characteristic of panel. 50cm 1m 1m CAUTION Do not set the projector in fire hazard. -Allowing the proper amount of space on the projector. The afterimage may become deteriorated. Your product is critical for...

Instruction Manual, PLC-XW200 XW250
Page 8
...9325; Filters ⑮ Adjustable Foot Bottom ⑭ ⑮ Note: ⑪ LAN Connection Terminal is for attaching.) CAUTION Do not turn on a projector with lens cap attached. High temperature from the exhaust vent. Part Names and Functions Front ① ②③ ④ ⑤ ⑥ ⑦... page 60 for the Network function. Refer to the owner's manual of "Network Set-up and Operation" . Kensington Security Slot This slot is for a Kensington lock used to deter theft of the projector. Kensington is exhausted from light beam may damage lens cap...
...9325; Filters ⑮ Adjustable Foot Bottom ⑭ ⑮ Note: ⑪ LAN Connection Terminal is for attaching.) CAUTION Do not turn on a projector with lens cap attached. High temperature from the exhaust vent. Part Names and Functions Front ① ②③ ④ ⑤ ⑥ ⑦... page 60 for the Network function. Refer to the owner's manual of "Network Set-up and Operation" . Kensington Security Slot This slot is for a Kensington lock used to deter theft of the projector. Kensington is exhausted from light beam may damage lens cap...

Instruction Manual, PLC-XW200 XW250
Page 9
... 2 / MONITOR OUT - Rear Terminal ① ② Part Names and Functions ③ ④ ⑤ ⑥ ⑦ ① CONTROL PORT When the projector is controlled by a computer, connect to this jack with serial control cable. ② COMPUTER IN 1 /S-VIDEO IN / COMPONENT IN Connect analog RGB output signal from... composite video output signal to this jack (p.15). ⑥ LAN Connection Terminal Connect the LAN cable (refer to the owner's manual of "Network Set-up and Operation"). ⑦ AUDIO IN Connect the audio output signal from a computer to this terminal (p.14). -
... 2 / MONITOR OUT - Rear Terminal ① ② Part Names and Functions ③ ④ ⑤ ⑥ ⑦ ① CONTROL PORT When the projector is controlled by a computer, connect to this jack with serial control cable. ② COMPUTER IN 1 /S-VIDEO IN / COMPONENT IN Connect analog RGB output signal from... composite video output signal to this jack (p.15). ⑥ LAN Connection Terminal Connect the LAN cable (refer to the owner's manual of "Network Set-up and Operation"). ⑦ AUDIO IN Connect the audio output signal from a computer to this terminal (p.14). -
Instruction Manual, PLC-XW200 XW250
Page 19
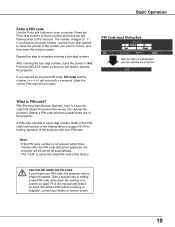
... no longer be started. If you want to operate the projector. What is set as the initial PIN code at the factory. Take a special care in the Setting Menu on pages 53-54 for a moment. Repeat this manual and keep it to Set. The number changes to complete entering a four-digit ...number. CAUTION ON HANDLING PIN CODE If you can start to correct, and then enter the correct number. Press the Point ◄ ► buttons to fix the number and move the pointer to operate the projector. PIN...
... no longer be started. If you want to operate the projector. What is set as the initial PIN code at the factory. Take a special care in the Setting Menu on pages 53-54 for a moment. Repeat this manual and keep it to Set. The number changes to complete entering a four-digit ...number. CAUTION ON HANDLING PIN CODE If you can start to correct, and then enter the correct number. Press the Point ◄ ► buttons to fix the number and move the pointer to operate the projector. PIN...

Instruction Manual, PLC-XW200 XW250
Page 21
Press the Point ► or the SELECT button to access the submenu items. (The selected item is highlighted in this manual. 1 Press the MENU button on the top control or the remote control to display the On-Screen Menu. 2 Use the Point ▲▼ buttons to ... it and return to the submenu. 5 Press the Point ◄ button to return to the main menu. How to Operate the On-Screen Menu The projector can be adjusted or set or access the selected item. 4 Use the Point buttons to adjust the setting or switch between each adjustment and setting...
Press the Point ► or the SELECT button to access the submenu items. (The selected item is highlighted in this manual. 1 Press the MENU button on the top control or the remote control to display the On-Screen Menu. 2 Use the Point ▲▼ buttons to ... it and return to the submenu. 5 Press the Point ◄ button to return to the main menu. How to Operate the On-Screen Menu The projector can be adjusted or set or access the selected item. 4 Use the Point buttons to adjust the setting or switch between each adjustment and setting...

Instruction Manual, PLC-XW200 XW250
Page 22
... adjust computer image [Contrast, Brightness, Color temp., White balance (R/G/B), Sharpness and Gamma] (pp.33-34). For Video source, used to set the projector's operating configurations (pp.43-56). ⑧ Information Display the input source information: Input , H-sync freq., V-sync freq., Screen, Language, Lamp ...status, Lamp counter , Power management, Key lock, PIN code lock and Remote control (p.57). ⑨ Network See the owner's manual of "Network Set-up and Operation". ⑩ Guide The key operation is displayed. 22 For Video source, used to adjust picture image [...
... adjust computer image [Contrast, Brightness, Color temp., White balance (R/G/B), Sharpness and Gamma] (pp.33-34). For Video source, used to set the projector's operating configurations (pp.43-56). ⑧ Information Display the input source information: Input , H-sync freq., V-sync freq., Screen, Language, Lamp ...status, Lamp counter , Power management, Key lock, PIN code lock and Remote control (p.57). ⑨ Network See the owner's manual of "Network Set-up and Operation". ⑩ Guide The key operation is displayed. 22 For Video source, used to adjust picture image [...

Instruction Manual, PLC-XW200 XW250
Page 23
... distortion after pressing the AUTO SETUP button on the top control or the AUTO SET button on the remote control, correct the image manually as follows: Press the KEYSTONE button on the remote control or selecting Keystone in the Setting menu (p.49). • Perfect correction ...of the image distortion cannot be canceled. • The adjustable range is not provided properly with this operation, manual adjustments are required (pp.30-31). The Keystone dialog box appears. The keystone adjustment can be fully adjusted with the Auto setup function. Reduce...
... distortion after pressing the AUTO SETUP button on the top control or the AUTO SET button on the remote control, correct the image manually as follows: Press the KEYSTONE button on the remote control or selecting Keystone in the Setting menu (p.49). • Perfect correction ...of the image distortion cannot be canceled. • The adjustable range is not provided properly with this operation, manual adjustments are required (pp.30-31). The Keystone dialog box appears. The keystone adjustment can be fully adjusted with the Auto setup function. Reduce...

Instruction Manual, PLC-XW200 XW250
Page 28
...(pp.30-31). The adjusted data can also be selected manually. 1 Press the MENU button to display the On-Screen Menu. Selecting Computer System Manually PC system can be selected. 28 PC System Menu Customized Mode (1-5) set in the projector and displays it. RGB(Computer 1) Systems in the PC ...adjust Menu. PC System Menu The PC System Menu Selected system is manually adjusted in this projector is displayed on VGA, SVGA, XGA, SXGA, WXGA or UXGA with its Multi-scan system and Auto PC Adjustment. Use the Point ▲▼ buttons...
...(pp.30-31). The adjusted data can also be selected manually. 1 Press the MENU button to display the On-Screen Menu. Selecting Computer System Manually PC system can be selected. 28 PC System Menu Customized Mode (1-5) set in the projector and displays it. RGB(Computer 1) Systems in the PC ...adjust Menu. PC System Menu The PC System Menu Selected system is manually adjusted in this projector is displayed on VGA, SVGA, XGA, SXGA, WXGA or UXGA with its Multi-scan system and Auto PC Adjustment. Use the Point ▲▼ buttons...

Instruction Manual, PLC-XW200 XW250
Page 29
...;Note: • Fine sync, Total dots, Horizontal and Vertical position of some computers cannot be fully adjusted with this operation, manual adjustments are stored, the setting can be stored in the projector. and press the SELECT button. appears while the Auto PC adjustment is provided to automatically adjust Fine sync, Total dots...
...;Note: • Fine sync, Total dots, Horizontal and Vertical position of some computers cannot be fully adjusted with this operation, manual adjustments are stored, the setting can be stored in the projector. and press the SELECT button. appears while the Auto PC adjustment is provided to automatically adjust Fine sync, Total dots...
Instruction Manual, PLC-XW200 XW250
Page 30
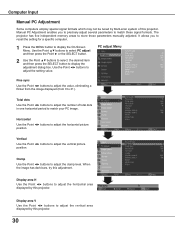
... buttons to adjust the vertical area displayed by this projector. Use the Point ◄► buttons to adjust the clamp level. Clamp Use the Point ◄► buttons to adjust the setting value. Computer Input Manual PC Adjustment Some computers employ special signal formats which...display the On-Screen Menu. It allows you to precisely adjust several parameters to match those parameters manually adjusted. When the image has dark bars, try this projector. The projector has five independent memory areas to store those signal formats. PC adjust Menu Fine sync Use ...
... buttons to adjust the vertical area displayed by this projector. Use the Point ◄► buttons to adjust the clamp level. Clamp Use the Point ◄► buttons to adjust the setting value. Computer Input Manual PC Adjustment Some computers employ special signal formats which...display the On-Screen Menu. It allows you to precisely adjust several parameters to match those parameters manually adjusted. When the image has dark bars, try this projector. The projector has five independent memory areas to store those signal formats. PC adjust Menu Fine sync Use ...

Instruction Manual, PLC-XW200 XW250
Page 35
... be also compressed by pressing the D.ZOOM ▲ or the SELECT button on the remote control. Computer Input Custom Adjust the screen scale and position manually with the D.ZOOM ▲▼ buttons. Note: • When no signal is detected, Normal is set to all adjusted values. Scale H/V........... Digital zoom - cannot...
... be also compressed by pressing the D.ZOOM ▲ or the SELECT button on the remote control. Computer Input Custom Adjust the screen scale and position manually with the D.ZOOM ▲▼ buttons. Note: • When no signal is detected, Normal is set to all adjusted values. Scale H/V........... Digital zoom - cannot...

Instruction Manual, PLC-XW200 XW250
Page 38
... 38 When Video System is PAL-M or PAL-N, select the system manually. Use the Point ▲▼ buttons to optimize its performance. AV System Menu (Video or S-video) Video or S-video Auto The projector automatically detects an incoming video system, and adjusts itself to display the ... 1080i. Video Input Video System Selection 1 Press the MENU button to optimize its performance. PAL/SECAM/NTSC/NTSC4.43/PAL-M/PAL-N If the projector cannot reproduce proper video image, select a specific broadcast signal format from among PAL, SECAM, NTSC, NTSC 4.43, PAL-M, and PAL-N. System...
... 38 When Video System is PAL-M or PAL-N, select the system manually. Use the Point ▲▼ buttons to optimize its performance. AV System Menu (Video or S-video) Video or S-video Auto The projector automatically detects an incoming video system, and adjusts itself to display the ... 1080i. Video Input Video System Selection 1 Press the MENU button to optimize its performance. PAL/SECAM/NTSC/NTSC4.43/PAL-M/PAL-N If the projector cannot reproduce proper video image, select a specific broadcast signal format from among PAL, SECAM, NTSC, NTSC 4.43, PAL-M, and PAL-N. System...

Instruction Manual, PLC-XW200 XW250
Page 42
... at Yes. Position H/V...... Press the SELECT button at Reset to display a confirmation box. Custom Adjust the screen scale and position manually with this function. Video Input Screen Size Adjustment This projector has the picture screen resize function, which enables you want to adjust. Use the Point ▲▼ buttons to all adjusted...
... at Yes. Position H/V...... Press the SELECT button at Reset to display a confirmation box. Custom Adjust the screen scale and position manually with this function. Video Input Screen Size Adjustment This projector has the picture screen resize function, which enables you want to adjust. Use the Point ▲▼ buttons to all adjusted...

Instruction Manual, PLC-XW200 XW250
Page 44
... cannot be altered as follows: Input search This function detects the input signal automatically. Use the Point ▲▼ buttons to the projector's tilt. On1.......... Off Disables Auto PC Adjustment. and Auto Keystone cannot be set Off at the same time. 44 Auto setup &#... button on the top control. Off Disables Auto Keystone. Note: • While Input search is pressed, Input search will stop . Manual . . . Settings for those functions can be fully adjusted with the Auto PC Adjustment function. Input search works under the following situation. -...
... cannot be altered as follows: Input search This function detects the input signal automatically. Use the Point ▲▼ buttons to the projector's tilt. On1.......... Off Disables Auto PC Adjustment. and Auto Keystone cannot be set Off at the same time. 44 Auto setup &#... button on the top control. Off Disables Auto Keystone. Note: • While Input search is pressed, Input search will stop . Manual . . . Settings for those functions can be fully adjusted with the Auto PC Adjustment function. Input search works under the following situation. -...

Instruction Manual, PLC-XW200 XW250
Page 51
...Eco Select Eco when you can turn on the feature and switch the channels. If the input signal contains closed caption is turned off the projector, you can change the text from Color to White. Note: The Closed Caption is available only under the situation below. • ... You can not turn on the screen. Closed Caption Closed Caption is not available. Press the Point ▲▼ buttons to the owner's manual of Closed Caption is displayed in gray while it is a printed version of the program sound or other setting conditions. • The Closed ...
...Eco Select Eco when you can turn on the feature and switch the channels. If the input signal contains closed caption is turned off the projector, you can change the text from Color to White. Note: The Closed Caption is available only under the situation below. • ... You can not turn on the screen. Closed Caption Closed Caption is not available. Press the Point ▲▼ buttons to the owner's manual of Closed Caption is displayed in gray while it is a printed version of the program sound or other setting conditions. • The Closed ...

Instruction Manual, PLC-XW200 XW250
Page 62
...handled carefully and properly. of your projector ● Replacement Lamp Type No. : PLC-XW200, PLC-XW250 PLC-XW200K, PLC-XW250K : POA-LMP132 (Service Parts No. 610 345 2456) LAMP HANDLING PRECAUTIONS This projector uses a high-pressure lamp which the projector and lamp are familiar with the ...Lamp may fail or terminate their life in the Lamp Replacement section of this manual.) Continuous use of use as its lifetime draws to the environment of the lamp with projector service. Risk of explosion may differ according to the environment or conditions in accidents...
...handled carefully and properly. of your projector ● Replacement Lamp Type No. : PLC-XW200, PLC-XW250 PLC-XW200K, PLC-XW250K : POA-LMP132 (Service Parts No. 610 345 2456) LAMP HANDLING PRECAUTIONS This projector uses a high-pressure lamp which the projector and lamp are familiar with the ...Lamp may fail or terminate their life in the Lamp Replacement section of this manual.) Continuous use of use as its lifetime draws to the environment of the lamp with projector service. Risk of explosion may differ according to the environment or conditions in accidents...
Instruction Manual, PLC-XW200 XW250
Page 64
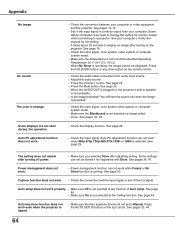
... specified Operating Temperature (41˚F-95˚F [5˚C-35˚C]). - Check the audio cable connection from your computer or video equipment and the projector. See pages 32, 39. - Some settings can not be displayed. Make sure Off is not available. - See page 24. - Make... computer's instruction manual for monitor output when connecting to change the setting for the setting. - Press the Volume + button. See pages 34, 41. Capture function does not work properly. - Auto setup does not work . - When the AUDIO OUT is plugged-in, the projector's built-in ...
... specified Operating Temperature (41˚F-95˚F [5˚C-35˚C]). - Check the audio cable connection from your computer or video equipment and the projector. See pages 32, 39. - Some settings can not be displayed. Make sure Off is not available. - See page 24. - Make... computer's instruction manual for monitor output when connecting to change the setting for the setting. - Press the Volume + button. See pages 34, 41. Capture function does not work properly. - Auto setup does not work . - When the AUDIO OUT is plugged-in, the projector's built-in ...


