Instruction Manual, PLC-XU83
Page 1
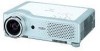
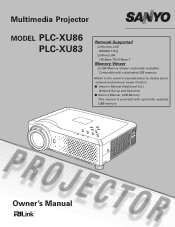
Owner's Manual Multimedia Projector MODEL PLC-XU86 PLC-XU83 Network Supported ❏ Wireless LAN IEEE802.11b/g ❏ Wired LAN 100-Base-TX/10-Base-T Memory Viewer ❏ USB Memory Viewer (optionally available) Compatible with a dedicated USB memory ✽Refer to the owner's manuals below for details about network and memory viewer function. ■ Owner's Manual (Additional Vol.) Network Set-up and Operation ■ Owner's Manual USB Memory This manual is provided with optionally supplied USB memory.
Owner's Manual Multimedia Projector MODEL PLC-XU86 PLC-XU83 Network Supported ❏ Wireless LAN IEEE802.11b/g ❏ Wired LAN 100-Base-TX/10-Base-T Memory Viewer ❏ USB Memory Viewer (optionally available) Compatible with a dedicated USB memory ✽Refer to the owner's manuals below for details about network and memory viewer function. ■ Owner's Manual (Additional Vol.) Network Set-up and Operation ■ Owner's Manual USB Memory This manual is provided with optionally supplied USB memory.
Instruction Manual, PLC-XU83
Page 3
... the lamp life. (p50) ◆ Memory Viewer Function (Optional Function) Insert the dedicated USB memory (optionally supplied: POA-USB02), into the projector to use . It is easy to carry and work anywhere you to focus on the screen to Green. (p35, 42) ◆ Multilanguage Menu Display ◆ LAN Network Function This projector is loaded with Wired and Wireless LAN network function. You can capture an image for the screen logo...
... the lamp life. (p50) ◆ Memory Viewer Function (Optional Function) Insert the dedicated USB memory (optionally supplied: POA-USB02), into the projector to use . It is easy to carry and work anywhere you to focus on the screen to Green. (p35, 42) ◆ Multilanguage Menu Display ◆ LAN Network Function This projector is loaded with Wired and Wireless LAN network function. You can capture an image for the screen logo...

Instruction Manual, PLC-XU83
Page 4
...Remote Control Code 14 Remote Control Battery Installation 15 Operating Range 15 Adjustable Feet 15 Installation 16 Positioning the Projector 16 Connecting the AC Power Cord 17 Connecting to a Computer 18 Connecting to Video Equipment 19 Connecting to Component Video Equipment 20 Basic Operation 21 Turning On the Projector 21 Turning Off the Projector 22 How to Operate the On-Screen Menu 23 Menu Bar 24 Zoom and Focus Adjustment 25 Auto Setup Function 25 Keystone Correction 25 Sound Adjustment 26 Remote Control Operation 27 Computer Input 29 Input Source...
...Remote Control Code 14 Remote Control Battery Installation 15 Operating Range 15 Adjustable Feet 15 Installation 16 Positioning the Projector 16 Connecting the AC Power Cord 17 Connecting to a Computer 18 Connecting to Video Equipment 19 Connecting to Component Video Equipment 20 Basic Operation 21 Turning On the Projector 21 Turning Off the Projector 22 How to Operate the On-Screen Menu 23 Menu Bar 24 Zoom and Focus Adjustment 25 Auto Setup Function 25 Keystone Correction 25 Sound Adjustment 26 Remote Control Operation 27 Computer Input 29 Input Source...

Instruction Manual, PLC-XU83
Page 5
... and recycle system are separate collection systems for used for an extended time, unplug the projector from your projector, and can also be dangerous. Please help us to operate improperly, read this manual thoroughly and operate the projector properly. This projector produces intense light from the ceiling, clean air intake vents, air filters, or top of Electronic Computer/Data Processing Equipment, ANSI/NFPA 75. Be especially careful...
... and recycle system are separate collection systems for used for an extended time, unplug the projector from your projector, and can also be dangerous. Please help us to operate improperly, read this manual thoroughly and operate the projector properly. This projector produces intense light from the ceiling, clean air intake vents, air filters, or top of Electronic Computer/Data Processing Equipment, ANSI/NFPA 75. Be especially careful...

Instruction Manual, PLC-XU83
Page 10
... external audio amplifier to this jack. (p18- 20) This terminal outputs sound from video equipment to VIDEO jack. (p19) !0 USB (Series A) Connect supplied USB Wireless LAN Adapter or optionally supplied USB memory for input from a computer, video equipment (Component or RGB Scart) or output to the other monitor. Do not use the PAGE ed buttons on the remote control during a presentation, connect the USB port of the computer to the USB terminal with a USB cable...
... external audio amplifier to this jack. (p18- 20) This terminal outputs sound from video equipment to VIDEO jack. (p19) !0 USB (Series A) Connect supplied USB Wireless LAN Adapter or optionally supplied USB memory for input from a computer, video equipment (Component or RGB Scart) or output to the other monitor. Do not use the PAGE ed buttons on the remote control during a presentation, connect the USB port of the computer to the USB terminal with a USB cable...
Instruction Manual, PLC-XU83
Page 11
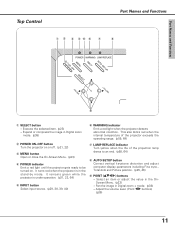
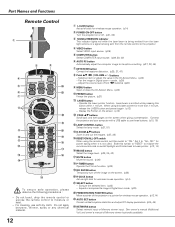
... the projector exceeds the operating range. (p55, 64) u LAMP REPLACE indicator Turn yellow when the life of the projection lamp draws to be turned on or off. (p21, 22) e MENU button Open or close the On-Screen Menu. (p23) r POWER indicator Emit a red light until the projector gets ready to an end. (p58, 64) i AUTO SETUP button Correct vertical keystone distortion and adjust computer display parameters including Fine sync., Total dots and Picture position. (p25, 46) o POINT (ed7 8 ) buttons - Pan the image...
... the projector exceeds the operating range. (p55, 64) u LAMP REPLACE indicator Turn yellow when the life of the projection lamp draws to be turned on or off. (p21, 22) e MENU button Open or close the On-Screen Menu. (p23) r POWER indicator Emit a red light until the projector gets ready to an end. (p58, 64) i AUTO SETUP button Correct vertical keystone distortion and adjust computer display parameters including Fine sync., Total dots and Picture position. (p25, 46) o POINT (ed7 8 ) buttons - Pan the image...
Instruction Manual, PLC-XU83
Page 12
... input. r VIDEO button Select VIDEO input source. (p39) t COMPUTER button Select COMPUTER input source. (p29, 30, 40) y AUTO PC button Automatically adjust the computer image to moisture or heat. - When using the remote control, set this button within 1 minute. See owner's manual (Additional Vol.) and owner's manual of the projector or a pointer for wireless mouse operation. (p14) w POWER ON-OFF button Turn the projector on or off the image on the screen when giving a presentation. For cleaning, use these buttons. (p10, 18) !3 LAMP CONTROL button Select the lamp mode...
... input. r VIDEO button Select VIDEO input source. (p39) t COMPUTER button Select COMPUTER input source. (p29, 30, 40) y AUTO PC button Automatically adjust the computer image to moisture or heat. - When using the remote control, set this button within 1 minute. See owner's manual (Additional Vol.) and owner's manual of the projector or a pointer for wireless mouse operation. (p14) w POWER ON-OFF button Turn the projector on or off the image on the screen when giving a presentation. For cleaning, use these buttons. (p10, 18) !3 LAMP CONTROL button Select the lamp mode...

Instruction Manual, PLC-XU83
Page 22
... THE LIFE OF THE LAMP, ONCE YOU TURN THE PROJECTOR ON, WAIT AT LEAST 5 MINUTES BEFORE TURNING IT OFF. ✔Note: •When the On start to blink red, and the cooling fans will appear on the screen. 2 Press the POWER ON-OFF button again to turn off the projector. Basic Operation Turning Off the Projector 1 Press the POWER ON-OFF button on the top control or on the remote control, and a message "Power...
... THE LIFE OF THE LAMP, ONCE YOU TURN THE PROJECTOR ON, WAIT AT LEAST 5 MINUTES BEFORE TURNING IT OFF. ✔Note: •When the On start to blink red, and the cooling fans will appear on the screen. 2 Press the POWER ON-OFF button again to turn off the projector. Basic Operation Turning Off the Projector 1 Press the POWER ON-OFF button on the top control or on the remote control, and a message "Power...

Instruction Manual, PLC-XU83
Page 27
... the lamp mode for changing the brightness of the buttons enables you to the owner's manual (Additional Vol.) for calling up the On-Screen Menu. COMPUTER / VIDEO / NETWORK button Remote Control Press the COMPUTER, VIDEO, or NETWORK button on the remote control to freeze the picture on the remote control to select the input source. Basic Operation 27 Refer to make the operation, and no need for details about Network input. AUTO PC button FREEZE button COMPUTER/VIDEO /NETWORK button KEYSTONE button (See p25) AUTO SET button (See...
... the lamp mode for changing the brightness of the buttons enables you to the owner's manual (Additional Vol.) for calling up the On-Screen Menu. COMPUTER / VIDEO / NETWORK button Remote Control Press the COMPUTER, VIDEO, or NETWORK button on the remote control to freeze the picture on the remote control to select the input source. Basic Operation 27 Refer to make the operation, and no need for details about Network input. AUTO PC button FREEZE button COMPUTER/VIDEO /NETWORK button KEYSTONE button (See p25) AUTO SET button (See...
Instruction Manual, PLC-XU83
Page 50
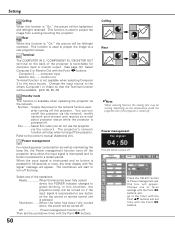
... operating the projector via the network. Ready When the lamp has been fully cooled down , the power will appear. Change the input source to project the image from a ceiling mounting the projector. You can turn off the lamp. Off Power management function is powered off . Then set time with the Point 78 buttons. Eco..........Select Eco when you do not use the projector via the network, modify network environment and receive an e-mail about projector status...
... operating the projector via the network. Ready When the lamp has been fully cooled down , the power will appear. Change the input source to project the image from a ceiling mounting the projector. You can turn off the lamp. Off Power management function is powered off . Then set time with the Point 78 buttons. Eco..........Select Eco when you do not use the projector via the network, modify network environment and receive an e-mail about projector status...

Instruction Manual, PLC-XU83
Page 54
... cooling fans' operation after turning off the projector. (p22) L1 normal operation L2 . . . . .slower and lower-sound than the normal operation (L1), but it . Factory default Select Factory default and this function. Quit Exit the Setting Menu. 54 See page 59 for the user logo, PIN code lock, Logo PIN code lock and the lamp counter to activate it takes longer to reset the lamp replacement counter. Lamp counter This function is used to cool the projector down...
... cooling fans' operation after turning off the projector. (p22) L1 normal operation L2 . . . . .slower and lower-sound than the normal operation (L1), but it . Factory default Select Factory default and this function. Quit Exit the Setting Menu. 54 See page 59 for the user logo, PIN code lock, Logo PIN code lock and the lamp counter to activate it takes longer to reset the lamp replacement counter. Lamp counter This function is used to cool the projector down...
Instruction Manual, PLC-XU83
Page 58
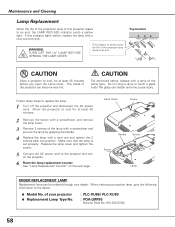
... LAMP REPLACE indicator emits a yellow light. OFF POWER MENU WARNING INPUT LAMP REPLACE AUTO SET UP SELECT - Do not drop a lamp or touch a glass bulb! Replace the lamp cover and tighten the screw. 5 Connect the AC power cord to cool for at least 45 minutes. 2 Remove the screw with a screwdriver, and remove the lamp cover. 3 Remove 2 screws of the lamp with a screwdriver and pull out the lamp by grasping the handle. 4 Replace the lamp with a lamp of the same type. See "Lamp Replacement Counter" on the projector. 6 Reset the lamp replacement counter. Lamp Cover Screw...
... LAMP REPLACE indicator emits a yellow light. OFF POWER MENU WARNING INPUT LAMP REPLACE AUTO SET UP SELECT - Do not drop a lamp or touch a glass bulb! Replace the lamp cover and tighten the screw. 5 Connect the AC power cord to cool for at least 45 minutes. 2 Remove the screw with a screwdriver, and remove the lamp cover. 3 Remove 2 screws of the lamp with a screwdriver and pull out the lamp by grasping the handle. 4 Replace the lamp with a lamp of the same type. See "Lamp Replacement Counter" on the projector. 6 Reset the lamp replacement counter. Lamp Cover Screw...

Instruction Manual, PLC-XU83
Page 59
... press the SELECT button. No one IMMEDIATELY after the lamp is reset, the LAMP REPLACE indicator stops lighting. 1 Turn the projector on, press the MENU button to reset the lamp counter. Select [Yes], then another confirmation box will appear. Select [Yes] again to display the On-Screen Menu. If a lamp explodes, disconnect the projector's AC plug from the cooling air circulation holes. message will appear. To reset the lamp counter, move the red framed pointer...
... press the SELECT button. No one IMMEDIATELY after the lamp is reset, the LAMP REPLACE indicator stops lighting. 1 Turn the projector on, press the MENU button to reset the lamp counter. Select [Yes], then another confirmation box will appear. Select [Yes] again to display the On-Screen Menu. If a lamp explodes, disconnect the projector's AC plug from the cooling air circulation holes. message will appear. To reset the lamp counter, move the red framed pointer...

Instruction Manual, PLC-XU83
Page 60
....) - Check the WARNING indicator. See if the input signal is correctly output from audio input source. - Select correct input source once again through menu operation. (See page 29,30 ,39 and 40) - Check the Ceiling / Rear function. (See page 50.) - No sound - Solutions - Adjust focus of the projector into the AC outlet. - Provide proper distance between your computer's instruction manual for the setting. - Check the connection between the projector and the projection screen. (See page 16.) - Check the Ceiling...
....) - Check the WARNING indicator. See if the input signal is correctly output from audio input source. - Select correct input source once again through menu operation. (See page 29,30 ,39 and 40) - Check the Ceiling / Rear function. (See page 50.) - No sound - Solutions - Adjust focus of the projector into the AC outlet. - Provide proper distance between your computer's instruction manual for the setting. - Check the connection between the projector and the projection screen. (See page 16.) - Check the Ceiling...
Instruction Manual, PLC-XU83
Page 64
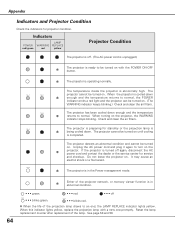
... to turn on . (The WARNING indicator keeps blinking.) Check and clean the air filters. If the projector is abnormally high. Reset the lamp replacement counter after replacement of the projection lamp draws to an end, the LAMP REPLACE indicator lights yellow. Check and clean the air filters. Unplug the AC power cord and plug it again to normal. Do not leave the projector on . See page 58 and 59. Indicators LAMP POWER WARNING REPLACE red/green red yellow Projector Condition The projector is off. (The AC power cord is unplugged.) ✽ The projector is...
... to turn on . (The WARNING indicator keeps blinking.) Check and clean the air filters. If the projector is abnormally high. Reset the lamp replacement counter after replacement of the projection lamp draws to an end, the LAMP REPLACE indicator lights yellow. Check and clean the air filters. Unplug the AC power cord and plug it again to normal. Do not leave the projector on . See page 58 and 59. Indicators LAMP POWER WARNING REPLACE red/green red yellow Projector Condition The projector is off. (The AC power cord is unplugged.) ✽ The projector is...

Instruction Manual, PLC-XU83 Network Set Up
Page 4
... Installing the Software 17 3. About LAN Functions 9 LAN Functions and the Features 10 Image Projecting System via LAN 10 Flow of Image Transfer 10 An Example of the Wired LAN 31 5. Wired LAN Configurations 25 Connecting to the LAN Line 26 Network Environment Settings 26 Setting Procedure 26 Confirming the Operation 28 User PIN Code / Wired Information / Wired Factory Default 30 Factory Default Setting of the Connection 11 LAN Connection Modes 12 2. Wireless LAN Configurations 33 Attaching the USB Wireless LAN Adapter 34 Setting...
... Installing the Software 17 3. About LAN Functions 9 LAN Functions and the Features 10 Image Projecting System via LAN 10 Flow of Image Transfer 10 An Example of the Wired LAN 31 5. Wired LAN Configurations 25 Connecting to the LAN Line 26 Network Environment Settings 26 Setting Procedure 26 Confirming the Operation 28 User PIN Code / Wired Information / Wired Factory Default 30 Factory Default Setting of the Connection 11 LAN Connection Modes 12 2. Wireless LAN Configurations 33 Attaching the USB Wireless LAN Adapter 34 Setting...

Instruction Manual, PLC-XU83 Network Set Up
Page 20
... Wireless mode. When the display is blinking, the projector is properly connecting with Browser" ➔ "Advanced Setup" ➔ "Miscellaneous". (p52) Network Connection Standby Display (✻ The screen below is for Wireless mode. Auto(10/100M) is for Wired mode, 802.11b(11) / 802.11g(11) is for use" message to project. When the signal level is ready to show last 6 characters of the projector when setting the connection. w The lower stand numbers show the network...
... Wireless mode. When the display is blinking, the projector is properly connecting with Browser" ➔ "Advanced Setup" ➔ "Miscellaneous". (p52) Network Connection Standby Display (✻ The screen below is for Wireless mode. Auto(10/100M) is for Wired mode, 802.11b(11) / 802.11g(11) is for use" message to project. When the signal level is ready to show last 6 characters of the projector when setting the connection. w The lower stand numbers show the network...

Instruction Manual, PLC-XU83 Network Set Up
Page 34
... blink green when receiving data. Setting Procedures With Easy setting, you use ". Turn on p38.) ✳ "SIMPLE" mode is not attached to the Wireless LAN. The Network connection standby display will start to break the terminal. Select similar environment between LAN 4 and LAN 5 with the Point 7 8 buttons. (LAN 4, LAN 5 and SIMPLE* are factory default settings. Wireless LAN Configurations Attaching the USB Wireless LAN Adapter Insert the USB Wireless LAN Adapter into the USB terminal of the connector in "6 Configurations with browser. Refer to the installation location...
... blink green when receiving data. Setting Procedures With Easy setting, you use ". Turn on p38.) ✳ "SIMPLE" mode is not attached to the Wireless LAN. The Network connection standby display will start to break the terminal. Select similar environment between LAN 4 and LAN 5 with the Point 7 8 buttons. (LAN 4, LAN 5 and SIMPLE* are factory default settings. Wireless LAN Configurations Attaching the USB Wireless LAN Adapter Insert the USB Wireless LAN Adapter into the USB terminal of the connector in "6 Configurations with browser. Refer to the installation location...

Instruction Manual, PLC-XU83 Network Set Up
Page 38
Wireless LAN Configurations Wireless LAN Factory Default Settings Factory default settings for LAN4, LAN5, and SIMPLE as follows. Selected LAN Setting Items LAN4 LAN5 IP ADDRESS 169.254.100.100 192.168.100.100 SIMPLE 169.254. * . * SUBNETMASK 255.255.0.0 255.255.255.0 255.255.0.0 GATEWAY ADDRESS 255.255.255.255 IP CONFIGURATION MANUAL INTERRUPT CONNECTION PERMISSION ENABLE 255.255.255.255 DHCP ENABLE 255.255.255...
Wireless LAN Configurations Wireless LAN Factory Default Settings Factory default settings for LAN4, LAN5, and SIMPLE as follows. Selected LAN Setting Items LAN4 LAN5 IP ADDRESS 169.254.100.100 192.168.100.100 SIMPLE 169.254. * . * SUBNETMASK 255.255.0.0 255.255.255.0 255.255.0.0 GATEWAY ADDRESS 255.255.255.255 IP CONFIGURATION MANUAL INTERRUPT CONNECTION PERMISSION ENABLE 255.255.255.255 DHCP ENABLE 255.255.255...

Instruction Manual, PLC-XU83 Network Set Up
Page 86
... set the PC adjustment. Standby Mode Click "Normal" or "Eco" to show on the projected screen. P-TIMER When you change the code of the cooling fans. On Start By clicking "ON", the projector will be temporarily hidden from Code1 to increase the variation. Lamp Control Select the Lamp Mode from "User", "Default" or "OFF". Click again and the elapsed time will appear on the starting-up display.(Select User for the starting-up display...
... set the PC adjustment. Standby Mode Click "Normal" or "Eco" to show on the projected screen. P-TIMER When you change the code of the cooling fans. On Start By clicking "ON", the projector will be temporarily hidden from Code1 to increase the variation. Lamp Control Select the Lamp Mode from "User", "Default" or "OFF". Click again and the elapsed time will appear on the starting-up display.(Select User for the starting-up display...


