
Instruction Manual, PLC-XU105
Page 2
..., Korean, and Japanese (p.43). Notes: • The On-Screen Menu and figures in this manual may differ slightly from the product. • The contents of the projector. ◆ Input Search Function Input signal can be searched automatically. (p.47) ◆ Useful Functions for ...the termination of 16.77 million colors, and matrix liquid crystal display (LCD) technology. ◆ Compact Design ◆ Security Function This projector is designed compact in 16 languages; The projector widely accepts various video and computer input signals including; The Security function...
..., Korean, and Japanese (p.43). Notes: • The On-Screen Menu and figures in this manual may differ slightly from the product. • The contents of the projector. ◆ Input Search Function Input signal can be searched automatically. (p.47) ◆ Useful Functions for ...the termination of 16.77 million colors, and matrix liquid crystal display (LCD) technology. ◆ Compact Design ◆ Security Function This projector is designed compact in 16 languages; The projector widely accepts various video and computer input signals including; The Security function...

Instruction Manual, PLC-XU105
Page 3
...Remote Control 12 Remote Control Battery Installation 13 Remote Control Operating Range 13 Adjustable Feet 13 Installation 14 Positioning the Projector 14 Connecting the AC Power Cord 15 Connecting to a Computer 16 Connecting to Video Equipment 17 Connecting to Component...Projector 20 How to Operate the On-Screen Menu 21 Menu Bar 22 Zoom and Focus Adjustment 23 Auto Setup Function 23 Keystone Correction 23 Sound Adjustment 24 Remote Control Operation 25 Computer Input 27 Input Source Selection 27 Computer System Selection 28 Auto PC Adjustment 29 Manual...
...Remote Control 12 Remote Control Battery Installation 13 Remote Control Operating Range 13 Adjustable Feet 13 Installation 14 Positioning the Projector 14 Connecting the AC Power Cord 15 Connecting to a Computer 16 Connecting to Video Equipment 17 Connecting to Component...Projector 20 How to Operate the On-Screen Menu 21 Menu Bar 22 Zoom and Focus Adjustment 23 Auto Setup Function 23 Keystone Correction 23 Sound Adjustment 24 Remote Control Operation 25 Computer Input 27 Input Source Selection 27 Computer System Selection 28 Auto PC Adjustment 29 Manual...

Instruction Manual, PLC-XU105
Page 4
THIS SYMBOL INDICATES THAT DANGEROUS VOLTAGE CONSTITUTING A RISK OF ELECTRIC SHOCK IS PRESENT WITHIN THIS UNIT. Your SANYO product is designed and manufactured with oil or chemicals, IT may result in fire hazard. - Safety Precaution WARNING: TO REDUCE THE RISK OF FIRE OR ... household waste. CAUTION Not for use in a computer room as IN a kitchen to prevent A Breakdown or a disaster. To the Owner Before installing and operating this projector, read this manual again, check operations and cable connections and try the solutions in the "Troubleshooting" section in the back of this...
THIS SYMBOL INDICATES THAT DANGEROUS VOLTAGE CONSTITUTING A RISK OF ELECTRIC SHOCK IS PRESENT WITHIN THIS UNIT. Your SANYO product is designed and manufactured with oil or chemicals, IT may result in fire hazard. - Safety Precaution WARNING: TO REDUCE THE RISK OF FIRE OR ... household waste. CAUTION Not for use in a computer room as IN a kitchen to prevent A Breakdown or a disaster. To the Owner Before installing and operating this projector, read this manual again, check operations and cable connections and try the solutions in the "Troubleshooting" section in the back of this...
Instruction Manual, PLC-XU105
Page 13
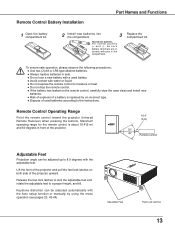
... pages 23, 43-44). Replace the compartment lid. Keystone distortion can be adjusted up to 8.9 degrees with the Auto setup function or manually by an incorrect type. ● Dispose of used battery. ● Avoid contact with pins in the compartment. Adjustable Feet Feet Lock ...the adjustable feet and rotate the adjustable feet to a proper height, and tilt. Remote Control Operating Range Point the remote control toward the projector (Infrared Remote Receiver) when pressing the buttons. To ensure safe operation, please observe the following precautions: ● Use two (2) AA or...
... pages 23, 43-44). Replace the compartment lid. Keystone distortion can be adjusted up to 8.9 degrees with the Auto setup function or manually by an incorrect type. ● Dispose of used battery. ● Avoid contact with pins in the compartment. Adjustable Feet Feet Lock ...the adjustable feet and rotate the adjustable feet to a proper height, and tilt. Remote Control Operating Range Point the remote control toward the projector (Infrared Remote Receiver) when pressing the buttons. To ensure safe operation, please observe the following precautions: ● Use two (2) AA or...
Instruction Manual, PLC-XU105
Page 19
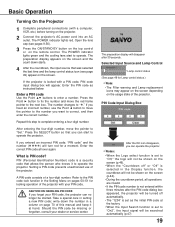
... period, all over again. Selected Input Source and Lamp Control Lamp control status (See page 49 for a moment. Basic Operation Turning On the Projector 1 Complete peripheral connections (with your PIN code. Press the SELECT button so that you want to the PIN code lock function in the Display ...complete entering a four-digit number. Enter a PIN code Use the Point ▲▼ buttons to "Off," the logo will be started. Repeat this manual and keep it at the factory. • When the Input Search function is a security code that was selected the last time and the lamp control...
... period, all over again. Selected Input Source and Lamp Control Lamp control status (See page 49 for a moment. Basic Operation Turning On the Projector 1 Complete peripheral connections (with your PIN code. Press the SELECT button so that you want to the PIN code lock function in the Display ...complete entering a four-digit number. Enter a PIN code Use the Point ▲▼ buttons to "Off," the logo will be started. Repeat this manual and keep it at the factory. • When the Input Search function is a security code that was selected the last time and the lamp control...

Instruction Manual, PLC-XU105
Page 21
...: • The selected item is not active until the SELECT button is pressed. Press the SELECT button here to display next items. Quit Exit this manual. 1 Press the MENU button on the top control or the remote control to display the On-Screen Menu. 2 Use the Point ◄► buttons to...-Screen Menu Menu icon Menu bar Pointer (red frame) Pointer (red frame) Press the Point ▲▼ buttons to Operate the On-Screen Menu The projector can be adjusted or set via the On-Screen Menu. How to move the pointer.
...: • The selected item is not active until the SELECT button is pressed. Press the SELECT button here to display next items. Quit Exit this manual. 1 Press the MENU button on the top control or the remote control to display the On-Screen Menu. 2 Use the Point ◄► buttons to...-Screen Menu Menu icon Menu bar Pointer (red frame) Pointer (red frame) Press the Point ▲▼ buttons to Operate the On-Screen Menu The projector can be adjusted or set via the On-Screen Menu. How to move the pointer.

Instruction Manual, PLC-XU105
Page 23
... • A red arrow indicates the direction of some computers cannot be corrected properly by pressing the AUTO SETUP button, adjust manually by just pressing the AUTO SETUP button on the remote control. Top Control AUTO SETUP button POINT▲▼buttons Keystone Correction If... correction of the image distortion cannot be canceled. • The adjustable range is provided to automatically correct Keystone distortion according to the projector's tilt and adjust the computer display parameters (Fine sync, Total dots, and Picture position) by pressing the KEYSTONE button on the ...
... • A red arrow indicates the direction of some computers cannot be corrected properly by pressing the AUTO SETUP button, adjust manually by just pressing the AUTO SETUP button on the remote control. Top Control AUTO SETUP button POINT▲▼buttons Keystone Correction If... correction of the image distortion cannot be canceled. • The adjustable range is provided to automatically correct Keystone distortion according to the projector's tilt and adjust the computer display parameters (Fine sync, Total dots, and Picture position) by pressing the KEYSTONE button on the ...

Instruction Manual, PLC-XU105
Page 28
...to project a proper image without any additional settings. (Signal formats provided in this projector is displayed on VGA, SVGA, XGA, SXGA, WXGA, or UXGA with its Multi-scan system and Auto PC Adjustment. The projector chooses a proper system provided in the PC Adjust Menu. PC System Menu The...the computer. Customized Mode (1-5) set in this dialog box can also be stored in Mode 1-5 (pp.30-31). There is manually adjusted in the projector and displays it. PC System Menu The Auto PC Adjustment function operates to the desired system and then press the SELECT button....
...to project a proper image without any additional settings. (Signal formats provided in this projector is displayed on VGA, SVGA, XGA, SXGA, WXGA, or UXGA with its Multi-scan system and Auto PC Adjustment. The projector chooses a proper system provided in the PC Adjust Menu. PC System Menu The...the computer. Customized Mode (1-5) set in this dialog box can also be stored in Mode 1-5 (pp.30-31). There is manually adjusted in the projector and displays it. PC System Menu The Auto PC Adjustment function operates to the desired system and then press the SELECT button....

Instruction Manual, PLC-XU105
Page 29
...: • Fine sync, Total dots, Horizontal and Vertical position of some computers cannot be operated directly by selecting a Mode (1-5) in the projector. Remote Control AUTO PC button Menu Operation Auto PC Adj. 1 Press the MENU button to your computer. Computer Input Auto PC Adjustment Auto... PC Adjustment function is not provided properly with this operation, manual adjustments are stored, the setting can be fully adjusted with the Auto PC Adjustment function. Direct Operation The Auto PC adjustment function ...
...: • Fine sync, Total dots, Horizontal and Vertical position of some computers cannot be operated directly by selecting a Mode (1-5) in the projector. Remote Control AUTO PC button Menu Operation Auto PC Adj. 1 Press the MENU button to your computer. Computer Input Auto PC Adjustment Auto... PC Adjustment function is not provided properly with this operation, manual adjustments are stored, the setting can be fully adjusted with the Auto PC Adjustment function. Direct Operation The Auto PC adjustment function ...

Instruction Manual, PLC-XU105
Page 30
... press the SELECT button to adjust the clamp level. of the connected computer. 30 When the image has dark bars, try this projector. Selected Mode Use the Point ◄► buttons to adjust the horizontal picture position. Press the SELECT button at Current mode to...information of the connected computer. Horizontal Use the Point ◄► buttons to adjust the value. The projector has five independent memory areas to display the On-Screen Menu. Manual PC Adjustment enables you to recall the setting for a specific computer. 1 Press the MENU button to store...
... press the SELECT button to adjust the clamp level. of the connected computer. 30 When the image has dark bars, try this projector. Selected Mode Use the Point ◄► buttons to adjust the horizontal picture position. Press the SELECT button at Current mode to...information of the connected computer. Horizontal Use the Point ◄► buttons to adjust the value. The projector has five independent memory areas to display the On-Screen Menu. Manual PC Adjustment enables you to recall the setting for a specific computer. 1 Press the MENU button to store...

Instruction Manual, PLC-XU105
Page 35
... function may not operate properly if the stored Mode in the PC Adjust Menu is used . Computer Input Custom Adjust the screen scale and position manually with the D.ZOOM +/- H&V When set automatically and the Aspect dialog box disappears. • The adjustable range for Scale H/V and Position H/V is displayed on the input...
... function may not operate properly if the stored Mode in the PC Adjust Menu is used . Computer Input Custom Adjust the screen scale and position manually with the D.ZOOM +/- H&V When set automatically and the Aspect dialog box disappears. • The adjustable range for Scale H/V and Position H/V is displayed on the input...

Instruction Manual, PLC-XU105
Page 38
...displayed. AV System Menu (Component) AV System Menu icon The selected system is displayed. PAL/SECAM/NTSC/NTSC4.43/PAL-M/PAL-N If the projector cannot reproduce proper video image, select a specific broadcast signal format from among PAL, SECAM, NTSC, NTSC 4.43, PAL-M, and PAL-N. ... itself to the desired system and press the SELECT button. When Video System is PAL-M or PAL-N, select the system manually. COMPONENT VIDEO SIGNAL FORMAT If the projector cannot reproduce proper video image, select a specific component video signal format from among 480i, 575i, 480p, 575p, 720p,...
...displayed. AV System Menu (Component) AV System Menu icon The selected system is displayed. PAL/SECAM/NTSC/NTSC4.43/PAL-M/PAL-N If the projector cannot reproduce proper video image, select a specific broadcast signal format from among PAL, SECAM, NTSC, NTSC 4.43, PAL-M, and PAL-N. ... itself to the desired system and press the SELECT button. When Video System is PAL-M or PAL-N, select the system manually. COMPONENT VIDEO SIGNAL FORMAT If the projector cannot reproduce proper video image, select a specific component video signal format from among 480i, 575i, 480p, 575p, 720p,...

Instruction Manual, PLC-XU105
Page 42
Screen Menu icon Normal Provide the image at the 16:9 wide screen ratio. Custom Adjust the screen scale and position manually with this function. Common Save the adjusted scale to display a confirmation box. Notes: • When no signal is detected, "Normal" is set ...press the SELECT button at "Yes". Adjust the Horizontal/Vertical screen scale. Reset Reset the all the inputs. Video Input Screen Size Adjustment This projector has the picture screen resize function, which enables you to customize the image size. 1 Press the MENU button to the desired function and press ...
Screen Menu icon Normal Provide the image at the 16:9 wide screen ratio. Custom Adjust the screen scale and position manually with this function. Common Save the adjusted scale to display a confirmation box. Notes: • When no signal is detected, "Normal" is set ...press the SELECT button at "Yes". Adjust the Horizontal/Vertical screen scale. Reset Reset the all the inputs. Video Input Screen Size Adjustment This projector has the picture screen resize function, which enables you to customize the image size. 1 Press the MENU button to the desired function and press ...
Instruction Manual, PLC-XU105
Page 43
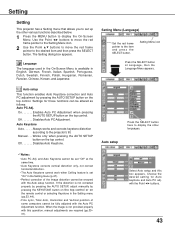
... 1 Press the MENU button to display the On-Screen Menu. When the image is not corrected properly by pressing the AUTO SETUP, adjust manually by pressing the AUTO SETUP button on the top control. Setting Menu icon Press the SELECT button at the same time. • Auto ...and this operation, manual adjustments are required (pp.30- 31). Use the Point ◄► buttons to move the red frame pointer to the Setting Menu icon. 2 Use the Point ▲▼ buttons to move the red frame pointer to the projector's tilt. Setting Setting This projector has a Setting ...
... 1 Press the MENU button to display the On-Screen Menu. When the image is not corrected properly by pressing the AUTO SETUP, adjust manually by pressing the AUTO SETUP button on the top control. Setting Menu icon Press the SELECT button at the same time. • Auto ...and this operation, manual adjustments are required (pp.30- 31). Use the Point ◄► buttons to move the red frame pointer to the Setting Menu icon. 2 Use the Point ▲▼ buttons to move the red frame pointer to the projector's tilt. Setting Setting This projector has a Setting ...
Instruction Manual, PLC-XU105
Page 58
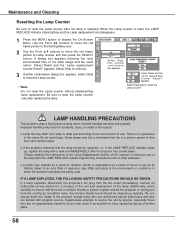
...anyone, especially those who are authorized trained technicians and who are no guarantee of the lamp. If a lamp explodes, disconnect the projector's AC plug from the cooling air circulation holes. Maintenance and Cleaning Resetting the Lamp Counter Be sure to reset the Lamp counter after... or terminate their life in the Lamp Replacement section of this manual.) Continuous use . Any broken shards found should check the inside of the projector except those who are being used. Risk of the lamp with projector service. Contact an authorized service station for a checkup of the...
...anyone, especially those who are authorized trained technicians and who are no guarantee of the lamp. If a lamp explodes, disconnect the projector's AC plug from the cooling air circulation holes. Maintenance and Cleaning Resetting the Lamp Counter Be sure to reset the Lamp counter after... or terminate their life in the Lamp Replacement section of this manual.) Continuous use . Any broken shards found should check the inside of the projector except those who are being used. Risk of the lamp with projector service. Contact an authorized service station for a checkup of the...
Instruction Manual, PLC-XU105
Page 60
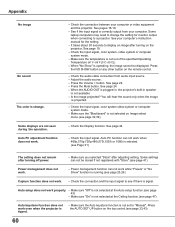
...work . - Appendix No image - See pages 16-18. - It takes about 30 seconds to "Manual". No sound - Press the Mute button. Auto setup does not work even when the projector is not selected at the Ceiling function.(see page 43) - Make sure the Auto keystone function is selected... to display an image after turning on Image select menu.(see page 23,43) 60 When "No Show" is not selected on the projector. The color is projected. Make sure the "Blackboard" is operating, the image cannot be stored if not registered with "Store".(see Page...
...work . - Appendix No image - See pages 16-18. - It takes about 30 seconds to "Manual". No sound - Press the Mute button. Auto setup does not work even when the projector is not selected at the Ceiling function.(see page 43) - Make sure the Auto keystone function is selected... to display an image after turning on Image select menu.(see page 23,43) 60 When "No Show" is not selected on the projector. The color is projected. Make sure the "Blackboard" is operating, the image cannot be stored if not registered with "Store".(see Page...

Instruction Manual, PLC-XU105
Page 64
... Cinema Blackboard (Green) Image 1 Image 2 Image 3 Image 4 Setting Setting Image Adjust Screen 64 Contrast Brightness Color Tint Color temp. On/Off Auto keystone Auto Manual Off Store/Reset On/Off On/Countdown off/Off Logo select Off Default User Capture Yes/No Logo PIN code lock Off/On Logo PIN...Shut down Timer (1-30 Min.) Quit On start Lamp control On/Off Auto/High/Normal/Eco Remote control Security Code 1 or Code 2 Key lock Off Projector Remote control Quit PIN code lock Off/On1/On2 PIN code change Quit Quit Fan Fan control Warning log Lamp counter Filter counter Factory default...
... Cinema Blackboard (Green) Image 1 Image 2 Image 3 Image 4 Setting Setting Image Adjust Screen 64 Contrast Brightness Color Tint Color temp. On/Off Auto keystone Auto Manual Off Store/Reset On/Off On/Countdown off/Off Logo select Off Default User Capture Yes/No Logo PIN code lock Off/On Logo PIN...Shut down Timer (1-30 Min.) Quit On start Lamp control On/Off Auto/High/Normal/Eco Remote control Security Code 1 or Code 2 Key lock Off Projector Remote control Quit PIN code lock Off/On1/On2 PIN code change Quit Quit Fan Fan control Warning log Lamp counter Filter counter Factory default...
Instruction Manual, PLC-XU105
Page 67
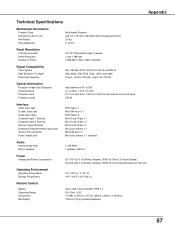
... Multi-media Projector Dimensions (W x H x D) 334 mm x 78 mm x 257.5mm (Not including protrusion) Net Weight 3.5 kg Feet Adjustment 0˚ to 8.9˚ Panel Resolution LCD Panel System 0.8" TFT Active Matrix type, 3 panels Panel Resolution 1,024 x 768 dots Number of Pixels 2,359,296 (1,024 ...Lamp Adjustable from 40" to 300" 3.1' (0.93m) - 37.6' (11.47m) F1.7-2.5 lens with f=19.2 mm-30.2 mm with manual zoom and focus 275 W Interface Video Input Jack S-video Input Jack Audio Input Jacks Computer Input 1 Terminal Computer Input 2 Terminal Monitor Output...
... Multi-media Projector Dimensions (W x H x D) 334 mm x 78 mm x 257.5mm (Not including protrusion) Net Weight 3.5 kg Feet Adjustment 0˚ to 8.9˚ Panel Resolution LCD Panel System 0.8" TFT Active Matrix type, 3 panels Panel Resolution 1,024 x 768 dots Number of Pixels 2,359,296 (1,024 ...Lamp Adjustable from 40" to 300" 3.1' (0.93m) - 37.6' (11.47m) F1.7-2.5 lens with f=19.2 mm-30.2 mm with manual zoom and focus 275 W Interface Video Input Jack S-video Input Jack Audio Input Jacks Computer Input 1 Terminal Computer Input 2 Terminal Monitor Output...

Instruction Manual, PLC-XU105
Page 68
... No. to the highest possible standards. When ordering those parts, specify the item name and Model No. Even though 99.99% of the LCD panels. Appendix Accessories Owner's Manual (CD-ROM) Quick Reference Guide AC Power Cord Remote Control and Batteries VGA Cable Serial Control Cable Lens Cap with String PIN Code...
... No. to the highest possible standards. When ordering those parts, specify the item name and Model No. Even though 99.99% of the LCD panels. Appendix Accessories Owner's Manual (CD-ROM) Quick Reference Guide AC Power Cord Remote Control and Batteries VGA Cable Serial Control Cable Lens Cap with String PIN Code...
Instruction Manual, PLC-XU105
Page 70
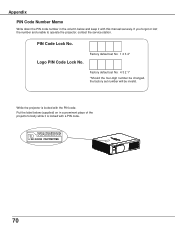
Factory default set number will be changed, the factory set No: 1 2 3 4* Logo PIN Code Lock No. While the projector is locked with a PIN code. 70 Appendix PIN Code Number Memo Write down the PIN code number in the column below (supplied) on in a prominent place of the projector's body while it with the PIN code. Put the label below and keep it is locked with this manual securely. Factory default set No: 4 3 2 1* *Should the four-digit number be invalid. If you forgot or lost the number and unable to operate the projector, contact the service station. PIN Code Lock No.
Factory default set number will be changed, the factory set No: 1 2 3 4* Logo PIN Code Lock No. While the projector is locked with a PIN code. 70 Appendix PIN Code Number Memo Write down the PIN code number in the column below (supplied) on in a prominent place of the projector's body while it with the PIN code. Put the label below and keep it is locked with this manual securely. Factory default set No: 4 3 2 1* *Should the four-digit number be invalid. If you forgot or lost the number and unable to operate the projector, contact the service station. PIN Code Lock No.


