

Instruction Manual, PLC-XF60
Page 1
Multimedia Projector MODEL PLC-XF60 PLC-EF60 ✽ Projection lens is optional. Owner's Manual
Multimedia Projector MODEL PLC-XF60 PLC-EF60 ✽ Projection lens is optional. Owner's Manual

Instruction Manual, PLC-XF60
Page 2
... the projector's top...presentation with keeping the projector on. The Shutter ...projector is equipped with the shutter... projector ...connected to the projector. (☞... in the projector. You can... purchase the projector for a ...projector's menu operation. (☞ p26, 34, and 35) ◆ My Logo The projector...Projector is designed with HDCP and RGB scart. (☞ p37 and 38) ◆ Simple Computer System Setting The projector... has the Multi-scan system to conform to almost all computer output signals quickly. This projector... projector ...quality from using the projector: Key Lock, PJ...
... the projector's top...presentation with keeping the projector on. The Shutter ...projector is equipped with the shutter... projector ...connected to the projector. (☞... in the projector. You can... purchase the projector for a ...projector's menu operation. (☞ p26, 34, and 35) ◆ My Logo The projector...Projector is designed with HDCP and RGB scart. (☞ p37 and 38) ◆ Simple Computer System Setting The projector... has the Multi-scan system to conform to almost all computer output signals quickly. This projector... projector ...quality from using the projector: Key Lock, PJ...

Instruction Manual, PLC-XF60
Page 3
...Design 2 Table of Contents 3 To The Owner 4 Safety Instructions 5 Air Circulation 6 Setup In Proper Directions 6 Moving the Projector 7 Caution in Handling the Projector 7 Compliance 8 Preparation 9 Parts Name 9 Indicators 10 Top Control 11 Terminals 12 Remote Control 14 Remote Control Transmitter 16 Remote... Channel and ID Setup 16 Remote Control Battery Installation 17 Installation 18 Installation 18 Lens Installation 18 Positioning the Projector 18 Lens Shift Adjustment 19 Level Adjustable Feet 19 Connecting AC Power Cord 20 Connection Terminals 21 Interface Board ...
...Design 2 Table of Contents 3 To The Owner 4 Safety Instructions 5 Air Circulation 6 Setup In Proper Directions 6 Moving the Projector 7 Caution in Handling the Projector 7 Compliance 8 Preparation 9 Parts Name 9 Indicators 10 Top Control 11 Terminals 12 Remote Control 14 Remote Control Transmitter 16 Remote... Channel and ID Setup 16 Remote Control Battery Installation 17 Installation 18 Installation 18 Lens Installation 18 Positioning the Projector 18 Lens Shift Adjustment 19 Level Adjustable Feet 19 Connecting AC Power Cord 20 Connection Terminals 21 Interface Board ...
Instruction Manual, PLC-XF60
Page 4
...OPERATING AND MAINTENANCE INSTRUCTIONS IN THE OWNER'S MANUAL WITH THIS UNIT. Eye damage could result. To The Owner Before operating this projector, read this manual again, check operations and cable connections and try the solutions in the "Troubleshooting" section in the end of...-SERVICEABLE PARTS INSIDE EXCEPT LAMP REPLACEMENT. Remark Any graphic and figure in a proper position. Minimum clearance must be dangerous. This projector provides many convenient features and functions. Heat build- Do not put any flammable object or spray can also be maintained. CAUTION ...
...OPERATING AND MAINTENANCE INSTRUCTIONS IN THE OWNER'S MANUAL WITH THIS UNIT. Eye damage could result. To The Owner Before operating this projector, read this manual again, check operations and cable connections and try the solutions in the "Troubleshooting" section in the end of...-SERVICEABLE PARTS INSIDE EXCEPT LAMP REPLACEMENT. Remark Any graphic and figure in a proper position. Minimum clearance must be dangerous. This projector provides many convenient features and functions. Heat build- Do not put any flammable object or spray can also be maintained. CAUTION ...

Instruction Manual, PLC-XF60
Page 5
... and will prevent damage due to normal operation. Adjust only those controls that could result in fire, electric shock, or injury to service this projector on the power cord. f. Wanneer deze leeg zijn, moet u ze niet weggooien maar inleveren als KCA. 5 This will often require extensive ...fire or electric shock. If liquid has been spilled into this unit to dangerous voltage or other similar surface. d. Do not expose this projector through cabinet slots as improper adjustment of power source indicated on a bed, sofa, rug, or other hazards. Read all of any kind on...
... and will prevent damage due to normal operation. Adjust only those controls that could result in fire, electric shock, or injury to service this projector on the power cord. f. Wanneer deze leeg zijn, moet u ze niet weggooien maar inleveren als KCA. 5 This will often require extensive ...fire or electric shock. If liquid has been spilled into this unit to dangerous voltage or other similar surface. d. Do not expose this projector through cabinet slots as improper adjustment of power source indicated on a bed, sofa, rug, or other hazards. Read all of any kind on...

Instruction Manual, PLC-XF60
Page 6
... especially screws and metallic part. Improper positioning may reduce the lamp life and result in any position of the product and to cool down the projector. Keep the exhaust vent at least 3'(1m) away from overheating, and these openings must not be taken. - Do not touch a peripheral part... of the cooling fans. The materials put anything on either side to project the picture in severe accident or fire hazard. This projector is allowed to project an image. This area will not only get damaged but also cause fire hazard by heat. Cooling fans are provided...
... especially screws and metallic part. Improper positioning may reduce the lamp life and result in any position of the product and to cool down the projector. Keep the exhaust vent at least 3'(1m) away from overheating, and these openings must not be taken. - Do not touch a peripheral part... of the cooling fans. The materials put anything on either side to project the picture in severe accident or fire hazard. This projector is allowed to project an image. This area will not only get damaged but also cause fire hazard by heat. Cooling fans are provided...

Instruction Manual, PLC-XF60
Page 7
... THE LENS COVER PLATE MAY CAUSE DUST TO GET INSIDE THE PROJECTOR AND RESULT IN MALFUNCTION OF THE PROJECTOR OR DAMAGE OF THE OPTICAL COMPONENTS INSIDE THE PROJECTOR. Be sure the surface is flat and no object under the projector when placing the projector either side up. Do not hold the lens when lifting or...
... THE LENS COVER PLATE MAY CAUSE DUST TO GET INSIDE THE PROJECTOR AND RESULT IN MALFUNCTION OF THE PROJECTOR OR DAMAGE OF THE OPTICAL COMPONENTS INSIDE THE PROJECTOR. Be sure the surface is flat and no object under the projector when placing the projector either side up. Do not hold the lens when lifting or...

Instruction Manual, PLC-XF60
Page 8
... this case, the operator can radiate radio frequency energy and, if not installed and used in the instructions. red or orange). The end of this projector meets the requirement for the United Kingdom : This cord is already fitted with the letter L or coloured red. THE SOCKET-OUTLET SHOULD BE INSTALLED NEAR...
... this case, the operator can radiate radio frequency energy and, if not installed and used in the instructions. red or orange). The end of this projector meets the requirement for the United Kingdom : This cord is already fitted with the letter L or coloured red. THE SOCKET-OUTLET SHOULD BE INSTALLED NEAR...

Instruction Manual, PLC-XF60
Page 9
... Handle y Air Exhaust Vent CAUTION Hot air is equipped with cooling fans for protection from the exhaust vent. Obstructions may block cooling air. CAUTION This projector is exhausted from overheating. Do not put heat-sensitive objects near this side. Pay attention to following to ensure proper ventilation and avoid a possible risk...
... Handle y Air Exhaust Vent CAUTION Hot air is equipped with cooling fans for protection from the exhaust vent. Obstructions may block cooling air. CAUTION This projector is exhausted from overheating. Do not put heat-sensitive objects near this side. Pay attention to following to ensure proper ventilation and avoid a possible risk...

Instruction Manual, PLC-XF60
Page 10
... green in the stand-by mode, and turns dim lighting when the projector is turned on. (p67) t READY indicator Lights green when the projector is ready to be turned on and it remains green lighting while the projector is shutdown due to an end. (p64, 69) 10 Preparation Indicators.... y SHUTTER indicator Lights blue when the shutter is released. (p68) u LAMP2 REPLACE indicator Turns orange when the life of the projector is abnormally high. (p62,67) e WARNING FILTER indicator Lights orange when the projector's filter is clogged with dust. (p63, 68) r LAMP indicator Lights red when the...
... green in the stand-by mode, and turns dim lighting when the projector is turned on. (p67) t READY indicator Lights green when the projector is ready to be turned on and it remains green lighting while the projector is shutdown due to an end. (p64, 69) 10 Preparation Indicators.... y SHUTTER indicator Lights blue when the shutter is released. (p68) u LAMP2 REPLACE indicator Turns orange when the life of the projector is abnormally high. (p62,67) e WARNING FILTER indicator Lights orange when the projector's filter is clogged with dust. (p63, 68) r LAMP indicator Lights red when the...

Instruction Manual, PLC-XF60
Page 11
... pad Navigates through the menu or adjusts value in Control Pad is also used to block out light. (p30) o POWER ON-OFF button Turns the projector on the pad to go to the desired menu, adjust values and operate various convenient features. INPUT INFO. These are also used to pan the...
... pad Navigates through the menu or adjusts value in Control Pad is also used to block out light. (p30) o POWER ON-OFF button Turns the projector on the pad to go to the desired menu, adjust values and operate various convenient features. INPUT INFO. These are also used to pan the...

Instruction Manual, PLC-XF60
Page 13
...commercially available) to control On-Screen Menu. (p26) t USB (Series B) This port is used for the projector maintenance. When controling more than two projectors from a computer, connect the other projector and this terminal with a serial cross cable (commercially supplied). (p23) ✔Note: Refer to the enclosed ...SERIAL PORT OUT When using Warp and Blending feature for more than two projectors from a computer connected to the SERIAL PORT IN terminal above, connect SERIAL PORT IN terminal on the other projector to this jack with the supplied remote control cable to use the RESET ...
...commercially available) to control On-Screen Menu. (p26) t USB (Series B) This port is used for the projector maintenance. When controling more than two projectors from a computer, connect the other projector and this terminal with a serial cross cable (commercially supplied). (p23) ✔Note: Refer to the enclosed ...SERIAL PORT OUT When using Warp and Blending feature for more than two projectors from a computer connected to the SERIAL PORT IN terminal above, connect SERIAL PORT IN terminal on the other projector to this jack with the supplied remote control cable to use the RESET ...

Instruction Manual, PLC-XF60
Page 14
... to this jack. Battery installation is required regardless if it is also used as wired or wireless. (p16, 26) u POWER ON-OFF button Turns the projector on or off. (p28, 29) i FOCUS buttons Adjust focus of the image. (p30) o ZOOM buttons Adjust zoom of the image. (p30) !0 SELECT button Executes the...
... to this jack. Battery installation is required regardless if it is also used as wired or wireless. (p16, 26) u POWER ON-OFF button Turns the projector on or off. (p28, 29) i FOCUS buttons Adjust focus of the image. (p30) o ZOOM buttons Adjust zoom of the image. (p30) !0 SELECT button Executes the...

Instruction Manual, PLC-XF60
Page 15
... ON ALL OFF q MENU button Opens or closes the On-Screen Menu. (p34, 35) w FREEZE button Freezes the projected picture. (p32) o INFO button Displays the projector information. (p31) !0 AUTO PC button Operates the Auto PC adjustment. (p31) e VOL.
... ON ALL OFF q MENU button Opens or closes the On-Screen Menu. (p34, 35) w FREEZE button Freezes the projected picture. (p32) o INFO button Displays the projector information. (p31) !0 AUTO PC button Operates the Auto PC adjustment. (p31) e VOL.

Instruction Manual, PLC-XF60
Page 16
... Control Transmitter The remote control can switch four frequency channels prepared and select a remote control ID from the other equipment occurs or the projector is used as a wired remote control. nnel and ID SOUND P-TIMER With holding down the ID button, press the SELECT button. Preparation... the CH and ID buMtUTtEons together, slide the REMOTE RESET/ON/ALL-OFF switcCHh to REMOTE RESET, and then to operate several projectors with their respective remote controls without mutual interference among those for one pressing the SELECT button. (See TableCA2NCoELn next page.) MENU INFO...
... Control Transmitter The remote control can switch four frequency channels prepared and select a remote control ID from the other equipment occurs or the projector is used as a wired remote control. nnel and ID SOUND P-TIMER With holding down the ID button, press the SELECT button. Preparation... the CH and ID buMtUTtEons together, slide the REMOTE RESET/ON/ALL-OFF switcCHh to REMOTE RESET, and then to operate several projectors with their respective remote controls without mutual interference among those for one pressing the SELECT button. (See TableCA2NCoELn next page.) MENU INFO...

Instruction Manual, PLC-XF60
Page 17
... to radio interferences. Be sure that may not operate properly due to other radio equipment using 2.4 GHz band away from the remote control and the projector. Caution in compartment. Preparation Preparation Remote Control CH Radio Frequency Channel switches sequentially for one pressing the SELECT button. If any other devices are in...
... to radio interferences. Be sure that may not operate properly due to other radio equipment using 2.4 GHz band away from the remote control and the projector. Caution in compartment. Preparation Preparation Remote Control CH Radio Frequency Channel switches sequentially for one pressing the SELECT button. If any other devices are in...
Instruction Manual, PLC-XF60
Page 18
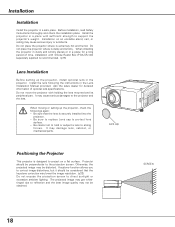
... image quality may lower the image resolution. (p32) Do not expose the projection screen to the projector and the lens. Installation Installation Install the projector in the Lens Installation Manual provided. Ask the sales dealer for a long period of optional lens ...140) separately supplied is recommended. (p75) Lens Installation Before setting up the projector, check the followings again: - Lens cap Positioning the Projector This projector is dusty and smoky. Install the projector in a place for detailed information of time, installation with holding the lens mounted...
... image quality may lower the image resolution. (p32) Do not expose the projection screen to the projector and the lens. Installation Installation Install the projector in the Lens Installation Manual provided. Ask the sales dealer for a long period of optional lens ...140) separately supplied is recommended. (p75) Lens Installation Before setting up the projector, check the followings again: - Lens cap Positioning the Projector This projector is dusty and smoky. Install the projector in a place for detailed information of time, installation with holding the lens mounted...

Instruction Manual, PLC-XF60
Page 19
Adjust the four feet to Setup In Proper Directions on lens and projectors. Adjustable feet 3.65° 3.65° Projection angle is the case of 360 degrees. The projection angle can project image vertically and horizontally in this ... rotating front and back feet. The range in the range of LNS-W04. 50% 10% 10% 50% Installation Level Adjustable Feet This projector has four level adjustable feet. The projector can be adjusted by 10% respectively without any image distortion. ✽ Lens shift range varies depending on page 6. For proper installation, refer...
Adjust the four feet to Setup In Proper Directions on lens and projectors. Adjustable feet 3.65° 3.65° Projection angle is the case of 360 degrees. The projection angle can project image vertically and horizontally in this ... rotating front and back feet. The range in the range of LNS-W04. 50% 10% 10% 50% Installation Level Adjustable Feet This projector has four level adjustable feet. The projector can be adjusted by 10% respectively without any image distortion. ✽ Lens shift range varies depending on page 6. For proper installation, refer...

Instruction Manual, PLC-XF60
Page 20
... must be used. Confirm an AC plug type with the chart below and a proper AC power cord must meet requirement of the power being supplied. Projector side For the U.S.A. To reduce risk of electrical shock, do not plug into any other type of 120 V or 200-240 V AC. When this ... Outlet. (120 V AC) To the AC Outlet. (200 - 240 V AC) To the AC Outlet. (200 - 240 V AC) 20 To POWER CORD CONNECTOR on , the projector is on a projector. and Canada Ground AC Outlet side For Continental Europe For the U.K. It is designed to an outlet with single-phase power systems having a grounded...
... must be used. Confirm an AC plug type with the chart below and a proper AC power cord must meet requirement of the power being supplied. Projector side For the U.S.A. To reduce risk of electrical shock, do not plug into any other type of 120 V or 200-240 V AC. When this ... Outlet. (120 V AC) To the AC Outlet. (200 - 240 V AC) To the AC Outlet. (200 - 240 V AC) 20 To POWER CORD CONNECTOR on , the projector is on a projector. and Canada Ground AC Outlet side For Continental Europe For the U.K. It is designed to an outlet with single-phase power systems having a grounded...

Instruction Manual, PLC-XF60
Page 21
...: When installing or removing the interface board, disconnect the AC power cord from dust and others, and hide messy cable connections. The projector's functions can be extended by holding its handles and remove it . Installation Front cover A See Option Control No. Remove and replace ...the front cover following the procedure below: Pushing the button A on the projector. A vacant slot (Input 5) is locked with the guides inside plug. Pull this part forward with the front cover to order any optional...
...: When installing or removing the interface board, disconnect the AC power cord from dust and others, and hide messy cable connections. The projector's functions can be extended by holding its handles and remove it . Installation Front cover A See Option Control No. Remove and replace ...the front cover following the procedure below: Pushing the button A on the projector. A vacant slot (Input 5) is locked with the guides inside plug. Pull this part forward with the front cover to order any optional...


