

Instruction Manual, PLC-XF60
Page 3
... Warning Temp Indicator 62 Air Filter Replacement 63 Lamp Replacement 64 Cleaning the Projection Lens 66 Cleaning the Projector Cabinet 66 Attaching the Cord Cover Strap 66 Indicators and Projector Condition 67 Main Indicators 67 Shutter Indicator 68 Warning Filter Indicator 68 Lamp Replace Indicators 69 Appendix 70 Troubleshooting 70 Compatible Computer Specifications 72 Technical Specifications 74 Optional Parts 75 Menu Tree 76 Dimensions 79 Terminal Configurations 80 PIN Code Number Memo 81 Index 82 3 Function 33 Volume Control 33 How to Video...
... Warning Temp Indicator 62 Air Filter Replacement 63 Lamp Replacement 64 Cleaning the Projection Lens 66 Cleaning the Projector Cabinet 66 Attaching the Cord Cover Strap 66 Indicators and Projector Condition 67 Main Indicators 67 Shutter Indicator 68 Warning Filter Indicator 68 Lamp Replace Indicators 69 Appendix 70 Troubleshooting 70 Compatible Computer Specifications 72 Technical Specifications 74 Optional Parts 75 Menu Tree 76 Dimensions 79 Terminal Configurations 80 PIN Code Number Memo 81 Index 82 3 Function 33 Volume Control 33 How to Video...
Instruction Manual, PLC-XF60
Page 18
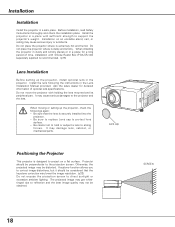
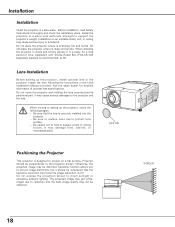
..., cart, or ceiling may be perpendicular to the projection screen. Do not move the projector with Smoke Resist Box (POA-SR-140) separately supplied is dusty and smoky. Be sure to replace Lens cap to strong forces. Install the projector in the Lens Installation Manual provided. Do not place the projector where is recommended. (p75) Lens Installation Before setting up the projector, check the followings again: - Projector should be...
..., cart, or ceiling may be perpendicular to the projection screen. Do not move the projector with Smoke Resist Box (POA-SR-140) separately supplied is dusty and smoky. Be sure to replace Lens cap to strong forces. Install the projector in the Lens Installation Manual provided. Do not place the projector where is recommended. (p75) Lens Installation Before setting up the projector, check the followings again: - Projector should be...

Instruction Manual, PLC-XF60
Page 29
appears on the screen. 2 Press the POWER ON-OFF button again to turn off ?" Continuous use may result in every 24 hours. • This projector monitors internal temperature and automatically controls the running speed of the cooling fans. • If the WARNING TEMP indicator blinks red or all the indicators except the LAMP indicator are blinking, see "Warning Temp Indicator" on page 62. • When "Power management" mode is Ready or Shut down the projector completely, turn it...
appears on the screen. 2 Press the POWER ON-OFF button again to turn off ?" Continuous use may result in every 24 hours. • This projector monitors internal temperature and automatically controls the running speed of the cooling fans. • If the WARNING TEMP indicator blinks red or all the indicators except the LAMP indicator are blinking, see "Warning Temp Indicator" on page 62. • When "Power management" mode is Ready or Shut down the projector completely, turn it...

Instruction Manual, PLC-XF60
Page 53
... button at the same time. To change CH and ID for one of the followings when no input source is connected to prevent radio frequency interference from the connected equipment: Blue . . . . . .blue colored background My logo . . .the image you captured Black . . . . .black colored background Lamp Control This feature allows you could no input signal is blinking red and the projector will appear. The remote control CH or ID switches sequentially for the projector; Changing...
... button at the same time. To change CH and ID for one of the followings when no input source is connected to prevent radio frequency interference from the connected equipment: Blue . . . . . .blue colored background My logo . . .the image you captured Black . . . . .black colored background Lamp Control This feature allows you could no input signal is blinking red and the projector will appear. The remote control CH or ID switches sequentially for the projector; Changing...

Instruction Manual, PLC-XF60
Page 54
... minutes. message ● P-TIMER ● "No signal" message ● "Please wait..." Shut down . . .When the lamp has been fully cooled down , the READY indicator changes to display On-Screen Displays. The count-down when the input signal is interrupted and no button is lighting red during this function is "On," the projector is canceled. Setting Display This function decides whether to green blinking. The next operation depends on the top control or remote control unit...
... minutes. message ● P-TIMER ● "No signal" message ● "Please wait..." Shut down . . .When the lamp has been fully cooled down , the READY indicator changes to display On-Screen Displays. The count-down when the input signal is interrupted and no button is lighting red during this function is "On," the projector is canceled. Setting Display This function decides whether to green blinking. The next operation depends on the top control or remote control unit...
Instruction Manual, PLC-XF60
Page 58
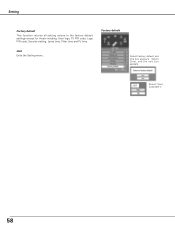
Select [Yes] to the factory default settings except for those including: User logo, PJ PIN code, Logo PIN code, Security setting, Lamp time, Filter time and PJ time. Factory default Select Factory default and this box appears. Setting Factory default This function returns all setting values to activate it. 58 Select [Yes], and the next box appears. Quit Exits the Setting menu.
Select [Yes] to the factory default settings except for those including: User logo, PJ PIN code, Logo PIN code, Security setting, Lamp time, Filter time and PJ time. Factory default Select Factory default and this box appears. Setting Factory default This function returns all setting values to activate it. 58 Select [Yes], and the next box appears. Quit Exits the Setting menu.

Instruction Manual, PLC-XF60
Page 59
... control functions: Lamp, Fan control, Filter, Auto PC adj., Test pattern, RS232C, and USB memory and displays Warning log. 1 Press the MENU button to show each lamp wattage and time. Select Lamp 1 or Lamp 2 to display On-Screen Menu. is not mounted on the projector. Normal . . .normal operation Max . . . . . .faster operation than "Normal". Select [Yes] to Reset and then press the SELECT button. Select Fan control and this box appears. To reset the Lamp time, move the pointer to "Reset...
... control functions: Lamp, Fan control, Filter, Auto PC adj., Test pattern, RS232C, and USB memory and displays Warning log. 1 Press the MENU button to show each lamp wattage and time. Select Lamp 1 or Lamp 2 to display On-Screen Menu. is not mounted on the projector. Normal . . .normal operation Max . . . . . .faster operation than "Normal". Select [Yes] to Reset and then press the SELECT button. Select Fan control and this box appears. To reset the Lamp time, move the pointer to "Reset...

Instruction Manual, PLC-XF60
Page 63
... may result in the Special menu on p59. CAUTION Do not operate a projector with dust and the performance is degraded, the WARNING FILTER indicator lights orange and let you know the filter replacement is clean. It may degrade quality of the filter cover, open the projector cover. 3 Pull out the air filter from the projector. 4 Replace the new air filter and the filter cover properly onto the projector. 5 Reset the Filter time. Using the projector with the air filter removed; Filter cover Air filter ✔Note: • The...
... may result in the Special menu on p59. CAUTION Do not operate a projector with dust and the performance is degraded, the WARNING FILTER indicator lights orange and let you know the filter replacement is clean. It may degrade quality of the filter cover, open the projector cover. 3 Pull out the air filter from the projector. 4 Replace the new air filter and the filter cover properly onto the projector. 5 Reset the Filter time. Using the projector with the air filter removed; Filter cover Air filter ✔Note: • The...

Instruction Manual, PLC-XF60
Page 64
... 2 REPLACE indicators light orange. Make sure that the lamp is set properly. Replace the lamp covers and tighten the screws. 5 Connect the AC power cord to cool, for at least 45 minutes before you open the Lamp cover. Allow a projector to the projector and turn on p59. Follow these steps to an end. See "Lamp time" on the projector. 6 Reset the Lamp time. Handle 64 The inside of each screw on the lamp covers with a new one promptly. LAMP 1 REPLACE indicator LAMP 2 REPLACE indicator These indicators light orange...
... 2 REPLACE indicators light orange. Make sure that the lamp is set properly. Replace the lamp covers and tighten the screws. 5 Connect the AC power cord to cool, for at least 45 minutes before you open the Lamp cover. Allow a projector to the projector and turn on p59. Follow these steps to an end. See "Lamp time" on the projector. 6 Reset the Lamp time. Handle 64 The inside of each screw on the lamp covers with a new one promptly. LAMP 1 REPLACE indicator LAMP 2 REPLACE indicator These indicators light orange...

Instruction Manual, PLC-XF60
Page 65
... a new one should be cleaned up carefully. Risk of explosion may differ from the AC outlet immediately. Additionally, check carefully to an end. Contact an authorized service station for each lamp. Maintenance and Cleaning ORDER REPLACEMENT LAMP Replacement Lamp can be ordered through your projector : ● Replacement Lamp Type No. : PLC-XF60 / PLC-EF60 POA-LMP80 (Service Parts No. 610 315 7689) Maintenance & Cleaning LAMP HANDLING PRECAUTIONS This projector uses a high-pressure lamp which...
... a new one should be cleaned up carefully. Risk of explosion may differ from the AC outlet immediately. Additionally, check carefully to an end. Contact an authorized service station for each lamp. Maintenance and Cleaning ORDER REPLACEMENT LAMP Replacement Lamp can be ordered through your projector : ● Replacement Lamp Type No. : PLC-XF60 / PLC-EF60 POA-LMP80 (Service Parts No. 610 315 7689) Maintenance & Cleaning LAMP HANDLING PRECAUTIONS This projector uses a high-pressure lamp which...

Instruction Manual, PLC-XF60
Page 70
... . - Image is turned OFF when turning the projector back on the projection lens. Wait 90 seconds after turning on page 62) - The projector can be turned on. (☞ "Warning Temp Indicator" on the projector. - If the WARNING TEMP. Check the projection lamp. (☞ page 64) - Adjust focus of the specified Operating Temperature (5°C ~ 35°C). - Check the projection lens to a projector. Moving the projector from your computer's instruction manual for assistance, check the items below . Check the connection between your dealer or service...
... . - Image is turned OFF when turning the projector back on the projection lens. Wait 90 seconds after turning on page 62) - The projector can be turned on. (☞ "Warning Temp Indicator" on the projector. - If the WARNING TEMP. Check the projection lamp. (☞ page 64) - Adjust focus of the specified Operating Temperature (5°C ~ 35°C). - Check the projection lens to a projector. Moving the projector from your computer's instruction manual for assistance, check the items below . Check the connection between your dealer or service...

Instruction Manual, PLC-XF60A
Page 10
Lights green when the projector is in the Power Management mode or when the projector is shutdown due to be turned on . (p.65~67) t READY indicator - Lights red when the projector is ready to a power failure. (p.65~67) y SHUTTER indicator Lights blue when the shutter is turned on and remains green lighting during operations. - Turns a dim lighting when the projector is closed. (p.66) u LAMP 2 REPLACE indicator Turns orange when the life of the projection Lamp 2 draws to an end. (p.62, 67) w WARNING TEMP indicator Blinks red when...
Lights green when the projector is in the Power Management mode or when the projector is shutdown due to be turned on . (p.65~67) t READY indicator - Lights red when the projector is ready to a power failure. (p.65~67) y SHUTTER indicator Lights blue when the shutter is turned on and remains green lighting during operations. - Turns a dim lighting when the projector is closed. (p.66) u LAMP 2 REPLACE indicator Turns orange when the life of the projection Lamp 2 draws to an end. (p.62, 67) w WARNING TEMP indicator Blinks red when...
Instruction Manual, PLC-XF60A
Page 18
...) Lens Installation Before setting up the projector, check the followings again: - Do not move the projector with sufficient strength to direct sunlight or excessive ambient lighting. Lens cap Positioning the Projector This projector is securely installed into the projector. - Be sure to replace Lens cap to the projection screen. Projector should be obtained. Otherwise, the projected image may lower the image resolution. (p.31) Do not expose the projection screen to support the projector's weight. Installation Installation Install the projector...
...) Lens Installation Before setting up the projector, check the followings again: - Do not move the projector with sufficient strength to direct sunlight or excessive ambient lighting. Lens cap Positioning the Projector This projector is securely installed into the projector. - Be sure to replace Lens cap to the projection screen. Projector should be obtained. Otherwise, the projected image may lower the image resolution. (p.31) Do not expose the projection screen to support the projector's weight. Installation Installation Install the projector...
Instruction Manual, PLC-XF60A
Page 50
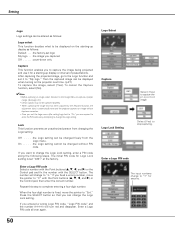
... fixed a wrong number, move the pointer to "Ent." Press the SELECT button so that has been adjusted by the Keystone function, the adjustment data is set "4321" at the factory. Enter a Logo PIN code all over again. 50 Logo Select Capture Select [Yes] to complete entering a four-digit number. Enter a Logo PIN code The input numbers change to "✳." Setting Logo Logo settings can be altered as follows: Default...
... fixed a wrong number, move the pointer to "Ent." Press the SELECT button so that has been adjusted by the Keystone function, the adjustment data is set "4321" at the factory. Enter a Logo PIN code all over again. 50 Logo Select Capture Select [Yes] to complete entering a four-digit number. Enter a Logo PIN code The input numbers change to "✳." Setting Logo Logo settings can be altered as follows: Default...

Instruction Manual, PLC-XF60A
Page 51
... input source is shorter and lights it cannot be switched again for one (1) lamp or two (2) lamps. 2-Lamp . . . .light both the projector and the remote control must be switched to switch using them at Remote control, the remote control CH and ID menu appears. Mode setting allows you to relevant instructions of the PJ Lock function on PIN code setting, refer to change CH and ID for the projector to prevent radio frequency interference from the connected equipment: Blue . . . . . .blue colored...
... input source is shorter and lights it cannot be switched again for one (1) lamp or two (2) lamps. 2-Lamp . . . .light both the projector and the remote control must be switched to switch using them at Remote control, the remote control CH and ID menu appears. Mode setting allows you to relevant instructions of the PJ Lock function on PIN code setting, refer to change CH and ID for the projector to prevent radio frequency interference from the connected equipment: Blue . . . . . .blue colored...

Instruction Manual, PLC-XF60A
Page 56
Factory default Select Factory default and this box appears. Select [Yes], and the next box appears. Select [Yes] to the factory default settings except for those including: User logo, PJ PIN code, Logo PIN code, Security setting, Lamp time, Filter time, and PJ time. Setting Factory default This function returns all setting values to activate it. 56 Quit Exits the Setting menu.
Factory default Select Factory default and this box appears. Select [Yes], and the next box appears. Select [Yes] to the factory default settings except for those including: User logo, PJ PIN code, Logo PIN code, Security setting, Lamp time, Filter time, and PJ time. Setting Factory default This function returns all setting values to activate it. 56 Quit Exits the Setting menu.

Instruction Manual, PLC-XF60A
Page 57
... then press the SELECT button. ✔Note: Be sure to display On-Screen Menu. The message "Lamp time reset?" The message "Lamp time reset?" Select Lamp 1 or Lamp 2 to select and then press the SELECT button. Select one of the lamps being used . is displayed. Fan control This function provides you want to show each lamp wattage and time. Special Special customizes control functions: Lamp, Fan control, Filter, Auto PC adj., Test pattern, RS232C, and USB memory and displays Warning log.
... then press the SELECT button. ✔Note: Be sure to display On-Screen Menu. The message "Lamp time reset?" The message "Lamp time reset?" Select Lamp 1 or Lamp 2 to select and then press the SELECT button. Select one of the lamps being used . is displayed. Fan control This function provides you want to show each lamp wattage and time. Special Special customizes control functions: Lamp, Fan control, Filter, Auto PC adj., Test pattern, RS232C, and USB memory and displays Warning log.

Instruction Manual, PLC-XF60A
Page 62
...lamp with a new one promptly. If one lamp and another with grasping the handle. 4 Replace each screw on the projector. 6 Reset the Lamp time. Top Control LAMP 1 REPLACE indicator LAMP 2 REPLACE indicator These indicators light orange when the life of the projection lamps draw to an end, the LAMP 1 and 2 REPLACE indicators light orange. Lamp covers Screws (Unremovable) Lamp 1 Handle Lamp 2 CAUTION : DO NOT OPERATE A PROJECTOR WHILE ANY OF LAMPS IS REMOVED. Replace the lamp covers and tighten the screws. 5 Connect the AC power cord to the projector and turn on the lamp...
...lamp with a new one promptly. If one lamp and another with grasping the handle. 4 Replace each screw on the projector. 6 Reset the Lamp time. Top Control LAMP 1 REPLACE indicator LAMP 2 REPLACE indicator These indicators light orange when the life of the projection lamps draw to an end, the LAMP 1 and 2 REPLACE indicators light orange. Lamp covers Screws (Unremovable) Lamp 1 Handle Lamp 2 CAUTION : DO NOT OPERATE A PROJECTOR WHILE ANY OF LAMPS IS REMOVED. Replace the lamp covers and tighten the screws. 5 Connect the AC power cord to the projector and turn on the lamp...

Instruction Manual, PLC-XF60A
Page 68
... connected to a projector. Check the projection lamp. (☞ p.62) - Check the Ceiling item. (☞ "Screen Setting" on page 48.) - button to see if it does not project an image, restart the computer. Check if the air filter is fully installed and the filter cover is Left/Right reversed. Check the projection lens to check the current projector condition before trying the solutions below once again. - indicator lights red, the projector cannot be turned on after turning on . - Select correct input source...
... connected to a projector. Check the projection lamp. (☞ p.62) - Check the Ceiling item. (☞ "Screen Setting" on page 48.) - button to see if it does not project an image, restart the computer. Check if the air filter is fully installed and the filter cover is Left/Right reversed. Check the projection lens to check the current projector condition before trying the solutions below once again. - indicator lights red, the projector cannot be turned on after turning on . - Select correct input source...
Instruction Manual, PLC-XF60A
Page 73
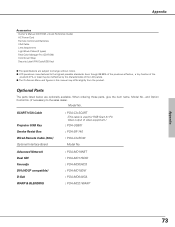
... ordering those parts, give the item name, Model No., and Option Control No. (if necessary) to the highest possible standards. Appendix Accessories Owner's Manual (CD-ROM + Quick Reference Guide) AC Power Cord Remote Control and Batteries VGA Cable Lens Attachment Light Block Plates (2 types) Real Color Manager Pro (CD-ROM) Cord Cover Strap Security Label (PIN Code/USB Key) ● The specifications are subject to change without notice. ● LCD panels are manufactured to...
... ordering those parts, give the item name, Model No., and Option Control No. (if necessary) to the highest possible standards. Appendix Accessories Owner's Manual (CD-ROM + Quick Reference Guide) AC Power Cord Remote Control and Batteries VGA Cable Lens Attachment Light Block Plates (2 types) Real Color Manager Pro (CD-ROM) Cord Cover Strap Security Label (PIN Code/USB Key) ● The specifications are subject to change without notice. ● LCD panels are manufactured to...


