Owners Manual
Page 2
... in the way indicated. q Remote Control Unit, supplied to this manual thoroughly and operate the projector properly. q If the projector is exhausted from the projection lens. q This projector produces intense light from the ventilation holes. READ AND KEEP THIS OWNER'S MANUAL FOR LATER USE. Do not cover the ventilation slot on yourself or other accidents. NO USERSERVICEABLE PARTS INSIDE EXCEPT LAMP REPLACEMENT. REFER SERVICING TO QUALIFIED SERVICE PERSONNEL. If the problem still persists...
... in the way indicated. q Remote Control Unit, supplied to this manual thoroughly and operate the projector properly. q If the projector is exhausted from the projection lens. q This projector produces intense light from the ventilation holes. READ AND KEEP THIS OWNER'S MANUAL FOR LATER USE. Do not cover the ventilation slot on yourself or other accidents. NO USERSERVICEABLE PARTS INSIDE EXCEPT LAMP REPLACEMENT. REFER SERVICING TO QUALIFIED SERVICE PERSONNEL. If the problem still persists...

Owners Manual
Page 3
... and extension cords as improper adjustment of power source indicated on a bed, sofa, rug, or other controls may touch dangerous voltage points or short out parts that are provided for long periods of the equipment and to qualified service personnel under the following the operating instructions. f. This projector should be read before cleaning. This will often require extensive work by the manufacturers. Use only...
... and extension cords as improper adjustment of power source indicated on a bed, sofa, rug, or other controls may touch dangerous voltage points or short out parts that are provided for long periods of the equipment and to qualified service personnel under the following the operating instructions. f. This projector should be read before cleaning. This will often require extensive work by the manufacturers. Use only...

Owners Manual
Page 4
...red. ASA If the fuse cover is operated in your electrician. The wire which is listed by the Underwriters Laboratories (UL) and certified by the safety earth symbol or coloured green or green-and-yellow. Operation of which case the user will fit into the outlet, contact your User Instructions. Do not make any changes... a fuse, the value of this projector meets the requirement for use the plug with the cover omitted. The Wires in this mains lead are coloured in accordance with the following code: Green-and-yellow Earth Blue Neutral Brown Live As the colours of...
...red. ASA If the fuse cover is operated in your electrician. The wire which is listed by the Underwriters Laboratories (UL) and certified by the safety earth symbol or coloured green or green-and-yellow. Operation of which case the user will fit into the outlet, contact your User Instructions. Do not make any changes... a fuse, the value of this projector meets the requirement for use the plug with the cover omitted. The Wires in this mains lead are coloured in accordance with the following code: Green-and-yellow Earth Blue Neutral Brown Live As the colours of...
Owners Manual
Page 5
... SPECIFICATIONS 25 27 PC ADJUSTMENT 28 NAME OF EACH PART OF PROJECTOR 7 AUTO PC ADJUSTMENT 28 SETTING-UP PROJECTOR 8 MANUAL PC ADJUSTMENT 29 CONNECTING AC POWER CORD 8 PICTURE IMAGE ADJUSTMENT 31 LENS INSTALLATION 9 IMAGE LEVEL SELECT 31 POSITIONING PROJECTOR 9 IMAGE LEVEL ADJUSTMENT 32 LENS SHIFT ADJUSTMENT 9 PICTURE SCREEN ADJUSTMENT 33 PICTURE LEVEL AND TILT ADJUSTMENT 10 MOVING PROJECTOR 10 VIDEO MODE 34 CONNECTING PROJECTOR 11 SELECTING INPUT SOURCE 34 TERMINALS OF PROJECTOR 11 SELECTING VIDEO SYSTEM 35 CONNECTING TO COMPUTER 14 PICTURE IMAGE...
... SPECIFICATIONS 25 27 PC ADJUSTMENT 28 NAME OF EACH PART OF PROJECTOR 7 AUTO PC ADJUSTMENT 28 SETTING-UP PROJECTOR 8 MANUAL PC ADJUSTMENT 29 CONNECTING AC POWER CORD 8 PICTURE IMAGE ADJUSTMENT 31 LENS INSTALLATION 9 IMAGE LEVEL SELECT 31 POSITIONING PROJECTOR 9 IMAGE LEVEL ADJUSTMENT 32 LENS SHIFT ADJUSTMENT 9 PICTURE SCREEN ADJUSTMENT 33 PICTURE LEVEL AND TILT ADJUSTMENT 10 MOVING PROJECTOR 10 VIDEO MODE 34 CONNECTING PROJECTOR 11 SELECTING INPUT SOURCE 34 TERMINALS OF PROJECTOR 11 SELECTING VIDEO SYSTEM 35 CONNECTING TO COMPUTER 14 PICTURE IMAGE...
Owners Manual
Page 6
... for troublesome manual adjustment of input sources just by digitally altering projection to arrange any operation button is displayed in Terminal Slots enable you purchased a projector. x Selectable Terminal Slots 3-built-in ; Projection Lamp is automatically turned on again when a projector detects signal or any combinations of frequency and other settings. Operation menu is pressed. x Wireless Mouse Remote Control Unit supplied with this problem by changing Terminal Boards. No complicated setup is necessary and projection is no...
... for troublesome manual adjustment of input sources just by digitally altering projection to arrange any operation button is displayed in Terminal Slots enable you purchased a projector. x Selectable Terminal Slots 3-built-in ; Projection Lamp is automatically turned on again when a projector detects signal or any combinations of frequency and other settings. Operation menu is pressed. x Wireless Mouse Remote Control Unit supplied with this problem by changing Terminal Boards. No complicated setup is necessary and projection is no...
Owners Manual
Page 9
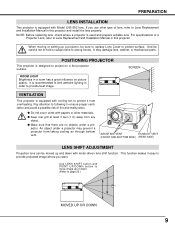
... specifications of lens, refer to page 22.) MOVED UP OR DOWN 9 AIR INTAKE VENT EXHAUST VENT (FRONT AND BOTTOM SIDE) (REAR SIDE) LENS SHIFT ADJUSTMENT Projection lens can be sure to replace Lens Cover to provide projected image where you use other materials. This function makes it from overheating. Use LENS SHIFT button and POINT UP/DOWN button to move image up and down . (Refer to Lens Replacement and Installation Manual in this projector...
... specifications of lens, refer to page 22.) MOVED UP OR DOWN 9 AIR INTAKE VENT EXHAUST VENT (FRONT AND BOTTOM SIDE) (REAR SIDE) LENS SHIFT ADJUSTMENT Projection lens can be sure to replace Lens Cover to provide projected image where you use other materials. This function makes it from overheating. Use LENS SHIFT button and POINT UP/DOWN button to move image up and down . (Refer to Lens Replacement and Installation Manual in this projector...

Owners Manual
Page 14
... (VGA / SVGA / XGA / SXGA/UXGA) Desktop type Laptop type 14 Monitor Output BNC Cable ✽ Monitor Output Monitor Output Audio Output Serial port PS/2 port ADB port MAC/VGA Adapter Set slide switches following chart below depending on RESOLUTION MODE that you want to use before computer is switched on. Turn a projector and peripheral equipment on before your computer. Audio Cable (stereo) ✽ Control Cable Control Cable Control Cable for Serial Port for PS/2 Port for PS/2 port, Serial port, or ADB port • MAC/VGA Adapter, DVI/VGA Adapter...
... (VGA / SVGA / XGA / SXGA/UXGA) Desktop type Laptop type 14 Monitor Output BNC Cable ✽ Monitor Output Monitor Output Audio Output Serial port PS/2 port ADB port MAC/VGA Adapter Set slide switches following chart below depending on RESOLUTION MODE that you want to use before computer is switched on. Turn a projector and peripheral equipment on before your computer. Audio Cable (stereo) ✽ Control Cable Control Cable Control Cable for Serial Port for PS/2 Port for PS/2 port, Serial port, or ADB port • MAC/VGA Adapter, DVI/VGA Adapter...

Owners Manual
Page 16
... . INDICATOR Flashes red when internal projector temperature is too high. (P42) READY INDICATOR Lights green when a projector is ready to expand / compress image in DIGITAL ZOOM +/- It is in Power Management mode. (P40) MENU BUTTON Used to open or close MENU operation. (P19, 20) SELECT BUTTON Used to execute item selected. Used to select input (P24) source. (P25) POWER ON-OFF BUTTON Used to turn a projector on its top. TOP CONTROL AND INDICATORS FOCUS BUTTONS Used to adjust focus. (P22) VOLUME BUTTONS INPUT BUTTONS Used to adjust zoom. (P22) AUTO PC ADJ. OFF ZOOM FOCUS...
... . INDICATOR Flashes red when internal projector temperature is too high. (P42) READY INDICATOR Lights green when a projector is ready to expand / compress image in DIGITAL ZOOM +/- It is in Power Management mode. (P40) MENU BUTTON Used to open or close MENU operation. (P19, 20) SELECT BUTTON Used to execute item selected. Used to select input (P24) source. (P25) POWER ON-OFF BUTTON Used to turn a projector on its top. TOP CONTROL AND INDICATORS FOCUS BUTTONS Used to adjust focus. (P22) VOLUME BUTTONS INPUT BUTTONS Used to adjust zoom. (P22) AUTO PC ADJ. OFF ZOOM FOCUS...

Owners Manual
Page 17
... DIGITAL ZOOM +/- BEFORE OPERATION OPERATION OF REMOTE CONTROL LOCK ALL OFF ON Left Side LASER POINTER INDICATOR Lights red while laser beam is emitted from Laser Light Window. SELECT BUTTON Used to execute item selected, or to select input source (INPUT 3). When using Remote Control Unit, turn projector on remote control. LASER POINTER INDICATOR lights RED and Laser is emitted with RED light to "ON." Three marks bellow are put on or off . CAUTION : Use of controls, adjustments or performance of this switch...
... DIGITAL ZOOM +/- BEFORE OPERATION OPERATION OF REMOTE CONTROL LOCK ALL OFF ON Left Side LASER POINTER INDICATOR Lights red while laser beam is emitted from Laser Light Window. SELECT BUTTON Used to execute item selected, or to select input source (INPUT 3). When using Remote Control Unit, turn projector on remote control. LASER POINTER INDICATOR lights RED and Laser is emitted with RED light to "ON." Three marks bellow are put on or off . CAUTION : Use of controls, adjustments or performance of this switch...

Owners Manual
Page 18
... BUTTON Used to adjust volume. (P24) D.ZOOM BUTTON Used to moisture, or heat. Press lid downward and slide it. 2 Slide batteries into black image. (P23) AUTO PC ADJ. q Do not expose Remote Control Unit to select DIGITAL ZOOM +/- BEFORE OPERATION ZOOM BUTTON Used to adjust zoom. (P22) ON-OFF ZOOM FOCUS VOLUME LOCK FOCUS BUTTON Used to adjust focus. (P22) MUTE BUTTON Used to mute sound.(P24) MUTE D.ZOOM INPUT 1/2 MENU INPUT 3 NO SHOW BUTTON Used to correct (5 m) keystone distortion. 60° (P22, 39) Remote Control Batteries Installation 1 Remove battery...
... BUTTON Used to adjust volume. (P24) D.ZOOM BUTTON Used to moisture, or heat. Press lid downward and slide it. 2 Slide batteries into black image. (P23) AUTO PC ADJ. q Do not expose Remote Control Unit to select DIGITAL ZOOM +/- BEFORE OPERATION ZOOM BUTTON Used to adjust zoom. (P22) ON-OFF ZOOM FOCUS VOLUME LOCK FOCUS BUTTON Used to adjust focus. (P22) MUTE BUTTON Used to mute sound.(P24) MUTE D.ZOOM INPUT 1/2 MENU INPUT 3 NO SHOW BUTTON Used to correct (5 m) keystone distortion. 60° (P22, 39) Remote Control Batteries Installation 1 Remove battery...

Owners Manual
Page 20
INPUT MENU Used to VIDEO input source. Refer to P35 IMAGE SELECT MENU Used to select image level among Standard, Real and Image 1 ~ 4. (Refer to P31) SCREEN MENU Used to adjust size of image. [Normal / True / Wide / Digital zoom +/-] (Refer to P33) SETTING MENU Used to change settings of selected video source. (Refer to P35) IMAGE ADJUST MENU Used to adjust picture image. [Contrast / Brightness / Color / Tint / White balance (R/G/B) / Sharpness / Gamma/Noise Reduction/Progressive] (Refer to select input source (Input 1, Input 2 or Input 3). Refer to P25 PC ADJUST MENU Used to ...
INPUT MENU Used to VIDEO input source. Refer to P35 IMAGE SELECT MENU Used to select image level among Standard, Real and Image 1 ~ 4. (Refer to P31) SCREEN MENU Used to adjust size of image. [Normal / True / Wide / Digital zoom +/-] (Refer to P33) SETTING MENU Used to change settings of selected video source. (Refer to P35) IMAGE ADJUST MENU Used to adjust picture image. [Contrast / Brightness / Color / Tint / White balance (R/G/B) / Sharpness / Gamma/Noise Reduction/Progressive] (Refer to select input source (Input 1, Input 2 or Input 3). Refer to P25 PC ADJUST MENU Used to ...

Owners Manual
Page 21
... Fans start to OFF and disconnect AC Power Cord from source appears after 4 seconds. LAMP indicator lights bright and READY indicator turns off . When WARNING TEMP. indicator should still continue to flash, follow procedures below: 1. Refer to "Power Management" on Pages 12~15 for dust accumulation. 3. indicator flashes red, projector is ON, projector detects signal interruption and turns off ? indicator continues to flash, contact sales dealer where you purchased this projector or service center. 21 Check Air Filters for connecting...
... Fans start to OFF and disconnect AC Power Cord from source appears after 4 seconds. LAMP indicator lights bright and READY indicator turns off . When WARNING TEMP. indicator should still continue to flash, follow procedures below: 1. Refer to "Power Management" on Pages 12~15 for dust accumulation. 3. indicator flashes red, projector is ON, projector detects signal interruption and turns off ? indicator continues to flash, contact sales dealer where you purchased this projector or service center. 21 Check Air Filters for connecting...
Owners Manual
Page 26
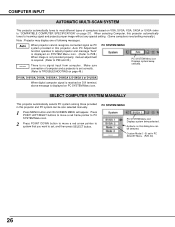
... this projector, Auto PC Adjustment function operates to adjust projector and message "Auto" is displayed on SYSTEM Menu icon. (Refer to P28.) When image is not provided properly, manual adjustment is displayed on this dialog box can be selected. Custom Mode (1~5) set correctly. (Refer to TROUBLESHOOTING on page 27). When selecting Computer, this projector and PC system can be also selected manually. 1 Press MENU button and ON-SCREEN MENU will appear. D-VGA, D-SVGA, D-XGA, D-SXGA...
... this projector, Auto PC Adjustment function operates to adjust projector and message "Auto" is displayed on SYSTEM Menu icon. (Refer to P28.) When image is not provided properly, manual adjustment is displayed on this dialog box can be selected. Custom Mode (1~5) set correctly. (Refer to TROUBLESHOOTING on page 27). When selecting Computer, this projector and PC system can be also selected manually. 1 Press MENU button and ON-SCREEN MENU will appear. D-VGA, D-SVGA, D-XGA, D-SXGA...
Owners Manual
Page 40
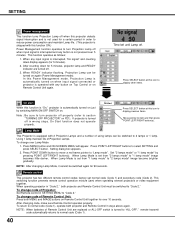
... to display other items. On start When this Power Management mode, Projection Lamp is automatically turned on when input signal connected or projector is operated with 2 Projection Lamps and a number of Remote Control Unit; Press POINT LEFT/RIGHT buttons to "Lamp mode". Setting dialog box appears. 2. Remote control This projector has two different remote control codes; factory-set from "2 lamps mode" to "Code 2." This switching function prevents remote control operation mixture (jam) when operating several projectors or video equipment together. To change code of Projection...
... to display other items. On start When this Power Management mode, Projection Lamp is automatically turned on when input signal connected or projector is operated with 2 Projection Lamps and a number of Remote Control Unit; Press POINT LEFT/RIGHT buttons to "Lamp mode". Setting dialog box appears. 2. Remote control This projector has two different remote control codes; factory-set from "2 lamps mode" to "Code 2." This switching function prevents remote control operation mixture (jam) when operating several projectors or video equipment together. To change code of Projection...

Owners Manual
Page 41
... press SELECT button. Message "Lamp replace counter Reset?" Projector mode Select " " when controlling a projector with Remote Control of this icon to display previous items. Move a pointer to item and then press POINT LEFT/RIGHT button(s). When Lamp Replace Counter is displayed. Quit Closes SETTING MENU. is reset, LAMP REPLACE indicator stops lighting. 1 Turn projector on, press MENU button and ON-SCREEN MENU will appear. Do not reset Lamp Replace Counter except after Projection lamp is equipped with USB port for interactive operation USB between a projector and...
... press SELECT button. Message "Lamp replace counter Reset?" Projector mode Select " " when controlling a projector with Remote Control of this icon to display previous items. Move a pointer to item and then press POINT LEFT/RIGHT button(s). When Lamp Replace Counter is displayed. Quit Closes SETTING MENU. is reset, LAMP REPLACE indicator stops lighting. 1 Turn projector on, press MENU button and ON-SCREEN MENU will appear. Do not reset Lamp Replace Counter except after Projection lamp is equipped with USB port for interactive operation USB between a projector and...
Owners Manual
Page 42
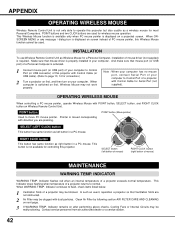
.... This Indicator stops flashing when temperature of a projector returns to operate this projector with POINT button, SELECT button, and RIGHT CLICK button on your computer to Control Port (or USB connector) of mouse) MAINTENANCE WARNING TEMP. Clean Air Filter by following section AIR FILTER CARE AND CLEANING on after performing above checks, Cooling Fans or Internal Circuits may not work properly. When ONSCREEN MENU or any message / dialog box is displayed on a projected screen. INSTALLATION To use Wireless Remote Control Unit as a wireless mouse...
.... This Indicator stops flashing when temperature of a projector returns to operate this projector with POINT button, SELECT button, and RIGHT CLICK button on your computer to Control Port (or USB connector) of mouse) MAINTENANCE WARNING TEMP. Clean Air Filter by following section AIR FILTER CARE AND CLEANING on after performing above checks, Cooling Fans or Internal Circuits may not work properly. When ONSCREEN MENU or any message / dialog box is displayed on a projected screen. INSTALLATION To use Wireless Remote Control Unit as a wireless mouse...
Owners Manual
Page 44
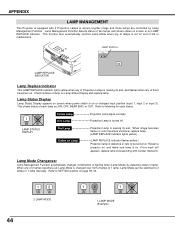
... of life or malfunctions. If this mark still appears, replace lamp corresponding with 2 Projection Lamps to be switched to 1 lamp. Refer to following for end of lighting lamp (Lamp Mode) by Lamp Management Function. Lamp Status Display Lamp Status Display appears on screen when power switch is on Lamp Status Display and replace lamp. When image becomes darker or color becomes unnatural, replace lamp. (LAMP REPLACE indicator lights yellow.) (LAMP REPLACE indicator flashes yellow.) Projection lamp is defective or fails to ensure brighter image and those lamps are controlled by...
... of life or malfunctions. If this mark still appears, replace lamp corresponding with 2 Projection Lamps to be switched to 1 lamp. Refer to following for end of lighting lamp (Lamp Mode) by Lamp Management Function. Lamp Status Display Lamp Status Display appears on screen when power switch is on Lamp Status Display and replace lamp. When image becomes darker or color becomes unnatural, replace lamp. (LAMP REPLACE indicator lights yellow.) (LAMP REPLACE indicator flashes yellow.) Projection lamp is defective or fails to ensure brighter image and those lamps are controlled by...
Owners Manual
Page 45
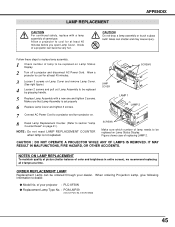
... Lamp Status Display. Allow a projector to dealer. LAMP COVER SCREWS LAMP 1 LAMP 2 7 Connect AC Power Cord to a projector and turn projector on page 41.) NOTE : Do not reset LAMP REPLACEMENT COUNTER when lamp is set properly 6 Replace Lamp Cover and tighten 3 screws. CAUTION Do not drop a lamp assembly or touch a glass bulb! CAUTION : DO NOT OPERATE A PROJECTOR WHILE ANY OF LAMPS IS REMOVED. SCREWS Make sure which number of your dealer. q Model No. Follow these steps to replace lamp assembly. 1 Check number of lamp to be replaced on Lamp Cover and remove Lamp Cover...
... Lamp Status Display. Allow a projector to dealer. LAMP COVER SCREWS LAMP 1 LAMP 2 7 Connect AC Power Cord to a projector and turn projector on page 41.) NOTE : Do not reset LAMP REPLACEMENT COUNTER when lamp is set properly 6 Replace Lamp Cover and tighten 3 screws. CAUTION Do not drop a lamp assembly or touch a glass bulb! CAUTION : DO NOT OPERATE A PROJECTOR WHILE ANY OF LAMPS IS REMOVED. SCREWS Make sure which number of your dealer. q Model No. Follow these steps to replace lamp assembly. 1 Check number of lamp to be replaced on Lamp Cover and remove Lamp Cover...
Owners Manual
Page 46
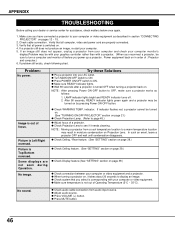
... cleaning. NOTE : After pressing Power ON-OFF button to ON. Some displays are properly connected. 3. q Check WARNING TEMP. indicator. NOTE : Moving a projector from audio input source. q Make sure temperature is not out of focus. Check cable connection. If problem still exists, check following chart. q Wait 90 seconds after a projector is out of Operating Temperature (5°C ~ 35°C). Image is turned OFF when turning a projector back on page 39.) q Check connection between your computer or video equipment. Picture is Left/Right reversed. q Adjust audio source...
... cleaning. NOTE : After pressing Power ON-OFF button to ON. Some displays are properly connected. 3. q Check WARNING TEMP. indicator. NOTE : Moving a projector from audio input source. q Make sure temperature is not out of focus. Check cable connection. If problem still exists, check following chart. q Wait 90 seconds after a projector is out of Operating Temperature (5°C ~ 35°C). Image is turned OFF when turning a projector back on page 39.) q Check connection between your computer or video equipment. Picture is Left/Right reversed. q Adjust audio source...

Owners Manual
Page 48
... Cable MAC/VGA Adapter and DVI/VGA Adapter 3 Types Control Cable (For PS/2, Serial and ADB port) 3 Types Light-Block Sheet (For option lens) Lens Mounting Adapter Protective Dust Cover q Specifications are subject to 6.9˚ AC 100 ~ 120 V (7.8 A Max. APPENDIX TECHNICAL SPECIFICATIONS Projector Type Dimensions (W x H x D) Net Weight LCD Panel System Panel Resolution Number of Pixels Color System High Definition TV Signal Motorized Lens Shift Scanning Frequency Horizontal Resolution Projection Lamp Input 1 Jacks Input 2 Jacks Input 3 Jacks Other Jacks Built-in Speakers Feet Adjustment...
... Cable MAC/VGA Adapter and DVI/VGA Adapter 3 Types Control Cable (For PS/2, Serial and ADB port) 3 Types Light-Block Sheet (For option lens) Lens Mounting Adapter Protective Dust Cover q Specifications are subject to 6.9˚ AC 100 ~ 120 V (7.8 A Max. APPENDIX TECHNICAL SPECIFICATIONS Projector Type Dimensions (W x H x D) Net Weight LCD Panel System Panel Resolution Number of Pixels Color System High Definition TV Signal Motorized Lens Shift Scanning Frequency Horizontal Resolution Projection Lamp Input 1 Jacks Input 2 Jacks Input 3 Jacks Other Jacks Built-in Speakers Feet Adjustment...


