
VPC-SH1 Owners Manual English
Page 6
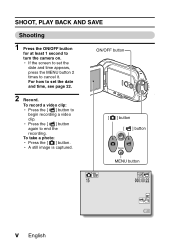
ON/OFF button [ ] button [ ] button MENU button 10M 15 Ful -HD 000:00:22 v English h If the screen to set the date and time, see page 22. 2 Record. To take a photo: h Press the [ ] button. h Press the [ ] button again to cancel it. h A still image is captured. For how to turn the camera on. SHOOT, PLAY BACK AND SAVE Shooting 1 Press the ON/OFF button for at least 1 second to set the date and time appears, press the MENU button 2 times to end the recording. To record a video clip: h Press the [ ] button to begin recording a video clip.
ON/OFF button [ ] button [ ] button MENU button 10M 15 Ful -HD 000:00:22 v English h If the screen to set the date and time, see page 22. 2 Record. To take a photo: h Press the [ ] button. h Press the [ ] button again to cancel it. h A still image is captured. For how to turn the camera on. SHOOT, PLAY BACK AND SAVE Shooting 1 Press the ON/OFF button for at least 1 second to set the date and time appears, press the MENU button 2 times to end the recording. To record a video clip: h Press the [ ] button to begin recording a video clip.

VPC-SH1 Owners Manual English
Page 9
Burn your recorded video clips onto a DVD Using the supplied CD-ROM (Xacti Software CD), you can store your computer's DVD drive. h When the window appears requesting to restart ..., a dialog box to connect to the website introducing Kodak's online service appears. Check the [No thanks !] option button, and then click on [TotalMedia Extreme for SANYO].
Burn your recorded video clips onto a DVD Using the supplied CD-ROM (Xacti Software CD), you can store your computer's DVD drive. h When the window appears requesting to restart ..., a dialog box to connect to the website introducing Kodak's online service appears. Check the [No thanks !] option button, and then click on [TotalMedia Extreme for SANYO].
VPC-SH1 Owners Manual English
Page 11
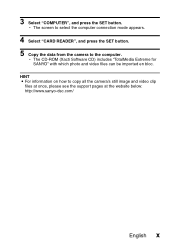
h The screen to select the computer connection mode appears. 4 Select "CARD READER", and press the SET button. 5 Copy the data from the camera to copy all the camera's still image and video clip files at once, please see the support pages at the website below: http://www.sanyo-dsc.com/ English x HINT i For information on how to the computer. 3 Select "COMPUTER", and press the SET button. h The CD-ROM (Xacti Software CD) includes "TotalMedia Extreme for SANYO" with which photo and video files can be imported en bloc.
h The screen to select the computer connection mode appears. 4 Select "CARD READER", and press the SET button. 5 Copy the data from the camera to copy all the camera's still image and video clip files at once, please see the support pages at the website below: http://www.sanyo-dsc.com/ English x HINT i For information on how to the computer. 3 Select "COMPUTER", and press the SET button. h The CD-ROM (Xacti Software CD) includes "TotalMedia Extreme for SANYO" with which photo and video files can be imported en bloc.
VPC-SH1 Owners Manual English
Page 12
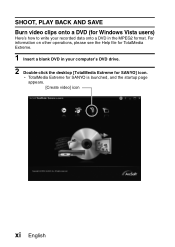
h TotalMedia Extreme for SANYO] icon. For information on other operations, please see the Help file for TotalMedia Extreme. 1 Insert a blank DVD in the MPEG2 format. SHOOT, PLAY BACK AND SAVE Burn video clips onto a DVD (for Windows Vista users) Here's how to write your recorded data onto a DVD in your computer's DVD drive. 2 Double-click the desktop [TotalMedia Extreme for SANYO is launched, and the startup page appears. [Create video] icon xi English
h TotalMedia Extreme for SANYO] icon. For information on other operations, please see the Help file for TotalMedia Extreme. 1 Insert a blank DVD in the MPEG2 format. SHOOT, PLAY BACK AND SAVE Burn video clips onto a DVD (for Windows Vista users) Here's how to write your recorded data onto a DVD in your computer's DVD drive. 2 Double-click the desktop [TotalMedia Extreme for SANYO is launched, and the startup page appears. [Create video] icon xi English

VPC-SH1 Owners Manual English
Page 13
3 Click the [Create video] icon. h The TotalMedia Studio screen appears. [New DVD project] English xii
3 Click the [Create video] icon. h The TotalMedia Studio screen appears. [New DVD project] English xii

VPC-SH1 Owners Manual English
Page 14
SHOOT, PLAY BACK AND SAVE 4 Click [New DVD project]. h The screen to create a video clip to burn to DVD appears. [Insert video] xiii English
SHOOT, PLAY BACK AND SAVE 4 Click [New DVD project]. h The screen to create a video clip to burn to DVD appears. [Insert video] xiii English
VPC-SH1 Owners Manual English
Page 15
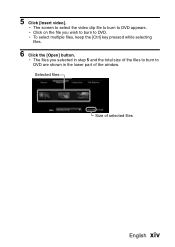
h The files you wish to burn to DVD are shown in the lower part of selected files English xiv h Click on the file you selected in step 5 and the total size of the files to burn to DVD. Selected files Size of the window. h To select multiple files, keep the [Ctrl] key pressed while selecting files. 6 Click the [Open] button. h The screen to select the video clip file to burn to DVD appears. 5 Click [Insert video].
h The files you wish to burn to DVD are shown in the lower part of selected files English xiv h Click on the file you selected in step 5 and the total size of the files to burn to DVD. Selected files Size of the window. h To select multiple files, keep the [Ctrl] key pressed while selecting files. 6 Click the [Open] button. h The screen to select the video clip file to burn to DVD appears. 5 Click [Insert video].

VPC-SH1 Owners Manual English
Page 17
h The screen to burn files to again edit the same video clips that you burned to DVD. h It is recommended that you save the project. English xvi h A window appears asking if you wish to save the project if you intend to the DVD appears. [Burn] button 9 Click the [Burn] button. 8 Click the [Produce] tab. h Saving the project will save your settings from steps 5 through 7.
h The screen to burn files to again edit the same video clips that you burned to DVD. h It is recommended that you save the project. English xvi h A window appears asking if you wish to save the project if you intend to the DVD appears. [Burn] button 9 Click the [Burn] button. 8 Click the [Produce] tab. h Saving the project will save your settings from steps 5 through 7.

VPC-SH1 Owners Manual English
Page 22
... SIMPLE mode and NORMAL mode 26 Switching between the SIMPLE and NORMAL modes 27 Accessing/exiting the SIMPLE/NORMAL Mode Menu Screen ..... 28 „ SHOOTING VIDEO CLIP RECORDING 29 SHOOTING SINGLE SHOTS 30 Using the flash 32 SHOOT A STILL IMAGE WHILE RECORDING...
... SIMPLE mode and NORMAL mode 26 Switching between the SIMPLE and NORMAL modes 27 Accessing/exiting the SIMPLE/NORMAL Mode Menu Screen ..... 28 „ SHOOTING VIDEO CLIP RECORDING 29 SHOOTING SINGLE SHOTS 30 Using the flash 32 SHOOT A STILL IMAGE WHILE RECORDING...
VPC-SH1 Owners Manual English
Page 23
... as a still image 41 SLIDESHOW PLAYBACK 42 PLAYBACK VOLUME 43 „ CONNECTING TO A TV CONNECTING TO A STANDARD VIDEO INPUT TERMINAL 44 ENJOY HIGHER IMAGE QUALITY 46 Connecting to the HDMI terminal 46 PLAYING BACK ON A TV 47 „ OBTAINING THE INSTRUCTION MANUAL OBTAINING ...
... as a still image 41 SLIDESHOW PLAYBACK 42 PLAYBACK VOLUME 43 „ CONNECTING TO A TV CONNECTING TO A STANDARD VIDEO INPUT TERMINAL 44 ENJOY HIGHER IMAGE QUALITY 46 Connecting to the HDMI terminal 46 PLAYING BACK ON A TV 47 „ OBTAINING THE INSTRUCTION MANUAL OBTAINING ...
VPC-SH1 Owners Manual English
Page 31
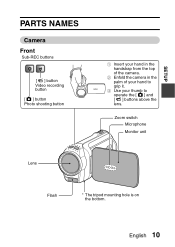
English 10 Zoom switch Microphone Monitor unit Lens Flash * The tripod mounting hole is on the bottom. SETUP SETUP SETUP PARTS NAMES Camera Front Sub-REC buttons [R] button Video recording button [O] button Photo shooting button 1 Insert your hand in the handstrap from the top of the camera. 2 Enfold the camera in the palm of your hand to grip it. 3 Use your thumb to operate the [O] and [R] buttons above the lens.
English 10 Zoom switch Microphone Monitor unit Lens Flash * The tripod mounting hole is on the bottom. SETUP SETUP SETUP PARTS NAMES Camera Front Sub-REC buttons [R] button Video recording button [O] button Photo shooting button 1 Insert your hand in the handstrap from the top of the camera. 2 Enfold the camera in the palm of your hand to grip it. 3 Use your thumb to operate the [O] and [R] buttons above the lens.
VPC-SH1 Owners Manual English
Page 32
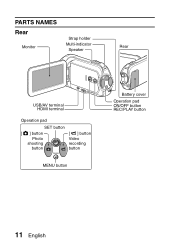
PARTS NAMES Rear Monitor Strap holder Multi-indicator Speaker Rear USB/AV terminal HDMI terminal Operation pad SET button [O] button Photo shooting button [R] button Video recording button MENU button Battery cover Operation pad ON/OFF button REC/PLAY button 11 English
PARTS NAMES Rear Monitor Strap holder Multi-indicator Speaker Rear USB/AV terminal HDMI terminal Operation pad SET button [O] button Photo shooting button [R] button Video recording button MENU button Battery cover Operation pad ON/OFF button REC/PLAY button 11 English
VPC-SH1 Owners Manual English
Page 39
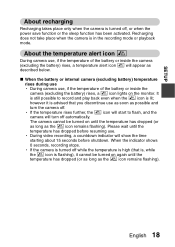
... the temperature rises further, the \ icon will turn the camera off , or when the power save function or the sleep function has been activated. h During video recording, a countdown indicator will appear as the \ icon remains flashing). English 18
... the temperature rises further, the \ icon will turn the camera off , or when the power save function or the sleep function has been activated. h During video recording, a countdown indicator will appear as the \ icon remains flashing). English 18

VPC-SH1 Owners Manual English
Page 47
SETUP SIMPLE MODE/NORMAL MODE About the SIMPLE mode and NORMAL mode The "SIMPLE mode" comprises only those functions that is suitable for your purposes. Select video and photo size SN OK RECORDING MENU 1 1 2 3 VIDEO PHOTO SCENE SELECT 10M 1 FILTER 2 FLASH 3 SELF-TIMER OK English 26 Select the mode that are most often used and necessary to operate the camera, while the "NORMAL mode" enables full use of all the camera's many functions.
SETUP SIMPLE MODE/NORMAL MODE About the SIMPLE mode and NORMAL mode The "SIMPLE mode" comprises only those functions that is suitable for your purposes. Select video and photo size SN OK RECORDING MENU 1 1 2 3 VIDEO PHOTO SCENE SELECT 10M 1 FILTER 2 FLASH 3 SELF-TIMER OK English 26 Select the mode that are most often used and necessary to operate the camera, while the "NORMAL mode" enables full use of all the camera's many functions.
VPC-SH1 Owners Manual English
Page 50
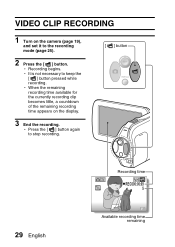
h Recording begins. h Press the [ ] button again to the recording mode (page 25). 2 Press the [ ] button. h When the remaining recording time available for the currently recording clip becomes little, a countdown of the remaining recording time appears on the camera (page 19), and set it to stop recording. [ ] button 29 English Recording time Full-HD RREECC000:00:09 5 Available recording time remaining SHOOTING SHOOTING VIDEO CLIP RECORDING 1 Turn on the display. 3 End the recording. h It is not necessary to keep the [ ] button pressed while recording.
h Recording begins. h Press the [ ] button again to the recording mode (page 25). 2 Press the [ ] button. h When the remaining recording time available for the currently recording clip becomes little, a countdown of the remaining recording time appears on the camera (page 19), and set it to stop recording. [ ] button 29 English Recording time Full-HD RREECC000:00:09 5 Available recording time remaining SHOOTING SHOOTING VIDEO CLIP RECORDING 1 Turn on the display. 3 End the recording. h It is not necessary to keep the [ ] button pressed while recording.

VPC-SH1 Owners Manual English
Page 54
... shortcut (page 48). SHOOTING SINGLE SHOTS CAUTION Do not touch the flash unit when shooting i The flash unit becomes very hot and may cause a burn. Video clip recording area 33 English Avoid touching the flash unit when shooting. HINT i The flash cannot be used during...
... shortcut (page 48). SHOOTING SINGLE SHOTS CAUTION Do not touch the flash unit when shooting i The flash unit becomes very hot and may cause a burn. Video clip recording area 33 English Avoid touching the flash unit when shooting. HINT i The flash cannot be used during...
VPC-SH1 Owners Manual English
Page 55
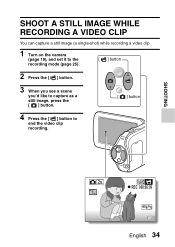
SHOOT A STILL IMAGE WHILE RECORDING A VIDEO CLIP You can capture a still image (a single-shot) while recording a video clip. 1 Turn on the camera (page 19), and set it to the recording mode (page 25). [ ] button 2 Press the [ ] button. 3 When you see a scene you'd like to capture as a still image, press the [ ] button. [ ] button 4 Press the [ ] button to end the video clip recording. SHOOTING Full-HD RREECC000:00:09 English 34
SHOOT A STILL IMAGE WHILE RECORDING A VIDEO CLIP You can capture a still image (a single-shot) while recording a video clip. 1 Turn on the camera (page 19), and set it to the recording mode (page 25). [ ] button 2 Press the [ ] button. 3 When you see a scene you'd like to capture as a still image, press the [ ] button. [ ] button 4 Press the [ ] button to end the video clip recording. SHOOTING Full-HD RREECC000:00:09 English 34

VPC-SH1 Owners Manual English
Page 56
...h It is not possible to capture a still image while recording a video clip, it will differ depending on the subject and on the recording size (page 48), as well as on the video clip recording size. The exact remaining recording time at a high recording speed... , (16:9) ) [ (4:3) h It is inoperative. SHOOT A STILL IMAGE WHILE RECORDING A VIDEO CLIP HINT i When shooting a still image while recording a video clip, the flash does not operate. i When the remaining video recording time becomes approximately 50 seconds, it is suggested that you take note of a still image captured...
...h It is not possible to capture a still image while recording a video clip, it will differ depending on the subject and on the recording size (page 48), as well as on the video clip recording size. The exact remaining recording time at a high recording speed... , (16:9) ) [ (4:3) h It is inoperative. SHOOT A STILL IMAGE WHILE RECORDING A VIDEO CLIP HINT i When shooting a still image while recording a video clip, the flash does not operate. i When the remaining video recording time becomes approximately 50 seconds, it is suggested that you take note of a still image captured...
VPC-SH1 Owners Manual English
Page 57
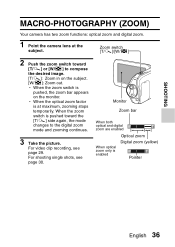
... stops temporarily. h When the zoom switch is at the subject. When the zoom switch is enabled Optical zoom Digital zoom (yellow) Pointer English 36 For video clip recording, see page 30. Zoom switch [T/]]/[W/P] 2 Push the zoom switch toward the [T/]] side again, the mode changes to compose the desired image. [T/]]: Zoom in...
... stops temporarily. h When the zoom switch is at the subject. When the zoom switch is enabled Optical zoom Digital zoom (yellow) Pointer English 36 For video clip recording, see page 30. Zoom switch [T/]]/[W/P] 2 Push the zoom switch toward the [T/]] side again, the mode changes to compose the desired image. [T/]]: Zoom in...

VPC-SH1 Owners Manual English
Page 58
...it possible to electronically magnify the image with no image degradation, and increase the magnification to stabilize the camera when recording video clips at a high magnification, a moving subject or moving camera can cause camera shake, resulting in a distorted playback image. ...MACRO-PHOTOGRAPHY (ZOOM) HINT When recording video clips at a high magnification i When recording video clips at a high magnification. This phenomenon is due to the characteristics of the CMOS sensor and is recommended that...
...it possible to electronically magnify the image with no image degradation, and increase the magnification to stabilize the camera when recording video clips at a high magnification, a moving subject or moving camera can cause camera shake, resulting in a distorted playback image. ...MACRO-PHOTOGRAPHY (ZOOM) HINT When recording video clips at a high magnification i When recording video clips at a high magnification. This phenomenon is due to the characteristics of the CMOS sensor and is recommended that...


