
Owners Manual
Page 4
To record a video clip: h Press the [ ] button to end the recording. h A still image is captured. MENU button ON/OFF button [] button [ ] button 10M-S 15 Ful -HD 000:00:17 iii English h Press the [ ] button again to begin recording a video clip. To take a photo: h Press the [ ] button. For how to set the date and time appears, press the MENU button 2 times to cancel it. Shooting 1 Press the ON/OFF button for at least 1 second to set the date and time, see page 33. 2 Record. h If the screen to turn the camera on.
To record a video clip: h Press the [ ] button to end the recording. h A still image is captured. MENU button ON/OFF button [] button [ ] button 10M-S 15 Ful -HD 000:00:17 iii English h Press the [ ] button again to begin recording a video clip. To take a photo: h Press the [ ] button. For how to set the date and time appears, press the MENU button 2 times to cancel it. Shooting 1 Press the ON/OFF button for at least 1 second to set the date and time, see page 33. 2 Record. h If the screen to turn the camera on.

Owners Manual
Page 11
... Select the focus setting 60 Hints for taking pictures 61 VIDEO CLIP RECORDING 62 SHOOTING SINGLE SHOTS 63 Using the flash 66 SHOOT A STILL IMAGE WHILE RECORDING A VIDEO CLIP ..........68 MACRO-PHOTOGRAPHY (ZOOM 70 PLAYBACK PLAYING BACK VIDEO CLIPS AND STILL IMAGES 72 How to save one frame... from a video clip as a still image 75 SLIDESHOW PLAYBACK 76 PLAYBACK VOLUME 77 DELETING FILES ...
... Select the focus setting 60 Hints for taking pictures 61 VIDEO CLIP RECORDING 62 SHOOTING SINGLE SHOTS 63 Using the flash 66 SHOOT A STILL IMAGE WHILE RECORDING A VIDEO CLIP ..........68 MACRO-PHOTOGRAPHY (ZOOM 70 PLAYBACK PLAYING BACK VIDEO CLIPS AND STILL IMAGES 72 How to save one frame... from a video clip as a still image 75 SLIDESHOW PLAYBACK 76 PLAYBACK VOLUME 77 DELETING FILES ...

Owners Manual
Page 12
NORMAL SHOOTING RECORDING MENU 1 84 Video setting 84 Still image setting 88 Scene select setting 89 Filter setting 89 Self-timer setting 90 RECORDING MENU 2 91 Motion compensation (image stabilizer) setting ... setting 101 PLAYBACK PLAYBACK MENU 1 102 Slideshow settings 102 File protect setting 103 Resize 105 Rotate 105 PLAYBACK MENU 2 106 Correcting the image 106 Editing video clips 107 Printing instructions 116 FILE INFO DISPLAY 120 3 English
NORMAL SHOOTING RECORDING MENU 1 84 Video setting 84 Still image setting 88 Scene select setting 89 Filter setting 89 Self-timer setting 90 RECORDING MENU 2 91 Motion compensation (image stabilizer) setting ... setting 101 PLAYBACK PLAYBACK MENU 1 102 Slideshow settings 102 File protect setting 103 Resize 105 Rotate 105 PLAYBACK MENU 2 106 Correcting the image 106 Editing video clips 107 Printing instructions 116 FILE INFO DISPLAY 120 3 English

Owners Manual
Page 13
... TV output setting 131 File No. continued setting 135 Formatting (initializing 137 CHECKING THE REMAINING CARD MEMORY 138 Checking the remaining number of images and video recording time 138 For audio recordings 139 CHECKING THE REMAINING BATTERY PACK CHARGE 140 OTHER DEVICES AND CONNECTIONS CONNECTING TO A COMPUTER OPERATING ENVIRONMENT 142...
... TV output setting 131 File No. continued setting 135 Formatting (initializing 137 CHECKING THE REMAINING CARD MEMORY 138 Checking the remaining number of images and video recording time 138 For audio recordings 139 CHECKING THE REMAINING BATTERY PACK CHARGE 140 OTHER DEVICES AND CONNECTIONS CONNECTING TO A COMPUTER OPERATING ENVIRONMENT 142...

Owners Manual
Page 14
... feature and filters 179 SPECIFICATIONS 181 Camera 181 Camera connectors 185 Battery life 185 Possible No. CONNECTING TO A TV CONNECTING TO A TV 156 Connecting to a video input terminal 157 Connecting to go 190 About the MPEG-4 Standard license 190 HINTS FOR TAKING PICTURES 191 5 English
... feature and filters 179 SPECIFICATIONS 181 Camera 181 Camera connectors 185 Battery life 185 Possible No. CONNECTING TO A TV CONNECTING TO A TV 156 Connecting to a video input terminal 157 Connecting to go 190 About the MPEG-4 Standard license 190 HINTS FOR TAKING PICTURES 191 5 English
Owners Manual
Page 15
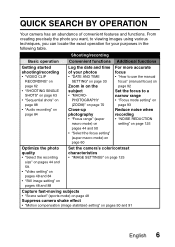
Shooting/recording Basic operation Convenient functions Additional functions Getting started shooting/recording • "VIDEO CLIP RECORDING" on page 62 • "SHOOTING SINGLE SHOTS" on page 63 • "Sequential shots" on page 88 • "Audio recording" on page 84 Log ... noise when recording • "NOISE REDUCTION setting" on page 125 Optimize the photo quality • "Select the recording size" on pages 44 and 59. • "Video setting" on pages 48 and 84 • "Still image setting" on pages 48 and 88 Set the camera's color/contrast characteristics • "IMAGE SETTINGS" on...
Shooting/recording Basic operation Convenient functions Additional functions Getting started shooting/recording • "VIDEO CLIP RECORDING" on page 62 • "SHOOTING SINGLE SHOTS" on page 63 • "Sequential shots" on page 88 • "Audio recording" on page 84 Log ... noise when recording • "NOISE REDUCTION setting" on page 125 Optimize the photo quality • "Select the recording size" on pages 44 and 59. • "Video setting" on pages 48 and 84 • "Still image setting" on pages 48 and 88 Set the camera's color/contrast characteristics • "IMAGE SETTINGS" on...

Owners Manual
Page 17
Playback Basic operation Convenient functions Additional functions Getting started viewing images • "PLAYING BACK VIDEO CLIPS AND STILL IMAGES" on page 72 Adjust the speaker volume • "PLAYBACK VOLUME" pages 53 and 77 Search for image/ audio files • "21-...
Playback Basic operation Convenient functions Additional functions Getting started viewing images • "PLAYING BACK VIDEO CLIPS AND STILL IMAGES" on page 72 Adjust the speaker volume • "PLAYBACK VOLUME" pages 53 and 77 Search for image/ audio files • "21-...

Owners Manual
Page 18
... • "File protect setting" on pages 53 and 103 Format a card • "Formatting (initializing)" on pages 127 and 137 Delete a part of a video clip and join video clips • "Editing video clips" on pages 54 and 107 Specify the number of prints, index print, and date imprint • "Printing instructions" on pages 54...
... • "File protect setting" on pages 53 and 103 Format a card • "Formatting (initializing)" on pages 127 and 137 Delete a part of a video clip and join video clips • "Editing video clips" on pages 54 and 107 Specify the number of prints, index print, and date imprint • "Printing instructions" on pages 54...

Owners Manual
Page 19
Using with a computer Basic operation Convenient functions Additional functions Use the camera as a card reader • "SETTING THE CONNECTION MODE" on page 143 • "USING AS A CARD READER" on page 146 Copy files from your camera to a computer • "Copy data from your camera to the computer" on page vi Playback • "About video clip files recorded with this camera" on page 150 Using as a webcam • "USING AS A PC CAMERA" on page 152 Record an image of the computer screen • "SCREEN CAPTURE" on page 162 English 10
Using with a computer Basic operation Convenient functions Additional functions Use the camera as a card reader • "SETTING THE CONNECTION MODE" on page 143 • "USING AS A CARD READER" on page 146 Copy files from your camera to a computer • "Copy data from your camera to the computer" on page vi Playback • "About video clip files recorded with this camera" on page 150 Using as a webcam • "USING AS A PC CAMERA" on page 152 Record an image of the computer screen • "SCREEN CAPTURE" on page 162 English 10

Owners Manual
Page 25
... getting flustered, as well as software with "Full High Definition*" (pages 48 and 59) Your camera can capture full high definition (full HD) 1920 × 1080-pixel video clips. GETTING THE MOST OUT OF YOUR CAMERA Your dual camera can record video clips in one highperformance camera. * "Full High Definition" by SANYO Dual Camera signifies recording at a resolution of...
... getting flustered, as well as software with "Full High Definition*" (pages 48 and 59) Your camera can capture full high definition (full HD) 1920 × 1080-pixel video clips. GETTING THE MOST OUT OF YOUR CAMERA Your dual camera can record video clips in one highperformance camera. * "Full High Definition" by SANYO Dual Camera signifies recording at a resolution of...

Owners Manual
Page 26
... photo size SN OK RECORDING MENU 1 1 2 3 VIDEO PHOTO SCENE SELECT Ful -HD 10M-S 1 FILTER 2 FLASH 3 SELF-TIMER OK Image stabilizer for sharp pictures (pages 50 and 91) Your camera can compensate for full use of all the camera's many features and functions. Includes SIMPLE mode for quick-and-easy operation (page 37) Select...
... photo size SN OK RECORDING MENU 1 1 2 3 VIDEO PHOTO SCENE SELECT Ful -HD 10M-S 1 FILTER 2 FLASH 3 SELF-TIMER OK Image stabilizer for sharp pictures (pages 50 and 91) Your camera can compensate for full use of all the camera's many features and functions. Includes SIMPLE mode for quick-and-easy operation (page 37) Select...

Owners Manual
Page 27
Eye-Fi smart By inserting a commercially sold Eye-Fi card (SD card with wireless LAN) in your camera, you can transfer video files if your computer, a sharing site, etc. Capture clear images of the targeted subject (pages 52 and 96) Both the color chaser feature to target a ...specific color, and the face chaser feature to your Eye-Fi card has a video upload function. Instructions for the Eye-Fi transfer feature can easily upload photos to capture clear face shots, are provided. automatically via a Wi-Fi network...
Eye-Fi smart By inserting a commercially sold Eye-Fi card (SD card with wireless LAN) in your camera, you can transfer video files if your computer, a sharing site, etc. Capture clear images of the targeted subject (pages 52 and 96) Both the color chaser feature to target a ...specific color, and the face chaser feature to your Eye-Fi card has a video upload function. Instructions for the Eye-Fi transfer feature can easily upload photos to capture clear face shots, are provided. automatically via a Wi-Fi network...

Owners Manual
Page 29
Lens Zoom switch Monitor unit Flash Stereo microphone * The tripod mounting hole is on the bottom. SETUP SETUP SETUP PARTS NAMES Front Sub-REC buttons [R] button Video recording button [O] button Photo shooting button 1 Insert your hand in the handstrap from the top of the camera. 2 Enfold the camera in the palm of your hand to grip it. 3 Use your thumb to operate the [O] and [R] buttons above the lens. English 20
Lens Zoom switch Monitor unit Flash Stereo microphone * The tripod mounting hole is on the bottom. SETUP SETUP SETUP PARTS NAMES Front Sub-REC buttons [R] button Video recording button [O] button Photo shooting button 1 Insert your hand in the handstrap from the top of the camera. 2 Enfold the camera in the palm of your hand to grip it. 3 Use your thumb to operate the [O] and [R] buttons above the lens. English 20

Owners Manual
Page 30
Rear Monitor [ ] button Photo shooting button [ ] button Video recording button Multi-indicator ZOOM RANGE button MENU button Card slot cover DC IN terminal cover Strap holder Battery cover Arrow keys REC/PLAY button ON/OFF button SET button Arrow keys 21 English
Rear Monitor [ ] button Photo shooting button [ ] button Video recording button Multi-indicator ZOOM RANGE button MENU button Card slot cover DC IN terminal cover Strap holder Battery cover Arrow keys REC/PLAY button ON/OFF button SET button Arrow keys 21 English

Owners Manual
Page 38
h If the temperature rises further, the \ icon will start to record and play back even when the \ icon is lit; h During video recording, a countdown indicator will show the time starting about 15 seconds before resuming use , if the temperature of the battery or inside the camera (excluding ...
h If the temperature rises further, the \ icon will start to record and play back even when the \ icon is lit; h During video recording, a countdown indicator will show the time starting about 15 seconds before resuming use , if the temperature of the battery or inside the camera (excluding ...

Owners Manual
Page 48
Press [I ] or [J] to select the item you wish to change , and press the SET button. h The Setting Screen for the selected item appears. Using the SIMPLE Mode Menu 4 Press [I ] Select an item to change Description of selected item Select video and photo size SN OK Press [J] Press SET To keep in HDTV size 10M 2M HDTV size 10M [4:3] OK 39 English
Press [I ] or [J] to select the item you wish to change , and press the SET button. h The Setting Screen for the selected item appears. Using the SIMPLE Mode Menu 4 Press [I ] Select an item to change Description of selected item Select video and photo size SN OK Press [J] Press SET To keep in HDTV size 10M 2M HDTV size 10M [4:3] OK 39 English

Owners Manual
Page 49
Press [I ] or [J] to select a tab. SETUP Using the NORMAL Mode Menu 4 Press [I ] Tab RECORDING MENU 1 1 2 3 VIDEO PHOTO Ful -HD 10M-S SCENE SELECT 1 FILTER 2 FLASH 3 SELF-TIMER SN OK Press [J] Press [H] RECORDING MENU 1 1 2 3 VIDEO PHOTO SCENE SELECT Ful -HD 10M-S 1 FILTER 2 FLASH 3 SELF-TIMER OK English 40 h The Menu Screen for the selected tab appears. 5 Press [H].
Press [I ] or [J] to select a tab. SETUP Using the NORMAL Mode Menu 4 Press [I ] Tab RECORDING MENU 1 1 2 3 VIDEO PHOTO Ful -HD 10M-S SCENE SELECT 1 FILTER 2 FLASH 3 SELF-TIMER SN OK Press [J] Press [H] RECORDING MENU 1 1 2 3 VIDEO PHOTO SCENE SELECT Ful -HD 10M-S 1 FILTER 2 FLASH 3 SELF-TIMER OK English 40 h The Menu Screen for the selected tab appears. 5 Press [H].

Owners Manual
Page 50
6 Press [I ] Press [J] Press SET Select an item to change , and press the SET button. h The Setting Screen for the selected item appears. h To return to change 1 2 3 RECORDING MENU 1 VIDEO PHOTO Ful -HD 10M-S SCENE SELECT 1 FILTER 2 FLASH 3 SELF-TIMER OK Applicable mode 12M 4000x3000 11M 4480x2520[16:9] 10M-H 3648x2736 10M-S 3648x2736 7.5M 3648x2056[16:9] 2M 1920x1080[16:9] SET OK 41 English Press [I ] or [J] to select the item you wish to the Menu Screen, press the MENU button.
6 Press [I ] Press [J] Press SET Select an item to change , and press the SET button. h The Setting Screen for the selected item appears. h To return to change 1 2 3 RECORDING MENU 1 VIDEO PHOTO Ful -HD 10M-S SCENE SELECT 1 FILTER 2 FLASH 3 SELF-TIMER OK Applicable mode 12M 4000x3000 11M 4480x2520[16:9] 10M-H 3648x2736 10M-S 3648x2736 7.5M 3648x2056[16:9] 2M 1920x1080[16:9] SET OK 41 English Press [I ] or [J] to select the item you wish to the Menu Screen, press the MENU button.

Owners Manual
Page 51
SETUP HINT About the applicable mode indicator i This indicator shows the shooting mode(s) for which the selected setting is effective. : This setting is effective during still image shooting. : This setting is effective during video clip recording. : This setting is effective during still image shooting and video clip recording. English 42
SETUP HINT About the applicable mode indicator i This indicator shows the shooting mode(s) for which the selected setting is effective. : This setting is effective during still image shooting. : This setting is effective during video clip recording. : This setting is effective during still image shooting and video clip recording. English 42

Owners Manual
Page 52
Overview of the SIMPLE Mode Setting Screen SIMPLE Mode Recording Menu Select video and photo size 1 2 3 4 SN OK 5 43 English
Overview of the SIMPLE Mode Setting Screen SIMPLE Mode Recording Menu Select video and photo size 1 2 3 4 SN OK 5 43 English


